


Have you ever wished you could practice a new language through immersive roleplay, like chatting with a Parisian barista in French or a Japanese tour guide in Tokyo? With the Vercel AI SDK and Expo, we can bring that dream to life — by creating an AI-powered Language Learning Roleplay Bot.
In this guide, we will walk through how to:
- Build a conversational UI using Expo (React Native)
- Create an AI chat endpoint using Vercel AI SDK and Express
- Enable immersive, character-driven language conversation
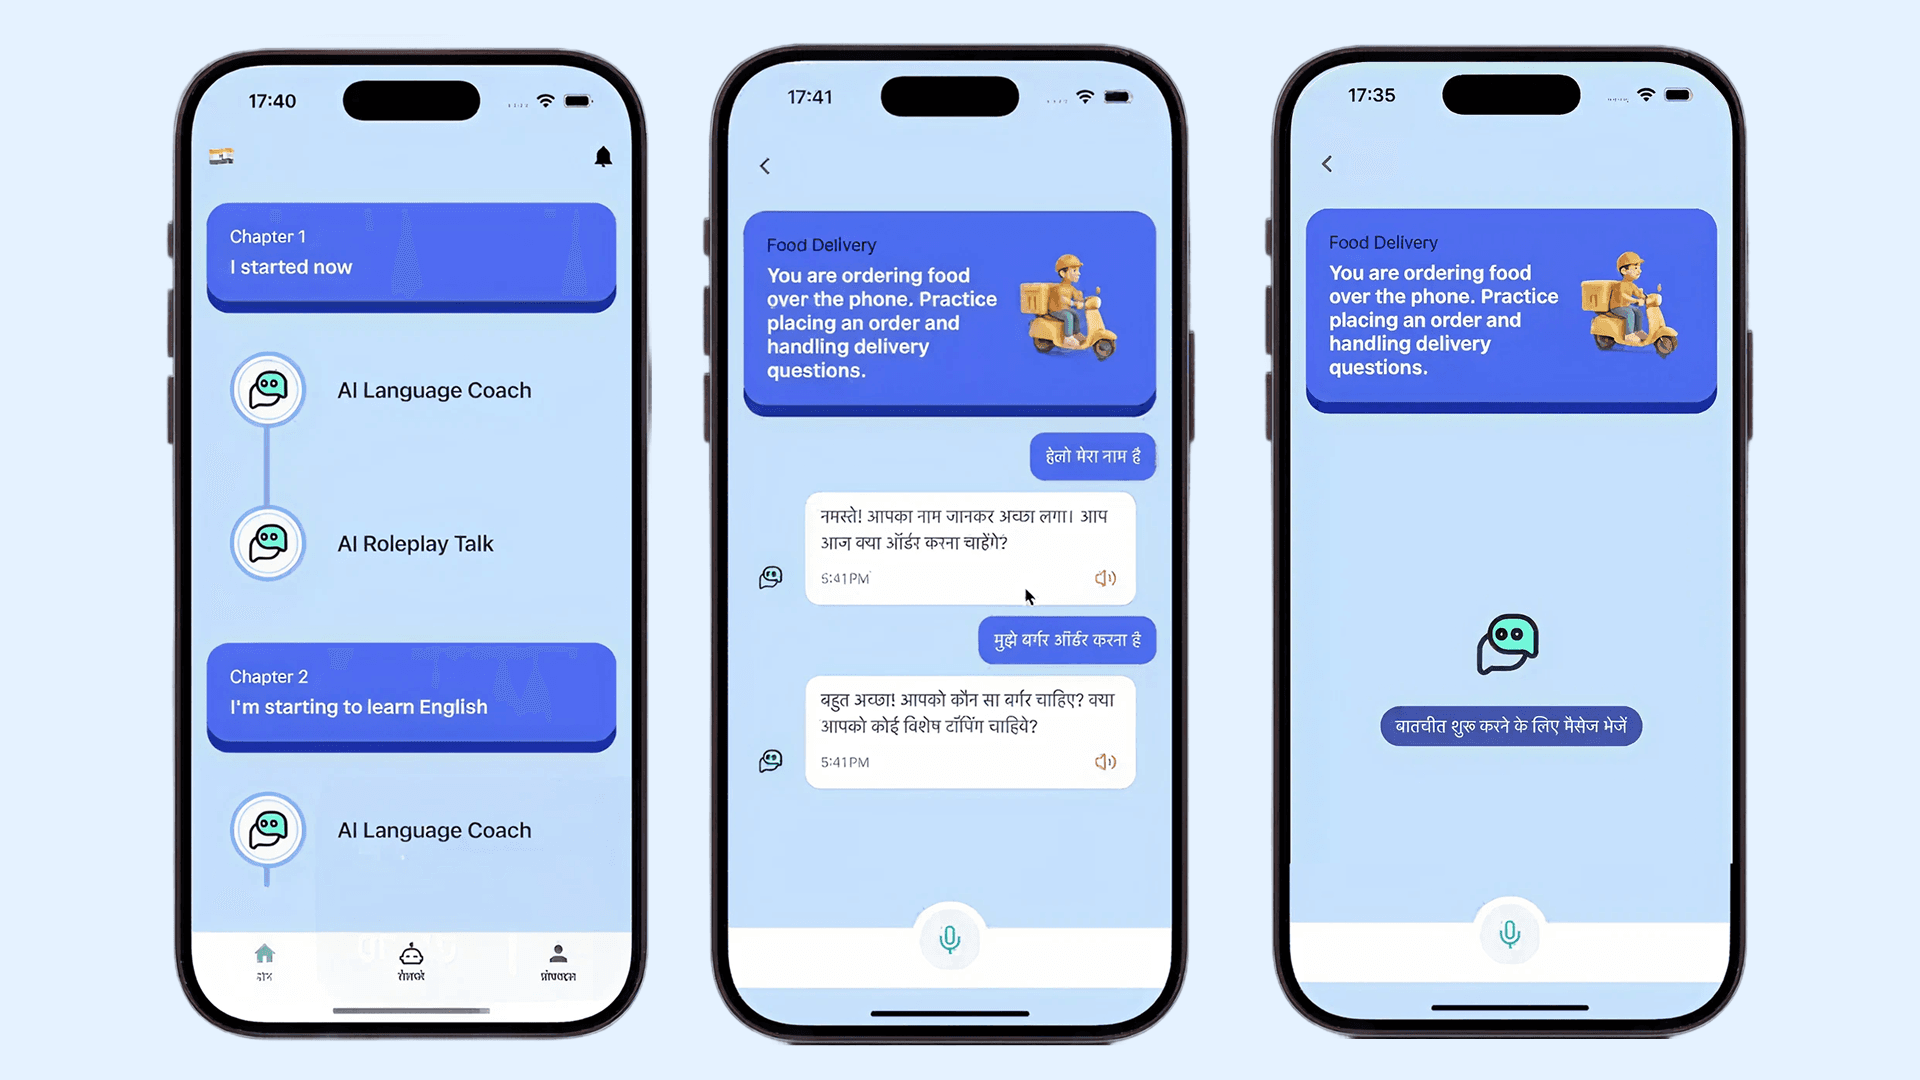
- Conversations
Building AI-Powered Web & Mobile Apps with Vercel AI SDK | Aman Fangeria | Geekspeak | GeekyAnts
Project Overview
We will be building an app that lets users pick a roleplay scenario — for example, ordering food at a restaurant or booking a flight. The AI then takes on a role (e.g., waiter, receptionist, teacher) and converses with the user in their target language, offering corrections and encouragement naturally.
The project is divided into two parts:
- Frontend (Expo) → Handles user input, chat UI, and communication with backend
- Backend (Node + Vercel AI SDK) → Uses OpenAI models (via Vercel AI SDK) to generate responses
Tech Stack
Layer | Technology |
|---|---|
Frontend | Expo (React Native), Tailwind CSS classes, TypeScript |
Backend | Express.js, Vercel AI SDK (ai package), zod for schema validation |
AI Model | OpenAI GPT-4o-mini (through Vercel AI SDK) |
Hosting | Vercel for API / Expo Go or EAS for mobile app |
Setting up the Backend (AI Controller)
Let us start with our Express controller that handles chat requests. This endpoint uses the Vercel AI SDK to call OpenAI models in a structured way.
// aiRolePlayController.ts
import { Request, Response } from 'express';
import { generateObject } from 'ai';
import { openai } from '@ai-sdk/openai';
import { z } from 'zod';

export const aiRoleplayTalkController = async (req: Request, res: Response) => {
  const { roleplayId } = req.params;
  const { messages, language, basePrompt, title } = req.body;

  try {
    const result = await generateObject({
      model: openai('gpt-4o-mini'),
      schema: z.object({
        message: z.string(),
      }),
      prompt: `
        You are an AI roleplay chatbot for language learning.

        ROLEPLAY CONTEXT:
        - Scenario: ${title}
        - Your role: ${basePrompt}
        - Target language: ${language}
  YOUR OBJECTIVES:
        1. Stay in character for the roleplay scenario
        2. Create an immersive, realistic conversation experience
        3. Help user practice ${language} through natural dialogue

        CONVERSATION GUIDELINES:
        - Maintain your roleplay character throughout the conversation
        - Ask only ONE focused question at a time
        - Gently correct language mistakes while staying in character
        - Keep responses concise (1–2 sentences)
        - Use ${language} primarily
        - Respond with patience and encouragement

        CONVERSATION HISTORY:
        ${messages
          .map((m: { role: string; content: string }) => `${m.role}: ${m.content}`)
          .join('\n')}

        Continue the roleplay conversation naturally in ${language}.
      `,
      temperature: 0.7,
      maxOutputTokens: 100,
    });

    res.json({ message: result.object.message });
  } catch (error) {
    console.error('Roleplay chat error:', error);
    res.status(500).json({ error: 'Roleplay conversation failed' });
  }
};
How It Works
- generateObject from ai SDK calls the OpenAI model in a structured manner.
- z.object() defines the schema for our expected output — in this case, just a single message.
- The prompt includes:
- The roleplay scenario (title)
- The character role (basePrompt)
- The target language
- The conversation history
This ensures responses stay consistent, concise, and immersive — ideal for language learning.
For setup, ensure your backend follows Vercel AI SDK for Node.js:
npm install ai @ai-sdk/openai zodAnd set your environment variable:
export OPENAI_API_KEY="your_api_key_here"Building the Frontend with Expo
Now, let us build the mobile interface where users can chat with the AI.
Here us the complete AIConversationBot.tsx component:
import React, { useState, useEffect, useRef } from 'react';
import {
  View, Text, TextInput, TouchableOpacity, ScrollView, Alert, Image, KeyboardAvoidingView,
} from 'react-native';
import { SafeAreaView } from 'react-native-safe-area-context';
import { useAppSelector } from '@/store/hook';
import { useTranslation } from 'react-i18next';
import { MaterialIcons } from '@expo/vector-icons';
import { router } from 'expo-router';

interface Message {
  id: string;
  text: string;
  isUser: boolean;
  timestamp: Date;
}

interface ConversationChatProps {
  roleplay: {
    id: number;
    title: string;
    avatarUrl: string | null;
    description: string;
    basePrompt: string;
    isPremium: boolean;
  };
}

const AIConversationBot: React.FC<ConversationChatProps> = ({ roleplay }) => {
  const { t } = useTranslation();
  const roleplayIdNumber = Number(roleplay.id);
  const [messages, setMessages] = useState<Message[]>([]);
  const [inputText, setInputText] = useState('');
  const [isLoading, setIsLoading] = useState(false);
  const [isInitializing, setIsInitializing] = useState(true);
  const scrollViewRef = useRef<ScrollView>(null);
  const user = useAppSelector((state) => state.userData.user);
  const language = user?.learningLanguage?.name;

  useEffect(() => {
    initializeChat();
  }, []);

  const initializeChat = async () => {
    try {
      setIsInitializing(true);
      setMessages([]);
    } catch (error) {
      console.error('Error initializing chat:', error);
    } finally {
      setIsInitializing(false);
    }
  };

  const sendMessage = async (text: string) => {
    if (!text.trim() || isLoading) return;

    const userMessage: Message = {
      id: Date.now().toString(),
      text: text.trim(),
      isUser: true,
      timestamp: new Date(),
    };

    setMessages((prev) => [...prev, userMessage]);
    setInputText('');
    setIsLoading(true);

    const typingMessage: Message = {
      id: 'typing',
      text: '',
      isUser: false,
      timestamp: new Date(),
    };
    setMessages((prev) => [...prev, typingMessage]);

    try {
      const response = await fetch(
        `${process.env.EXPO_PUBLIC_API_URL}/api/v1/ai-roleplay-talk/chat/${roleplayIdNumber}`,
        {
          method: 'POST',
          headers: { 'Content-Type': 'application/json' },
          body: JSON.stringify({
            messages: [...messages, userMessage]?.map((m) => ({
              role: m.isUser ? 'user' : 'assistant',
              content: m.text,
            })),
            language,
            basePrompt: roleplay.basePrompt,
            title: roleplay.title,
          }),
        },
      );

      if (!response.ok) throw new Error('Chat request failed');
      const data = await response.json();

      setMessages((prev) => {
        const messagesWithoutTyping = prev.filter((m) => m.id !== 'typing');
        return [
          ...messagesWithoutTyping,
          {
            id: Date.now().toString(),
            text: data.message,
            isUser: false,
            timestamp: new Date(),
          },
        ];
      });
    } catch (error) {
      console.error('Send message error:', error);
      setMessages((prev) => prev.filter((m) => m.id !== 'typing'));
      Alert.alert('Error', 'Failed to send message. Please try again.');
    } finally {
      setIsLoading(false);
    }
  };

  const handleSend = () => sendMessage(inputText);

  return (
    <SafeAreaView className='flex-1 bg-brand-blue-light'>
      <KeyboardAvoidingView className='flex-1 bg-brand-blue-light' behavior='padding'>
        {/* Header */}
        <View className='flex-row items-center px-4 pt-4 pb-6'>
          <TouchableOpacity onPress={() => router.back()} className='p-1'>
            <MaterialIcons name='chevron-left' size={32} color='#494949' />
          </TouchableOpacity>
        </View>

        {/* Roleplay Card */}
        <View className='bg-brand-blue-dark rounded-3xl pb-3 mx-4 mb-4'>
          <View className='bg-brand-blue rounded-3xl p-6'>
            <View className='flex-row justify-between items-center'>
              <View className='flex-1'>
                <Text className='text-black text-base mb-2 opacity-80'>{roleplay.title}</Text>
                <Text className='text-lg text-white font-bold'>{roleplay.description}</Text>
              </View>
              {roleplay.avatarUrl ? (
                <Image
                  source={{ uri: `${process.env.EXPO_PUBLIC_API_URL}${roleplay.avatarUrl}` }}
                  className='w-32 h-32 rounded-full'
                  resizeMode='contain'
                />
              ) : (
                <Text className='text-2xl'>💬</Text>
              )}
            </View>
          </View>
        </View>

        {/* Chat Messages */}
        <ScrollView
          ref={scrollViewRef}
          className='flex-1 px-4'
          onContentSizeChange={() => scrollViewRef.current?.scrollToEnd()}
        >
          {messages.length === 0 && (
            <View className='flex items-center justify-center mt-40'>
              <Image
                source={require('@/assets/images/main.png')}
                className='w-32 h-32 rounded-full mr-2 p-8'
                resizeMode='contain'
              />
              <Text className='text-white bg-brand-blue-dark px-4 py-2 rounded-full text-base mb-2 opacity-80'>
                {t('Start the conversation')}
              </Text>
            </View>
          )}

          {messages.map((message) => (
            <View
              key={message.id}
              className={`mb-3 flex-row items-end ${
                message.isUser ? 'justify-end' : 'justify-start'
              }`}
            >
              {!message.isUser && (
                <Image
                  source={require('@/assets/images/main.png')}
                  className='w-14 h-14 rounded-full mr-2 p-4'
                  resizeMode='contain'
                />
              )}
              <View
                className={`max-w-[80%] px-4 py-3 rounded-2xl ${
                  message.isUser ? 'bg-brand-blue' : 'bg-white'
                }`}
              >
                {message.id === 'typing' ? (
                  <Text className='text-base text-text-secondary'>{t('Thinking...')}</Text>
                ) : (
                  <>
                    <Text
                      className={`text-base ${
                        message.isUser ? 'text-white' : 'text-text-primary'
                      }`}
                    >
                      {message.text}
                    </Text>
                    <Text className='text-xs text-text-secondary mt-1 text-right'>
                      {message.timestamp.toLocaleTimeString([], {
                        hour: '2-digit',
                        minute: '2-digit',
                      })}
                    </Text>
                  </>
                )}
              </View>
            </View>
          ))}
        </ScrollView>

        {/* Input Box */}
        <View className='px-4 py-3 bg-white min-h-[7%]'>
          <View className='flex-row items-center space-x-2'>
            <TextInput
              value={inputText}
              onChangeText={setInputText}
              placeholder={isInitializing ? 'Initializing chat...' : 'Type your message...'}
              className='flex-1 bg-background-secondary rounded-full px-4 py-2'
              multiline
              maxLength={500}
              onSubmitEditing={handleSend}
              editable={!isInitializing}
              placeholderTextColor='#666666'
            />
            <TouchableOpacity
              onPress={handleSend}
              className={`p-3 rounded-xl ${
                !inputText.trim() || isLoading || isInitializing
                  ? 'bg-gray-300'
                  : 'bg-brand-blue-dark'
              }`}
              disabled={!inputText.trim() || isLoading || isInitializing}
            >
              <Text className='text-white font-medium'>Send</Text>
            </TouchableOpacity>
          </View>
        </View>
      </KeyboardAvoidingView>
    </SafeAreaView>
  );
};

export default AIConversationBot;
How It Works
- Each user message is appended to the local messages state.
- The app sends the chat history and roleplay info to the backend endpoint.
- The backend uses generateObject() from the Vercel AI SDK to get a structured response.
- The response is displayed in the chat interface.
AI Challenges & How I Tackled Them
Building an AI-driven roleplay experience is about shaping its behavior consistently across dynamic scenarios. During development, I encountered several interesting AI-related challenges that required careful prompt design and structured validation.
1. Staying in Character and Context
The challenge:
Early on, the AI often drifted out of character — for example, the “Parisian barista” would suddenly start explaining grammar rules in English or forget the roleplay context after several messages.
Why it happened:
Language models like GPT depend heavily on prompt conditioning and the recency of conversation context. When the input messages grew longer, the AI would prioritize recent dialogue over the initial scenario setup.
My solution:
I strengthened the base prompt to explicitly remind the AI of its role, tone, and constraints at every call. I also included a clearly structured “ROLEPLAY CONTEXT” and “CONVERSATION GUIDELINES” section, so even mid-session, the model re-anchored itself to the scenario.
This simple improvement made a huge difference — the AI now stays consistently “in character,” maintaining immersion throughout the chat.
2. Unexpected or Unstructured Outputs
The challenge:
At times, the AI would return responses that did not follow a clean text format — for instance, extra punctuation, emojis, or even Markdown artifacts like **bold**.
This caused parsing issues on the frontend and broke message rendering.
Why it happened:
By default, model responses are flexible and creative — which is great for conversation, but risky when the app expects structured JSON.
My solution:
I used the generateObject() method from the Vercel AI SDK combined with Zod validation.
The SDK ensures that the AI must respond in a JSON-compatible format matching the schema. If the output deviates, it’s automatically retried or flagged — ensuring stability and predictable results every time.
These adjustments turned the chatbot from a loosely responsive assistant into a controlled, immersive AI character. It now stays in context, replies only in the target language, and outputs cleanly structured messages that plug directly into the chat UI — no post-processing needed.
Future Enhancements
- Add speech recognition and text-to-speech for full voice interaction
- Store conversation history locally or in Firebase
- Support multi-language translation mode
- Use streamText() from Vercel AI SDK for real-time streaming replies
Conclusion
With Expo and Vercel AI SDK, you can quickly create powerful, structured, and context-aware chatbots. This roleplay-based approach to language learning feels alive — your AI teacher becomes a travel guide, a barista, or even a friend abroad.







