

Image cropping and optimization are crucial in App Development to enhance user experience and performance. Though image optimization and cropping might not seem like necessary tasks, they are recommended if your application shows a lot of graphical images, transfers images on the network, provides camera functionalities, etc.
Cropping images allows developers to focus on essential parts of an image, improving visual appeal and clarity. This can be especially important for profile pictures, thumbnails, and feature images, where displaying the most relevant part is key.
Optimization, on the other hand, reduces the file size of images. This leads to faster loading times, reduced bandwidth usage, and a smoother user experience.
Efficient image handling is essential for high performance, particularly in mobile apps with more significant resource constraints. By incorporating image cropping and optimization, we can ensure that the apps are visually appealing, efficient, and user-friendly.
Let us discuss the above functionalities step by step:
- Image Picker
- Image Cropping And Optimization
- Image Transfer Through Network
- Image Picker :
The image_picker package in Flutter offers a straightforward solution for selecting images from a device's gallery or camera. By integrating this package, developers can enable users to easily pick images directly within the app, enhancing functionality and user engagement. This package was picked because of its easy-to-use functions.
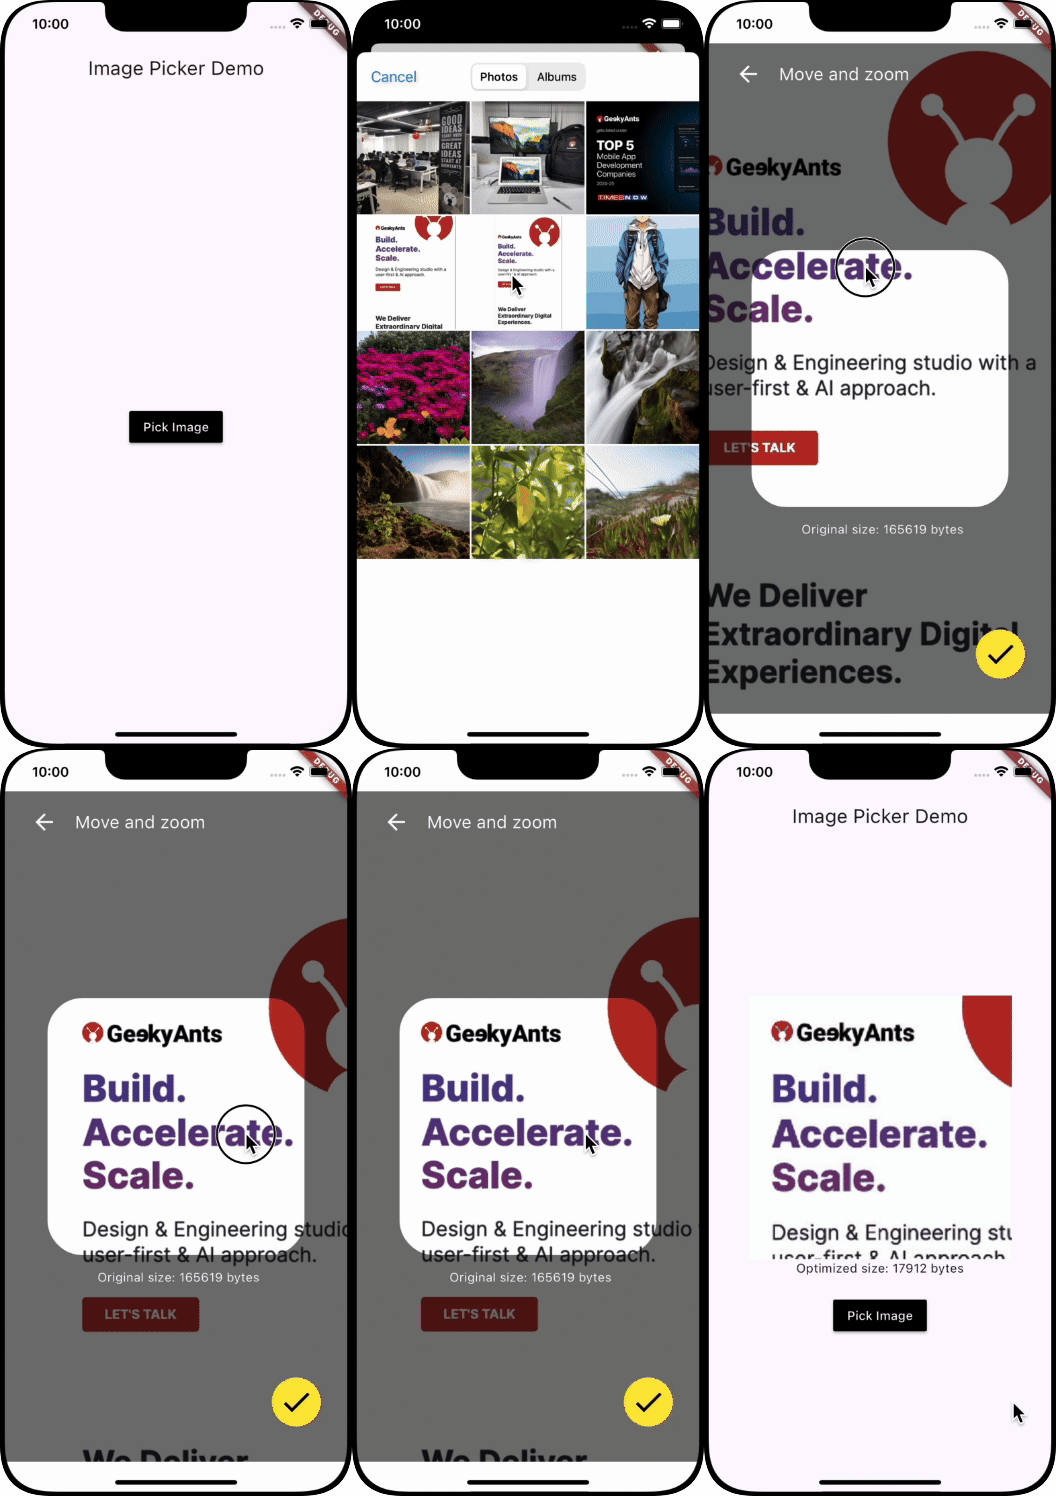
We have created a function _pickImage(), as below, which picks an image from the gallery and checks for its size. To avoid any memory issues, we only permit images below or equal to 2 MB to be picked. This is the first step towards optimising our image, as this will allow the app to deal only with a specific size of images.
  Future<void> _pickImage() async {
    final picker = ImagePicker();
    final pickedImage =
        await picker.pickImage(source: ImageSource.gallery);

    if (pickedImage != null) {
      File image = File(pickedImage.path);

      //getting size of image
      final Uint8List imageUint8List = image.readAsBytesSync();
      final bytes = imageUint8List.lengthInBytes;
      final kb = bytes / 1024;
      final mb = kb / 1024;
      //allows picking up images only if size <= 2 MB
      if (mb <= 2) {
        final result = await Navigator.push(
          context,
          MaterialPageRoute(
            builder: (context) => CropImage(
                imageModel: CropImagePageModel(image: imageUint8List)),
          ),
        );
        if (result != null && (result is CropImagePageModel)) {
          imageModel = CropImagePageModel(image: result.image);
          setState(() {});
        }
      } else {
        // Show the Snackbar when the image size is greater then 2 mb
        const snackBar = SnackBar(
          backgroundColor: Colors.red,
          content: Text("File should be less than or equal to 2 MB"),
          duration: Duration(
              seconds:
                  1), // Optional: Set the duration the Snackbar will be displayed
        );
        ScaffoldMessenger.of(context).showSnackBar(snackBar);
      }
    }
}- Image Cropping And Optimization :
We use the crop_your_image package from pub.dev because of its wide popularity and great pub rating.
The package supports customizable cropping areas and aspect ratios, making it versatile for various use cases, such as profile picture adjustments or product image refinement.
Cropping an image allows the user to select only the necessary parts of an image. The cropping feature's usage depends on the application's nature; however, keeping the crop feature within your applications, especially for applications dealing with profile photos, feature photos, wallpapers, thumbnails, etc., will be a great way to optimize your images in the long run. This will allow the usage of only required details and remove the irrelevant parts. The Crop() widget provided by the package allows for a designated cropping area to be shown, which can be adjusted and zoomed as required. You can also specify the area, colors, backgrounds, onCrop methods, etc, based on your specific requirement.
Crop(
      image: widget.imageModel.image,
      // can be set as per required ratio
      aspectRatio: 16 / 16,
      interactive: true,
      //define the size of your cropping area below
      initialSize: 1,
      maskColor: Colors.black54,
      cornerDotBuilder: (size, edgeAlignment) {
       return const SizedBox();
       },
      radius: 40,
      fixCropRect: true,
      controller: _controller,
      onCropped: (image) {
       //RESIZING IMAGE TO A FIXED SIZE AND REDUCING QUALITY
      resizedImageBytes = Uint8List.fromList(
      img.encodeJpg(
      img.copyResize(
      img.decodeImage(image)!, // Decode the image
       width: 300, // Set the width to 200 pixels
       height: 300, // Set the height to 200 pixels
          ),
       //reducing quality to 75%
        quality: 75),
        );
         setState(() {});
         final CropImagePageModel result =
         CropImagePageModel(image: resizedImageBytes!);
         Navigator.pop(context, result);
          },
       )
The above function onCropped( ) also performs a series of steps to resize and compress an image, producing a smaller and more efficient version of the original. Here's what each part does:
Decoding the Image:
img.decodeImage(image)!converts the image from its original format into a format that can be manipulated programmatically. The exclamation mark ensures that the image is not null.
Resizing the Image:
img.copyResize(...)resizes the decoded image to a width and height of 300 pixels. This helps reduce the image's dimensions to the specified size.
Compressing the Image:
img.encodeJpg(..., quality: 75)converts the resized image back to JPEG format while reducing the quality to 75%. This further reduces the file size while maintaining reasonable image quality.
Creating a Uint8List:
Uint8List.fromList(...)takes the compressed image bytes and converts them into a Uint8List, a format suitable for further processing or storage.- Image Transfer Through Network:
- We can ensure that the image transferred through the network to our BE services in the Flutter app remains efficient, secure, and fast.
- The first and foremost step is compressing your image using packages, as in the above steps. These packages significantly reduce the size of your images, ensuring faster transfer.
- Secondly, convert the compressed image to a Base64 string if your backend expects this format. This is completely optional, as sending raw bytes is typically more efficient.
- Thirdly, multipart/form-data requests, which are supported by most backend frameworks and designed for sending files, should be used for large images.
- Lastly, always use HTTPS to encrypt the data during transmission to ensure the image is sent securely. Add an authentication token in the request headers to ensure only authorized users can upload images.
 // Create a multipart request
  var request = http.MultipartRequest('POST', Uri.parse('https://your-backend-url.com/upload'));
  request.files.add(http.MultipartFile.fromBytes('image', resizedImageBytes, filename: 'image.jpg'));
  // Add authentication token if required
  request.headers['Authorization'] = 'Bearer your_auth_token';
  // Send the request
  var response = await request.send();
  if (response.statusCode == 200) {
    print('Image uploaded successfully!');
  } else {
    print('Image upload failed with status: ${response.statusCode}');
  }
Full Example Snippet:
import 'dart:io';
import 'dart:typed_data';
import 'package:crop_your_image/crop_your_image.dart';
import 'package:flutter/material.dart';
import 'package:flutter_image_demo/image_model.dart';
import 'package:image_picker/image_picker.dart';
import 'package:image/image.dart' as img;

void main() {
  runApp(const MyApp1());
}

class MyApp1 extends StatelessWidget {
  const MyApp1({super.key});

  @override
  Widget build(BuildContext context) {
    return MaterialApp(
        title: 'Image Demo',
        theme: ThemeData(
          colorScheme: ColorScheme.fromSeed(seedColor: Colors.deepPurple),
          useMaterial3: true,
        ),
        home: const MyApp());
  }
}

class CropImagePageModel {
  final Uint8List image;
  CropImagePageModel({
    required this.image,
  });
}

class MyApp extends StatefulWidget {
  const MyApp({super.key});

  @override
  State<MyApp> createState() => _MyAppState();
}

class _MyAppState extends State<MyApp> {
  CropImagePageModel? imageModel;
  bool isLoading = true;

  Future<void> _pickImage() async {
    final picker = ImagePicker();
    final pickedImage =
        await picker.pickImage(source: ImageSource.gallery, imageQuality: 20);

    if (pickedImage != null) {
      File image = File(pickedImage.path);

      //getting size of image
      final Uint8List imageUint8List = image.readAsBytesSync();
      final bytes = imageUint8List.lengthInBytes;
      final kb = bytes / 1024;
      final mb = kb / 1024;
      //allows picking up images only if size <= 2 MB
      if (mb <= 2) {
        final result = await Navigator.push(
          context,
          MaterialPageRoute(
            builder: (context) => CropImage(
                imageModel: CropImagePageModel(image: imageUint8List)),
          ),
        );
        if (result != null && (result is CropImagePageModel)) {
          imageModel = CropImagePageModel(image: result.image);
          setState(() {});
        }
      } else {
        // Show the Snackbar when the image size is greater then 2 mb
        const snackBar = SnackBar(
          backgroundColor: Colors.red,
          content: Text("file should be"),
          duration: Duration(
              seconds:
                  1), // Optional: Set the duration the Snackbar will be displayed
        );
        ScaffoldMessenger.of(context).showSnackBar(snackBar);
      }
    }
  }

  @override
  Widget build(BuildContext context) {
    return Scaffold(
      appBar: AppBar(
        title: const Text('Image Picker Demo'),
      ),
      body: Center(
          child: Column(
        mainAxisAlignment: MainAxisAlignment.center,
        children: [
          (imageModel != null && imageModel?.image != null)
              ? Column(
                  children: [
                    Image.memory(imageModel!.image),
                    Text(
                        'Optimized size: ${imageModel!.image.lengthInBytes} bytes'),
                  ],
                )
              : const SizedBox(),
          const SizedBox(
            height: 20,
          ),
          MaterialButton(
            color: Colors.black,
            onPressed: () {
              _pickImage();
            },
            child: const Text(
              'Pick Image',
              style: TextStyle(color: Colors.white),
            ),
          ),
        ],
      )),
    );
  }
}

class CropImage extends StatefulWidget {
  final CropImagePageModel imageModel;
  const CropImage({super.key, required this.imageModel});

  @override
  State<CropImage> createState() => _CropImageState();
}

class _CropImageState extends State<CropImage> {
  final _controller = CropController();
  bool cropped = false;
  Uint8List? resizedImageBytes;

  @override
  Widget build(BuildContext context) {
    return Scaffold(
      backgroundColor: Colors.white,
      body: SafeArea(
        child: Container(
          color: Colors.white,
          child: Stack(
            children: <Widget>[
              Center(
                child: cropped == false
                    ? Padding(
                        padding: const EdgeInsets.all(0),
                        child: Crop(
                          image: widget.imageModel.image,
                          // can be set as per required ratio
                          aspectRatio: 16 / 16,
                          interactive: true,
                          //define the size of your cropping area below
                          initialSize: 1,
                          maskColor: Colors.black54,
                          cornerDotBuilder: (size, edgeAlignment) {
                            return const SizedBox();
                          },
                          radius: 40,
                          fixCropRect: true,
                          controller: _controller,
                          onCropped: (image) {
                            //RESIZING IMAGE TO A FIXED SIZE AND REDUCING QUALITY
                            resizedImageBytes = Uint8List.fromList(
                              img.encodeJpg(
                                  img.copyResize(
                                    img.decodeImage(image)!, // Decode the image
                                    width: 300, // Set the width to 200 pixels
                                    height: 300, // Set the height to 200 pixels
                                  ),
                                  //reducing quality to 75%
                                  quality: 75),
                            );
                            setState(() {});
                            final CropImagePageModel result =
                                CropImagePageModel(image: resizedImageBytes!);
                            Navigator.pop(context, result);
                          },
                        ),
                      )
                    : const SizedBox(
                        height: 30,
                        width: 30,
                        child: CircularProgressIndicator(
                          color: Colors.white,
                        )),
              ),
              Padding(
                padding: const EdgeInsets.only(
                    left: 30.0, right: 30.0, bottom: 8.0, top: 20.0),
                child: Row(
                  children: [
                    GestureDetector(
                      onTap: () {
                        Navigator.pop(context);
                      },
                      child: const Icon(
                        Icons.arrow_back,
                        color: Colors.white,
                        size: 30,
                      ),
                    ),
                    const SizedBox(
                      width: 20,
                    ),
                    Text(
                      'Move and zoom',
                      style: Theme.of(context)
                          .textTheme
                          .headlineMedium
                          ?.copyWith(fontSize: 20, color: Colors.white),
                    )
                  ],
                ),
              ),
              Positioned(
                bottom: 200,
                right: 100,
                child: Text(
                  'Original size: ${(widget.imageModel.image.lengthInBytes)} bytes',
                  style: const TextStyle(color: Colors.white),
                ),
              ),
              Positioned(
                bottom: 40,
                right: 30,
                child: GestureDetector(
                  onTap: () {
                    _controller.crop();
                    if (mounted) {
                      setState(() {
                        cropped = true;
                      });
                    }
                  },
                  child: Container(
                    decoration: BoxDecoration(
                        color: Colors.yellow,
                        borderRadius: BorderRadius.circular(100)),
                    child: const Padding(
                      padding: EdgeInsets.all(8.0),
                      child: Icon(
                        Icons.check,
                        color: Colors.black,
                        size: 40,
                      ),
                    ),
                  ),
                ),
              )
            ],
          ),
        ),
      ),
    );
  }
}
Key Takeaways
Integrating image cropping and optimization into app development is crucial for improving user experience and app performance. While these processes might appear optional, they are vital when handling multiple graphical images. They serve their own advantages with respect to each feature discussed above.
- Image Cropping: Enhances visual appeal by focusing on essential image parts.
- Optimization: Reduces file size for faster loading and reduced bandwidth usage.
- Efficient Image Handling: Maintains high performance in resource-constrained mobile environments.
Implementing these practices ensures that your app remains efficient, visually appealing, and provides a better overall user experience.







