Third-party attribution services like Branch, AppsFlyer, and Firebase Dynamic Links offer turn-key deep linking out of the box. However, they frequently bring vendor lock-in, recurring SaaS subscription overhead, privacy and data residency compliance challenges, and sudden deprecations (such as the sunsetting of Firebase Dynamic Links). Firebase Dynamic Links is the clearest example: Google shut the service down on August 25, 2025, and every page.link URL stopped working on that date.
This guide walks through building a fully self-hosted, vendor-agnostic deep linking and referral system using native OS domain verification, AWS infrastructure (S3, CloudFront, Application Load Balancer), a NestJS backend, and a React Native mobile client.
What Is Deep Linking?
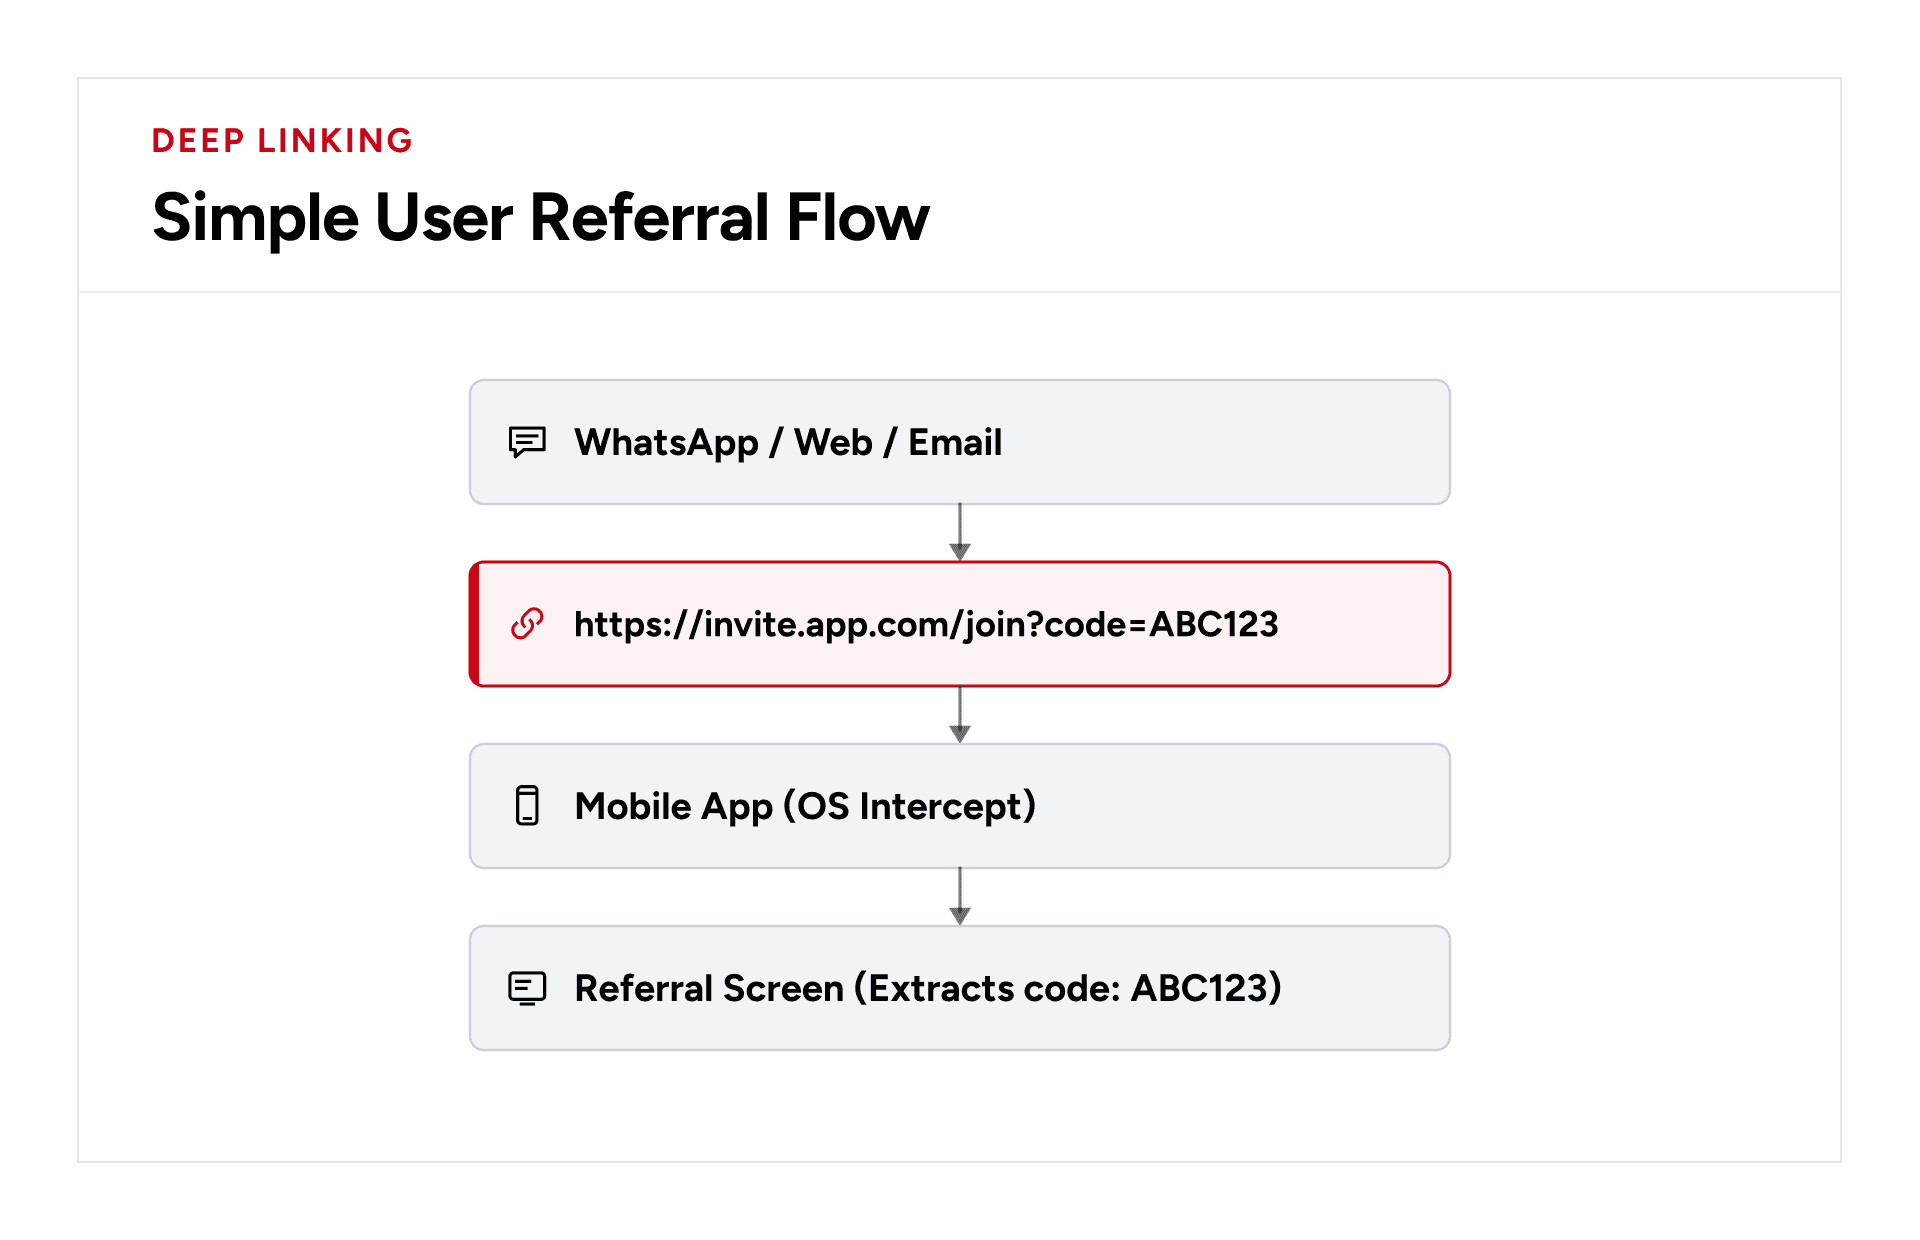
Deep linking routes a user directly to a specific screen or action within a mobile app when clicking a standard HTTPS URL, bypassing the default home screen.
Tap a normal link on your phone and your browser opens the matching webpage. A deep link works the same way, except it opens a specific screen inside an app instead.
Example: an invite link
A friend sends you a link to join an app.
- Normal link: takes you to a generic webpage or app store listing
- Deep link: if the app is already installed, it skips the browser completely and drops you straight into the exact screen you need, like a sign-up form with your friend's invite code already filled in
Why this matters
Without deep linking, joining through a link looks like this:
- Tap the link
- Land on a generic webpage
- Manually open the app
- Find the right screen
- Type in the code by hand
With deep linking, all five steps collapse into one tap.
The hard part: app not installed
If the app isn't on the phone yet, the link still needs to do something useful. Usually that means sending the person to the App Store or Play Store, then remembering their original intent (like that invite code) once they install and open the app for the first time.
This is the harder problem the rest of the guide solves, and it's usually why teams reach for paid third-party tools instead of building it themselves.
Types of Mobile Links
Mobile platforms support more than one kind of link. This guide uses verified HTTPS links because they are the only type that the operating system ties to a domain you own.
Link type | Example | How the OS trusts it | Limitation |
Custom URI scheme | myapp://join?code=ABC123 | No verification. Any app can register the same scheme | Fails with an error when the app is not installed |
https://invite.app.com/join?code=ABC123 | Android checks assetlinks.json on your domain through the Digital Asset Links API | Opens in the browser if verification fails | |
https://invite.app.com/join?code=ABC123 | iOS checks apple-app-site-association on your domain | Opens in Safari if the app is missing or the file cannot be fetched |
App Links and Universal Links share one URL for both platforms. The same link also works as a normal web page when the app is not installed, which is what makes the store redirect in this guide possible.
Core Use Cases
The rest of this guide builds the referral onboarding case end to end. The same setup supports the other three cases once you add their paths to the manifests and the app router.
Use Case | Example URL | Expected Target Screen |
Referral Onboarding | [https://invite.app.com/join?code=ABC123](https://invite.app.com/join?code=ABC123) | Pre-filled Registration Screen |
Product Sharing | [https://store.app.com/products/8930](https://store.app.com/products/8930) | Specific Product Details Page |
Push Notifications | [https://app.com/notifications/102](https://app.com/notifications/102) | Direct Chat / Message Context |
Marketing Campaigns | [https://app.com/promos/summer2026](https://app.com/promos/summer2026) | Discount / Landing Screen |
Direct vs. Deferred Deep Linking
Understanding operating system boundaries is essential before designing the architecture.
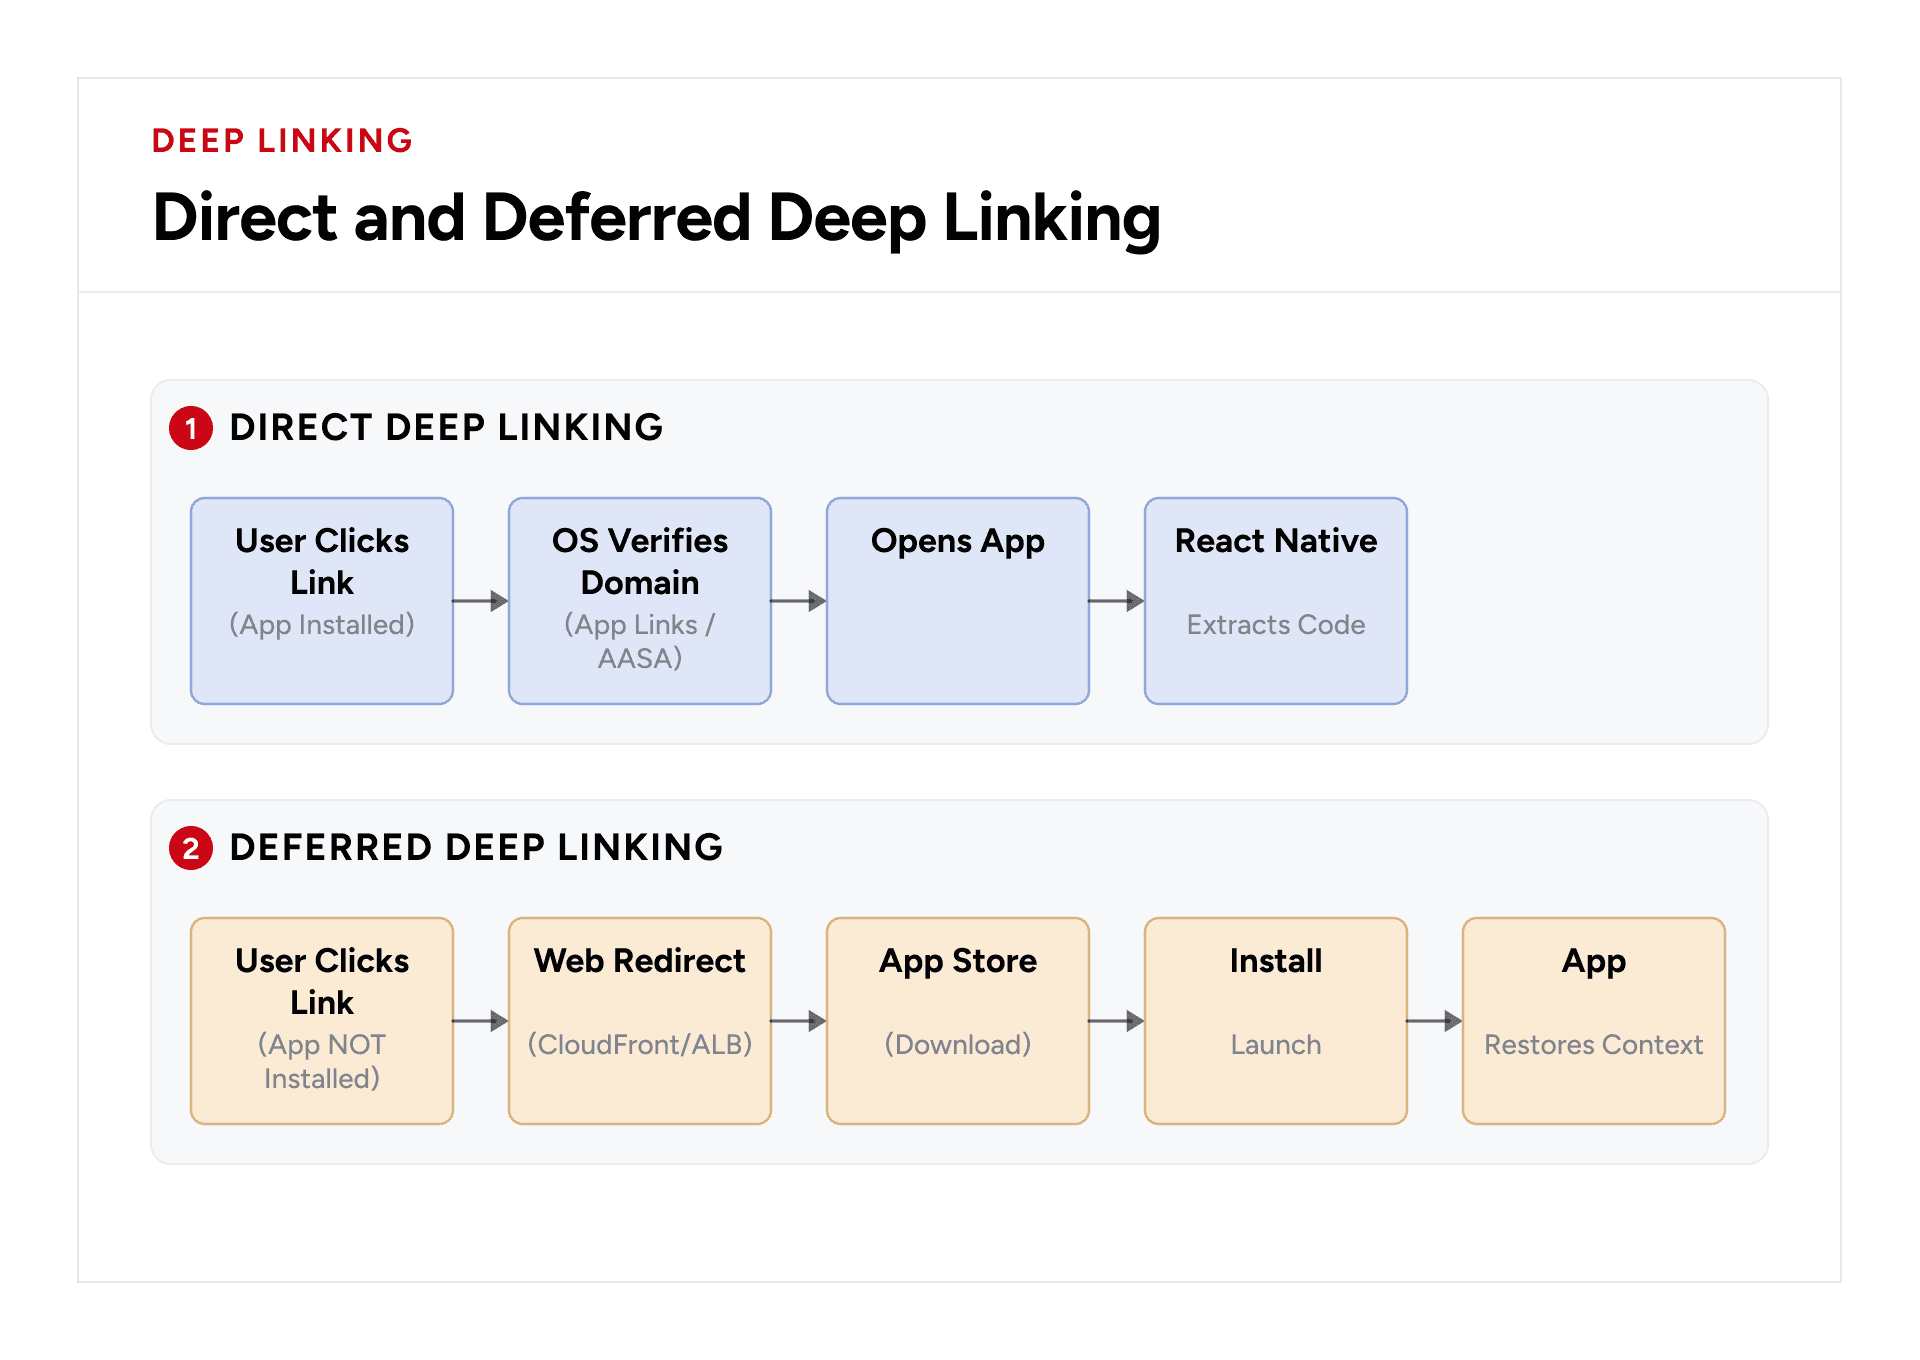
Direct Deep Linking
The mobile application is already installed. The mobile operating system (Android or iOS) intercepts the HTTP request, matches the domain signature against its installed applications, and directly opens the app without touching the web browser or backend web servers.
The OS only intercepts links that a user taps. On iOS, a Universal Link typed or pasted into the Safari address bar opens the web page instead of the app. A tap on a link to the same domain inside Safari also stays in the browser. Share links from messages, email, notes or other apps to get the expected behavior.
Deferred Deep Linking
The application is not installed. The browser handles the URL, sending the request to your backend. The user is redirected to the Google Play Store or Apple App Store. Because native Android App Links and iOS Universal Links do not natively pass context across an installation boundary, the original URL parameters are lost upon install.
Scenario | Who handles the link | Does the referral code survive? |
App installed | Android or iOS opens the app directly | Yes. The app reads it from the URL |
App not installed, Android | Browser, then CloudFront, then NestJS, then Play Store | Yes, through the Play Install Referrer |
App not installed, iOS | Browser, then CloudFront, then NestJS, then App Store | No. The user enters it in the app during a grace period |
Architecture Distinction: Without third-party SDKs, this architecture provides store routing with server-side/manual attribution (via Play Store Install Referrer on Android and manual user/web account grace periods on iOS) rather than seamless, native OS-level deferred deep linking.
How the Deep Linking Architecture Works
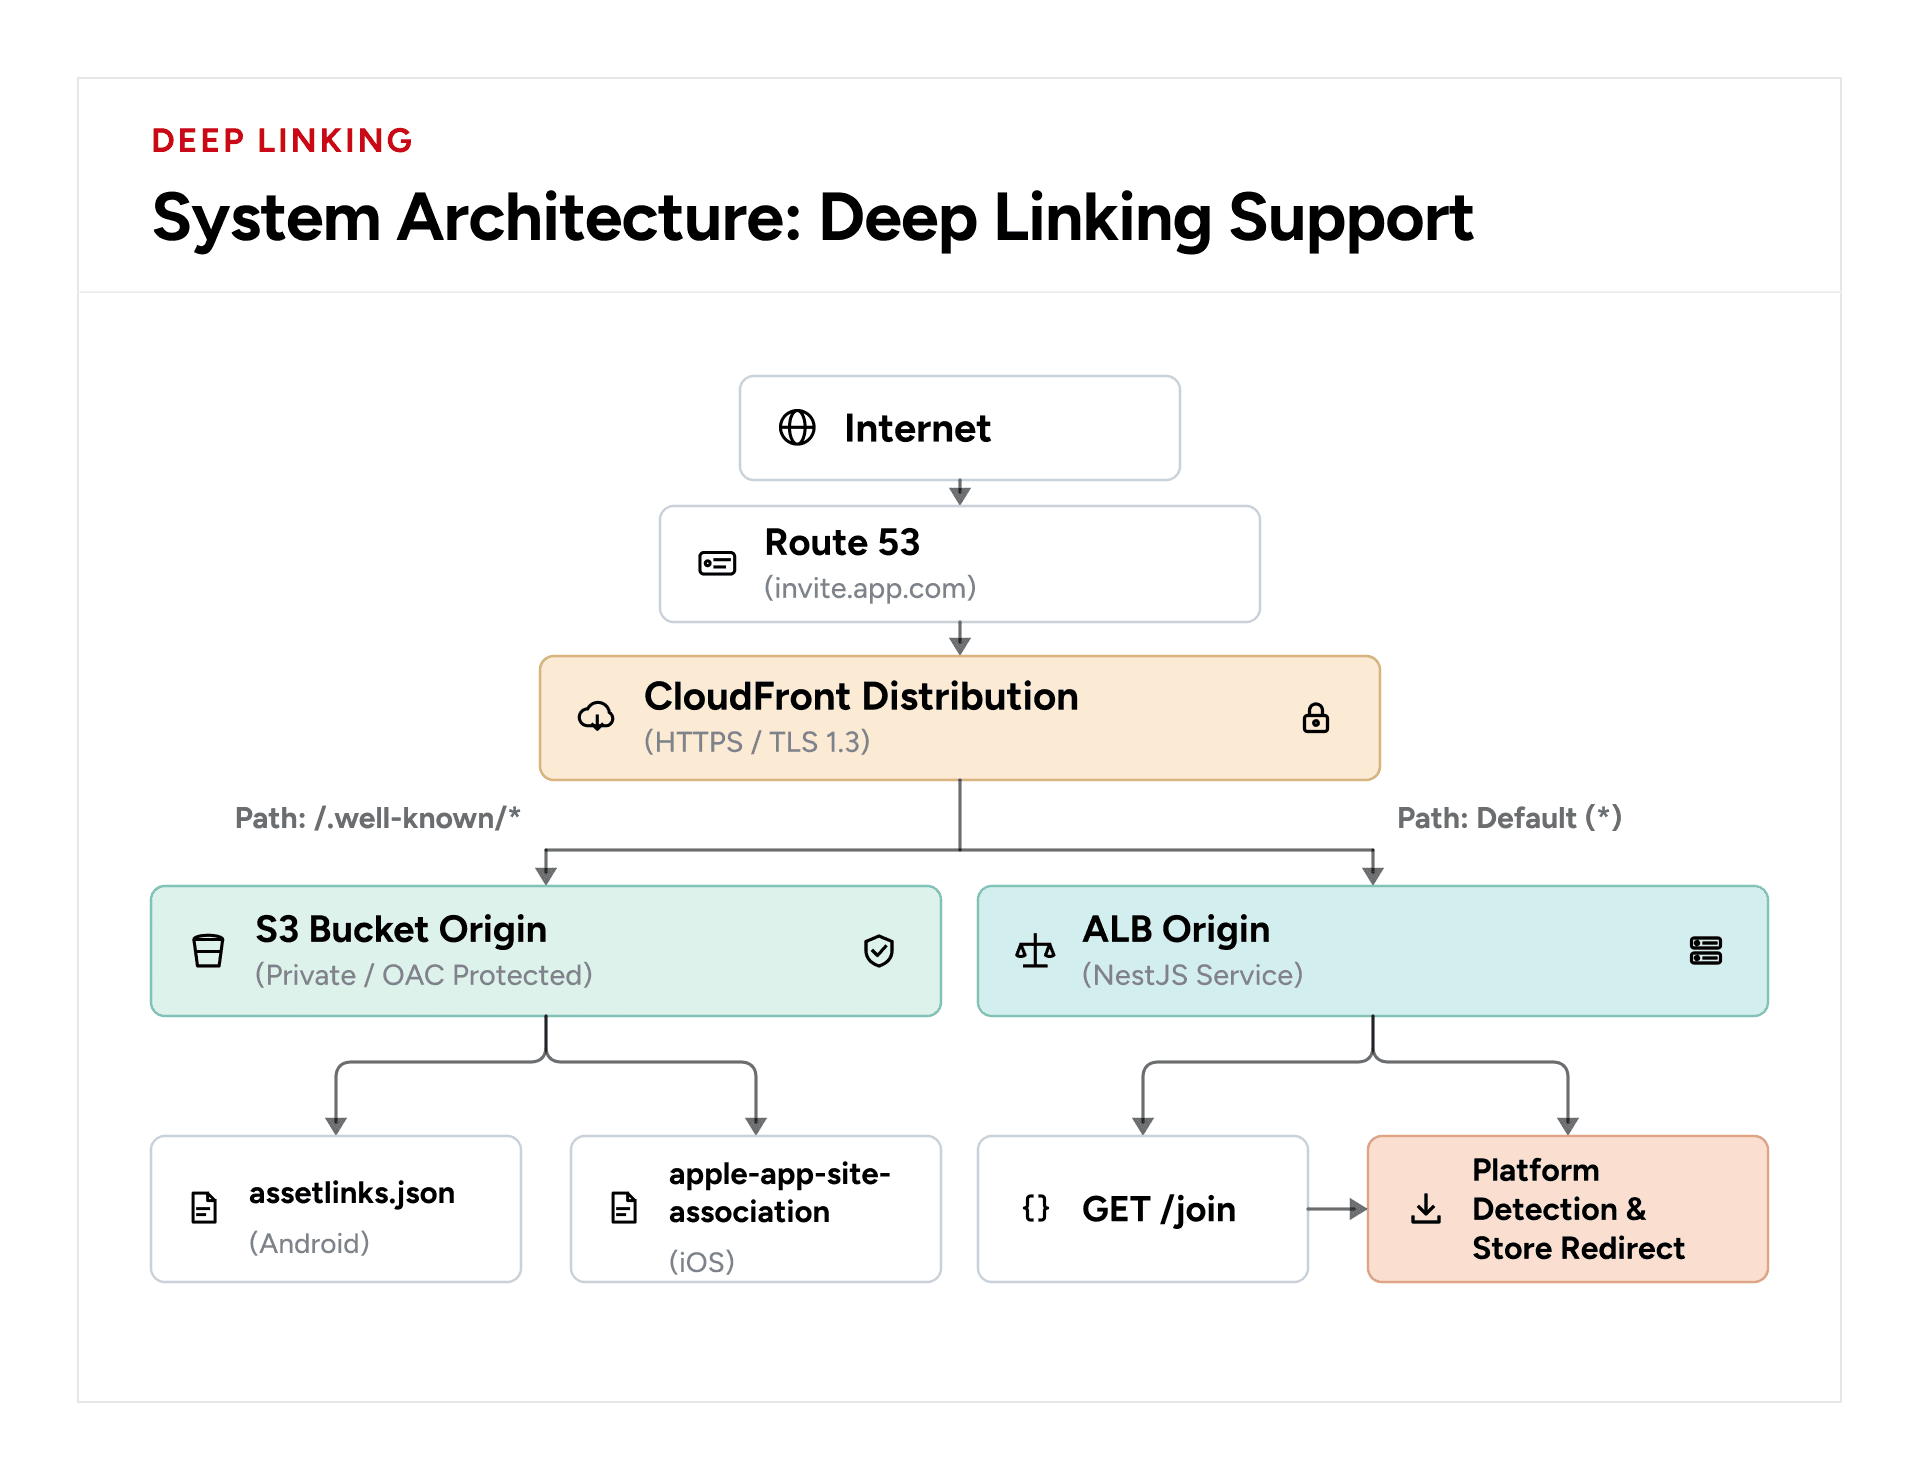
One CloudFront distribution sits in front of two origins. Static verification files come from a private S3 bucket, and every dynamic request on the domain goes to the NestJS service behind the Application Load Balancer. This keeps the files that Android and iOS read separate from the redirect logic, on a single domain and a single HTTPS certificate.
Component Responsibilities
AWS / Stack Component | Primary Responsibility |
Amazon Route 53 | Manages DNS A records (Alias to CloudFront). |
Amazon CloudFront | CDN handling HTTPS termination, edge routing, and origin caching. |
Amazon S3 | Private origin hosting static .well-known OS verification manifests. |
AWS ALB | Routes dynamic requests (/join, API routes) to the NestJS cluster. |
NestJS API | Evaluates User-Agent headers, processes referral logic, and executes store redirects. |
React Native App | Handles incoming deep link events via native Linking listeners. |
A request to /.well-known/* is served from S3. Every other path goes to the ALB and then to NestJS, which decides where to send the visitor.
Hosting the Verification Files on Amazon S3
This creates the storage for the two files that Android and iOS download to verify your domain. The bucket stays private, and CloudFront is the only service allowed to read it.
Step 1: Create a Private Amazon S3 Bucket
- Open the Amazon S3 Console and click Create bucket.
- Name the bucket (e.g., app-domain-verification-prod).
- Keep Block all public access enabled.
- Set Object Ownership to Bucket owner enforced.
S3 Bucket Structure
└── .well-known/
    ├── assetlinks.json
    └── apple-app-site-association
Step 2: Generate OS Verification Manifests
Create a local directory named .well-known containing the two required manifest files. Each file lists the apps that are allowed to open links on your domain.
Android Verification (.well-known/assetlinks.json)
[
  {
    "relation": [
      "delegate_permission/common.handle_all_urls"
    ],
    "target": {
      "namespace": "android_app",
      "package_name": "com.company.app",
      "sha256_cert_fingerprints": [
        "your-sha-fingerprint-here"
      ]
    }
  }
]
Pro Tip: Retrieve your SHA-256 fingerprint for production builds via Google Play Console under App Signing > App signing key certificate. The same page in Play Console also shows a ready-made Digital Asset Links JSON snippet for your app. The sha256_cert_fingerprints field is an array, so you can add the upload key fingerprint as a second entry if testers install builds outside the Play Store.
iOS Verification (.well-known/apple-app-site-association)
Note: Do not append .json to the file name.
{
  "applinks": {
    "details": [
      {
        "appIDs": [
          "9JA6382026.com.company.app"
        ],
        "components": [
          {
            "/": "/join*"
          }
        ]
      }
    ]
  }
}
The value in appIDs is your Apple Team ID followed by the app's bundle identifier. The components array controls which paths open the app. Here only paths that start with /join are claimed, so every other page on the domain keeps opening in the browser.
Apple sets three hosting rules for this file. It must be served over https:// with a valid certificate, it must return directly with no redirects, and it must sit in the .well-known directory. Since iOS 14, devices do not fetch the file from your server. They fetch it from an Apple-managed CDN, which requests your file within 24 hours. Expect a delay before changes reach devices.
Step 3: Upload Object & Set MIME Types
Upload the .well-known folder to your S3 bucket. Ensure the HTTP Content-Type metadata for both files is explicitly configured as application/json:
aws s3 cp .well-known/ s3://app-domain-verification-prod/.well-known/ \
  --recursive \
  --content-type "application/json"
CloudFront caches these files at the edge. When you change either file later, create an invalidation so the new version is served right away:
aws cloudfront create-invalidation \
  --distribution-id <your-distribution-id> \
  --paths "/.well-known/*"
Configuring CloudFront and Route 53
One CloudFront distribution serves both origins. Static verification files come from S3, and every other request on the domain goes to the NestJS service behind the ALB.
Step 1: Configure Origins & Origin Access Control (OAC)
- Navigate to CloudFront > Distributions > Create Distribution.
- Origin 1 (S3): Select your S3 bucket endpoint.
- Under Origin Access, select Origin Access Control (OAC) and create an OAC control setting.
- Apply the provided JSON policy to your S3 bucket policy to allow CloudFront access while keeping the bucket completely private.
- Origin 2 (ALB): Add your Application Load Balancer domain (e.g., nestjs-alb-12345.ap-south-1.elb.amazonaws.com) using HTTPS.
Important: When CloudFront connects to an origin over HTTPS, the origin's certificate must include a domain name that matches the Origin Domain. If it does not match, CloudFront returns 502 Bad Gateway. You cannot issue a certificate for the default elb.amazonaws.com name. Create a DNS record such as origin-api.app.com that points to the ALB, attach an ACM certificate for that name to the ALB's HTTPS listener, and enter origin-api.app.com as the Origin Domain. This certificate is created in the ALB's own Region.
Step 2: Configure Path-Based Cache Behaviors
Set up path routing rules to separate static verification from dynamic application requests:
Priority 1 (/.well-known/*): Target: S3 Origin. Caching Enabled (Managed-CachingOptimized).

Priority 2 (/join or Default *): Target: ALB Origin.
Cache Policy: Managed-CachingDisabled (TTL = 0). Dynamic redirects must never be cached by CloudFront edge nodes.

Origin Request Policy: Must forward Query Strings (code) and Headers (User-Agent, or CloudFront Device Detection headers: CloudFront-Is-Mobile-Viewer, CloudFront-Is-IOS-Viewer, CloudFront-Is-Android-Viewer).

Note: By default, CloudFront strips query parameters and overwrites the viewer User-Agent with Amazon CloudFront. Forwarding these headers/queries is required for NestJS platform detection.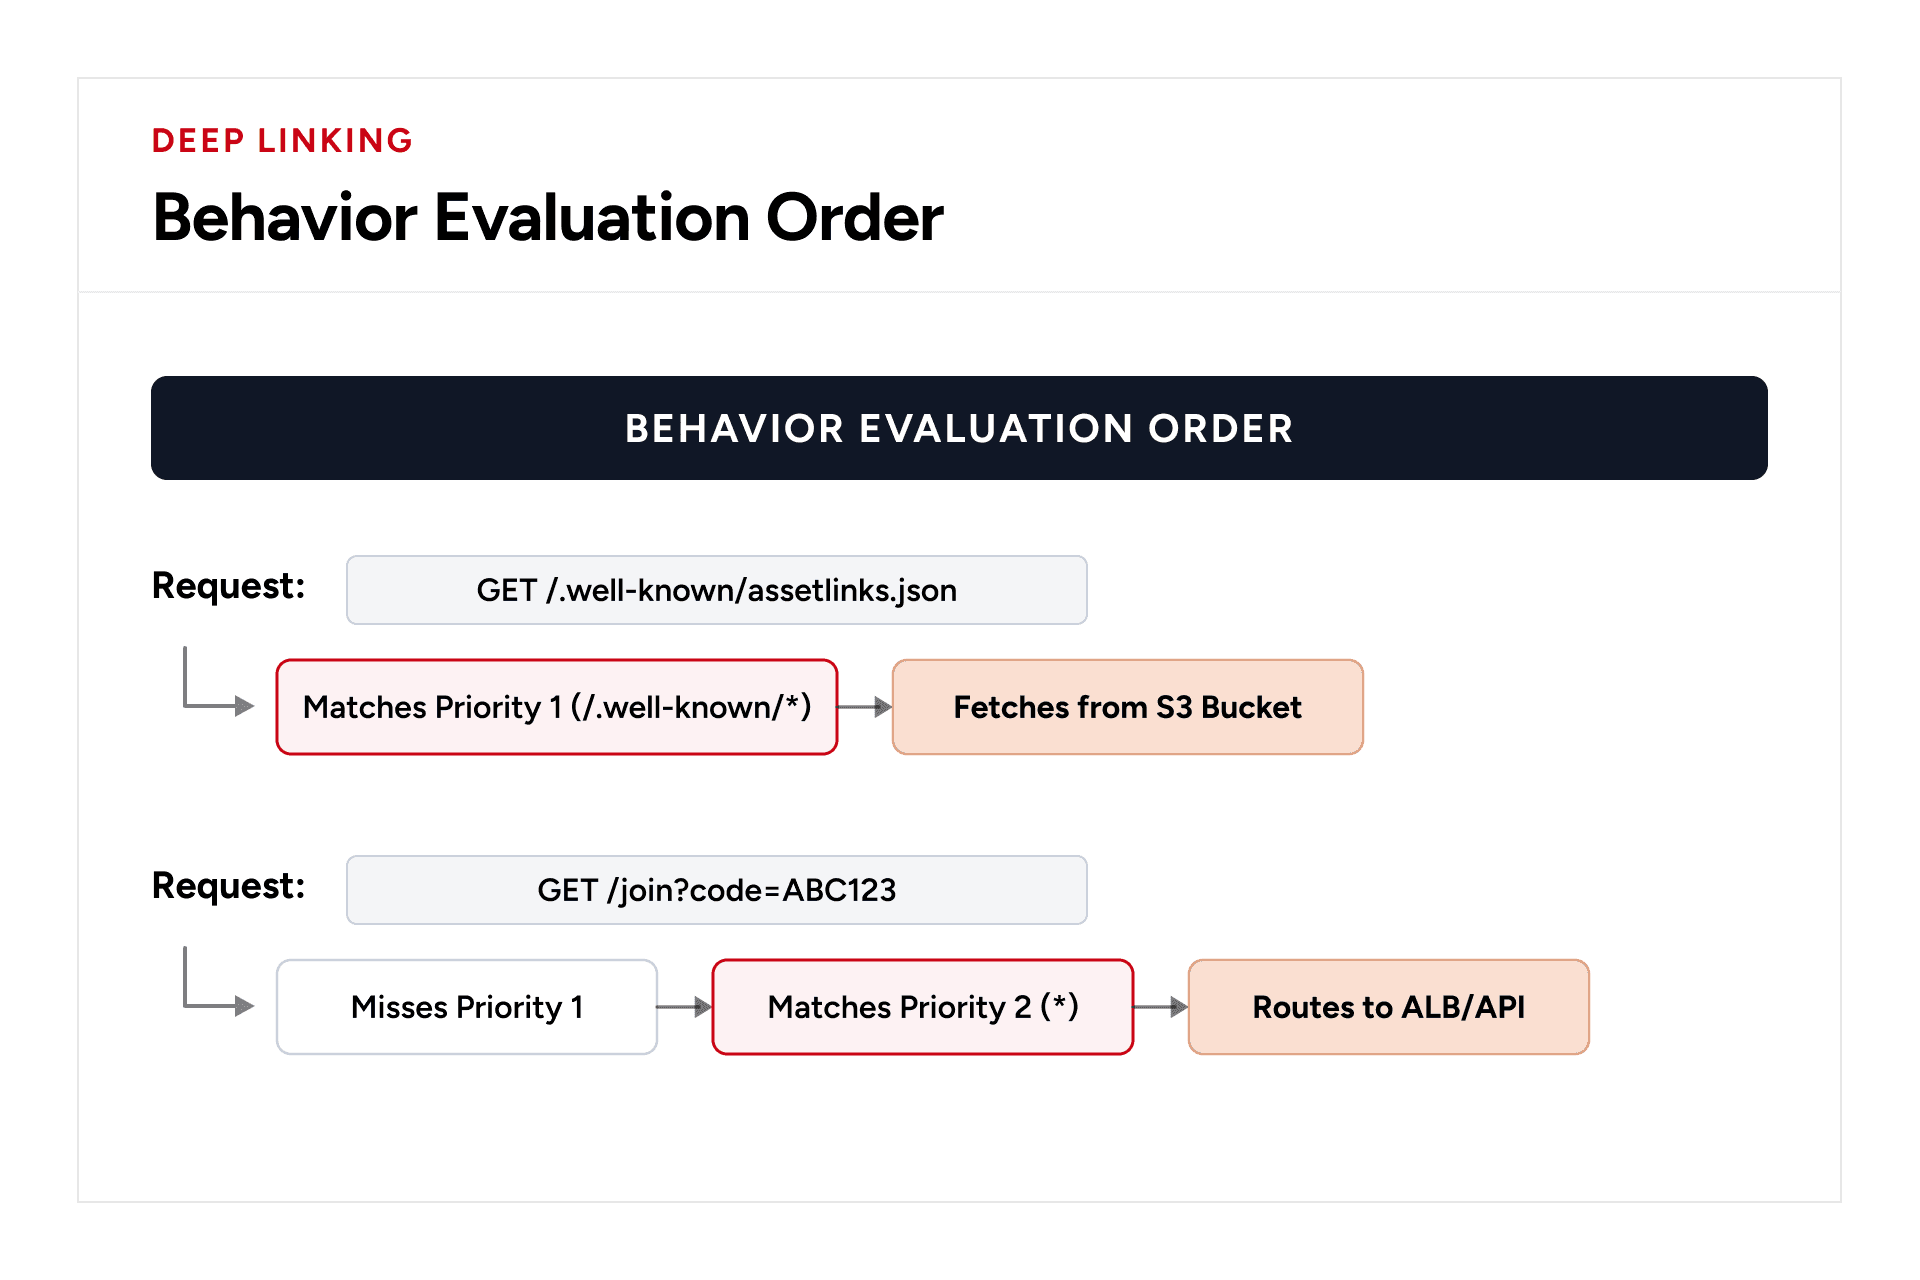
Step 3: SSL Certificate & DNS Alias
- Request an AWS Certificate Manager (ACM) public certificate for invite.app.com.
- Crucial Rule: The certificate must be created in the us-east-1 (N. Virginia) region to attach to CloudFront.
- In CloudFront Settings, add invite.app.com under Alternate domain name (CNAME) and select the ACM certificate.
- In Route 53, create an A Record for invite.app.com, choose Alias, and point it to the CloudFront distribution target (dXXXXXX.cloudfront.net).
Step 4: Protect ALB Origin (Direct Access Prevention)
To prevent users or malicious traffic from bypassing CloudFront and hitting the ALB directly:
- In CloudFront Origin Settings for the ALB, add a custom HTTP header: X-Origin-Verify: <your-secret-token>.
- In your ALB Listener rules (or NestJS middleware), block any incoming request that does not contain this exact X-Origin-Verify header value with a 403 Forbidden.
- Restrict the ALB security group so it only accepts traffic from the AWS-managed prefix list com.amazonaws.global.cloudfront.origin-facing.
The prefix list and the header protect against different things. The prefix list blocks traffic that does not come from CloudFront. The header blocks traffic from other CloudFront distributions that could also reach your ALB. AWS recommends using both together.
If you are building a new stack, CloudFront VPC origins are another option. They let CloudFront reach an ALB in a private subnet, so the ALB has no public endpoint at all. AWS announced VPC origins in November 2024 at no additional cost.
Verifying Infrastructure Deployment
Run standard curl checks to verify headers and response bodies before proceeding with client-side integration:
# 1. Verify Android Verification Asset
curl -i https://invite.app.com/.well-known/assetlinks.json

# Expected Output:
# HTTP/2 200
# content-type: application/json
# x-cache: Hit from cloudfront

# 2. Verify iOS Verification Asset
curl -i https://invite.app.com/.well-known/apple-app-site-association

# Expected Output:
# HTTP/2 200
# content-type: application/json
The first request after an upload or invalidation returns x-cache: Miss from cloudfront. Run the command again to see the cached Hit response. A 301 or 302 status on either file is a failure, since both platforms reject redirects.
Two more checks confirm what the platforms themselves see:
# 3. Ask Google's Digital Asset Links API to read your Android file
curl "https://digitalassetlinks.googleapis.com/v1/statements:list?source.web.site=https://invite.app.com&relation=delegate_permission/common.handle_all_urls"

# 4. Check the copy of your iOS file held on Apple's CDN
curl -i https://app-site-association.cdn-apple.com/a/v1/invite.app.com
Check 3 returns your package name and fingerprint when Google can parse the file. Check 4 returns the file once Apple's CDN has fetched it, which can take up to 24 hours after the first upload.
Configuring Android App Links and iOS Universal Links
The server files say which app may open your links. The app must also declare which domain it handles. Both sides have to match before Android or iOS will open the app.
Android Configuration (AndroidManifest.xml)
Add the auto-verify intent filter inside your <activity> block (typically MainActivity):
XML
<activity
  android:name=".MainActivity"
  android:launchMode="singleTask"
  android:exported="true">

  <intent-filter android:autoVerify="true">
      <action android:name="android.intent.action.VIEW" />
      <category android:name="android.intent.category.DEFAULT" />
      <category android:name="android.intent.category.BROWSABLE" />

      <data
          android:scheme="https"
          android:host="invite.app.com"
          android:pathPrefix="/join" />
  </intent-filter>
</activity>
Three attributes matter most here:
- android:autoVerify="true" tells Android to check assetlinks.json on install. On Android 6.0 and higher, the system verifies the hosts in your intent filters automatically when the app is installed.
- android:launchMode="singleTask" reuses the running app instance. A link tapped while the app is open then reaches the existing Linking listener instead of starting a second copy of the screen.
- android:pathPrefix="/join" limits the app to referral paths, which matches the /join* rule in the iOS file.
iOS Configuration (Xcode Capability)
- Open your iOS workspace in Xcode.
- Under Target > Signing & Capabilities, click + Capability and select Associated Domains.
- Add the domain entry using the applinks: prefix:
applinks:invite.app.comHandling Deep Links in React Native
The app can receive a link in two states. In a cold start, the link launches a closed app. In a warm launch, the link arrives while the app runs in the background. React Native's Linking API covers both: getInitialURL() for cold starts and the url event for warm launches.
Handle cold-start launches (getInitialURL) and background warm launches (addEventListener):
// src/services/DeepLinkHandler.ts
import { useEffect } from 'react';
import { Linking } from 'react-native';
import AsyncStorage from '@react-native-async-storage/async-storage';

export const PENDING_REFERRAL_KEY = '@pending_referral_code';

export function parseReferralCode(url: string | null): string | null {
  if (!url) return null;

  try {
    const parsedUrl = new URL(url);
    if (
      parsedUrl.hostname === 'invite.app.com' &&
      parsedUrl.pathname === '/join'
    ) {
      return parsedUrl.searchParams.get('code');
    }
  } catch (error) {
    console.error('Failed to parse deep link URL:', error);
  }
  return null;
}

export function useDeepLinkHandler() {
  useEffect(() => {
    // 1. Handle background/running app deep links
    const subscription = Linking.addEventListener('url', async ({ url }) => {
      const code = parseReferralCode(url);
      if (code) {
        await AsyncStorage.setItem(PENDING_REFERRAL_KEY, code);
        // Trigger navigation or dispatch action to store
      }
    });

    // 2. Handle cold-start deep links
    async function checkInitialUrl() {
      const initialUrl = await Linking.getInitialURL();
      const code = parseReferralCode(initialUrl);
      if (code) {
        await AsyncStorage.setItem(PENDING_REFERRAL_KEY, code);
      }
    }

    checkInitialUrl();

    return () => {
      subscription.remove();
    };
  }, []);
}
''While iOS requires server-side or grace-period attribution, Android allows us to extract the original referral code automatically from the Play Store install metadata upon first launch.''
Handling Android Deferred Links (Play Store Install Referrer)
On Android, when a user installs the app via a Play Store link containing &referrer=..., the referral code is preserved in the Play Store metadata. Use react-native-play-install-referrer to fetch it on first launch:
import { Platform } from 'react-native';
import AsyncStorage from '@react-native-async-storage/async-storage';
import PlayInstallReferrer from 'react-native-play-install-referrer';
import { PENDING_REFERRAL_KEY } from './DeepLinkHandler';

async function checkAndroidInstallReferrer() {
  if (Platform.OS !== 'android') return;

  const isFirstLaunch = await AsyncStorage.getItem('@first_launch_done');
  if (!isFirstLaunch) {
    PlayInstallReferrer.getInstallReferrer(async (installReferrerInfo, error) => {
      if (!error && installReferrerInfo?.installReferrer) {
        const params = new URLSearchParams(installReferrerInfo.installReferrer);
        const code = params.get('utm_content');
        if (code) {
          await AsyncStorage.setItem(PENDING_REFERRAL_KEY, code);
        }
      }
      await AsyncStorage.setItem('@first_launch_done', 'true');
    });
  }
}
Google keeps the referrer data for 90 days, and it does not change unless the app is reinstalled. Google also advises calling the API only once, during the first run after install. The @first_launch_done flag handles this. The flag is now written inside the callback, so a launch that closes before the Play Store responds will try again on the next start.
Building the NestJS Redirect Backend
When users without the app click the deep link, CloudFront routes the request to your NestJS server behind the ALB. The backend detects the platform and redirects the user to the appropriate App Store.
NestJS Controller (referral.controller.ts)
import { Controller, Get, Query, Req, Res, BadRequestException, Headers } from '@nestjs/common';
import { Request, Response } from 'express';

@Controller('join')
export class ReferralController {
  private readonly PLAY_STORE_URL = 'https://play.google.com/store/apps/details?id=com.company.app';
  private readonly APP_STORE_URL = 'https://apps.apple.com/app/id1234567890';
  private readonly WEB_FALLBACK_URL = 'https://app.com/download';

  @Get()
  handleReferralRedirect(
    @Query('code') code: string,
    @Req() req: Request,
    @Res() res: Response,
    @Headers('cloudfront-is-android-viewer') isAndroidCloudFront?: string,
    @Headers('cloudfront-is-ios-viewer') isIosCloudFront?: string,
  ) {
    if (!code || !/^[A-Za-z0-9_-]{3,16}$/.test(code)) {
      throw new BadRequestException('Invalid or missing referral code.');
    }

    const userAgent = req.headers['user-agent'] || '';

    // Check CloudFront Device Headers first, fallback to User-Agent
    const isAndroid = isAndroidCloudFront === 'true' || /Android/i.test(userAgent);
    const isIOS = isIosCloudFront === 'true' || /iPhone|iPad|iPod/i.test(userAgent);

    if (isAndroid) {
      // Appends Play Store install referrer parameter
      return res.redirect(302, `${this.PLAY_STORE_URL}&referrer=utm_source%3Dreferral%26utm_content%3D${encodeURIComponent(code)}`);
    }

    if (isIOS) {
      return res.redirect(302, this.APP_STORE_URL);
    }

    return res.redirect(302, `${this.WEB_FALLBACK_URL}?code=${encodeURIComponent(code)}`);
  }
}
Production Controls: Abuse & Replay Prevention
- Rate Limiting: Protect the /join endpoint using @nestjs/throttler (e.g., max 10 requests per minute per IP) to prevent referral code enumeration attacks.
- Referral Claim Limits: Enforce database constraints limiting one claimed referral code per user account and unique device ID.
- Fraud Checks: Flag accounts claiming codes where the referrer and referee share the same IP address or payment method.
Fallback Strategies for Uninstalled Users
Because iOS Universal Links and standard App Links do not preserve URL query params across fresh store downloads without a vendor SDK, choose one of these production-ready custom fallbacks:
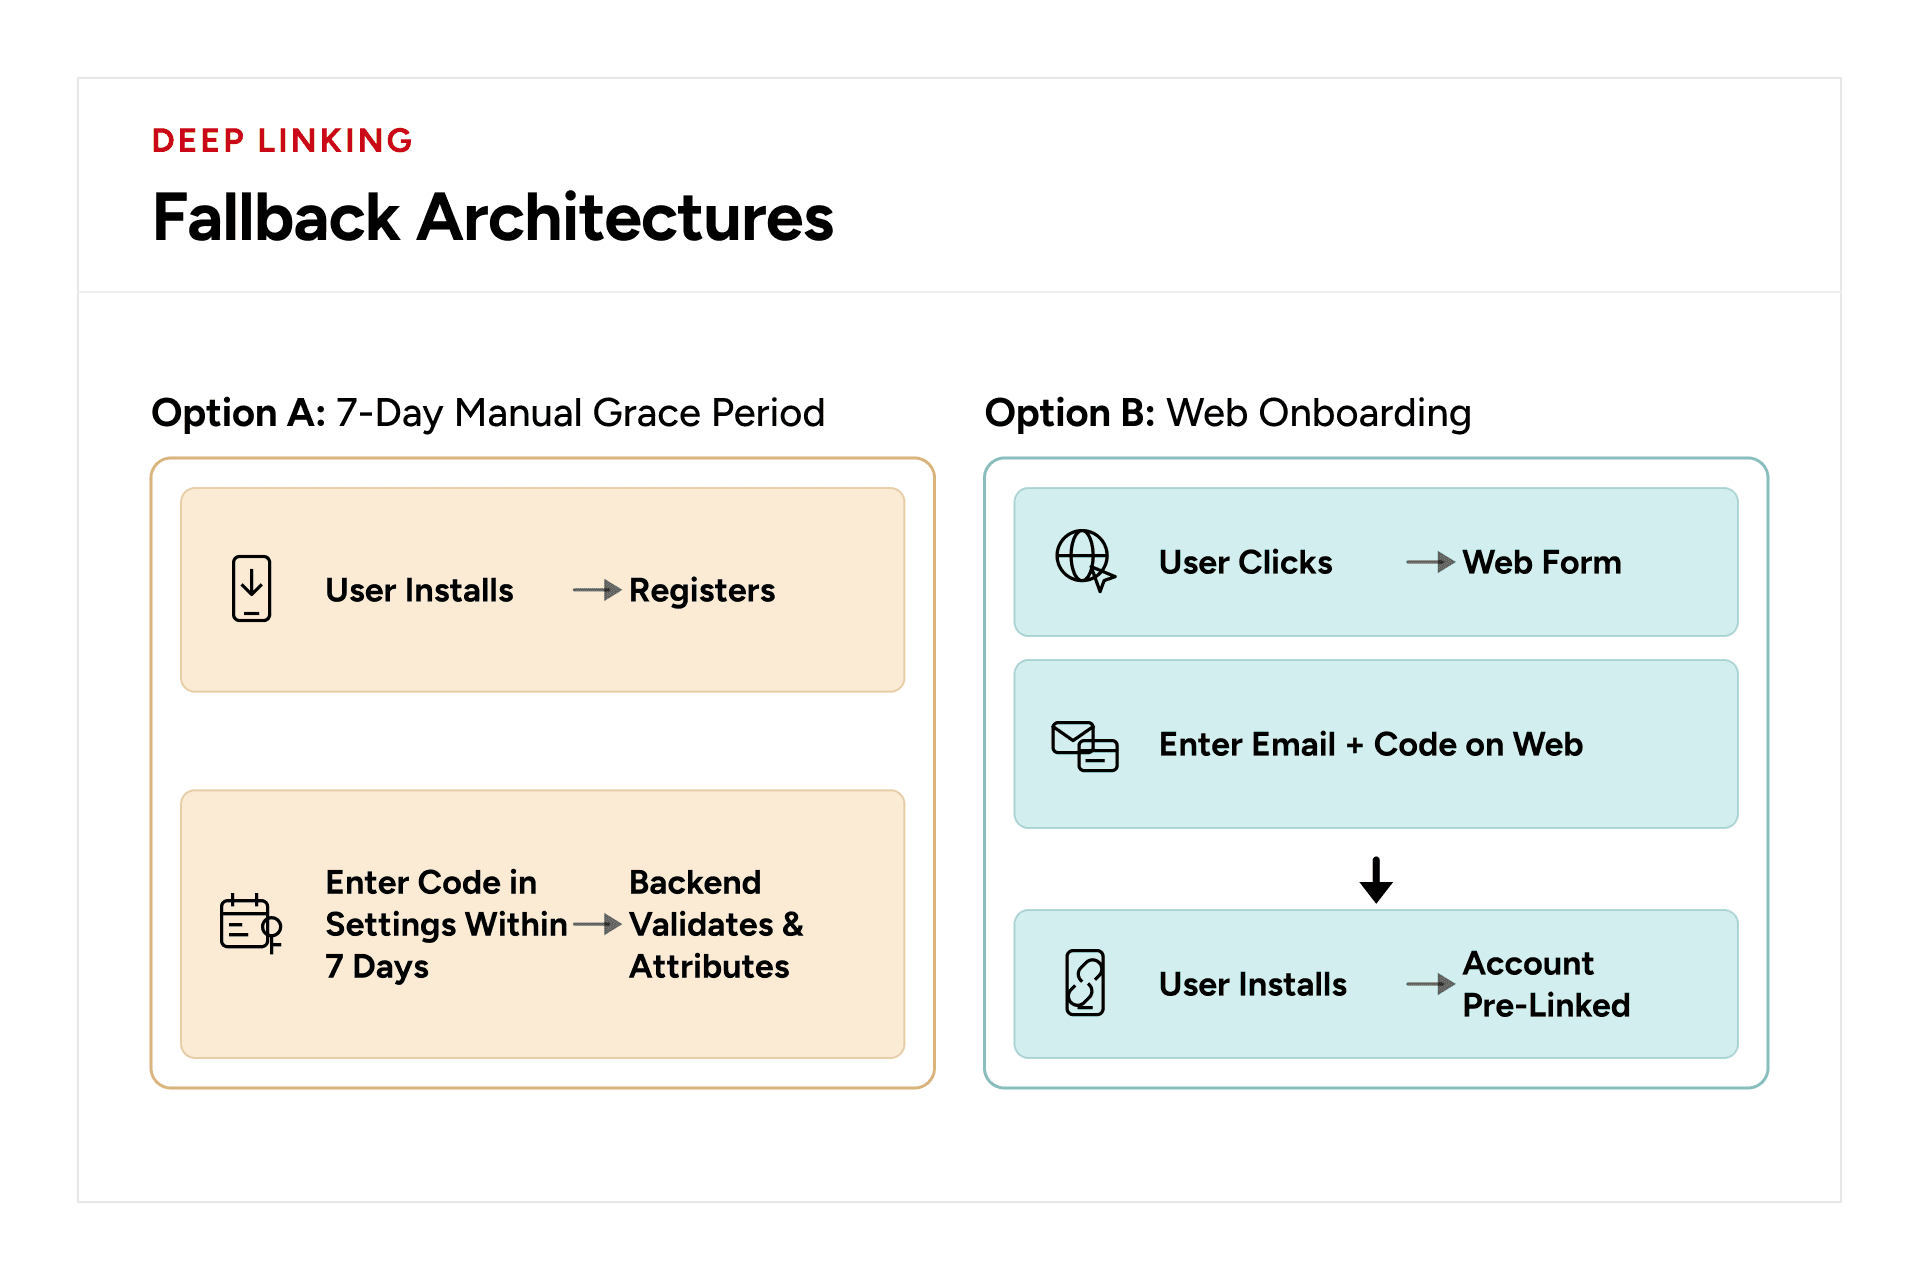
Option A: 7-Day In-App Grace Period
Allow newly registered users to manually claim or enter a referral code within 7 days of account creation.
Claims Service (referral-claim.service.ts)
import { Injectable, BadRequestException, ConflictException } from '@nestjs/common';
import { PrismaService } from '../prisma/prisma.service';

@Injectable()
export class ReferralClaimService {
  constructor(private readonly prisma: PrismaService) {}

  async claimReferral(userId: string, code: string) {
    const user = await this.prisma.user.findUnique({ where: { id: userId } });
    if (!user) throw new BadRequestException('User not found.');

    // 1. Enforce 7-Day Expiration Policy
    const gracePeriodMs = 7 * 24 * 60 * 60 * 1000;
    const isEligible = Date.now() - new Date(user.createdAt).getTime() <= gracePeriodMs;

    if (!isEligible) {
      throw new BadRequestException('The 7-day grace period for applying a referral code has expired.');
    }

    // 2. Validate Referral Code Existence & Ownership
    const referralCodeOwner = await this.prisma.referralCode.findUnique({ where: { code } });
    if (!referralCodeOwner) {
      throw new BadRequestException('Invalid referral code.');
    }

    if (referralCodeOwner.ownerId === userId) {
      throw new BadRequestException('Users cannot claim their own referral code.');
    }

    // 3. Atomically Record Claim
    return this.prisma.$transaction(async (tx) => {
      const existingClaim = await tx.referralClaim.findUnique({ where: { userId } });
      if (existingClaim) {
        throw new ConflictException('A referral code has already been applied to this account.');
      }

      const claim = await tx.referralClaim.create({
        data: {
          userId,
          referralCode: code,
          referrerId: referralCodeOwner.ownerId,
        },
      });

      // Credit rewards to both parties...
      return claim;
    });
  }
}
Common Pitfalls
Symptom | Primary Cause | Solution |
App opens in browser instead of app | Fingerprint mismatch or missing domain configuration. | Check assetlinks.json SHA-256 fingerprint. On iOS, verify applinks: is present in Xcode Capabilities. |
CloudFront returns 403 Forbidden | S3 Bucket Policy is blocking CloudFront OAC. | Update S3 bucket policy with proper AWS:SourceArn matching CloudFront distribution ARN. |
/join request hits wrong origin | Priority order misconfiguration in CloudFront Cache Behaviors. | Ensure /.well-known/* behavior is listed above Default (*) behavior in CloudFront console. |
Universal Link fails on iOS Simulator | Scheme/domain not registered in Simulator environment or bad test invocation. | Test Universal Links on iOS Simulator via CLI using xcrun simctl openurl booted "[https://invite.app.com/join?code=ABC123](https://invite.app.com/join?code=ABC123)". Ensure Associated Domains capability is added to the Xcode scheme. |
Production Test Matrix
The Play Store only records the referrer when the install starts from the redirected link. Test the Android path with the full /join redirect instead of opening the store listing directly.
Platform | App Status | Test Trigger URL | Expected Behavior | Verification Step |
Android | Installed | [https://invite.app.com/join?code=TEST1](https://invite.app.com/join?code=TEST1) | Intercepted by OS; opens app directly to onboarding screen. | App opens without browser redirect; code=TEST1 present in app state. |
Android | Not Installed | [https://invite.app.com/join?code=TEST1](https://invite.app.com/join?code=TEST1) | CloudFront routes to NestJS; 302 redirects to Play Store with &referrer=.... | Inspect Network tab; confirm Play Store URL contains referrer query parameter. |
iOS | Installed | [https://invite.app.com/join?code=TEST1](https://invite.app.com/join?code=TEST1) | Intercepted by iOS Universal Links; opens app directly. | App opens directly from Safari/Notes/Messages without opening a web page. |
iOS | Not Installed | [https://invite.app.com/join?code=TEST1](https://invite.app.com/join?code=TEST1) | CloudFront routes to NestJS; 302 redirects to Apple App Store. | User is redirected to App Store; code applied post-install via 7-day grace period fallback. |
Self-Hosted vs Third-Party SDK
The table below compares this self-hosted setup with a third-party SDK. Use it to decide whether the setup covers your attribution needs.
Capability | Custom AWS Architecture | Third-Party SDK (Branch / AppsFlyer) |
Direct Deep Linking (App Installed) | Native | Native |
Zero Vendor Subscription Cost | Yes | High SaaS Tiers |
Data Privacy & GDPR Compliance | 100% Data Ownership | Third-party Tracking |
Zero External SDK Overhead | Native Modules Only | Large SDK Footprint |
Automatic Install Fingerprinting | Requires Web Fallback / Grace Period | Probabilistic / Deterministic Engine |
The self-hosted setup suits teams that need branded links, referral onboarding and full control of user data. A third-party SDK is the better fit when marketing needs automatic install attribution on iOS across paid ad networks.
Need Help Building This?
Setting up deep linking infrastructure from scratch takes real engineering time: AWS configuration, platform-specific verification files, backend routing logic, and ongoing maintenance as app store requirements shift.
If your team needs hands-on support, GeekyAnts' Mobile Engineering services cover React Native architecture, backend integration, and infrastructure setup like the one in this guide. Our engineers are active contributors to the React Native ecosystem and have shipped 300+ React Native apps for global enterprises.
Conclusion
This setup gives you deep links that run on your own domain and your own AWS account. Android and iOS verify the domain through two static files on S3, CloudFront splits those files from the dynamic /join route, and NestJS sends each visitor without the app to the correct store. The React Native app reads the code on every launch path, the Play Install Referrer carries it through Android installs, and the grace period, web fallback or invite matching recover it on iOS. With the checklist complete and the test matrix passing, the same infrastructure can carry product, notification and campaign links by adding their paths to the manifests and the app router.