Nov 20, 2020
Introduction to React Three Fiber
An Introduction to React Three Fiber and Three.js
Author


Book a call
Are you a Three.js lover or curious about creating 3D moving objects in your web Browser? If you head nodded on its own, then this article is for you.
This article focuses on the implementation of Three.js with React Three Fiber and also discusses the hooks and functions that React Three Fiber provides as well as its ecosystem.
What is Three.js ?
Three.js is a cross-browser JavaScript library and application programming interface used to create and display animated 3D computer graphics in a web browser using WebGL.
React-three-fiber is a small React renderer for Three.js (also known as R3F), which is essentially a powerful React renderer for Three.js, usable for the web and with React Native.
Why Do We Need React Three Fiber ?
With React Three Fiber, building a dynamic scene graph becomes so much easier because you can break it up into declarative, reusable components with clean, reactive semantics. This also opens up the ecosystem so that now you can apply generic packages for state, animation, gestures and so on.
This is a small reconciler config with a few additions for interaction and hooks holding it all together. It does not know or care about the Three.js internals. Three.js is constantly changing and we don't want to rely on a specific version or chase their release cycle. This library works with v.1 as well as the latest release. At the same time, we don't want to alter any rules. If something works in Three.js in a specific way, it will be the same here.
What Does React Three Fiber Have To Offer ?
1. Component based scene.
It allows us to write Three.js objects in a declarative way, so we can build-up our scene while creating reusable React components, leveraging props, states and hooks.
2. Built in helpers.
3. Hooks
It comes with a lot of hooks like useFrame by default, that allow us to attach functions into the requestAnimationFrame loop (or even override the default one) and useThree from where we can get useful objects like renderer, scene, camera etc.
4. Ecosystem.
It also provides a great ecosystem like react-spring for integrating animations, zustand as a state management library, drei as useful helpers etc.
5. Dependency-free.
Since it’s just a renderer, it doesn’t rely on Three.js versions. So, you are free to choose your preferred version and it will work.
6. Re-render only when needed.
It works as any React component would. It updates itself on a dependency change every time (state, store, etc).
Some Basic Terms:
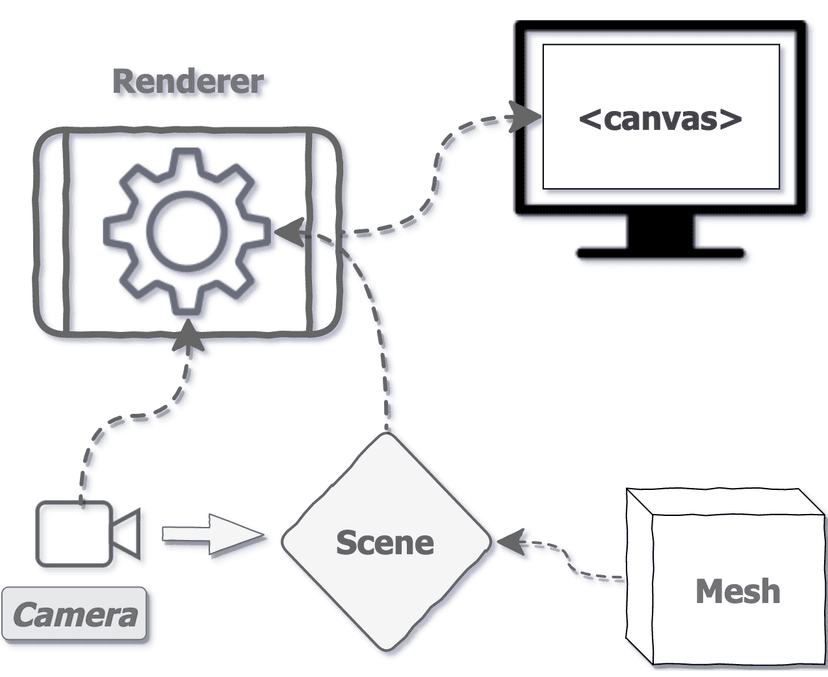
- Canvas: The canvas object is used to draw graphics on your scene. It is similar to a real canvas which is used to draw paintings on. It only renders Three.js elements and not DOM elements.
- Scene: It's just like in a movie with actors, actresses and environments on a single screen, but not bounded by time frames, it holds all 3D objects on the screen.
- Camera: A viewer that allows you to look at all surroundings and objects in the scene.
- Object3d: Most of the things like the camera, scenes, mesh, lights etc. are derived from this base class in Three.js. This class provides a set of properties and methods for manipulating objects in the 3D space.
5. The Three.js coordinate System (as below):
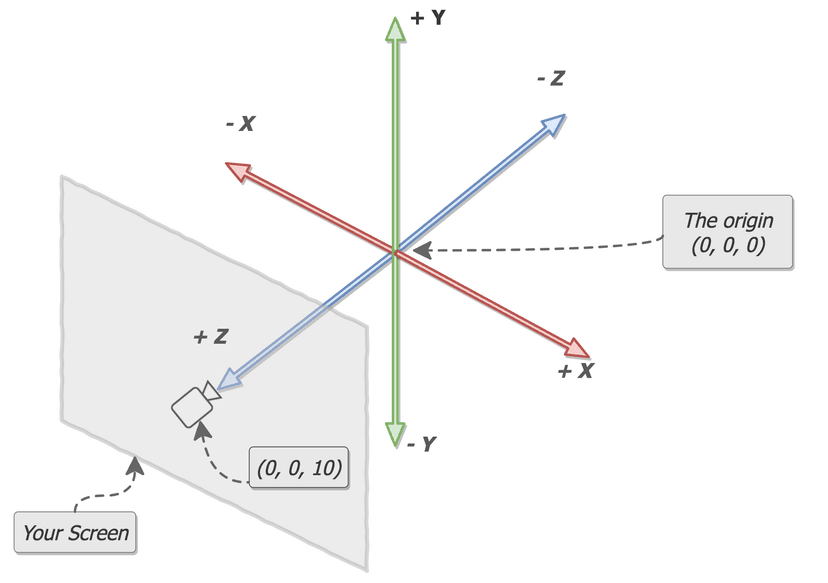
In Three.js, the x-axis represents left and right direction, the y-axis represents up and down direction and the z-axis represents the forward and backward perspective.
Enough talk, let's jump on to an example to understand the above concepts.
In this example, we will be making 3D Cubes that rotate automatically.
You can start by installing the React Three Fiber library in your React project.
Step 1 (Creating the Canvas):
First of all, we will start by making the Canvas tags. This will give us the white board and we can fill it with objects etc. Remember to give it height and width equivalent to the screen or according to your requirements.
Step 2 (Making Box Component):
Now we will make a simple Box component which will be our 3D cube object in the scene. Like Three.js, we do not need to define our scene explicitly here, as the canvas sets it up as the default component for us.
Step 3 (Adding mesh):
Now, we will make the mesh component. Too many terms, right? Don't worry. It's pretty straight forward.
Mesh: Mesh is just a holder for Geometry and Material and defines the position of an object in the 3D space. We can add this to our Scene.
Geometry: This defines the shape of the object.
Material: This defines the appearance of the surface of the mesh .
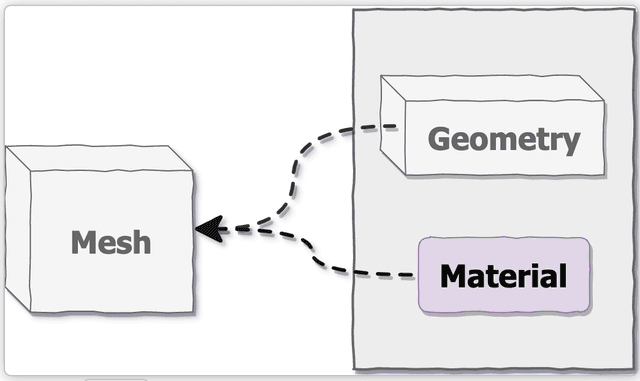
The above is the simplest definition of what a mesh is. If you are making the most of the objects on your own in the project, then knowing about Geometry and Material would be helpful to unleash your creativity and make your scene even more beautiful.
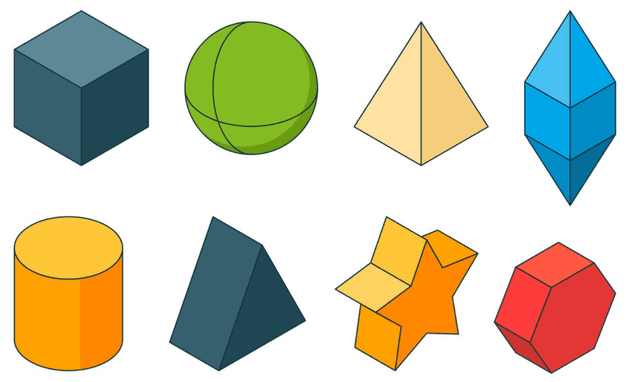
Geometry
In Three.js, there are two main core geometry classes: Geometry and BufferGeometry.
Geometries store attributes (vertex positions, faces, colors, etc.) using objects like Vector3 or Color that are easier to read and edit but less efficient than typed arrays and have methods like rotateX(Y,Z), copy, clone, center, normalize etc.
All other geometries like CircleGeometry, ConeGeometry, CylinderGeometry, PlaneGeometry, TetraHedron Geometry etc. would be derived from the above two classes.
You can refer to the Three.js docs for more info on this.
Step 4 (Adding Geometries):
In the mesh added before, we will add BoxBuffergeometry to simply make a 3D cube. Now, we are just left with the material type.
You can refer this site to learn more about materials.
We are adding the StandardMaterial mesh, which has properties like roughness and metalness which, in simple terms, can be used to give your material a metallic finish.
One thing to note here is that we are adding attach property to both geometry and material which adds itself as a property to the parent component, which is mesh.
Step 5 (Light It Up):
Now we have rendered our box but are not able to see its colour. Reason being that the scene is regarded as an environment in which things are not visible if there is no light and everything will be dark. That's why we have given white colour to our body of canvas and now we will be adding lighting to the code.
There are various types of lights in Three.js, namely Ambient light, Hemisphere Light, Directional Light, Point Light, Spot Light, RectArea Light etc. that can be used in R3F too.
Here, we will be using ambient light. This light globally illuminates all objects in the scene equally.
This light cannot be used to cast shadows as it does not have a direction.
You may have observed that now the colors of objects are showing up but the surfaces are not illuminating enough.
To make that happen, I am also adding a spotlight here. This light gets emitted from a single point in one direction, along a cone that increases in size, the further it gets from the light.
You can go through this spotlight example here and play with light color, intensity, distance coverage, angle, focus etc.
So cool.
We have a lot of things to experiment on with a simple spot light.
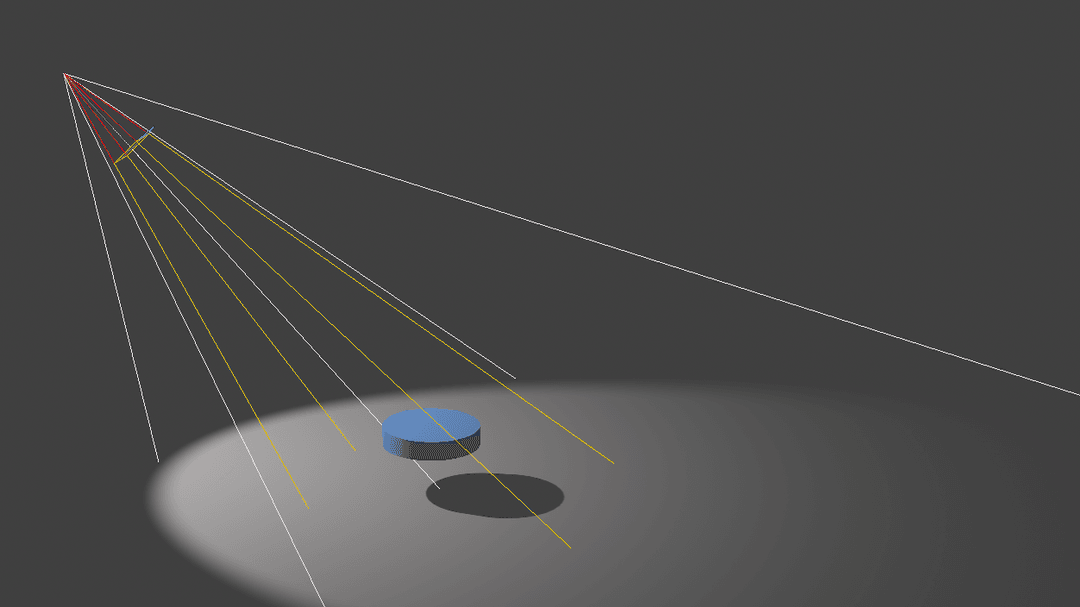
Spotlights are effectively a point light with a cone attached, where the light only shines inside the cone. There's actually 2 cones: an outer cone and an inner cone. Between the inner cone and the outer cone, the light fades from full intensity to zero.
You can also play with light helper components that help you see light sources and targets.
Putting a light source between Canvas by default adds light to the scene as a scene is setup by default in Canvas in R3F.
Now it looks good.
Step 6 (Rotating along axis):
The fun thing about R3F is that you can also pass ref to it and manipulate the 3d object.
Here, I will be using useFrame hook from R3F. This hook calls you back every frame, which is good for running effects, updating controls, etc.
In this hook, I will be adding a small delta value to the y component of rotation of mesh which will lead to auto rotation around its y axis in each frame.
Now that looks cool.
Pretty simple.
Step 7 (Messing around):
The mesh objects are not only limited to adding rotation. You can also scale them, move them, add click or hovering events (there's no need to add Raycasting like three.js. R3F provides it for free).
So, let's hover and scale them.
First, create a local state hover with useState hook. Now, simply add onPointerOver, onPointerOut events and toggle the hover state. In the mesh standard material, change color according to the hover state. It's easy and just two lines of code.
Similarly, create a local state active with useState hook, add onClick event and change the scale property of mesh according to the active state.
Step 8 (Taking control over your camera):
We are dealing with 3D Objects but it's not very convincing, considering that there is no camera control.
So, let us becoming the cameraman of our 3D world and control the camera in our scene.
There are basically two types of camera settings, Orthographic and perspective, and both cameras have a few basic properties like far and near, which are the clipping planes for the scene.
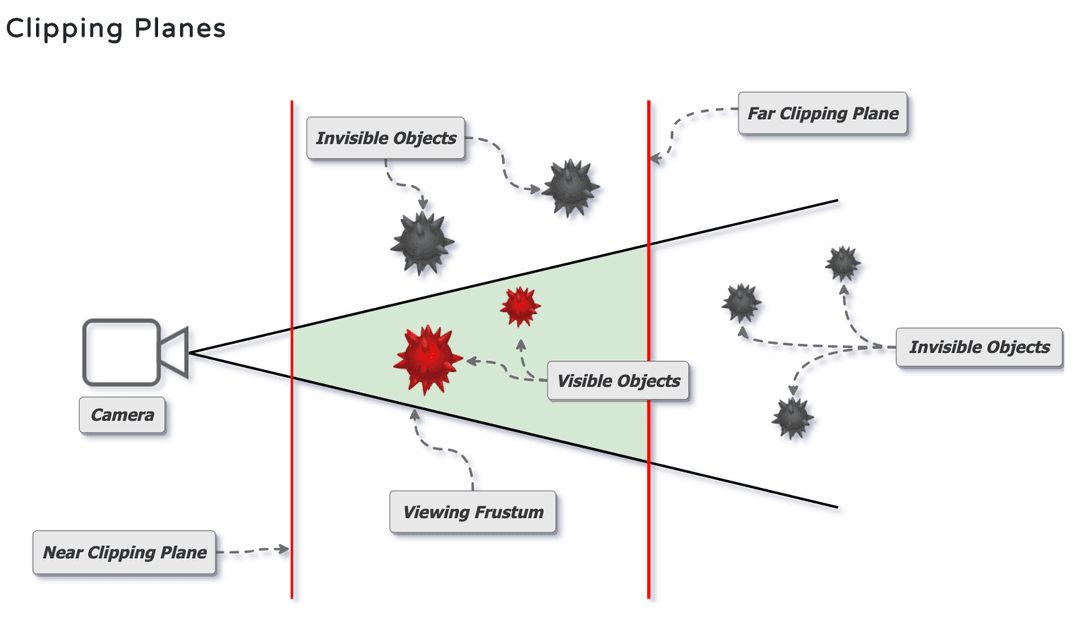
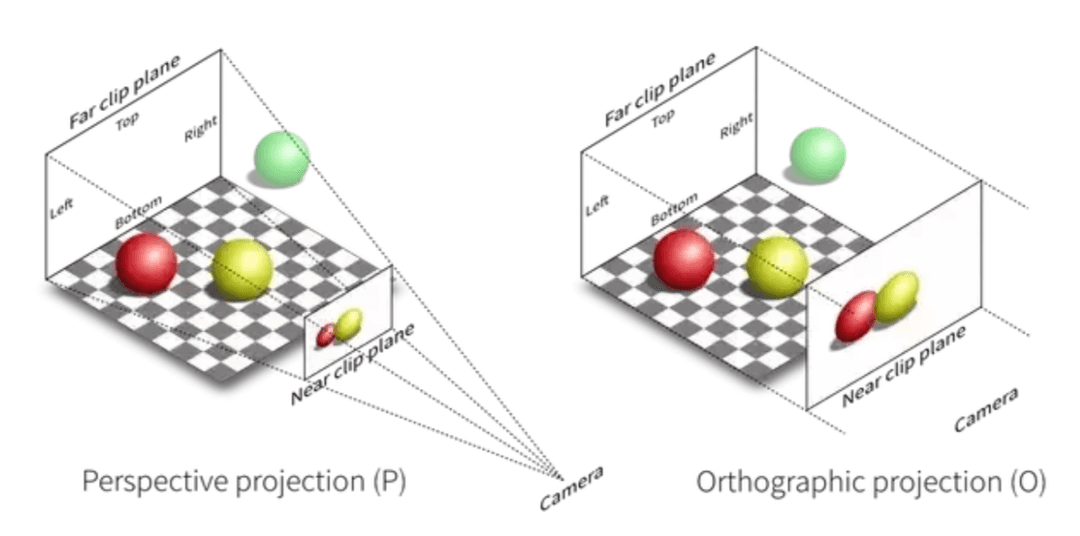
The only difference between these camera planes is their viewing plane.Orthographic projection uses orthogonal projection (parallel projection) which is a representation of 3D objects in 2D dimension.Perspective projection is a linear projection where three dimensional objects are projected on a picture plane. It makes use of a frustum plane ,which is why distant objects appear smaller than nearer objects, The picture below explains it better.
As you can see, in perspective, the red ball is behind the yellow ball and appears smaller, where as in Orthographic, the red ball being behind still appears to be the same size.
In R3F, our canvas by default, sets up the perspective camera. You can switch to orthographic too.
Now that we know our cameras, we can also move our camera with help of controls like orbital controls, fly controls, PointerLock Controls, FirstPerson Controls etc.
Here, I will be using the Orbital controls from drei library, which basically makes the camera orbit around a target. You do not need to add any extra lines of code to setup controls as drei also provides many helper components.
Step 9 (Using Drei to add Sky):
You can also add a background instead of static colours, which gives you a nice and immersive BG . You can learn more about skybox.Drei provides a Sky component that you can use to add Sky as a background in your application, but it is not very configurable.
Step 10 (Using Drei to add Stars):
With Drei, you can also add stars as in the space. For that, you would need to change the background colour. You can also customise the radius, depth, count, factor, saturation and fade value of the 'stars' too.
Final Words
Phew! You made it to the end.
This was just a basic example to help you understand Three.js and how React Three Fiber works with Three.js.
You can experiment a lot with the React Three Fiber and create even better virtual scenes.
Useful Resources:
1. React Three Fiber official https://github.com/pmndrs/react-three-fiber.
2. Three.js docs https://threejs.org/docs.
3. Three.js examples https://threejs.org/examples/.
4. Discover Threejs https://discoverthreejs.com/.
5. A great website for Three.js fundamentals https://threejsfundamentals.org/.
Thank you so much for reading.
Subscribe to Our Newsletter
Subscribe to RSS
Press & Media Hub RSS FeedRelated Articles.
More from the engineering frontline.
Dive deep into our research and insights on design, development, and the impact of various trends to businesses.

Jul 10, 2026
How We Built the Missing Bridge from Code to Figma

Jun 27, 2026
Building a Resilient Hybrid-Cloud Network with WireGuard HA, Route-Based Failover, and Deep Observability

Jun 19, 2026
We Built a 114-Second AWS-to-Azure Failover. Here’s What We Learned

Jun 12, 2026
Cloud-Native and Cloud-Agnostic Are Not Ideologies; They Are Business-Stage Decisions

Jun 8, 2026
Geeklego: The Open-Source Design System Built to Work With AI

May 18, 2026