
Editor’s Note: This article was originally written by Rishav Kumar and published in July, 2024. It was revised and updated by Shivangi Agarwal in July, 2026 to include current technologies, implementation practices, industry requirements, and examples.
Key Takeaways
- Laravel supports secure PayPal and Stripe integration for one-time payments, subscriptions, and global checkout flows.
- PayPal offers strong brand recognition and account-based payments, while Stripe provides greater checkout customization and broader developer control.
- API keys should stay in Laravel’s .env file, with separate sandbox and production credentials, restricted permissions, and regular secret rotation.
- Successful payments should be verified through PayPal or Stripe APIs and signed webhooks before an order is marked as paid.
Ever wondered how to effortlessly handle payments on your web application? Or perhaps you're torn between choosing PayPal or Stripe for your business? If these questions resonate with you, you're in the right place.
Note: If you want to learn more about how to integrate a payment gateway in Food Delivery Apps, read our blog: [Integrating Payment Gateway in Food Delivery Apps: A Step-by-Step Guide].
This guide will show you how to integrate two leading payment gateways—PayPal and Stripe—into a Laravel application. You'll learn about their features, ease of use, and key differences to help you make an informed decision. By the end, you'll have a solid payment system capable of managing transactions worldwide.
Why is a seamless payment experience so critical? Imagine losing customers at the final step due to a cumbersome payment process. A smooth and secure transaction flow can significantly enhance user satisfaction and boost your business.
To start, let's explore the key aspects that distinguish PayPal from Stripe and how they can impact your application.
PayPal
Adding PayPal to your Laravel application allows you to accept global payments effortlessly. As a trusted and widely used payment gateway, PayPal supports various methods like credit cards and PayPal balances. Its robust API helps you manage transactions, subscriptions, and customer billing efficiently, ensuring a secure and seamless payment experience for your users.
Stripe
Integrating Stripe into your Laravel application provides a versatile and secure payment solution. Stripe's powerful API supports multiple payment methods and currencies, making it ideal for e-commerce platforms. With Stripe, you can handle one-time payments, manage subscriptions, and process customer billing, enhancing your app's functionality and reliability.
Key Differences Between PayPal and Stripe
Understanding the differences between PayPal and Stripe can help you choose the right payment gateway for your needs. Here are some key distinctions:
Aspect | PayPal | Stripe |
Setup and Configuration | Slightly more complex setup with multiple routes and transaction states (e.g., creating, processing, success, cancellation). | Straightforward setup with fewer configurations. Checkout session creation and redirection simplify integration. |
Payment Methods | Known for PayPal balance and credit card payments. Also supports Venmo, PayPal Credit, and local payment methods in different regions. | Offers a wide range of payment methods, including credit and debit cards, Apple Pay, Google Pay, ACH transfers, and many local payment methods worldwide. |
Fees and Pricing | Typically higher transaction fees, especially for international transactions. | Generally more competitive pricing with transparent fee structures. |
User Experience | Redirects users to a PayPal page, which can sometimes disrupt the checkout flow. | Keeps users on your site for most transactions, providing a more seamless and integrated user experience. |
Integrating PayPal Payment in Laravel
1. Ensure you have a suitable Development environment.
You will need
- Programming knowledge (Basic knowledge of Laravel is a must).
- An IDE or text editor.
2. Set up the Necessary keys needed for Payment
PAYPAL_MODE=sandbox
PAYPAL_SANDBOX_CLIENT_ID=AV6hjh-Tr3Ken8CloTXEKf_W26Im-weFz7i1buSI_ipgRUyl8SjyKjBeCOc519dReJtUjOzSSRd6oxC8
PAYPAL_SANDBOX_CLIENT_SECRET=EEunSmoYh6ADPo0px9sSvTErShvvFoKB4cLABGC_A1YxNIc_wrv60oiUD9_lZApsiZgXZAoAZXwE0P2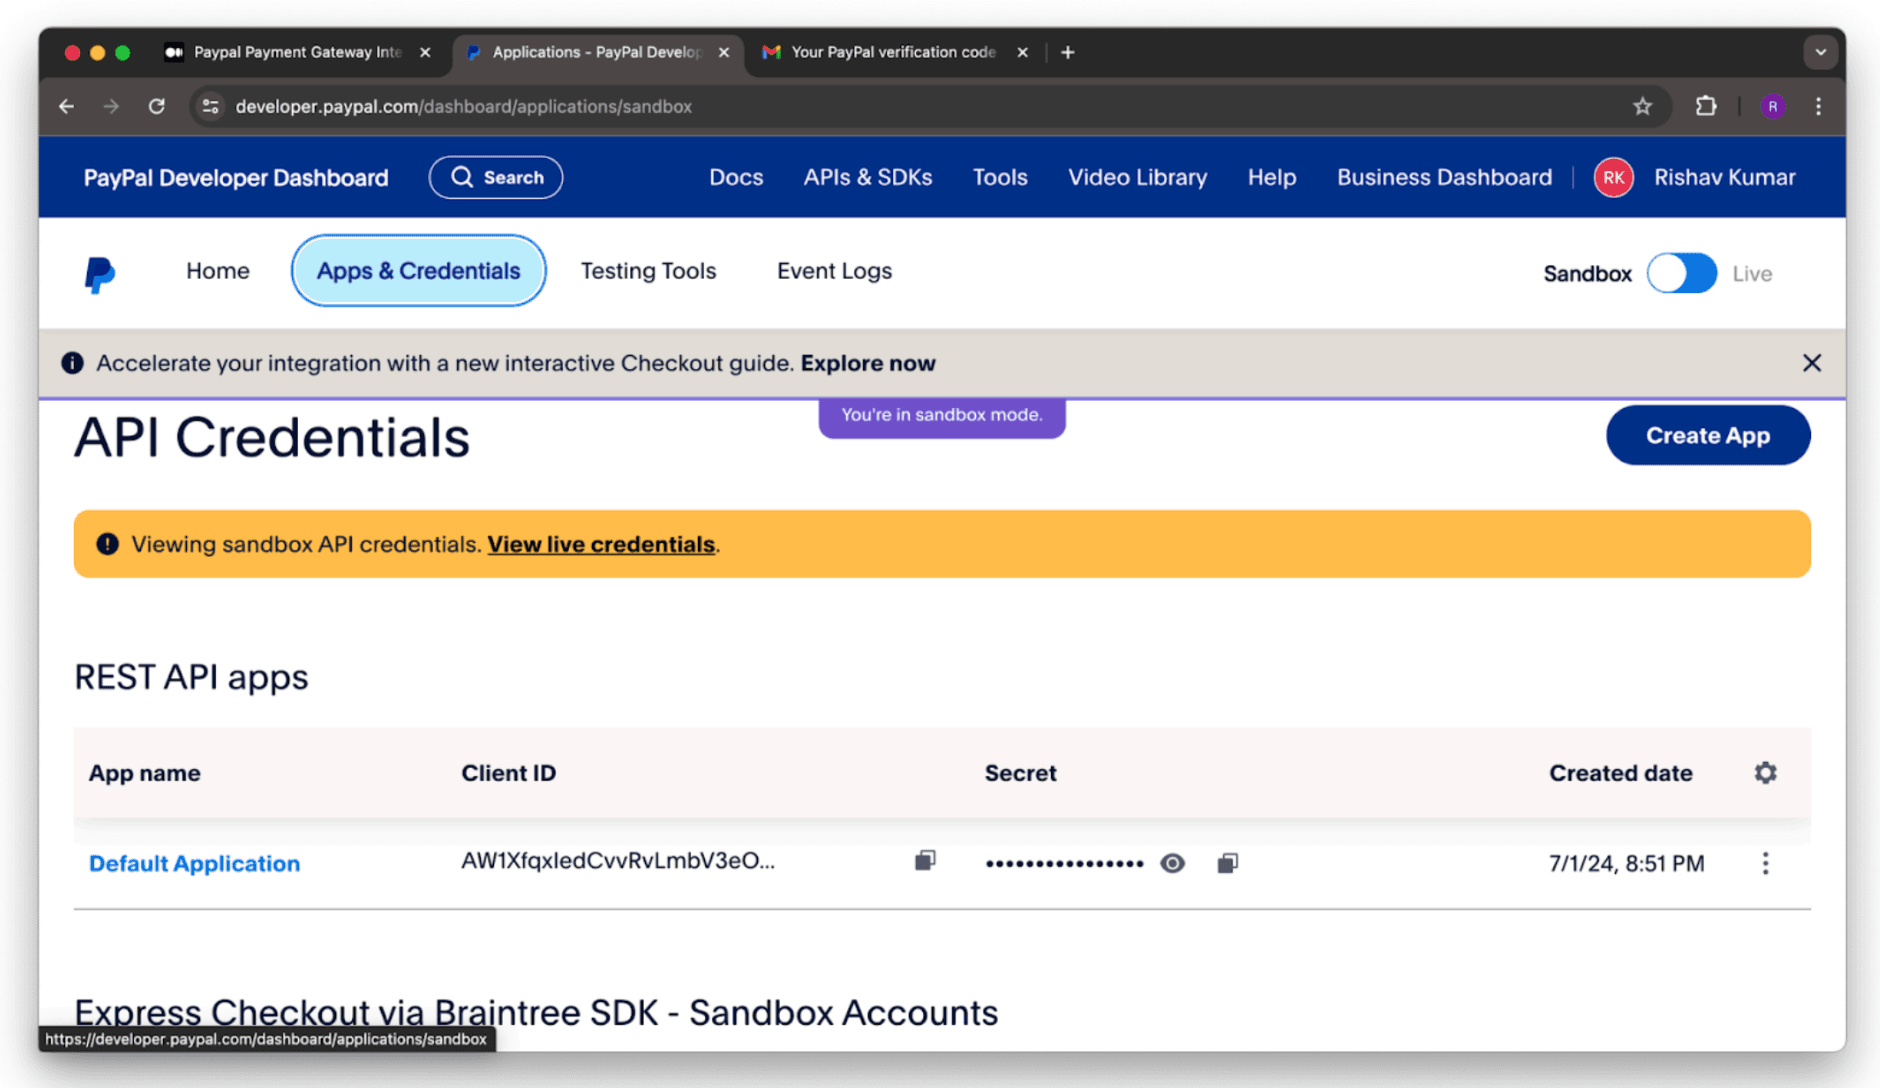
3. Install Necessary Packages
composer require srmklive/paypal:~3.04. Configure your Package (Optional)
If you want to customize the package’s default configuration options, run the vendor:publish command below.
php artisan vendor:publish --provider
"Srmklive\PayPal\Providers\PayPalServiceProvider"
This will create a configuration file config/paypal.php with the details below, which you can modify.
5. Create your Necessary Route that is Required
We need to create a route to test the application's transaction functionality. To do this, open the routes/web.php file in your Laravel application and add the following new route
Route::get('/create-transaction', [PayPalController::class, 'createTransaction'])->name('createTransaction');
Route::get('/process-transaction/{slug}', [PayPalController::class, 'processTransaction'])->name('processTransaction');
Route::get('/success-transaction', [PayPalController::class, 'successTransaction'])->name('successTransaction');
Route::get('/cancel-transaction', [PayPalController::class, 'cancelTransaction'])->name('cancelTransaction');
6. Create the PayPal Controller
We already have a controller in the directory app/Http/Controllers/ PayPalController.php. Open it and add the code below.
<?php
namespace App\Http\Controllers;
use Illuminate\Http\Request;
use Srmklive\PayPal\Services\PayPal as PayPalClient;
class PayPalController extends Controller
{
    /**
     * create transaction.
     *
     * @return \Illuminate\Http\Response
     */
    public function createTransaction()
    {
        return view('transaction');
    }
    /**
     * process transaction.
     *
     * @return \Illuminate\Http\Response
     */
    public function processTransaction(Request $request)
    {
        $provider = new PayPalClient;
        $provider->setApiCredentials(config('paypal'));
        $paypalToken = $provider->getAccessToken();
        $response = $provider->createOrder([
            "intent" => "CAPTURE",
            "application_context" => [
                "return_url" => route('successTransaction'),
                "cancel_url" => route('cancelTransaction'),
            ],
            "purchase_units" => [
                0 => [
                    "amount" => [
                        "currency_code" => "USD",
                        "value" => "1000.00"
                    ]
                ]
            ]
        ]);
        if (isset($response['id']) && $response['id'] != null) {
            // redirect to approve href
            foreach ($response['links'] as $links) {
                if ($links['rel'] == 'approve') {
                    return redirect()->away($links['href']);
                }
            }
            return redirect()
                ->route('createTransaction')
                ->with('error', 'Something went wrong.');
        } else {
            return redirect()
                ->route('createTransaction')
                ->with('error', $response['message'] ?? 'Something went wrong.');
        }
    }
    /**
     * success transaction.
     *
     * @return \Illuminate\Http\Response
     */
    public function successTransaction(Request $request)
    {
        $provider = new PayPalClient;
        $provider->setApiCredentials(config('paypal'));
        $provider->getAccessToken();
        $response = $provider->capturePaymentOrder($request['token']);
        if (isset($response['status']) && $response['status'] == 'COMPLETED') {
            return redirect()
                ->route('createTransaction')
                ->with('success', 'Transaction complete.');
        } else {
            return redirect()
                ->route('createTransaction')
                ->with('error', $response['message'] ?? 'Something went wrong.');
        }
    }
    /**
     * cancel transaction.
     *
     * @return \Illuminate\Http\Response
     */
    public function cancelTransaction(Request $request)
    {
        return redirect()
            ->route('createTransaction')
            ->with('error', $response['message'] ?? 'You have canceled the transaction.');
    }
}
7: Create a View
We are going to create a view that will direct to process the transaction. Create blade view resources/views/transaction.blade.php file and add below code to it.
<!DOCTYPE html>
<html lang="en">
<head>
    <meta charset="UTF-8">
    <meta name="viewport" content="width=device-width, initial-scale=1.0">
    <meta http-equiv="X-UA-Compatible" content="ie=edge">
</head>
<body>
    <h2>Product: Laptop</h2>
    <h3>Price: $5</h3>
    <form action="{{ route('processTransaction') }}" method="post">
        @csrf
        <input type="hidden" name="price" value="5">
        <input type="hidden" name="product_name" value="Laptop">
        <input type="hidden" name="quantity" value="1">
        <button type="submit">Pay with Paypal</button>
    </form>
</body>
</html>
See It In Action: PayPal
Integrating Stripe Payment in Laravel
1: Setup your Development Environment
Programming knowledge (Python is commonly used for interacting with the ChatGPT API).
- An IDE or text editor.
- Access to the ChatGPT API, which requires an OpenAI API key.
Setup the necessary keys needed for payment:
STRIPE_TEST_PK=pk_test_51OFZ3zI3hY1Jc4DzUtimeKqiANmmSvju1Rtkz2* STRIPE_TEST_SK=sk_test_51OFZ3zI3hY1Jc4Dzx4VMcmJkeEVqrXuL1S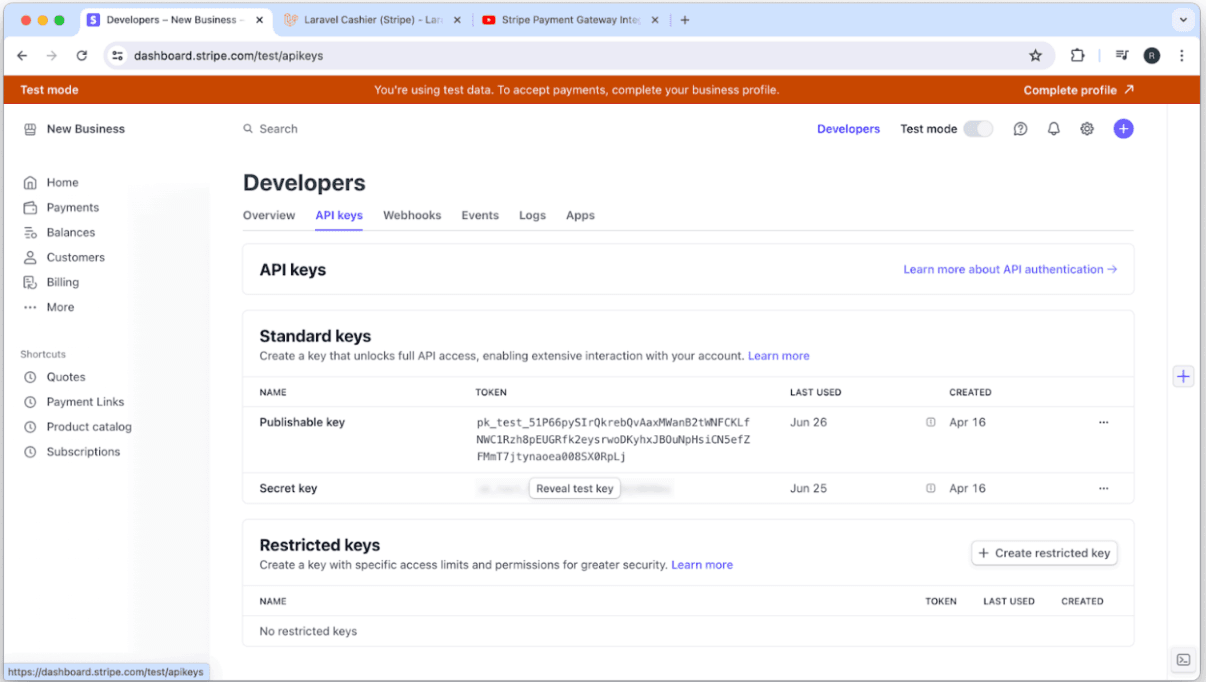
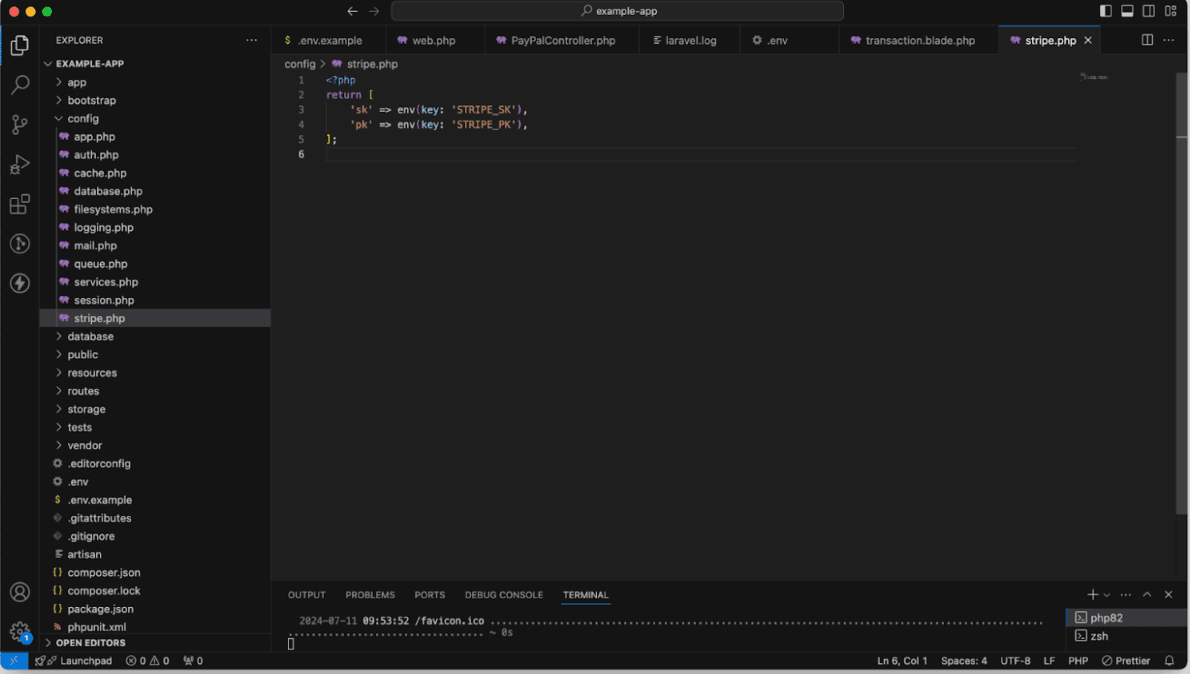
2. In the config folder, create a file: "stripe.php". Write the following codes there:
<?php
return [
    'stripe_pk' => env('STRIPE_TEST_PK'),
    'stripe_sk' => env('STRIPE_TEST_SK'),
];
3. Install necessary Libraries and Packages
composer require stripe/stripe-php4. Create your necessary Route that are required
Route::post('/stripe-purchase', [StripeController::class, 'checkout'])->name('purchase');
Route::get('/payment-success', [StripeController::class, 'success'])->name('payment-success');
Route::get('/payment-cancel', [StripeController::class, 'index'])->name('payment-cancel');
4.1:
class Payment extends Model
{
    use HasFactory;
    /**
     * The attributes that are mass assignable.
     *
     * @var array<int, string>
     */
    protected $fillable = [
        'payment_id',
        'product_name',
        'quantity',
        'amount',
        'currency',
        'customer_name',
        'customer_email',
        'payment_status',
        'payment_methods',
    ];
}
Create a Payment Migration:
public function up(): void
    {
        Schema::create('payments', function (Blueprint $table) {
            $table->id();
            $table->string('payment_id');
            $table->string('product_name');
            $table->string('quantity');
            $table->string('amount');
            $table->string('currency');
            $table->string('customer_name');
            $table->string('customer_email');
            $table->string('payment_status');
            $table->string('payment_methods');
            $table->timestamps();
        });
    }
    /**
     * Reverse the migrations.
     */
    public function down(): void
    {
        Schema::dropIfExists('payments');
    }
5. Describe your Stripe Controller
public function checkout(Request $request)
    {
        $stripe = new \Stripe\StripeClient(config('stripe.sk'));
        $response = $stripe->checkout->sessions->create([
            'line_items' => [
                [
                    'price_data' => [
                        'currency' => 'usd',
                        'product_data' => ['name' => 'T-shirt'],
                        'unit_amount' => $request->price * 100,
                    ],
                    'quantity' => 1,
                ],
            ],
            'mode' => 'payment',
            'success_url' => route('payment-success') . '?session_id={CHECKOUT_SESSION_ID}',
            'cancel_url' => route('payment-cancel'),
        ]);
        if (isset($response->id) && $response->id != '') {
            session()->put('product_name', "dslkjnsdkbfdskjb");
            session()->put('quantity', '1');
            session()->put('price', '2000');
            return redirect($response->url);
        } else {
            return redirect()->route('cancel');
        }
    }
    public function success(Request $request)
    {
        if (isset($request->session_id)) {
            $stripe = new \Stripe\StripeClient(config('stripe.sk'));
            $response = $stripe->checkout->sessions->retrieve($request->session_id);
            $payment = new Payment();
            $payment->payment_id = $response->id;
            $payment->product_name = session()->get('product_name');
            $payment->quantity = session()->get('quantity');
            $payment->amount = session()->get('price');
            $payment->currency = $response->currency;
            $payment->customer_name = $response->customer_details->name;
            $payment->customer_email = $response->customer_details->email;
            $payment->payment_status = $response->status;
            $payment->payment_methods = "Stripe";
            $payment->save();
            return "Payment is Successful";
        } else {
            return redirect()->route('cancel');
        }
    }
    public function cancel()
    {
        return "Payment is Canceled";
    }
For additional information on configuring line items, please refer to the Stripe documentation.
To make line item quantities adjustable, search for this specific topic within the documentation.
See It In Action: Laravel
Conclusion
Integrating PayPal and Stripe into a Laravel application significantly enhances its payment processing capabilities. Both offer flexibility and security for handling transactions.
By following the detailed steps outlined in this guide, you can seamlessly incorporate these robust payment gateways, providing a reliable and efficient experience for your users.
Regardless of your choice, both integrations will equip your Laravel application with the necessary tools to handle global transactions efficiently and securely, ensuring your e-commerce platform remains competitive and user-friendly.
Remember: Choosing between PayPal and Stripe ultimately depends on your specific needs. Whether you prioritize PayPal's extensive global reach and trusted brand or Stripe's competitive pricing and seamless user experience — the decision lies with you.