Table of Contents
Building a HIPAA-compliant Healthcare Application
Author

Date
Book a call
Introduction
This article breaks down the talk by Arindam Ganguly (Engineering Manager, GeekyAnts) at our recent GeekSpeak session. In his talk, he decodes how we at GeekyAnts built a partially HIPAA-compliant healthcare app.
What is HIPAA compliance, and why is it important in modern healthcare applications?
We will try to answer these questions in this article. We cover what HIPAA is, why it is necessary in today's healthcare applications, and how to implement it technically.
There has been a lot of buzz about HIPAA in recent months. We developed GeekCare, an in-house telemedicine application, as a proof of concept (POC). As our business expectations from it started to develop, we turned it into a showcase application. We eventually realized the importance of making the app HIPAA-compliant and started researching and prioritizing HIPAA compliance.
Read on as we explore HIPAA compliance benefits and technical aspects in healthcare applications.
What is HIPAA?
HIPAA stands for Health Insurance Portability and Accountability Act. It is a US federal law focusing on the security and privacy of patient health information in app building. The law requires secure communication channels, defined security protocols, and measures to keep patient information confidential.
HL7, on the other hand, is a nonprofit organization that focuses on communication channels for exchanging data electronically. It ensures that data is HIPAA compliant and follows protocols for secure messaging. While HL7 primarily concentrates on messaging, it also ensures that data transferred via its protocols is HIPAA compliant. These two entities are major healthcare data security and privacy players.
A Deeper Look into HIPAA
After conducting some research, we have identified three main safeguards that allow you to control your information:
- Administrative Safeguards: These can include appointing a privacy official or ensuring that your staff is properly trained.
- Physical Safeguards: Examples of physical safeguards include setting up alarm and security systems and locking areas where important files are stored.
- Technical Safeguards: Technical HIPAA safeguards may include data encryption, antivirus software, automatic log-off, and audit controls.
Which Entities Need to Be HIPAA-Compliant?
The answer to this question is covered entities and business associates.
Covered entities are the entities that patients usually interact with, such as hospitals, doctors, or clinics that they visit. Business associates are the technology partners or associates that covered entities work with to build custom technical solutions, which are often over the internet. For example, GeekyAnts can be considered a business associate.
It is important for business associates to understand that they also fall under HIPAA compliance guidelines. If software is being developed for healthcare purposes, it is equally important to maintain compliance with these guidelines.
What is ePHI?
ePHI stands for Protected Health Information. It refers to any health information that is electronically stored. This includes any medical information recorded by hospitals, doctors, personal caretakers, or third-party service providers for a patient.
The Four HIPAA Rules
There are four major rules of HIPAA:
- HIPAA Privacy Rule: This rule applies only to covered entities, not business associates. Covered entities, such as hospitals or primary healthcare partners, have the most access to sensitive information and must define the bridges and gaps between the data sets that are shared. For example, if a business entity is working with a hospital, it is up to the hospital to decide how much data related to a particular patient they will share.
- HIPAA Security Rule: The security rule covers both business associates and covered entities. It focuses on how to handle the Protected Health Information (PHI) that they have.
- HIPAA Breach Notification Rule: The breach notification rule again applies to both business associates and covered entities. Its purpose is to identify data breaches containing any sort of PHI.
- HIPAA Omnibus Rule: This rule mandates that business associates working for any healthcare application must also be HIPAA compliant. This is because informed associates working on a healthcare application would be aware of HIPAA compliance and create a digital solution that meets HIPAA standards. An app that fails the HIPAA checklist would not be useful to a business partner.
A Scenario Without HIPAA
Think about our daily lives in today's world. When an average person falls sick, they usually visit doctors, clinics, or hospitals. As shown in the graph below, the patient's data flows from the doctor's office to the hospital. Thus, the doctor's office and the hospital may have all the information related to the patient's illness or disease. However, other specialists, such as nursing technicians or tech partners, do not necessarily need to know the details of the patient's condition or treatment.
The patient may be undergoing sensitive treatment that they do not wish to disclose to everyone. Unfortunately, the current system is not closed, and patient information is usually stored in files, either as hard copies or in third-party applications. As a result, most of the sensitive information is still vulnerable and can be accessed by anyone apart from doctors. This is where HIPAA can step in and improve the security of patient information.
How We Built GeekCare to Be HIPAA-compliant?
As mentioned earlier, we started GeekCare as an in-house POC and developed a good working product. We then explored ways to modify and improve it further. We realized that to pitch it to clients or other businesses, we had to make it HIPAA compliant. We accumulated data on HIPAA and followed these steps to make our product partially HIPAA compliant.
We made the application scope HIPAA compliant by following some crucial steps:
- HIPAA Training: Our team underwent HIPAA training to learn about different terminologies, use cases of HIPAA, data that should be protected, and data that can be kept open.
- Strong Password Hashing: We chose a strong password hashing algorithm, which is hard to traverse back.
- Role-based Authentication: We implemented role-based authentication to have authorized access throughout the application.
- Encrypting Sensitive Files: Finally, we encrypted sensitive files on the server side.
Implementation — Role-based Authentication
Let's start by looking at the implementation of role-based authentication. In the image below, two tables are marked: Appointments and Timeslots. In a typical use case, appointments should be accessible to both doctors and patients. Therefore, the Appointment table allows these users to read and write data with some custom checks in place. Both the physician and the member have permission to insert and update data in this table.
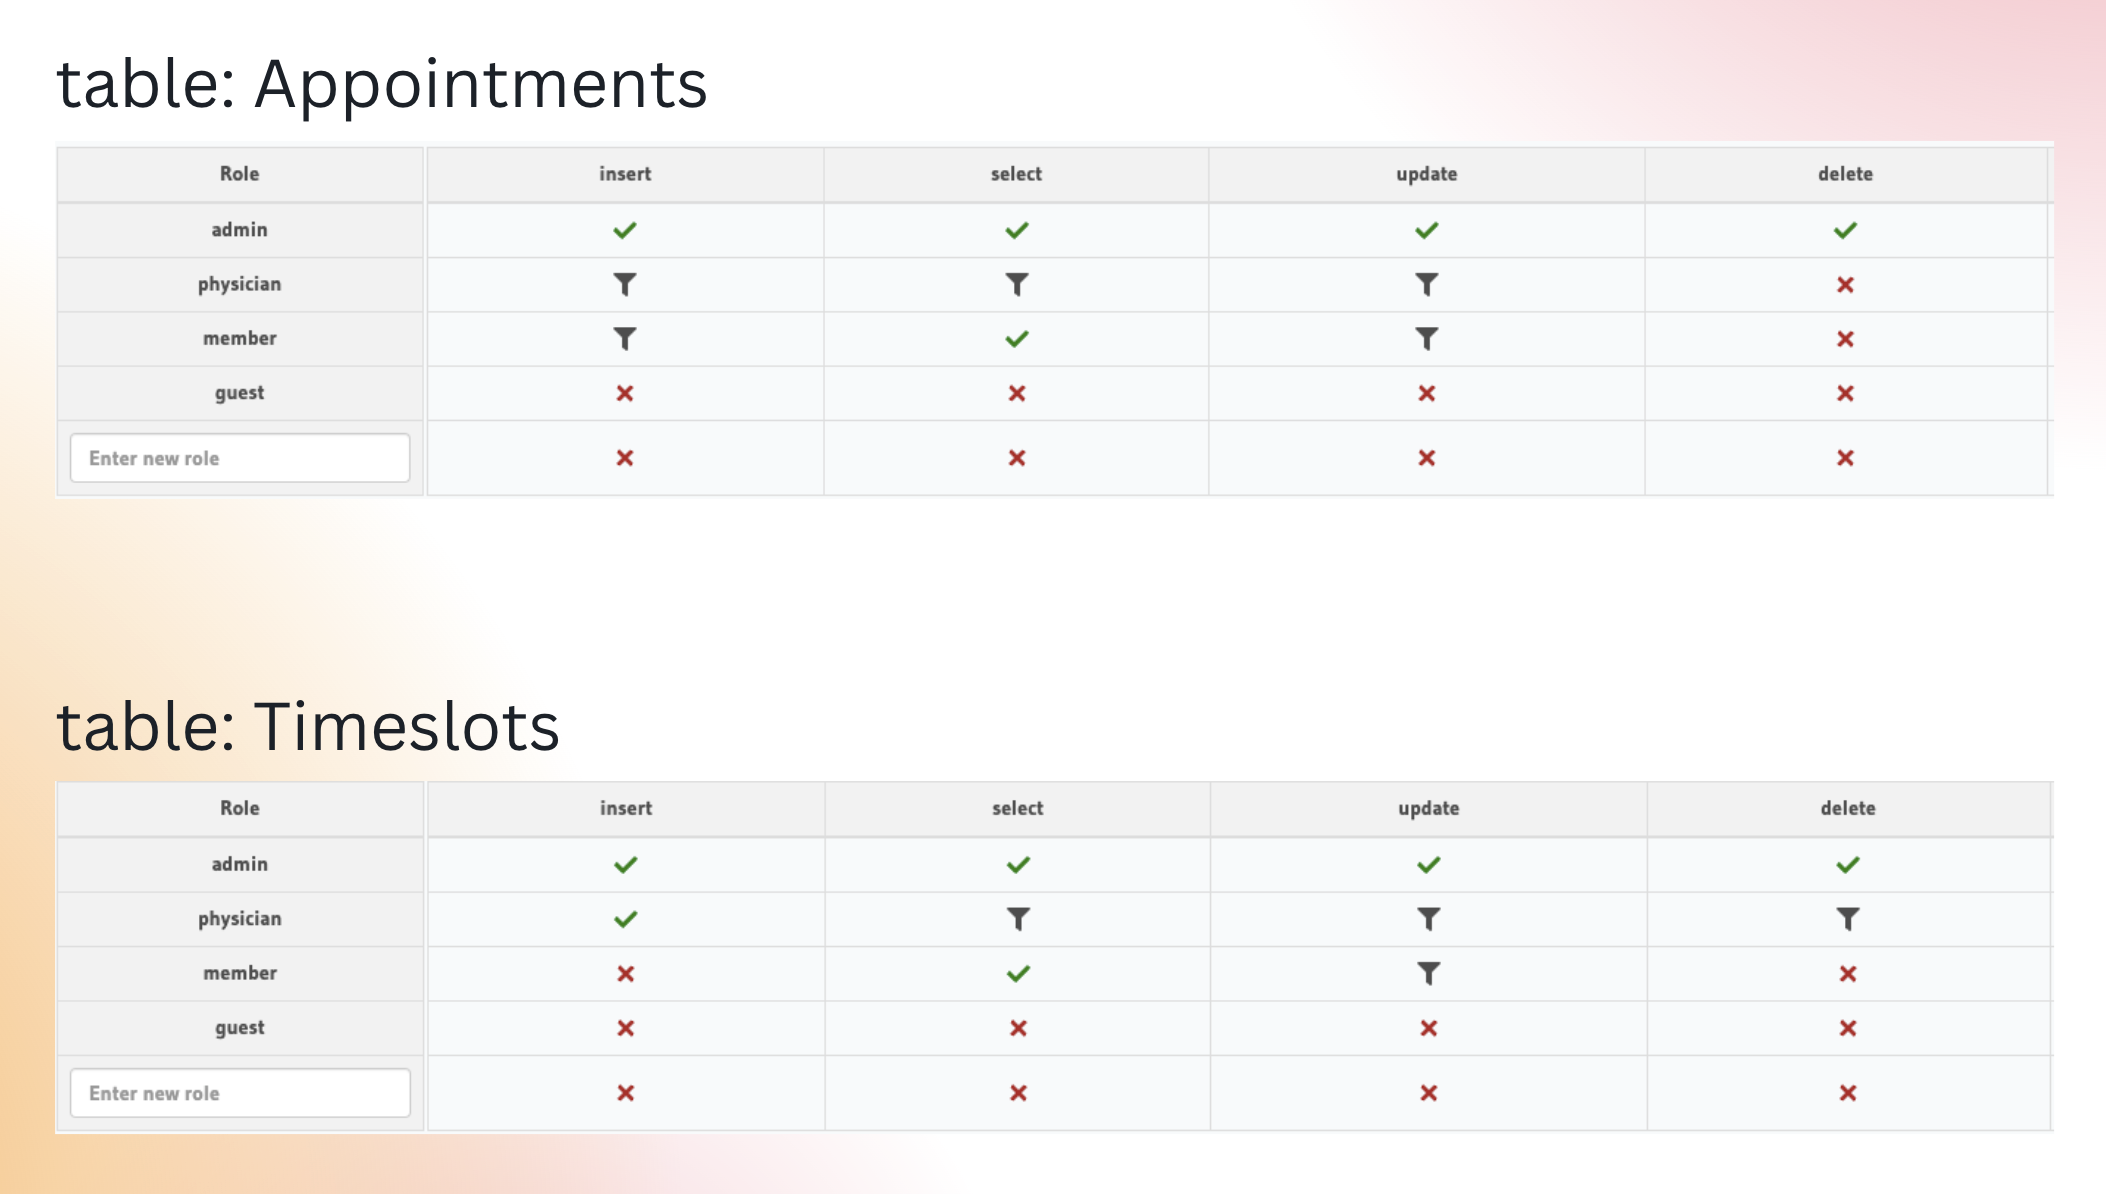
On the other hand, the Timeslot table is where the physician or doctor makes their availability known. Members do not have much to see or do in this table; they only have permission to select data. They cannot update or insert data points in the Timeslot table.
Frontend Implementation
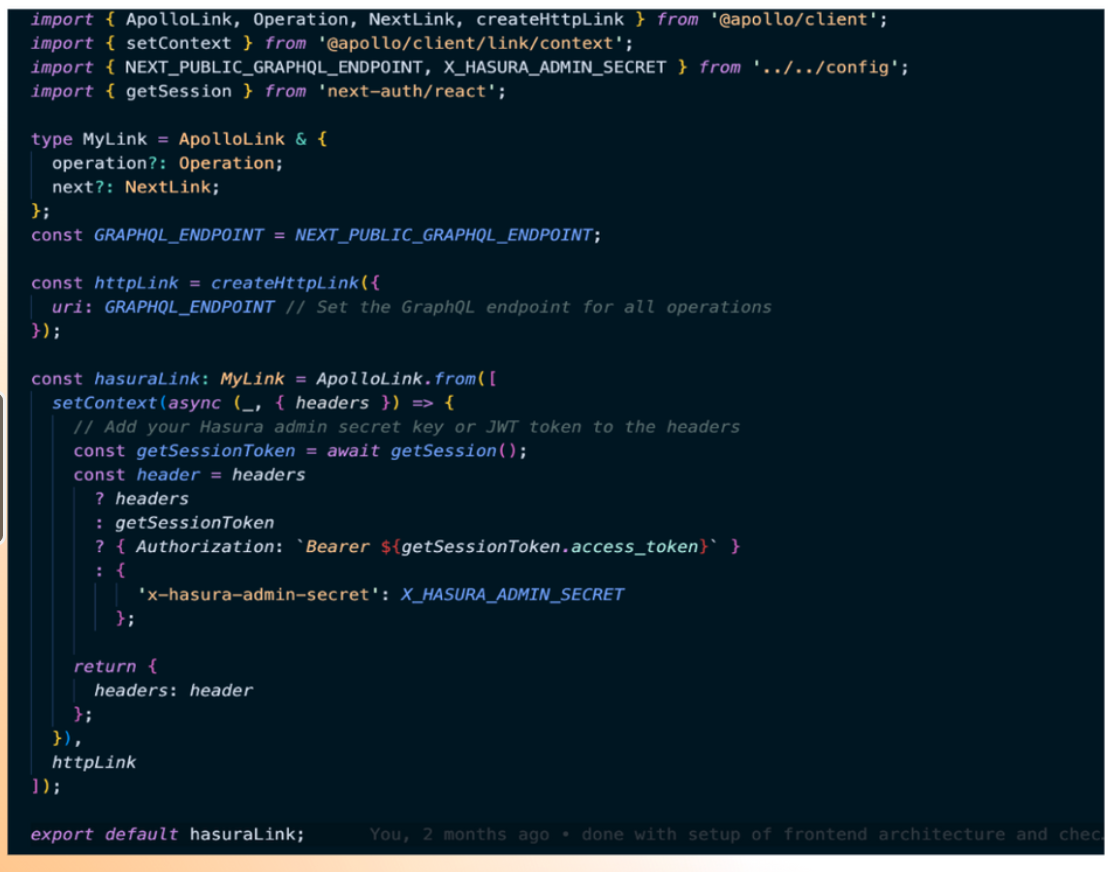
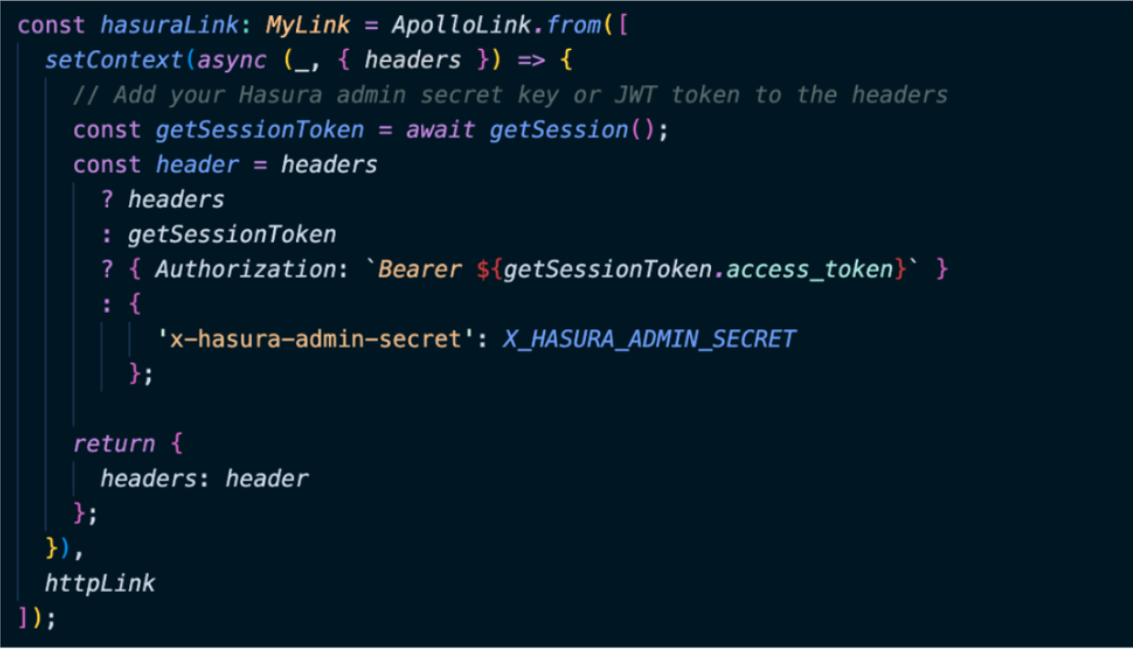
We have established a Hasura link through which we pass the X_HASURA_ADMIN_SECRET in order to obtain the authorization token. If a user is logged in, their authorization token will be stored. If not, they can use their session to attach the authorization token to the headers and pass the admin secret of Hasura. You can refer to this video to learn more about HIPAA and how we implement it.
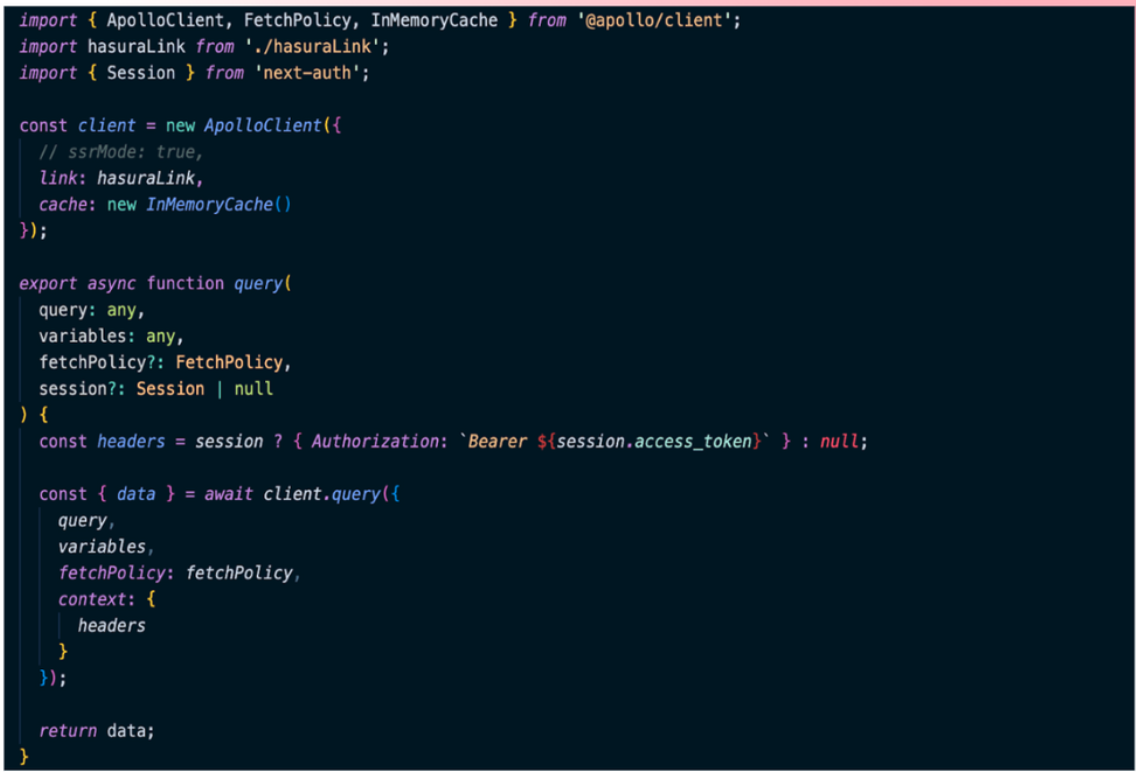
In the Hasura link we created, it returns the headers in the SDTP link. We then passed the same role ID to the JWT. The image below shows a decoded version of the JWT. For this specific user, the role is a member. We have also included the allowed roles in the JWT claims. Currently, we only accept two roles: "member" and "physician". For the user "Arindam Ganguly" the role is "member". This ensures that users with the member role can only access routes specific to members, not physicians. Similarly, if the role were "physician", the member's routes or the member's part/module of the application would not be accessible to the physician.

Encrypting Our File Server-side
Another thing we did was encrypt our file server-side using AWS KMS. Earlier, we were using Cloudinary primarily because it offered up to 25 GB of free data storage. However, we later realized the importance of encrypting our server-side data. We initially tried making the files password-protected on the client-side and then uploading them to the Cloudinary storage, but we could not find support for password-protected files in Cloudinary. Another problem we faced was that someone with super admin access could always view the files in the console. Here’s hoping they soon develop some encryption algorithm to resolve this issue. Consequently, we switched to AWS Key Management Service (KMS).
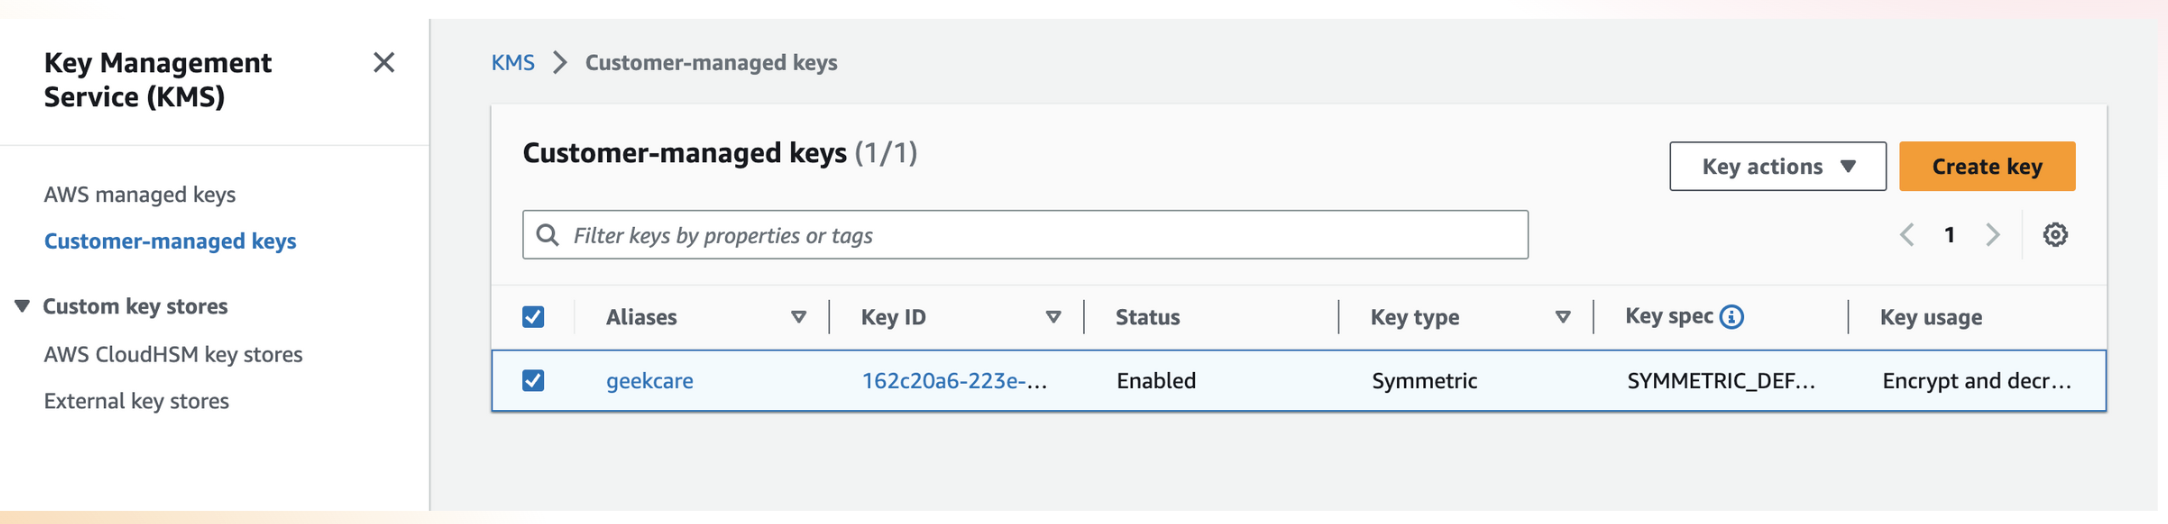
What is KMS?
KMS stands for Key Management Service. It is a service provided by AWS by default and supports two types of keys: symmetric and asymmetric.
With symmetric keys, you do not need a separate private key to decrypt your file. You simply provide the key specification and file metadata. When decrypting the file, the metadata is used to understand which KMS key ID to use. This key ID is crucial and should be used throughout the application.
For even greater security, you can use asymmetric keys. With this method, you have a separate private key, which is required to decrypt a specific file. It's important to note that when using KMS, you must have the necessary permissions. You can refer to the AWS official documentation for guidance on obtaining the required permissions, which may require contacting the administrator for your IAM users.
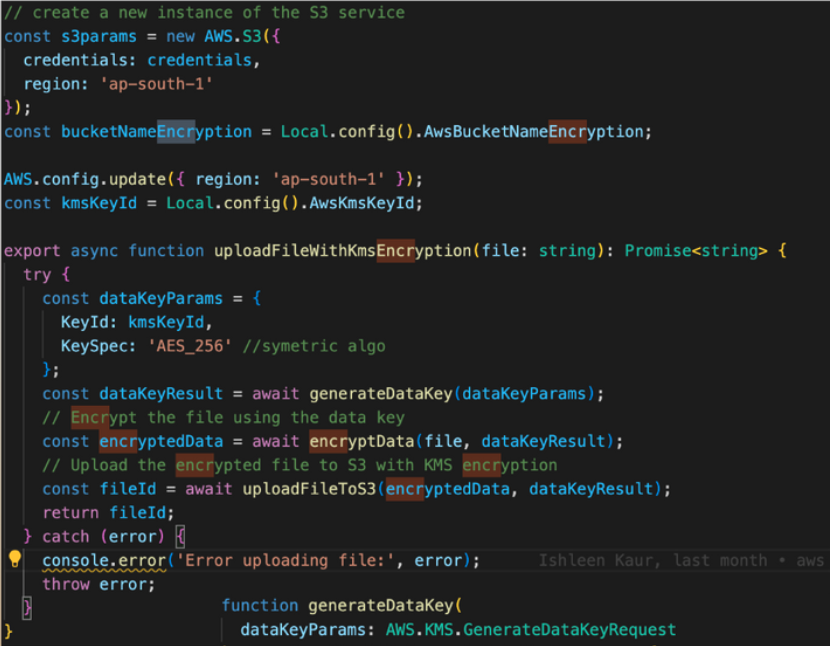
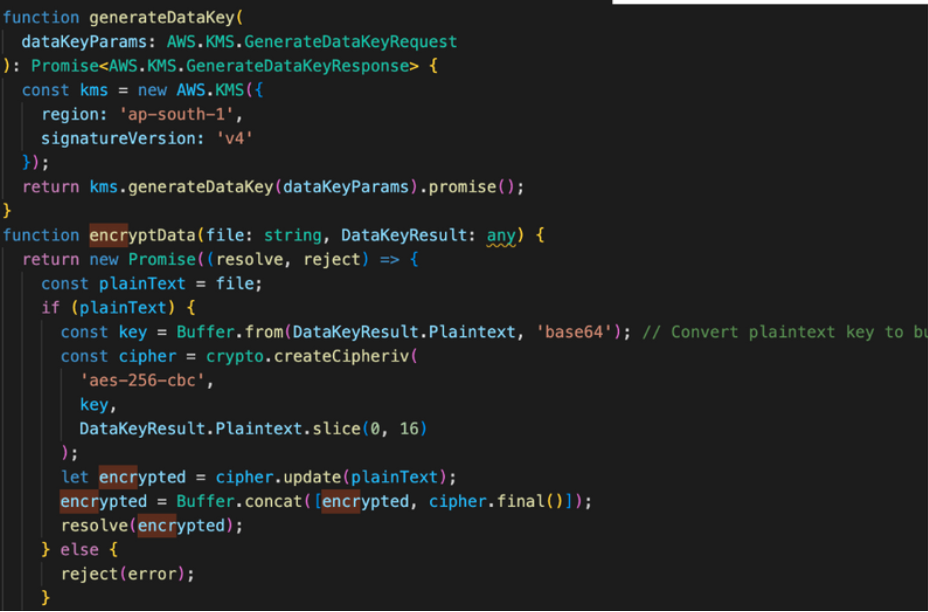
Implementation of the Encryption Using KMS
Here, we have three main functions: encrypting the file, uploading the encrypted file with KMS encryption, and uploading the encrypted file to the S3 Bucket. If you refer to the image below, we utilize the “aes-256-cbc” algorithm for file encryption. Once the file is encrypted, we proceed to upload it to the S3 Bucket. Currently, we have kept the S3 Bucket as an open bucket instead of a private one. However, if you are using a private bucket, you can specify the user groups that have access to it. We chose an open bucket for now due to the limited and non-real-time nature of our data.
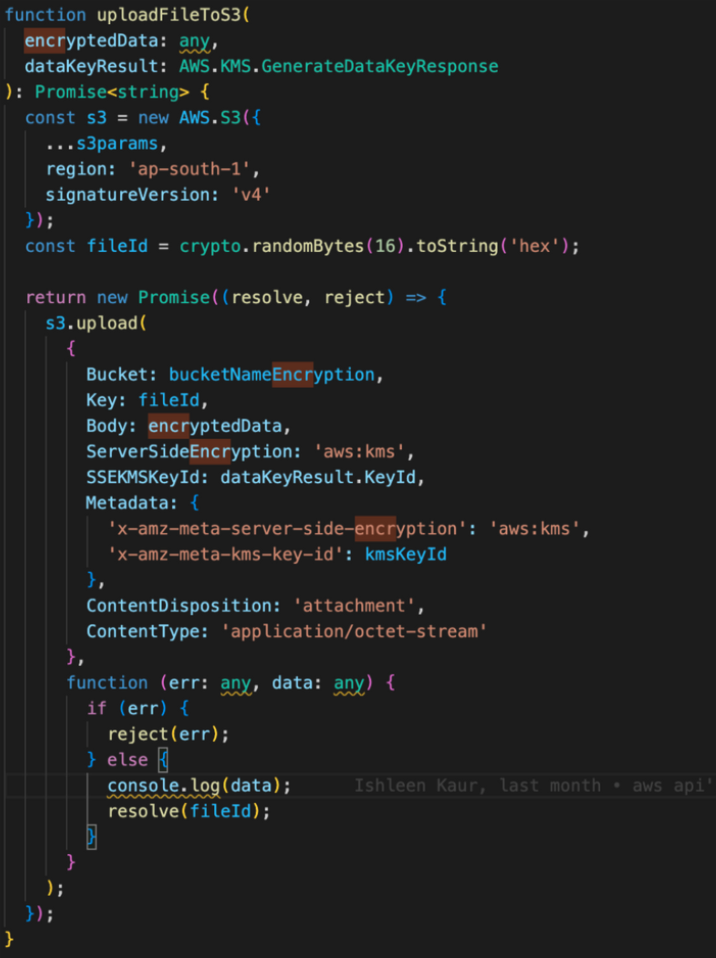
It is important to note the distinction between the data key and the KMS key ID. The data key serves as a unique identifier for each individual file being uploaded, while the KMS key ID is a single ID that is associated with all the files. The KMS key ID plays a critical role in the encryption and decryption process for these files. Once the file is encrypted, we upload it to the bucket using a specific key. The encrypted file data is included in the body of the upload request, while the KMS key ID is attached as metadata. When a decryption request is made, the system refers to the metadata present in the file to decrypt it promptly. After decryption, the file is returned in its original, decrypted form.
The image below shows the bucket where we have implemented our encryption. It is a screenshot of a single file. When we click on a file from our KMS-enabled file system and try to open the link, we receive an "access denied" error. This happens because when the file is opened in the browser, it tries to access the KMS key ID needed to access the file. The access is denied since the browser has no clue about the KMS key ID. While opening it from the app, it reads the key ID from the metadata itself.

A Successful Implementation
These were the major factors we considered to make the application partially HIPAA compliant. There are a few other things to discuss, such as FHIR. FHIR focuses more on how you should structure your data, so it is securely available across platforms.
It is important to note that although we have implemented HIPAA in Next.js and Hasura, HIPAA is not technology-specific. It provides a set of rules; it is up to you and your tech stack to determine how to implement them. If those rules are satisfied, you can implement HIPAA in any language or framework used to develop your applications. The primary goal of HIPAA is to protect patient’s sensitive information.
Check out the video below to learn more about this project and listen to Arindam Ganguly's full talk!
Dive deep into our research and insights. In our articles and blogs, we explore topics on design, how it relates to development, and impact of various trends to businesses.


