
This article outlines leveraging Amazon services like Amazon Content Rekognition and Amazon SQS in Node.js. These services enable the detection of NSFW (Not Safe For Work) images in the background and potentially notify or block the user.
The article assumes that the Node.js project and AWS account are set up and that image uploads to storage buckets have been completed separately. We’ll focus on connecting all the AWS services to build the content moderation system.
Ensure you’ve reviewed the prerequisites below and set up a functional working environment.
Prerequisites
Ensure you have the following set up and working:
- A working AWS account.
- Node.js:- I’ve used v20 LTS while writing this article.
- A working Node.js Express project (or any other framework of your choice) that at least has a working API for uploading the image to the storage bucket.
TL;DR
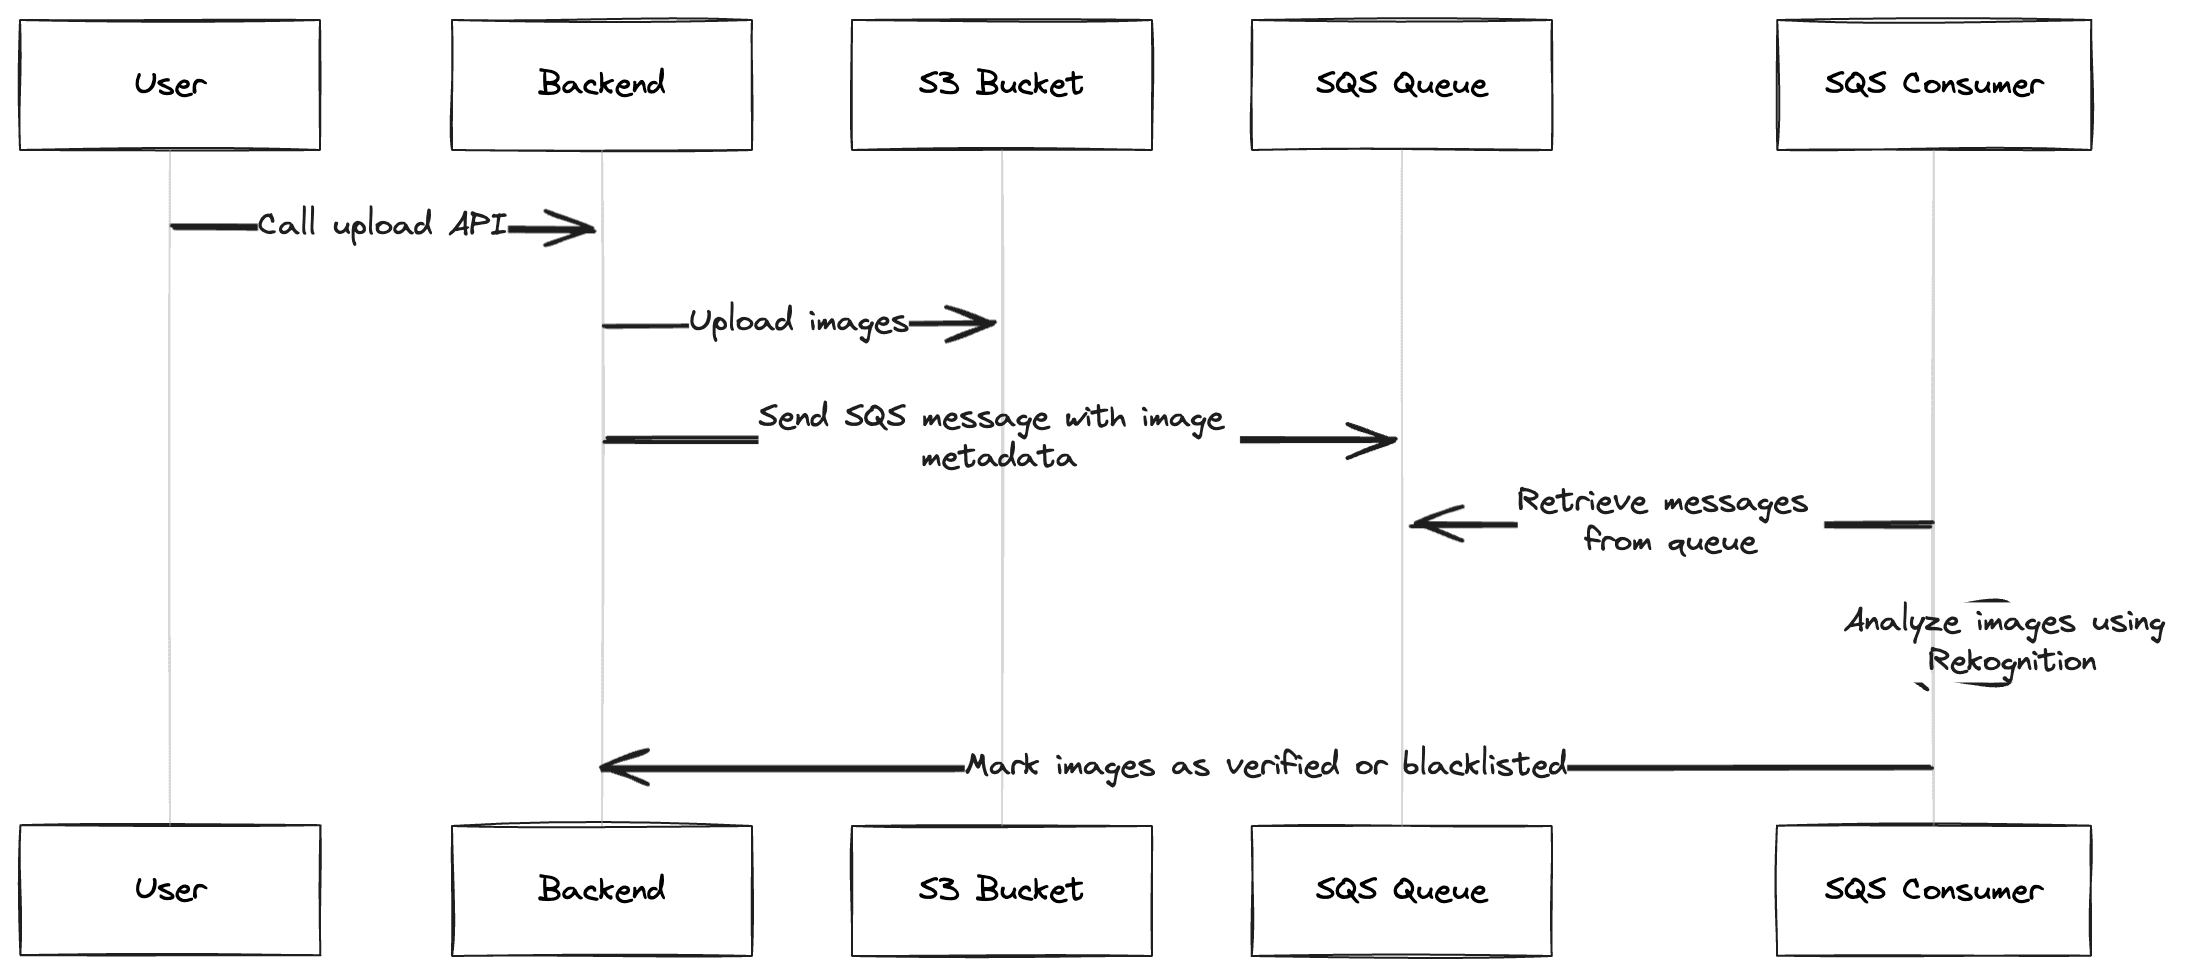
- Initialize the Node.js project with the required dependencies.
- Upload images to the S3 bucket.
- Send messages to the SQS queue to process the uploaded images.
- Retrieve messages from the queue and use Amazon Rekognition to analyze the images.
- Mark images as verified or blacklisted based on the analysis.
A Brief about AWS services used here
You can skip this one if you know the services used here.
Amazon Rekognition: We have used it to perform image moderation, i.e., to get the labels and sub-labels from the image that will tell us the percentage of explicit, violent, and not safe-for-work content in that image.
Amazon SQS: We have used it to separate the image upload and moderation processes. This ensures that the image upload process can be completed quickly, and the moderation can be handled asynchronously in the background.
Amazon S3: S3 is cloud storage service that we’ll use to store the uploaded images. The benefit of using this is Amazon Rekognition can pick up the images from S3 directly using the S3 object key. You can also directly send the image byte data to Rekognition API if you use another storage provider.
Set up Services on the AWS Console
- AWS Credentials: Retrieve your access key and secret key. Go to Summary → Security Credentials to create them and download them.
- S3 Bucket: Follow these steps from the AWS documentation to create the bucket. If you want to display the images directly on our front end, you can set the permission to public, read-only. But we don’t need it for this article.
- SQS Queue: Follow these steps to create a standard queue.
TIP: To prevent unwanted cost, you can also simulate S3 and SQS on local system using tools like localstack, MinIO, and ElasticMQ to test the integration. For Amazon Rekognition, you can only test it with a live AWS account.
Let’s get started with Implementation:
This section will describe the steps in more detail. I’ve also included the example code with all the steps and commented on the lines to explain what they do.
- Install the following dependencies into your Node.js project.
npm install @aws-sdk/client-rekognition @aws-sdk/client-s3 @aws-sdk/client-sqs sqs-consumerMost of the packages are self-explanatory. The additional package used here is sqs-consumer. SQS is a poll-based queue. Hence, to get the messages, you need to poll them yourself. To ease the development, we’ve used sqs-consumer that provides helper methods to effortlessly set up consumers.
2. Set the following environment variables in your project. Don’t change the key names of AWS variables because keeping the key name the same as below will allow AWS SDK to automatically pick up the correct credentials from the environment.
AWS_ACCESS_KEY_ID=
AWS_SECRET_ACCESS_KEY=
AWS_REGION=
AWS_S3_BUCKET=Your bucket name that you set up above
AWS_IMAGE_MODERATION_FIFO=image-moderation.fifo
3. Create the aws services helper class in awsService.ts. This class creates and maintains the instance of different aws services used in the project.
import { S3Client } from '@aws-sdk/client-s3'
import * as AWS from '@aws-sdk/client-rekognition'
import * as AwsSQS from '@aws-sdk/client-sqs'

/**
 * Creates and maintains the instances for AWS services used.
 */
class AwsService {
    public readonly s3Client: S3Client
    public readonly rekognitionclient: AWS.Rekognition
    public readonly sqsClient: AwsSQS.SQS

    constructor() {
        this.s3Client = new S3Client({ region: process.env.AWS_REGION })
        this.rekognitionclient = new AWS.Rekognition({ region: process.env.AWS_REGION })
        this.sqsClient = new AwsSQS.SQS({ region: process.env.AWS_REGION })
    }

    public async getImageModerationUrl(): Promise<string> {
        const queueUrl = await this.sqsClient.getQueueUrl({ QueueName: process.env.AWS_IMAGE_MODERATION_FIFO })
        return queueUrl.QueueUrl
    }
}

const awsService = new AwsService()
export { awsService }
TIP: If you are simulating some of the services on your local system, don’t forget to pass the custom endoint that points to your localhost, for example, new AwsService.SQS({ ..., endpoint: '<http://localhost>:SERVICE_PORT' })
4. Create a route that uploads the image to the s3 service and queues the image for content moderation. An example snippet uses an express framwork. This does not include request validations and other sanity checks. Make sure to include them in the actual codebase.
import { Router } from 'express'
import { SendMessageCommandInput } from '@aws-sdk/client-sqs'
import { awsService } from './awsService'

// Express router instance.
const router = Router()

/**
 * API accepts the image data (and optionally user id for whom this image is uploaded), and upload it to S3 bucket.
 */
this.router.post("/upload-image", (req, res) => {
		// Let's say, we are getting the image file called user_image.jpg from the request.
		const filename = "user_image.jpg"

		// Write code to upload this image to S3 bucket...
		// After image is uploaded, we'll create a new message in next line to mark this image for content moderation.

		// Create a SQS message to queue this image for content moderation.
		const messageParams: SendMessageCommandInput = {
		    MessageBody: JSON.stringify({ filename: filename }),
		    MessageGroupId: "UserId" // Make sure to include the actual user id here,
		    QueueUrl: await awsService.getImageModerationUrl(),
		}

		// Queue the message. Consumer will poll from this queue.
		// We will create the consumer in next code snippet.
		awsService.sqsClient.sendMessage(messageParams, (err, data) => {
		    if (err) {
		        console.error(err)
		    } else {
		        console.log(`Message sent to queue: ${data?.MessageId}`)
		    }
		})
})- Create the consumer in your entry point i
ndex.tsfile. This will poll the queue and get the message we put in the above code snippet.
import { Consumer } from 'sqs-consumer'
import { Message } from '@aws-sdk/client-sqs'
import { awsService } from './awsService'

// Create the consumer that will poll the queue and call handleMessage whenever new message is received.
const queue = Consumer.create({
    queueUrl: await awsService.getImageModerationUrl(),
    sqs: awsService.sqsClient,
    handleMessage: RekognitionService.callRekognition, // This method is defined in below code snippet.
})
queue.start()


class RekognitionService {
		/**
		 * This method is called whenever we extract a new message from the queue.
		 * It is responsibe to call the Rekognition API and get the labels for image, and take action on user.
		 */
    public static async callRekognition(message: Message): Promise<void> {
        if (!message.Body) return

        // Extract parameters from body.
        const body = JSON.parse(message.Body!)
        const filename = String(body['filename'])

        // Create params for image content moderation. AWS can directly pick the image from S3 bucket for moderation.
        // If you are not using S3, you can pass image data directly. Go through the documentation for more details.
        const params = {
            Image: {
                S3Object: {
                    Bucket: env.AWS_S3_BUCKET,
                    Name: filename,
                },
            },
        }

        // Here, we reject the image if AWS thinks image is > 50% NSFW.
        const IMAGE_MODERATION_MIN_CONFIDENCE_PERCENT = 50

        try {
			      // Get the labels for this image.
						const image = await awsService.rekognitionclient.detectModerationLabels(params)
            const labels = image.ModerationLabels ?? []
            console.log(`The following moderation labels were detected: ${JSON.stringify(labels)}`)

	          // If any of the labels detected has more than 50% confidence, we reject that image.
	          // Labels include Explicit, Violence, Gambling, etc. Be sure to check the link at the end
	          // to find the list of all labels.
            const nsfwLabels = labels.filter(
                val => val.Confidence && val.Confidence > IMAGE_MODERATION_MIN_CONFIDENCE_PERCENT,
	          )

	          if (nsfwLabels.length > 0) {
			          console.log("NSFW image detected")

			          // Take action on the user here.
			          // Update the DB, mark the user as blocked / warning, or send notification to user...
	          }
        } catch (err) {
						console.error(err)
        }
    }
}
TIP 1: Make sure to go through the response of the Rekognition API in detail. It returns the individual percentage of detected labels and sub-labels, which you can use to filter the images more accurately based on your requirements instead of just filtering all of them directly by 50% as I have done above. To go through the list of all labels and sub-labels visit this link:
https://docs.aws.amazon.com/rekognition/latest/dg/moderation.html#moderation-api
TIP 2: Be sure to check out the documentation at https://docs.aws.amazon.com/rekognition/latest/APIReference/API_DetectModerationLabels.html to find out more request parameters and response values to suit your needs.
Conclusion
That’s it! We have demonstrated how to build a content moderation system using Node.js and AWS services. We can also extend this by setting up Custom Moderation Labels that can help enhance the accuracy, tailored more towards your project requirements. Thanks a lot for reading.