Table of Contents
Web Renderers: Which One to Choose Html or Canvaskit?
Author

Date

Book a call
We know Flutter started as a UI framework for building beautiful iOS and Android mobile apps. However, the ultimate aim of Flutter is to create stunning, natively compiled applications for any platform. Since the web runs everywhere on different platforms, developing web apps seemed like a logical progression for Flutter.
With Flutter 2.0, we now have stable, production-quality web support, enabling us to create apps for iOS, Android, and browsers using a single code base.
Since we are aware that Flutter Web still has a ways to go before realizing all of its potential for web development, we were curious about the flutter web architecture's inner workings, which is how we learned about flutter web rendering.
Many developers out there might not have noticed these renderings, so if one were to choose between them, they would each need to be tested from scratch. This article focuses on these renderers, discussing their benefits, applications, and best practices for use.
When operating and developing apps for the flutter web, you may select multiple rendering strategies based on your needs. HTML Renderer and CanvasKit Renderer are the most common.
As a result, this article concentrates on three major themes.
- Types of renderers and how to get started.
- Performance comparison of these renderers.
- Conclusion and which one to choose?
Defining these Renderers
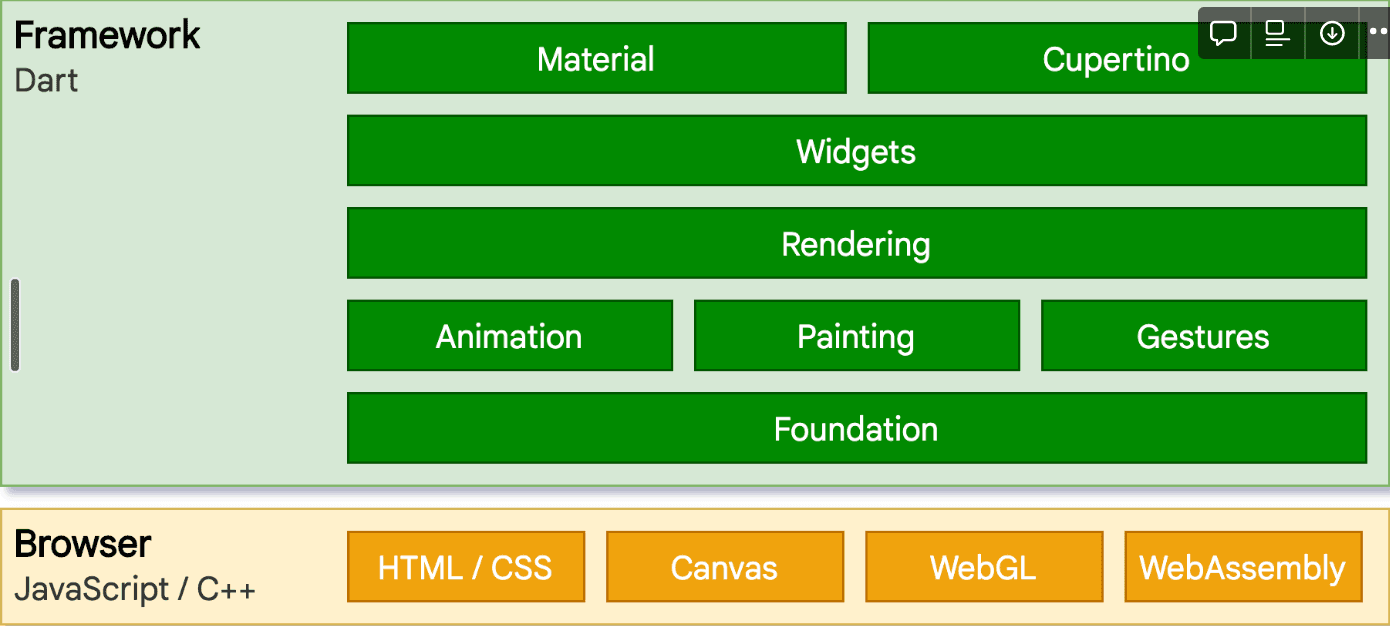
Dart has been compiling to JavaScript since the language's inception. Many key apps, some of which may be seen in Google Ads, compile from Dart to JavaScript and operate in production today. Because the Flutter framework is built in Dart, converting it to JavaScript was simple.
Compared to our Flutter mobile app, which uses Skia to draw the application, we presently have two rendering choices for Flutter web: HTML and WebGL. One is HTML, which is rendered on the web using DOM Canvas APIs. Flutter renders in WebGL using CanvasKit, a version of Skia converted to WebAssembly. When these two are compared, HTML has the best code size characteristics; but CanvasKit has the shortest access to the browser's graphics stack and superior graphical fidelity with native mobile targets.
How to Get Started with These Renderers?
By default, when we want to run our Flutter app, we use the command flutter run -d chrome since we have not specified the renderer option Flutter takes auto as the default value. Coming to these values, flutter has three different values to run our application on the web as
auto- by default; this is determined by the platform on which our web application is operated. HTML renderer is selected if it is operating on a mobile browser. Canvaskit is chosen if it is running on a desktop browser.html- to use HTML Renderer and in the command line, we can do that byflutter run -d chrome --web-renderer htmlcanvaskit- to use canvaskit as renderer type and in the command line, we can employflutter run -d chrome --web-renderer canvaskit
We can also use these commands while building the web for example:
`flutter build web --web-renderer canvaskit`
We can also override the renderer configuration during runtime by adding the <script> tag in the web/index.html file.
So in place of yourValue, we can set the value to true if we want to run in the HTML renderer and set yourValue to false to run in the CanvasKit renderer.
Performance Comparison Between Two Renderers
To compare these two renderers, I have built a single-page web application that includes three basic contents, which are Text, Video, and Network Image, and hostedthis web application in Firebase using release mode with default renderers such as CanvasKit and HTML.
Link to these websites are embedded below:
- HTML Renderer
- CanvasKit Renderer
Here is what it looks like:
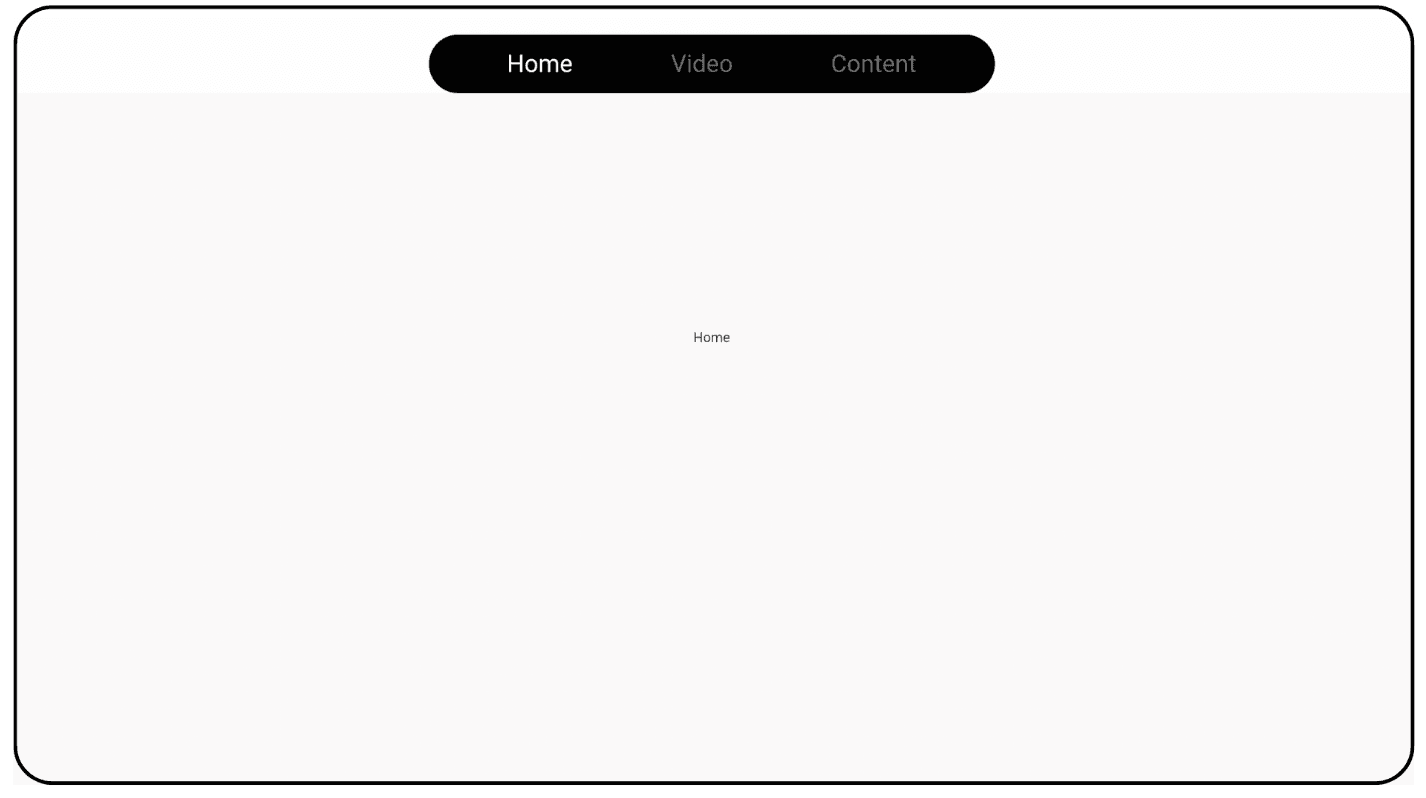

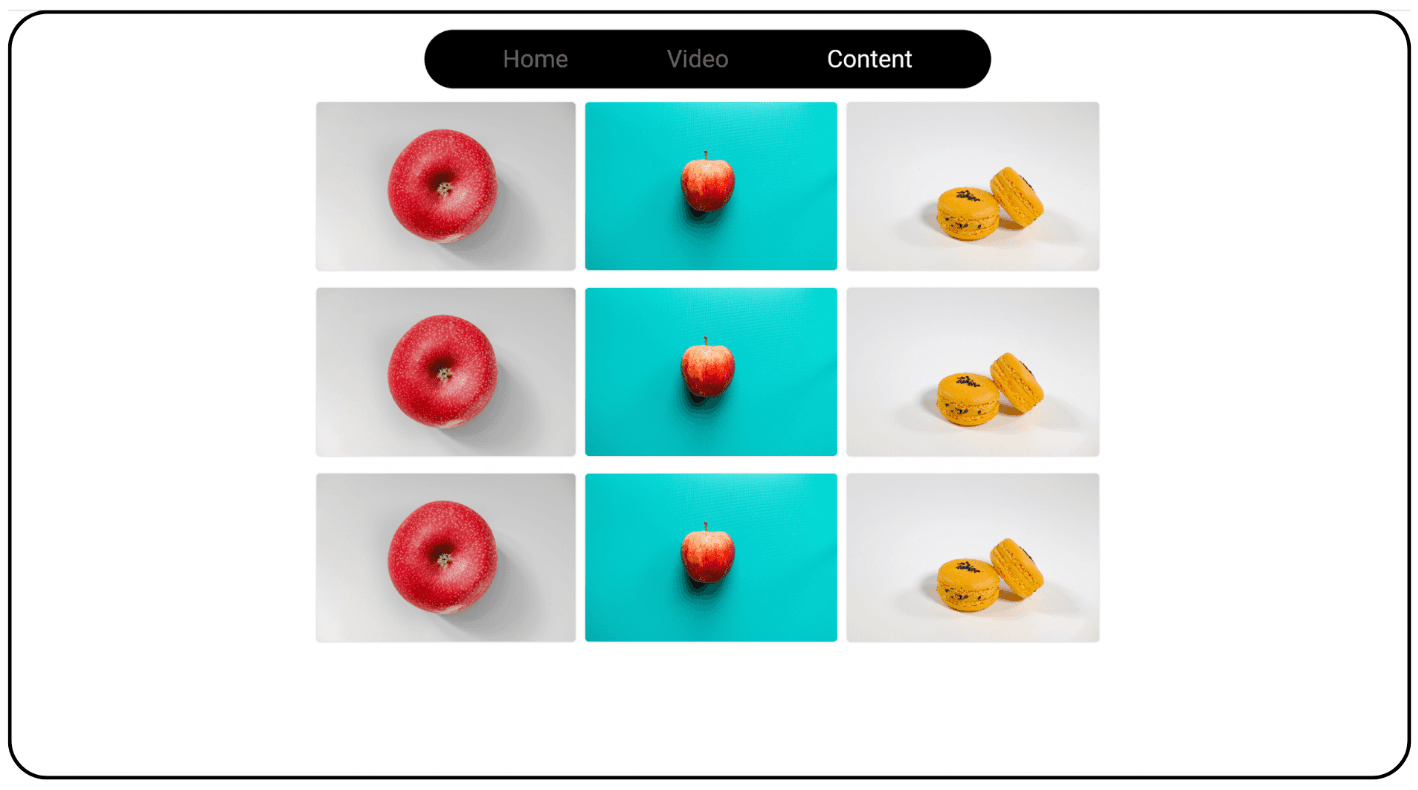
The tool utilized to analyze the performance comparison between these two web page apps was Google Chrome Lighthouse, which provided in-depth knowledge about the performance study.
Remember that both websites were tested in Google Chrome Incognito mode with an internet speed of 50mb/s and were hosted on Firebase.
The Analysis
By leaving the default settings in Chrome Lighthouse and selecting a Desktop mode for this article, the following findings were obtained.
A. CanvasKit Renderer
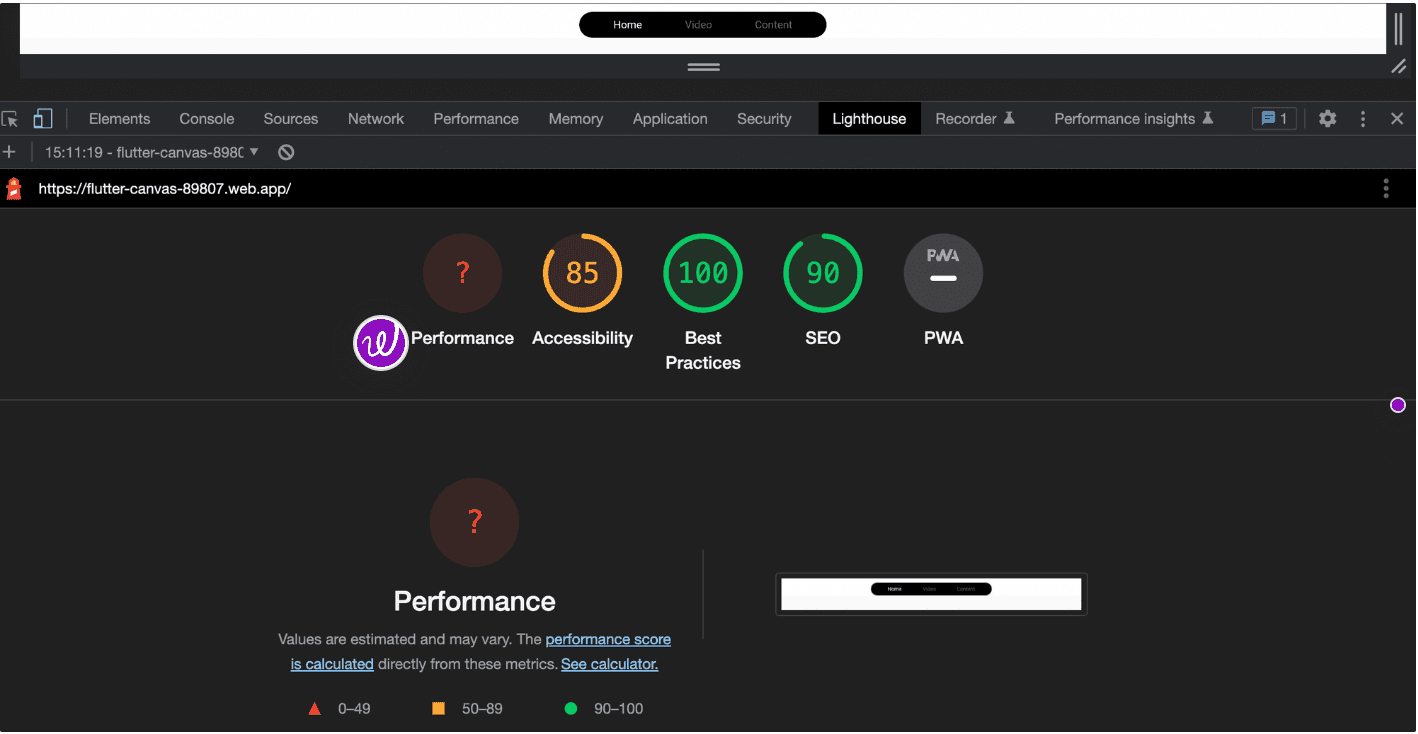
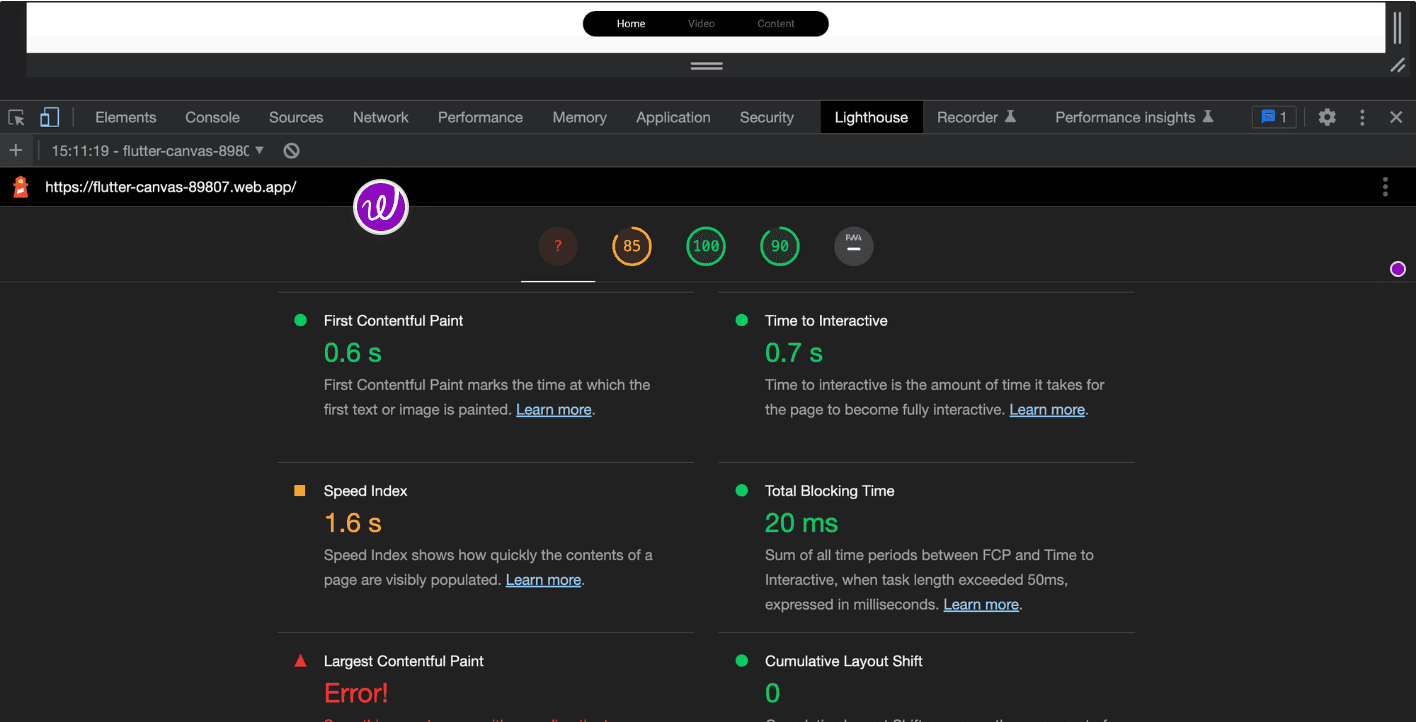
For some reason, the lighthouse appears as a Question Mark (error) for the Performance score for CanvasKit, the same as it appeared as an error for Largest Contentful Paint for CanvasKit render even after running it two or three times. However, if we focus on the First Contentful Paint, we can see that the canvas kit took roughly 0.6 seconds to complete, as well as other data such as the Time to interactive, shown in the image below.
Here is a video capturing CanvasKit Lighthouse performance:
B. HTML Renderer
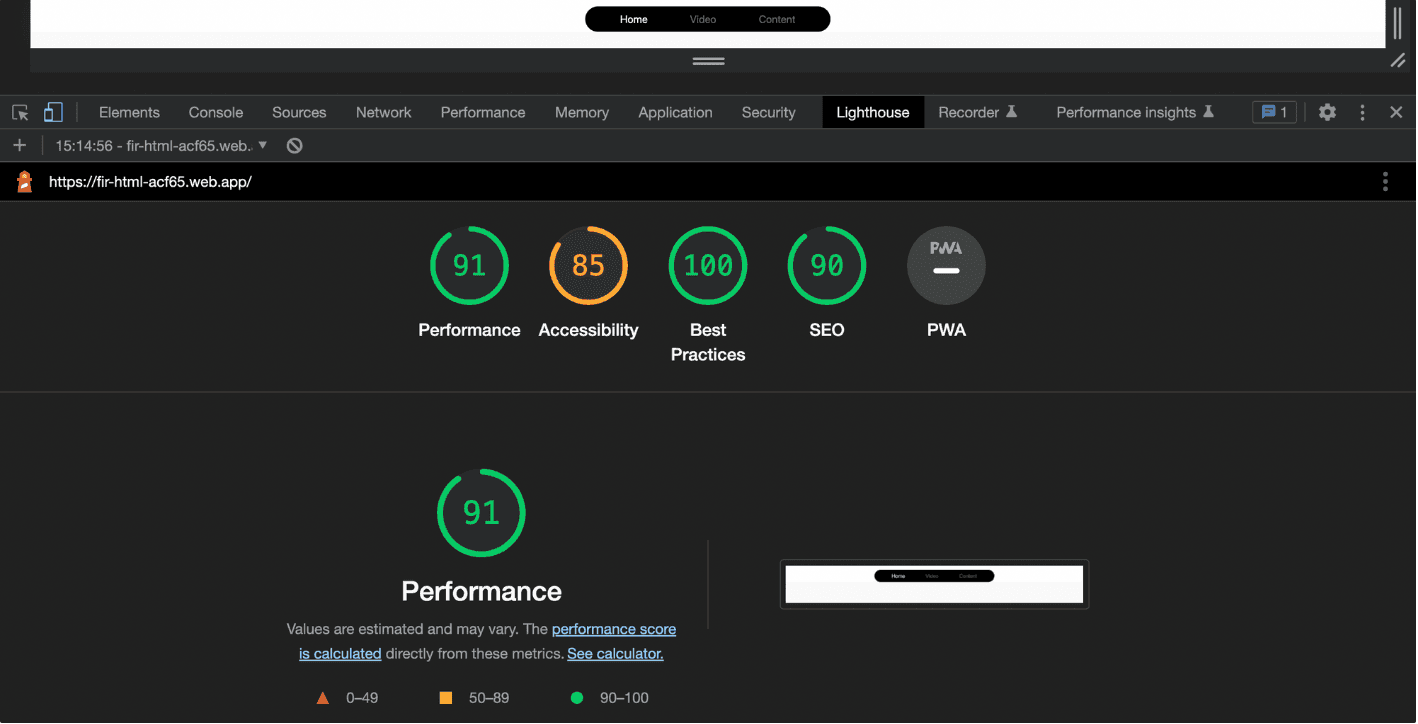
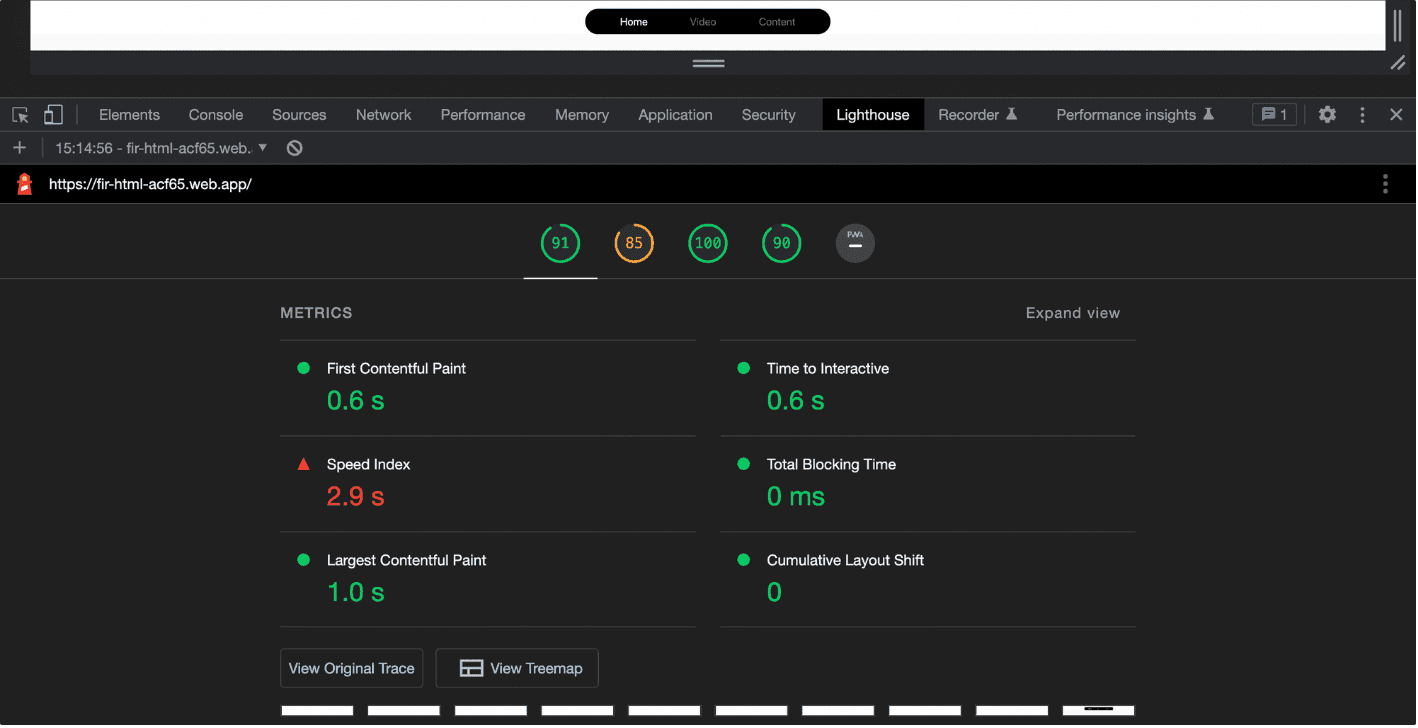
While using the HTML renderer, the lighthouse received an excellent 97 points for performance. It was able to produce the First Contentful Paint in the same time as the Canvaskit renderer (0.6 seconds), and the HTML renderer was also able to render the Largest Contentful Paint in the same time as the Canvaskit renderer (1.0 seconds), as demonstrated in the image below.
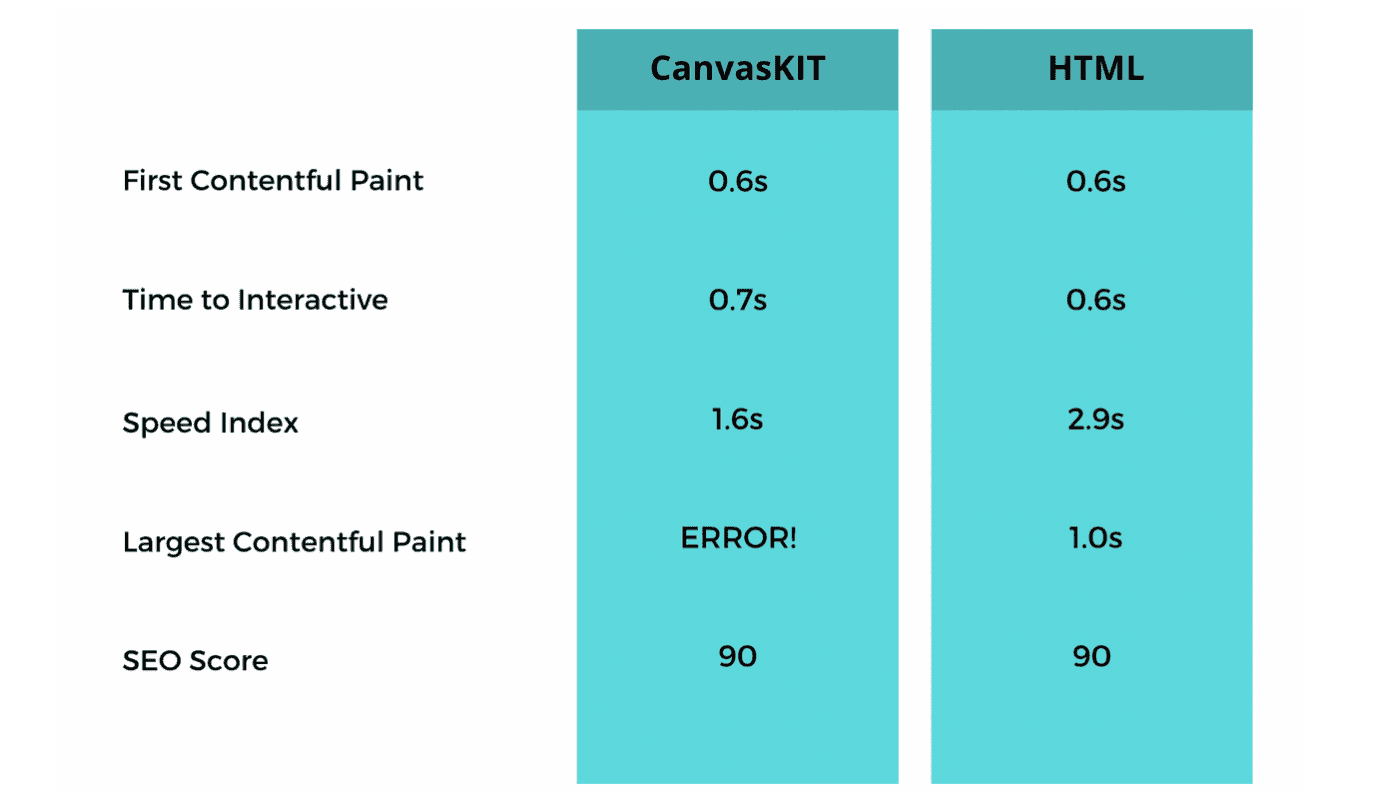
So, to give you a complete comparison, here is the table below, from which we can see that even though the CanvasKit gave us an error, both renderers achieved the same number of SEO scores given that it will rely on website structure and contents as well.
The Game Changer - Performance Insights
Despite the fact that there was an issue with CanvasKit in providing Performance scores due to an ERROR generated by Largest Contentful Paint in providing a full narrative of these performances, the test was carried out in Performance Insights. These websites were then examined in Google Chrome's Performance Insights, where CanvasKit exhibited some severe difficulties.
Here are the snapshots of two renderers that were tested in Performance Insights.
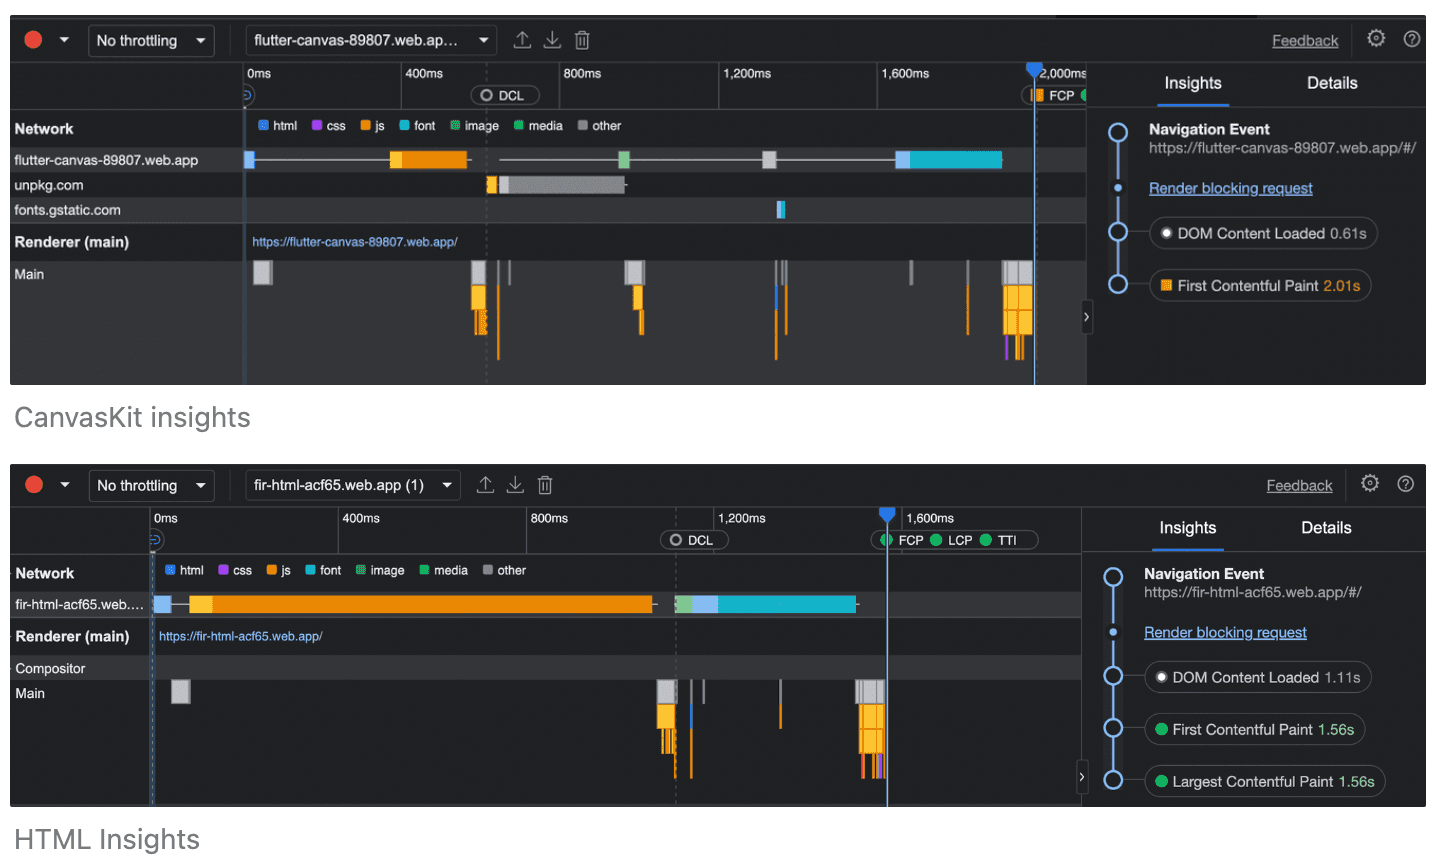
As seen in the photos above, Canvaskit did not load the Largest Contentful Paint when compared to HTML, where it displayed the time it took to load the Largest Contentful Paint. Another thing to note is the time it takes these renderers to load JS; CanvasKit took roughly 400 milliseconds, but HTML took less than 200 milliseconds, and the pictures and fonts were loaded quicker than CanvasKit. So, is it possible to state that the HTML renderer is far superior to CanvasKit? There was another catch to this question after performing these tests 4-5 times, CanvasKIt revealed some unexpected differences in the timeframe.
Comparing the Graph
When the CanvasKit Renderer was run for the first time in Performance Insights, there were no errors, and it took about 2.01 seconds to load the material into the main renderer. However, when it was run a second time, it took a whopping 21.76 seconds to render the initial content, which is a significant amount of time for the user.
Here is a line graph between these renderers and time to help you comprehend this time variance.
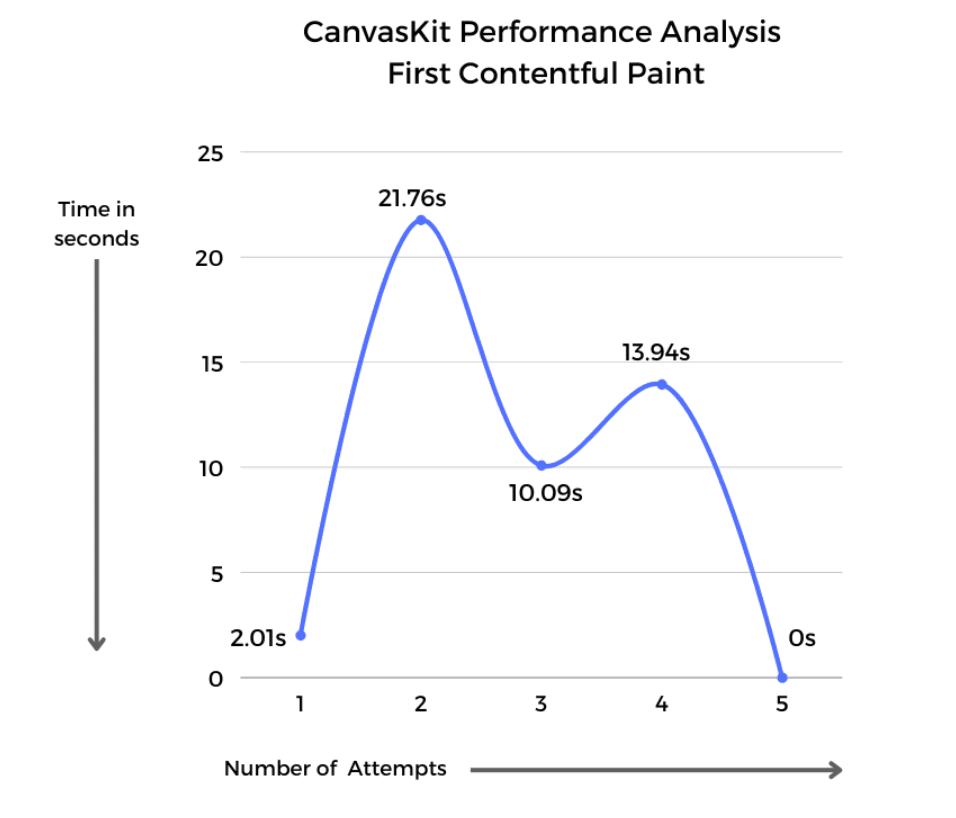
CanvasKit took approximately 9.56 seconds to load the material on average; why the phrase approximately? Because when the CanvasKit ran for the fifth time, it did not load the material to the main Renderer, and the time indicated by the Performance Insight is zero, the user did not receive any pictures or fonts.

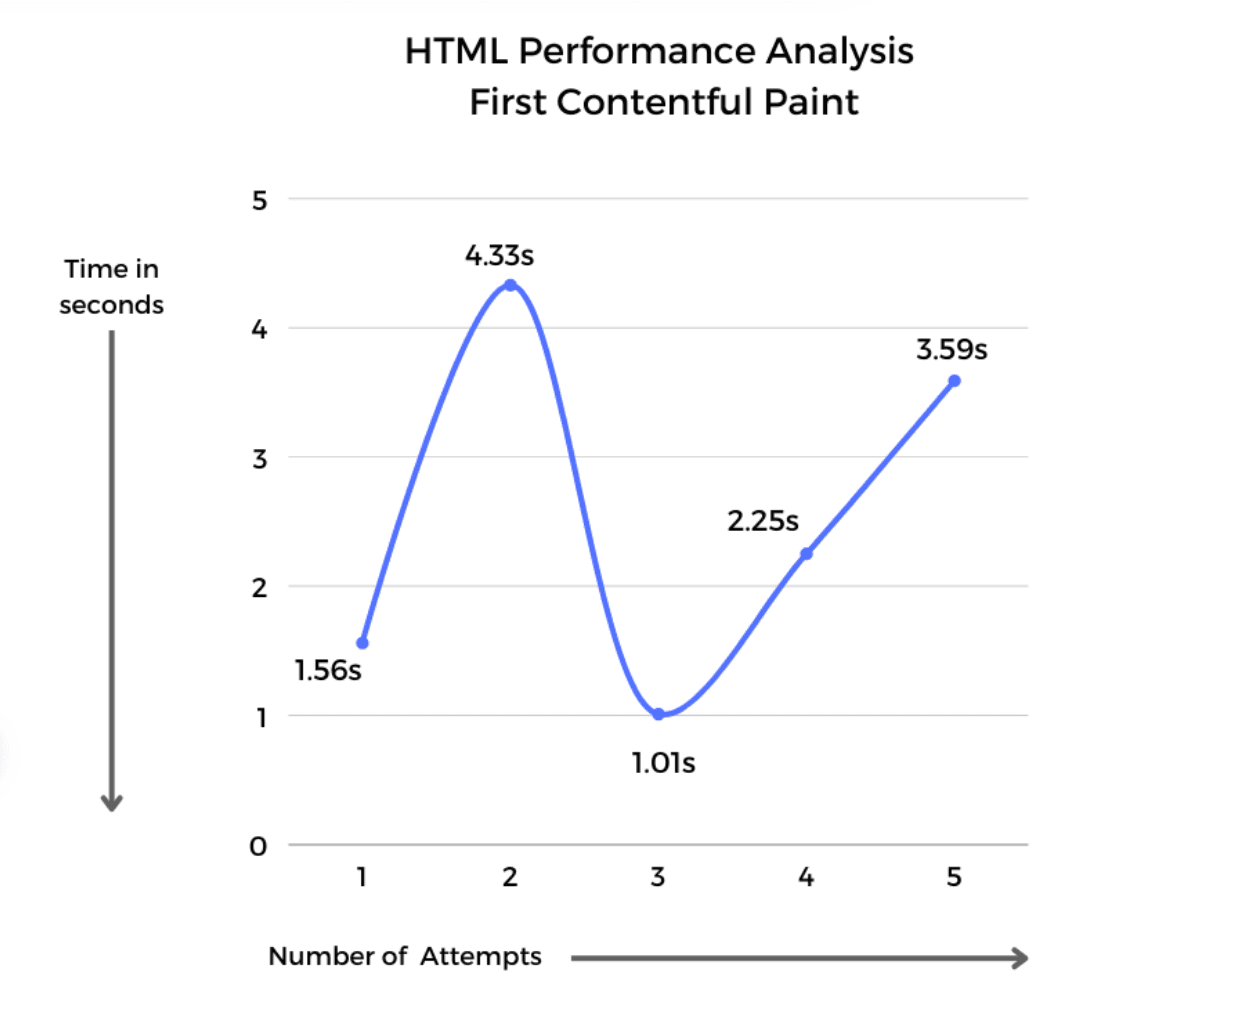
On the bright side, HTML provided us with immaculate results every time the application was tested, giving us a timeline of fewer than 4.5 seconds, giving us an average of 2.548 seconds, and every time the test was conducted, it would load up the material in the Renderer (main). Furthermore, the HTML renderer provided the time for the Largest Contentful Paint, which is equal to the time for the First Contentful Paint.
Conclusion
Is there a catch to using CanvasKit, or would folks just prefer to draw some paints? There is, and here is where CanvasKit outperforms HTML.
When the application was constructed, it had four primary contents: animation (Lottie), text, video, and image. However, when it was run in Chrome in HTML rendering, the animation would not show up because the Lottie animation, which was downloaded from the network URL, could not be shown in HTML format. When Lottie's animation was produced in CanvasKit, the same application would display it.
This post is to select the renderer based on your demands while keeping performance, memory, and CPU usage in mind.
- Choose the
htmloption if you are optimizing download size over performance on both desktop and mobile browsers. - Choose the
canvaskitoption if you are prioritizing performance and pixel-perfect consistency on both desktop and mobile browsers.
Finally, the next time you have to select between HTML and CanvasKit Renderer. It is important to consider what material is presented on the website, including any heavy animations, graphical content photos, paragraph shaping, custom shaders, or perspective modification. If it involves this sort of material, CanvasKit is a superior renderer choice; however, if the focus is on performance or delivering the content back to the user in a short amount of time, then HTML is the best option to go ahead with.


