Mar 3, 2023
Understanding the Workflow of GeekCare for Patients and Physicians
This blog explains how the workflow in the GeekCare application was created for each user persona — patient and doctor.
Author

Subject Matter Expert


Book a call
Table of Contents
GeekCare is a comprehensive healthcare app for patients and doctors that manages appointments, prescriptions, payments, and medical history. The app's design prioritizes ease of use for both doctors and patients. Each party gets separate displays to streamline the appointment scheduling and communication processes.
This blog explains how we designed the workflow for each user persona — patient and doctor. Code snippets, app screenshots, and workflow diagrams are included for clarity.
Working Flow of GeekCare
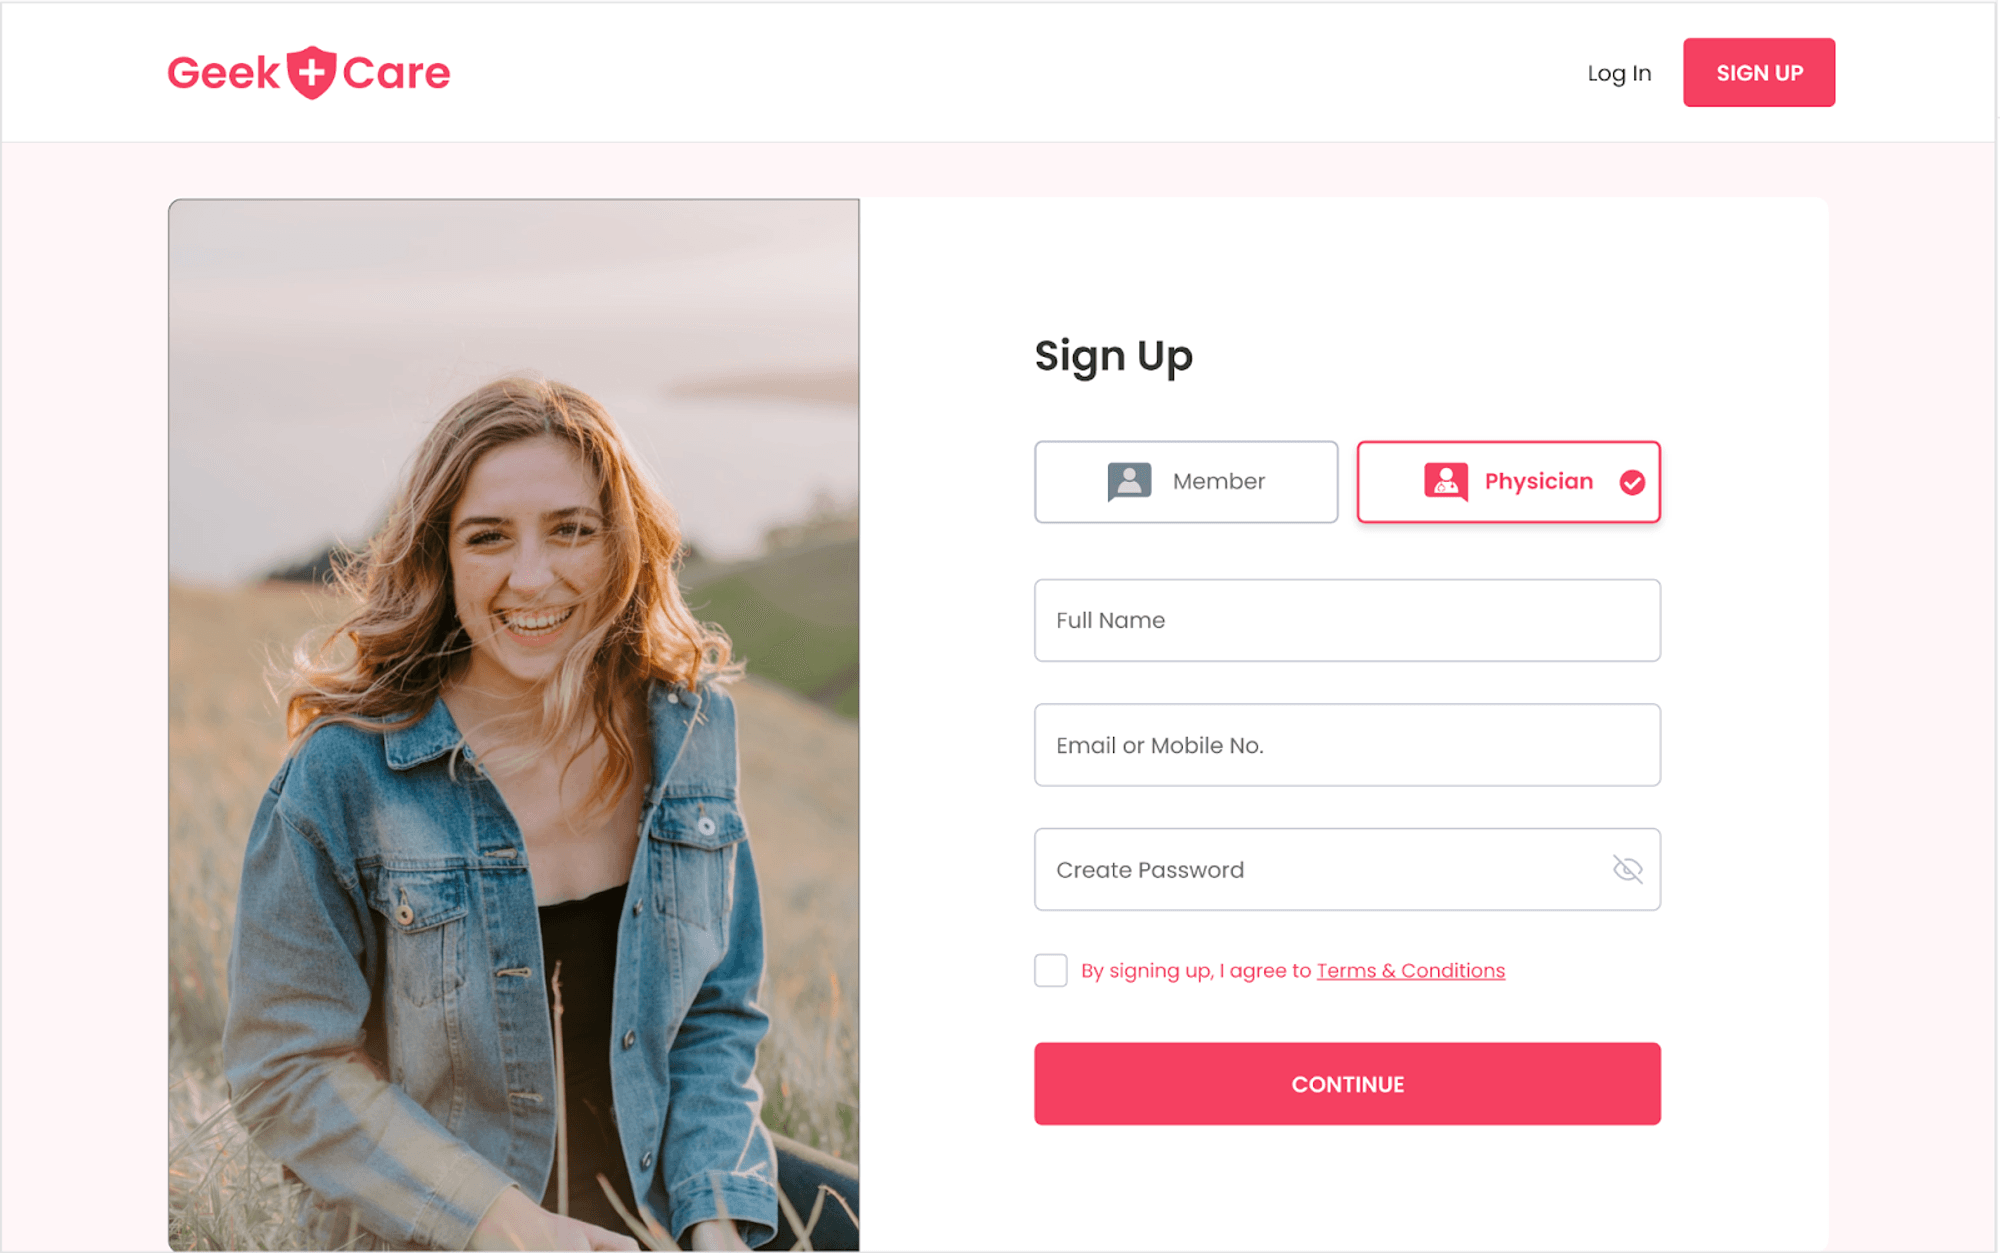
Patients and physicians get different interfaces, options, and tools in the application. The segmentation occurs in the sign-up process, where the user specifies their roles and fills in basic information such as full name, email address, and password. This determines the level of access and functionality within the application. Once users have signed up or logged in to GeekCare, they can access the platform's features and functionality.
Logging in Flow
Signup Screen
Once users complete the sign-up process, their information is saved in the GeekCare database. The user's full name will be destructured into first and last names for ease of use. The email address and role will be saved and the password will be converted into a hash password for added security. This ensures that user information is stored safely and easily retrieved within the application. The user can access their account using the email and password in the future.
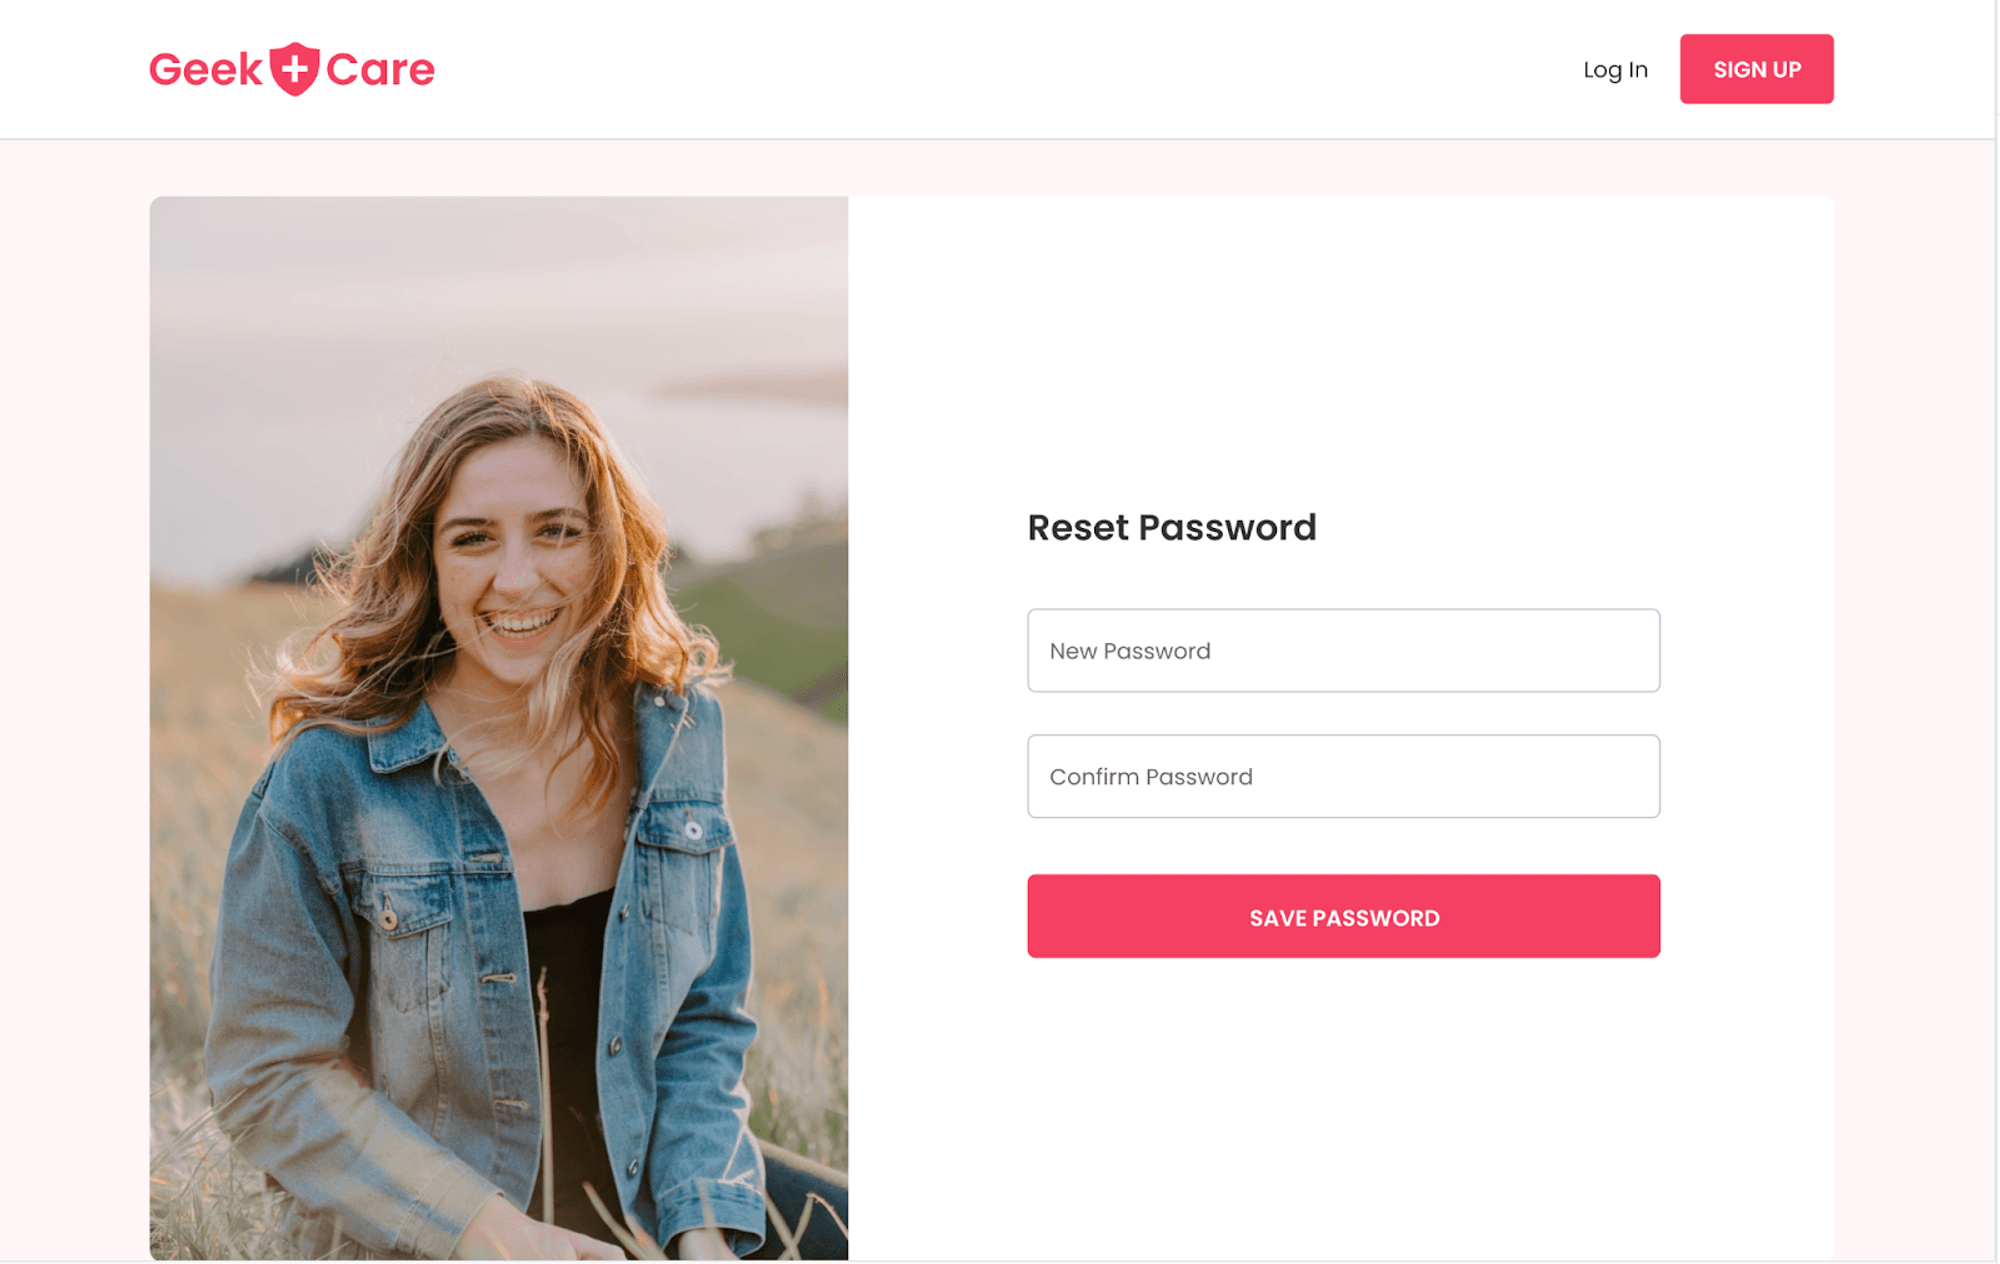
Forgot and Reset Password
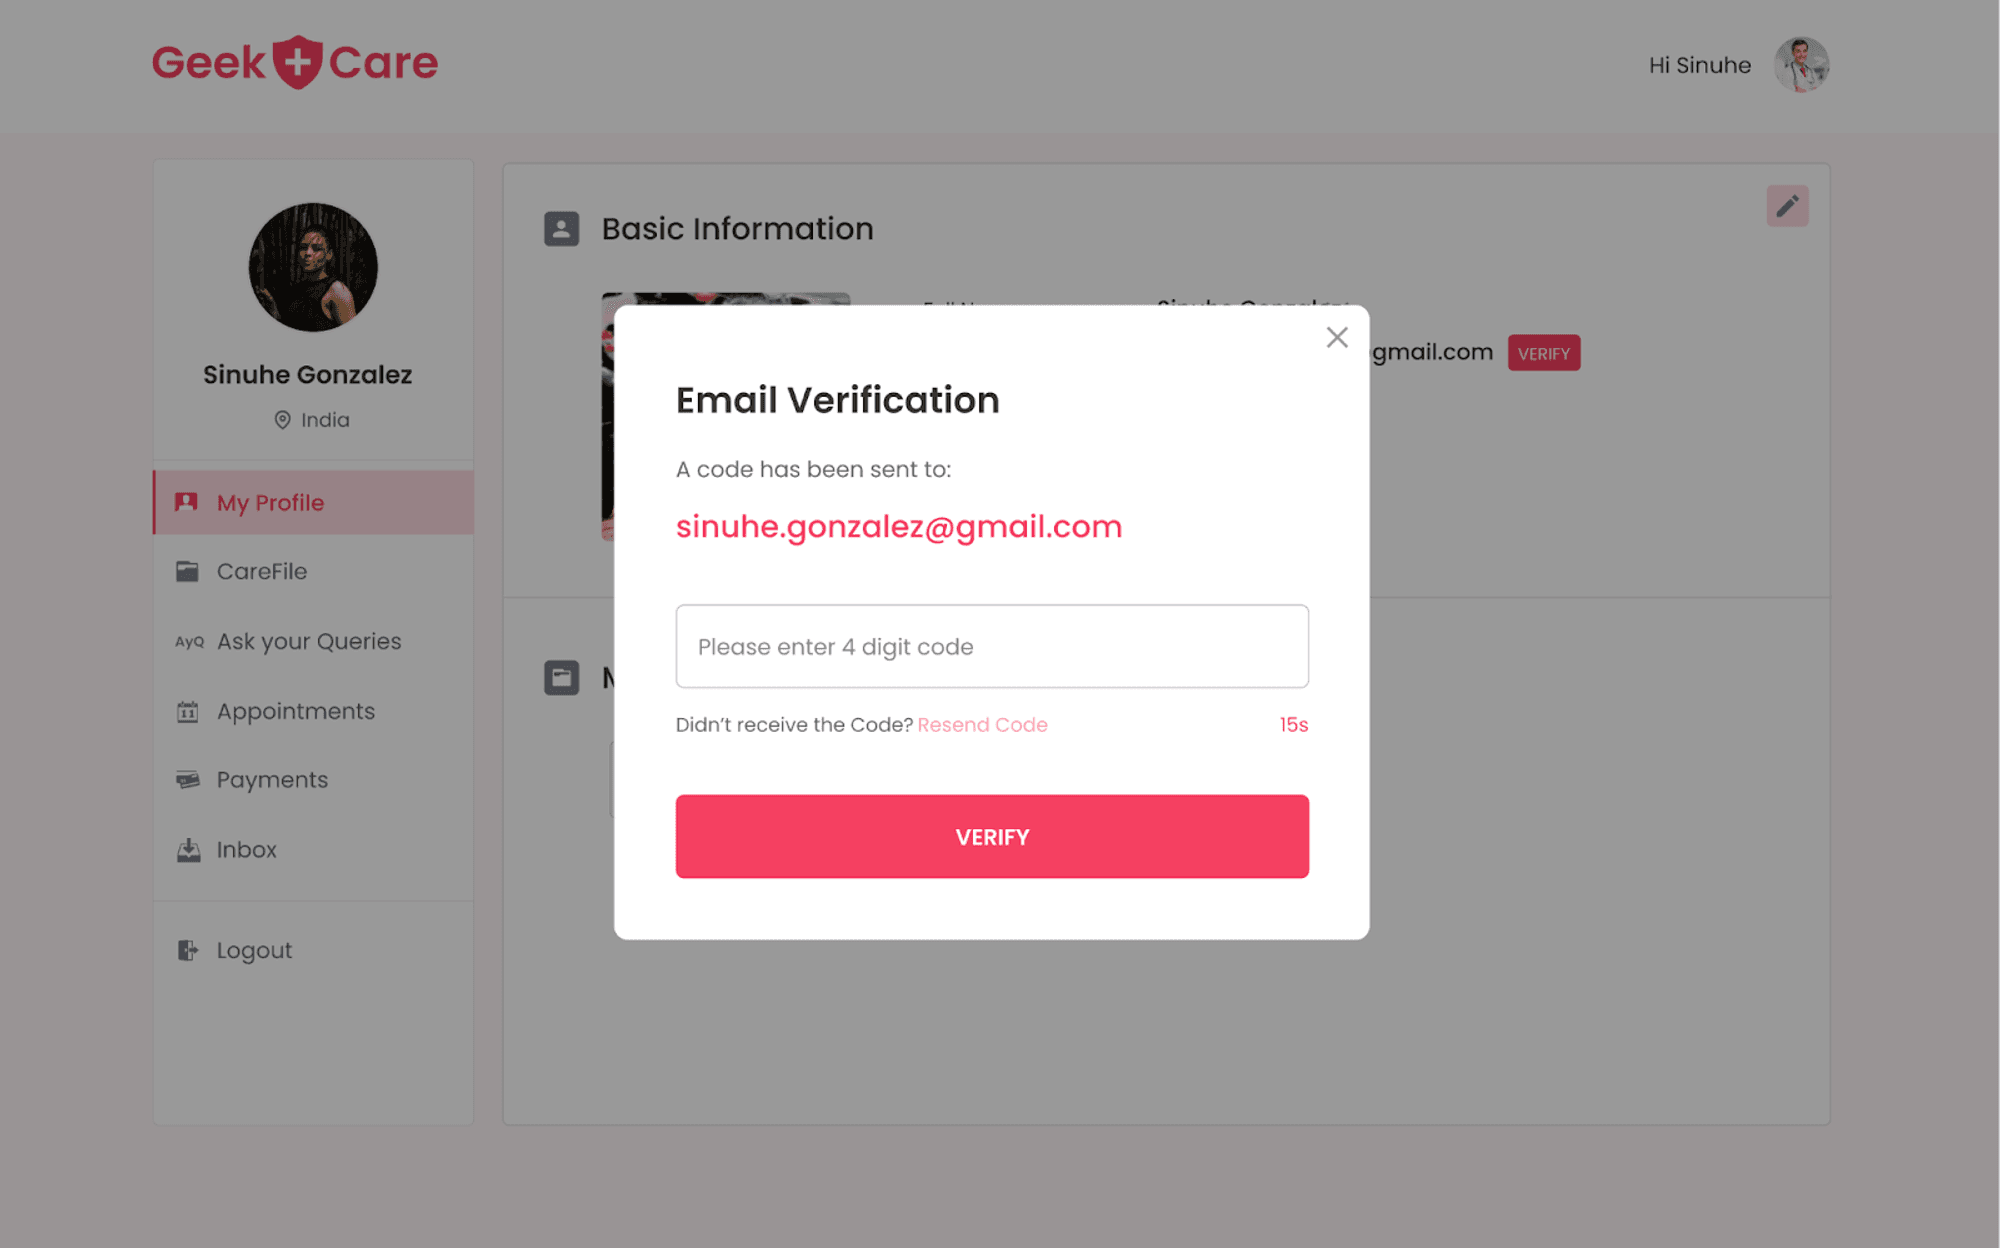
If a user forgets their password, there is also an option to reset it on the login screen. The user must click on "Forgot Password" and provide their email address for verification. A modal will then pop up, asking the user to verify the email address with an OTP that has been sent to the entered email address.
Once the user enters the correct OTP, they will be redirected to the reset password screen, where they can change their password. This process ensures that only the user with access to the email address associated with the account can reset the password, providing added security to the user's account.

Physician User Flow
Profile Page
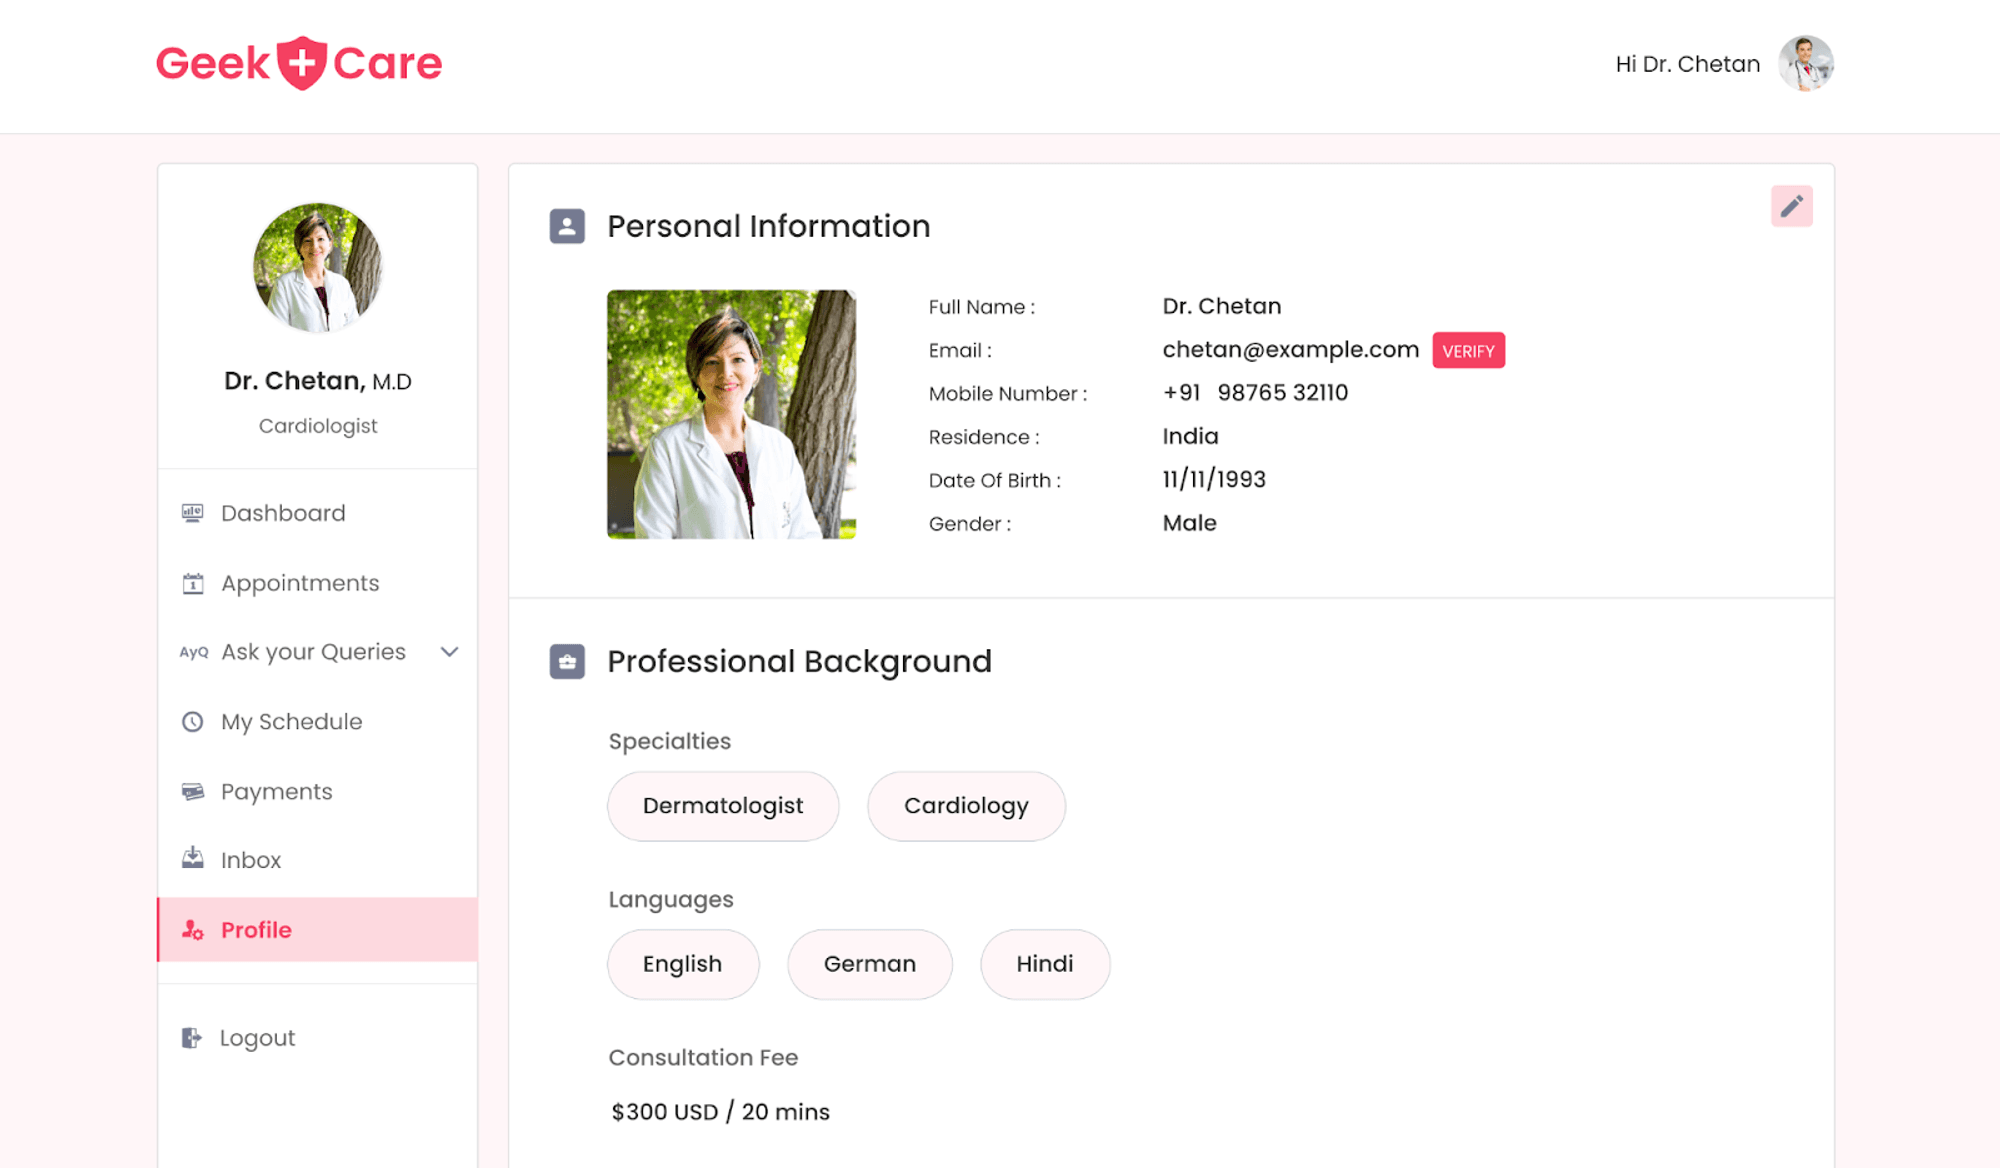
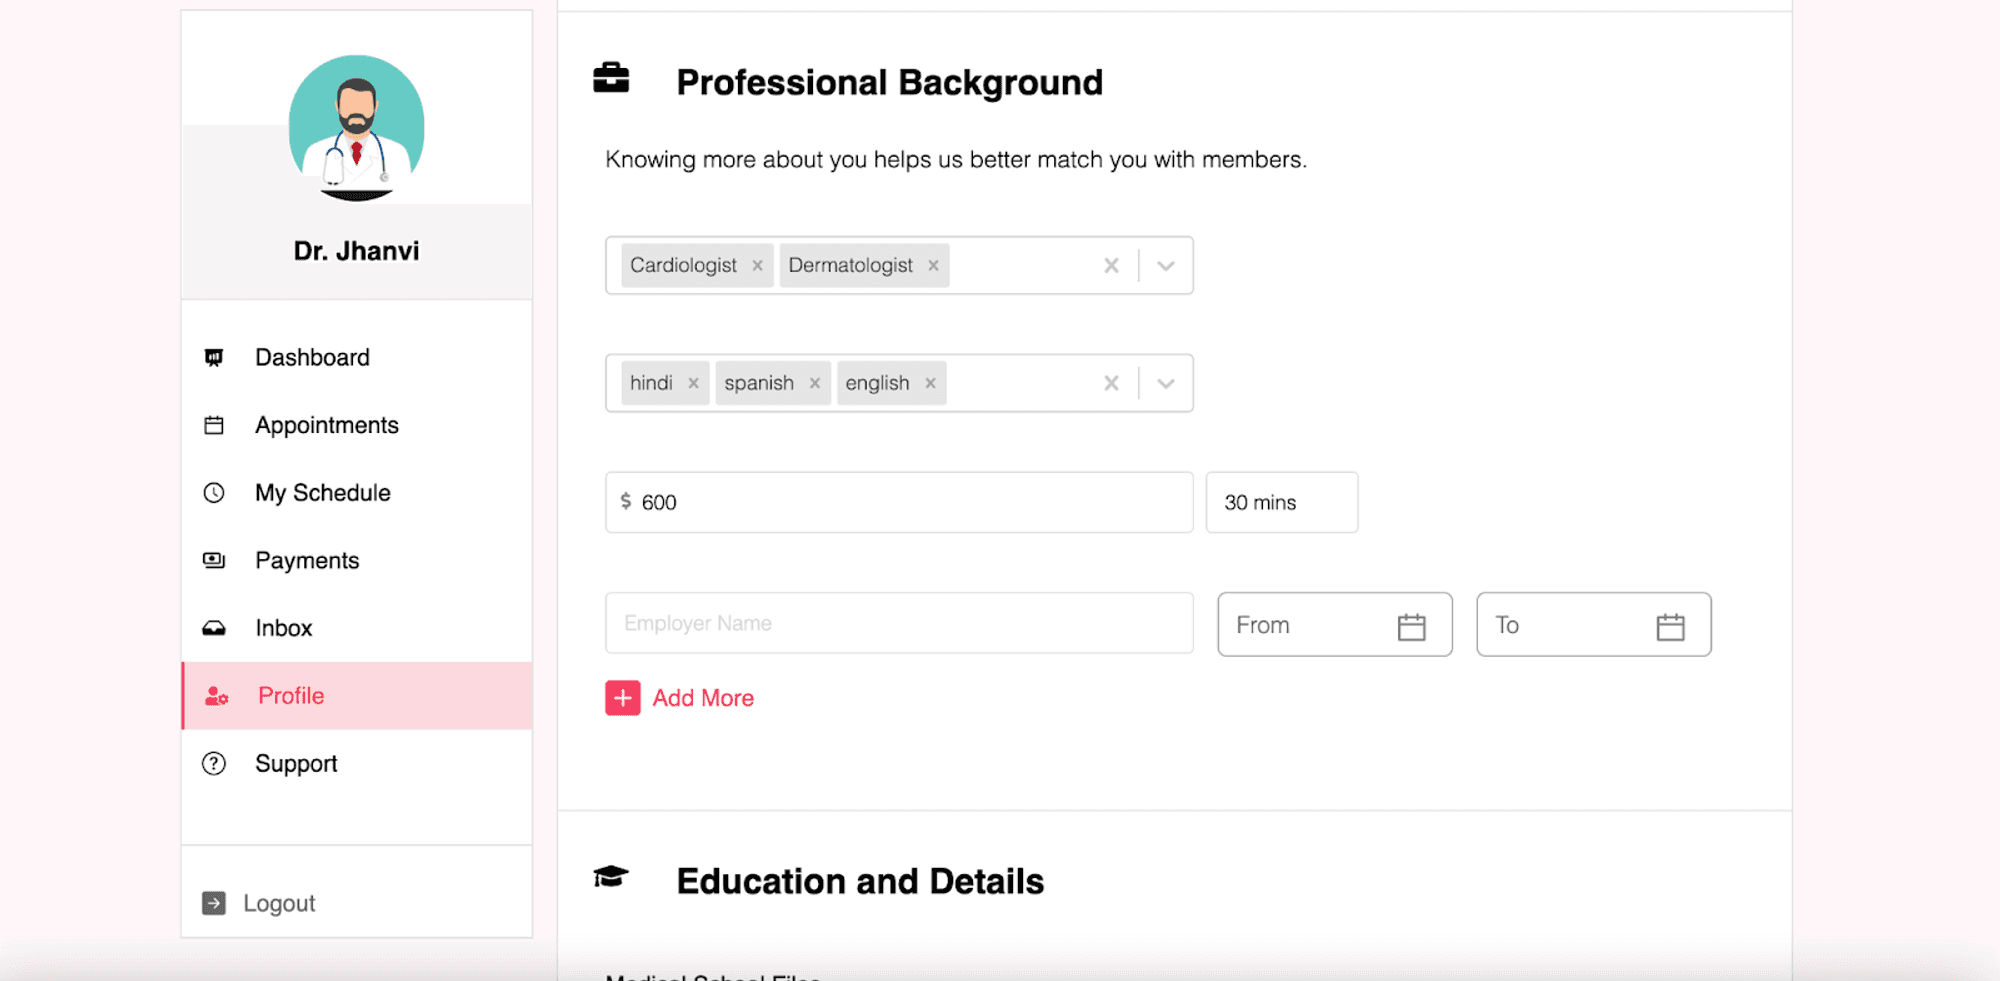
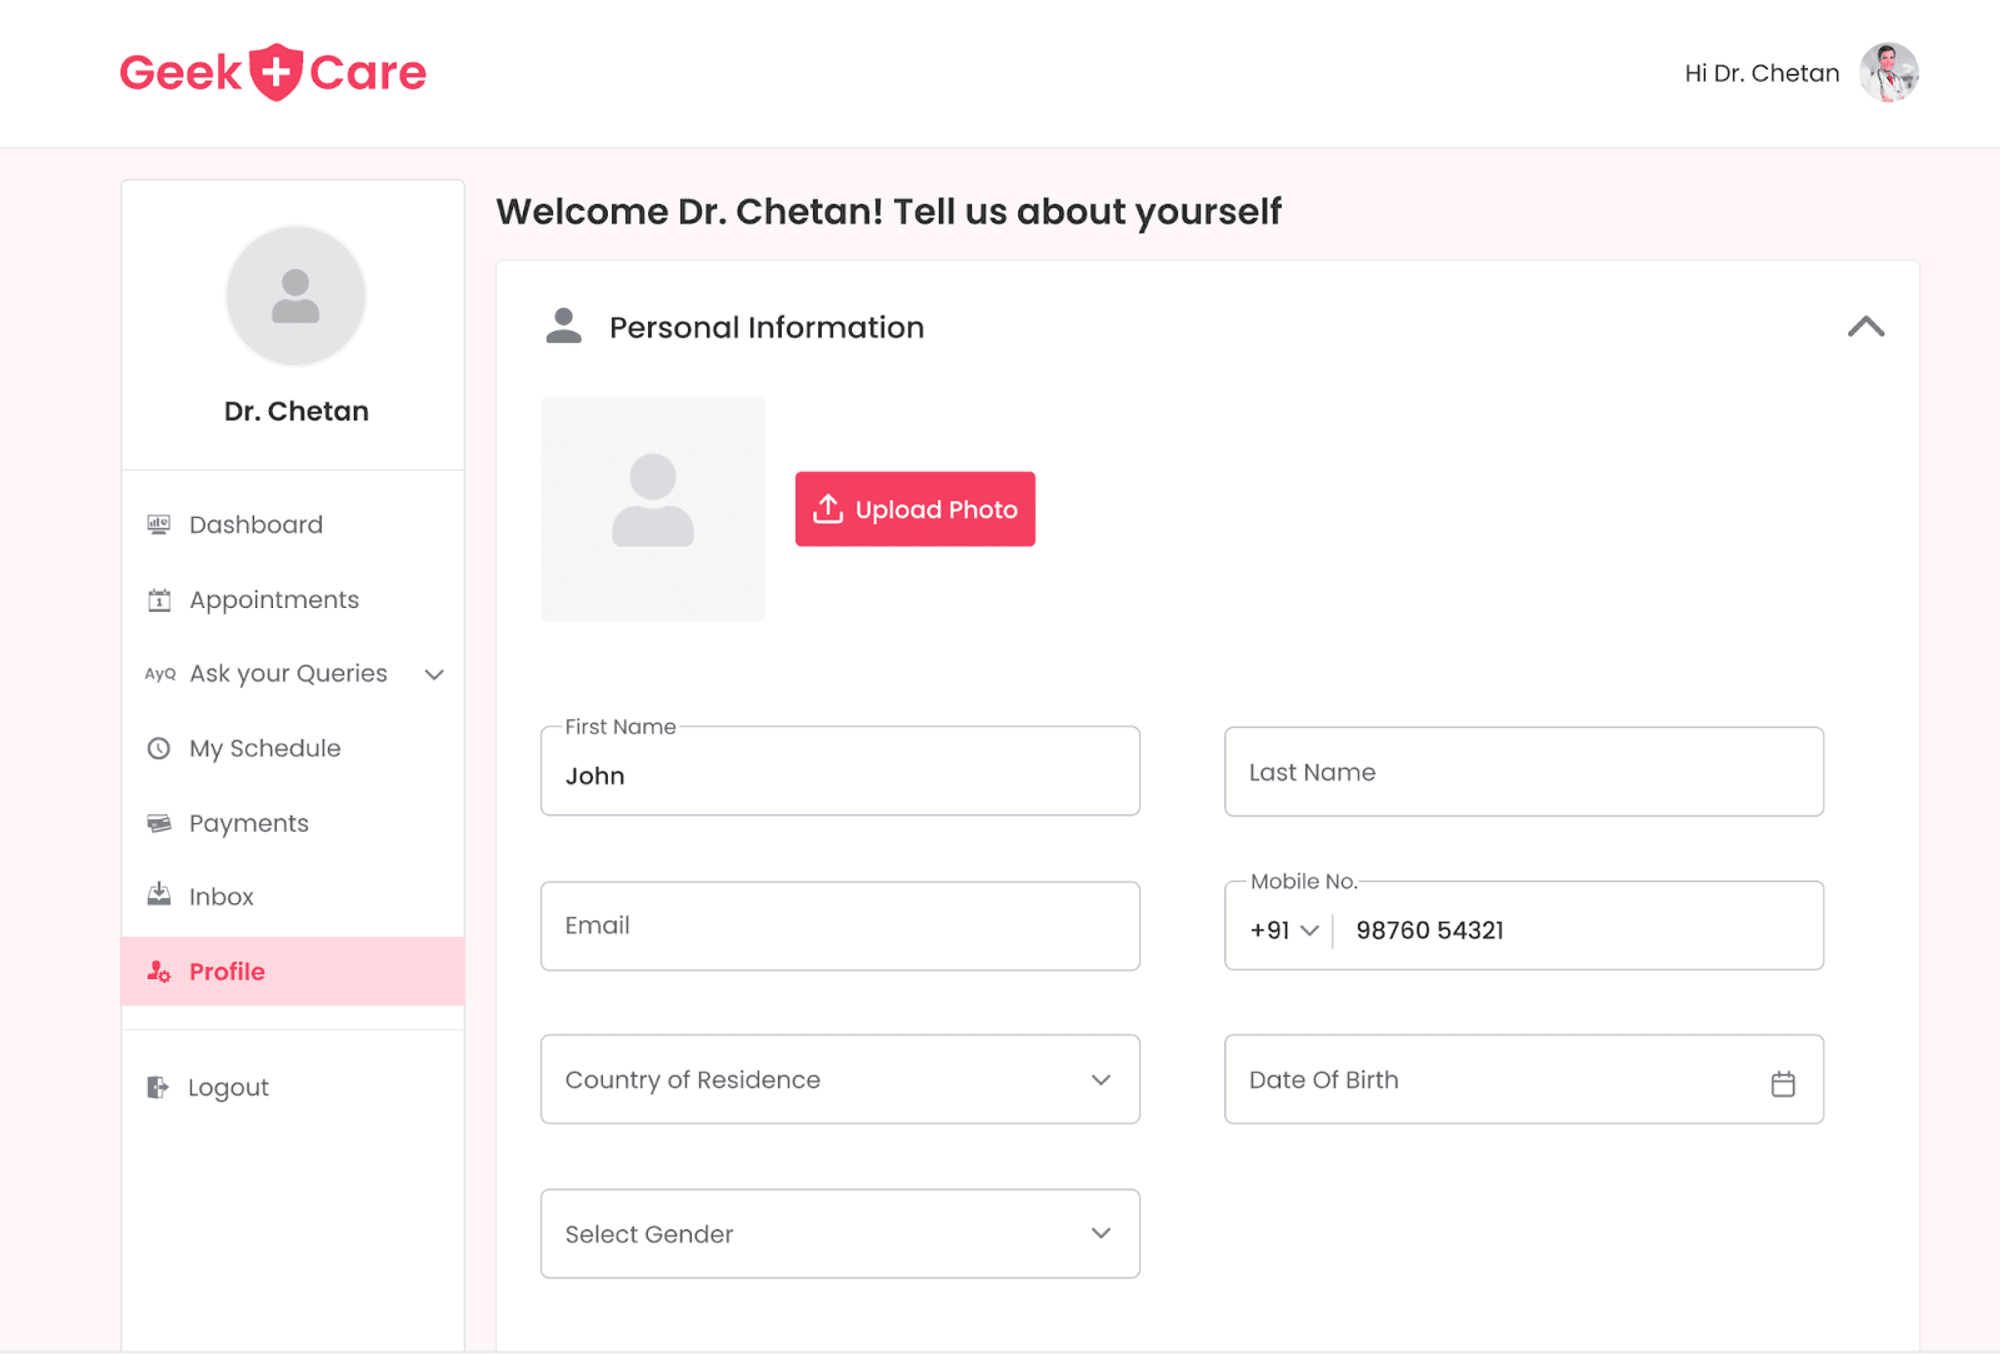
After logging in, physicians will be taken to their profile page. On this page, they must enter their details and upload their education qualifications. To complete their profile, they must also provide information about their professional background, such as their specialties, languages spoken, consultation rate per hour fees, and previous employment history.
Patients will use these details to filter and search for a doctor. Once the details are filled in, the profile section is complete and can be edited if needed. Additionally, there are options to change the password and delete the account.
Appointment Creation
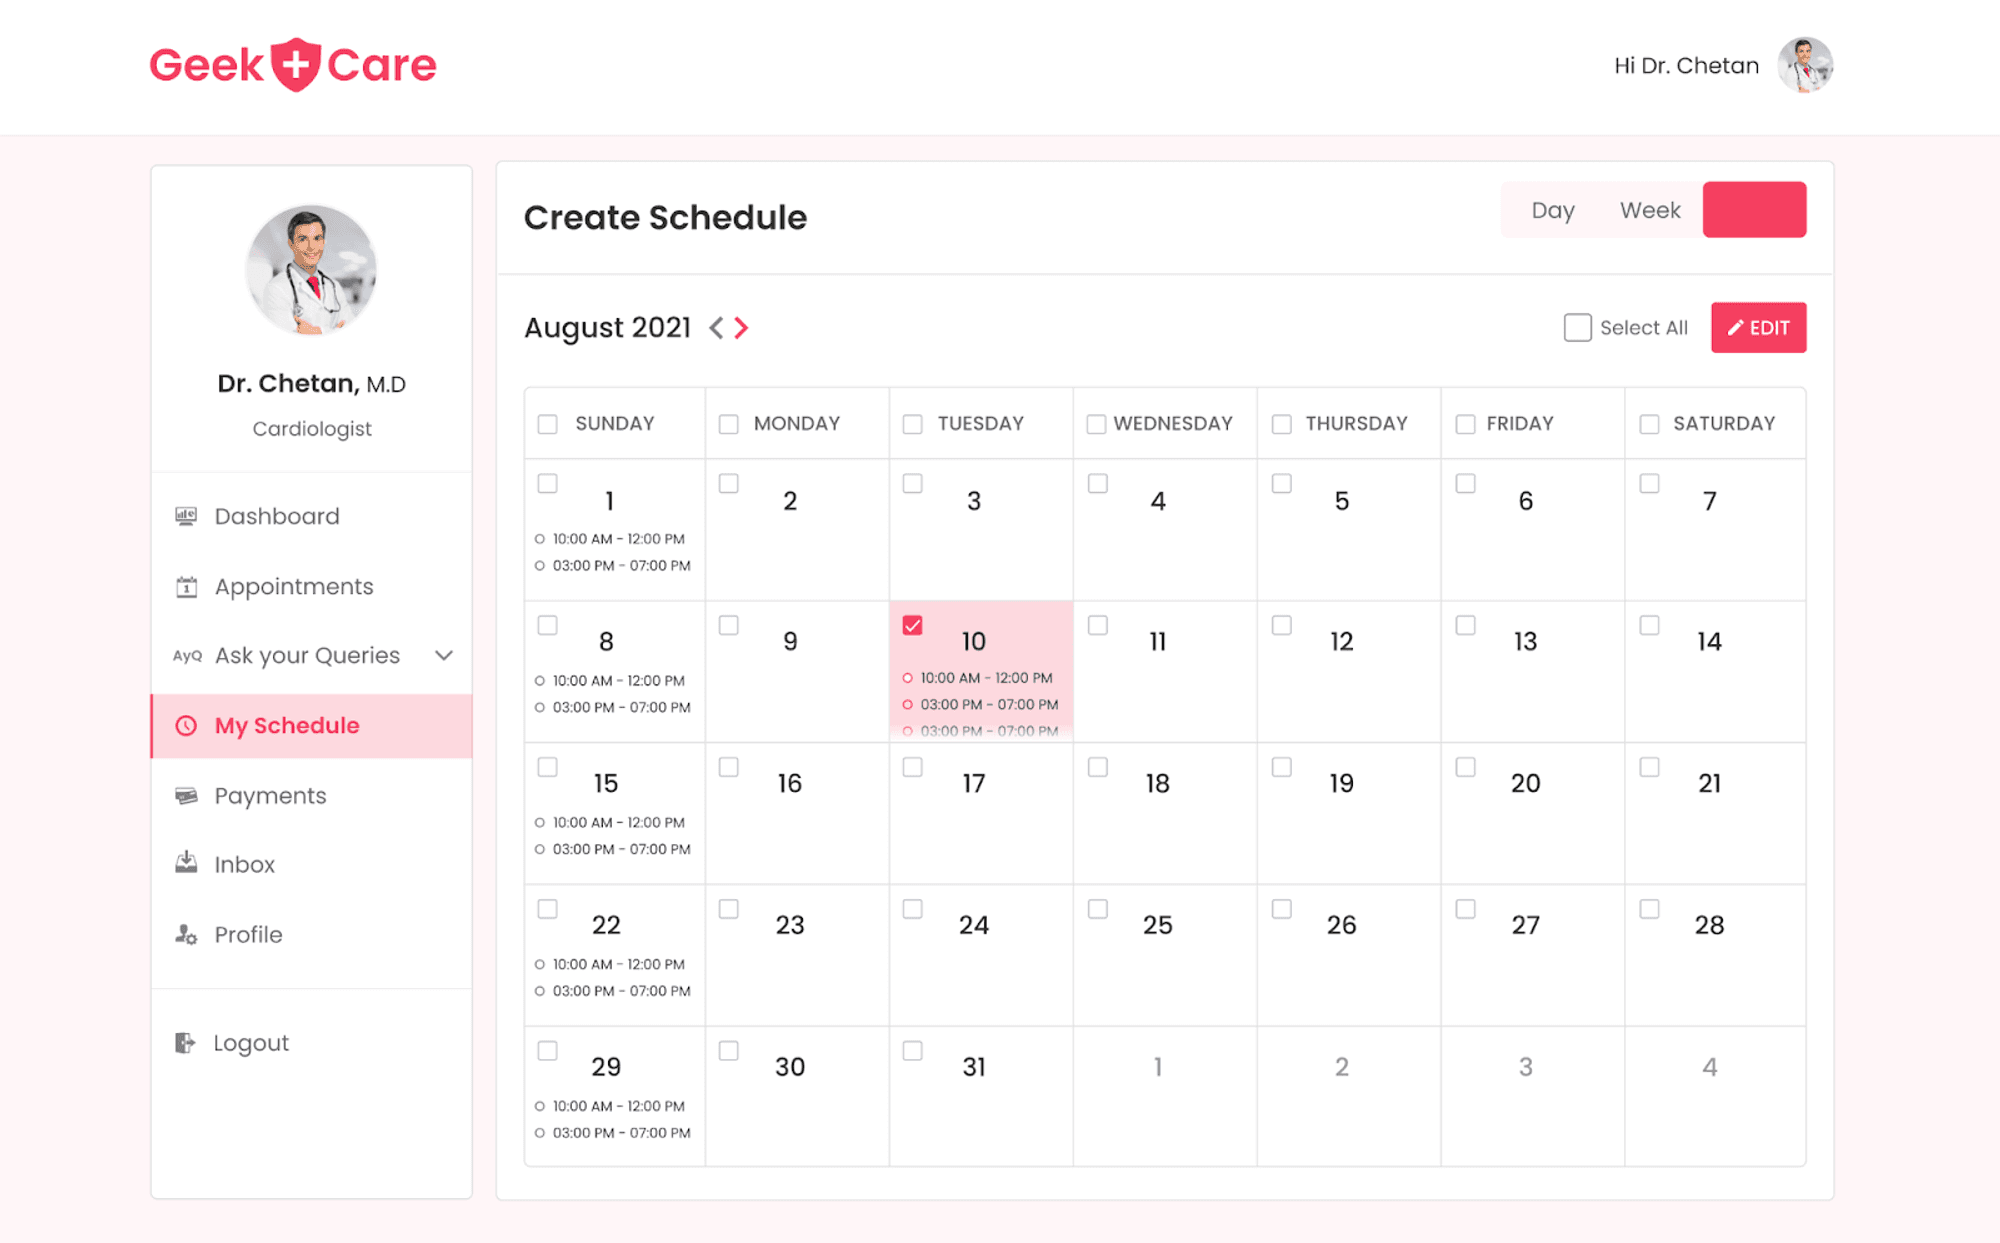
After filling in their profile details, doctors can create time slots for when they are available for appointments. These time slots will be visible on the patient portal and allow patients to schedule sessions. To create a timeslot, doctors can navigate to the "My Schedule" page from the sidebar. This will open a calendar on their profile.
The calendar has three views: month, week, and day. By clicking on a date, a modal will open, allowing them to select the duration and timeslot. To edit or remove a slot, the doctor can simply click on it and the appropriate options appear. The design and functionality of this feature are similar to that of Google Calendar, making it easy to understand and use.
Appointments
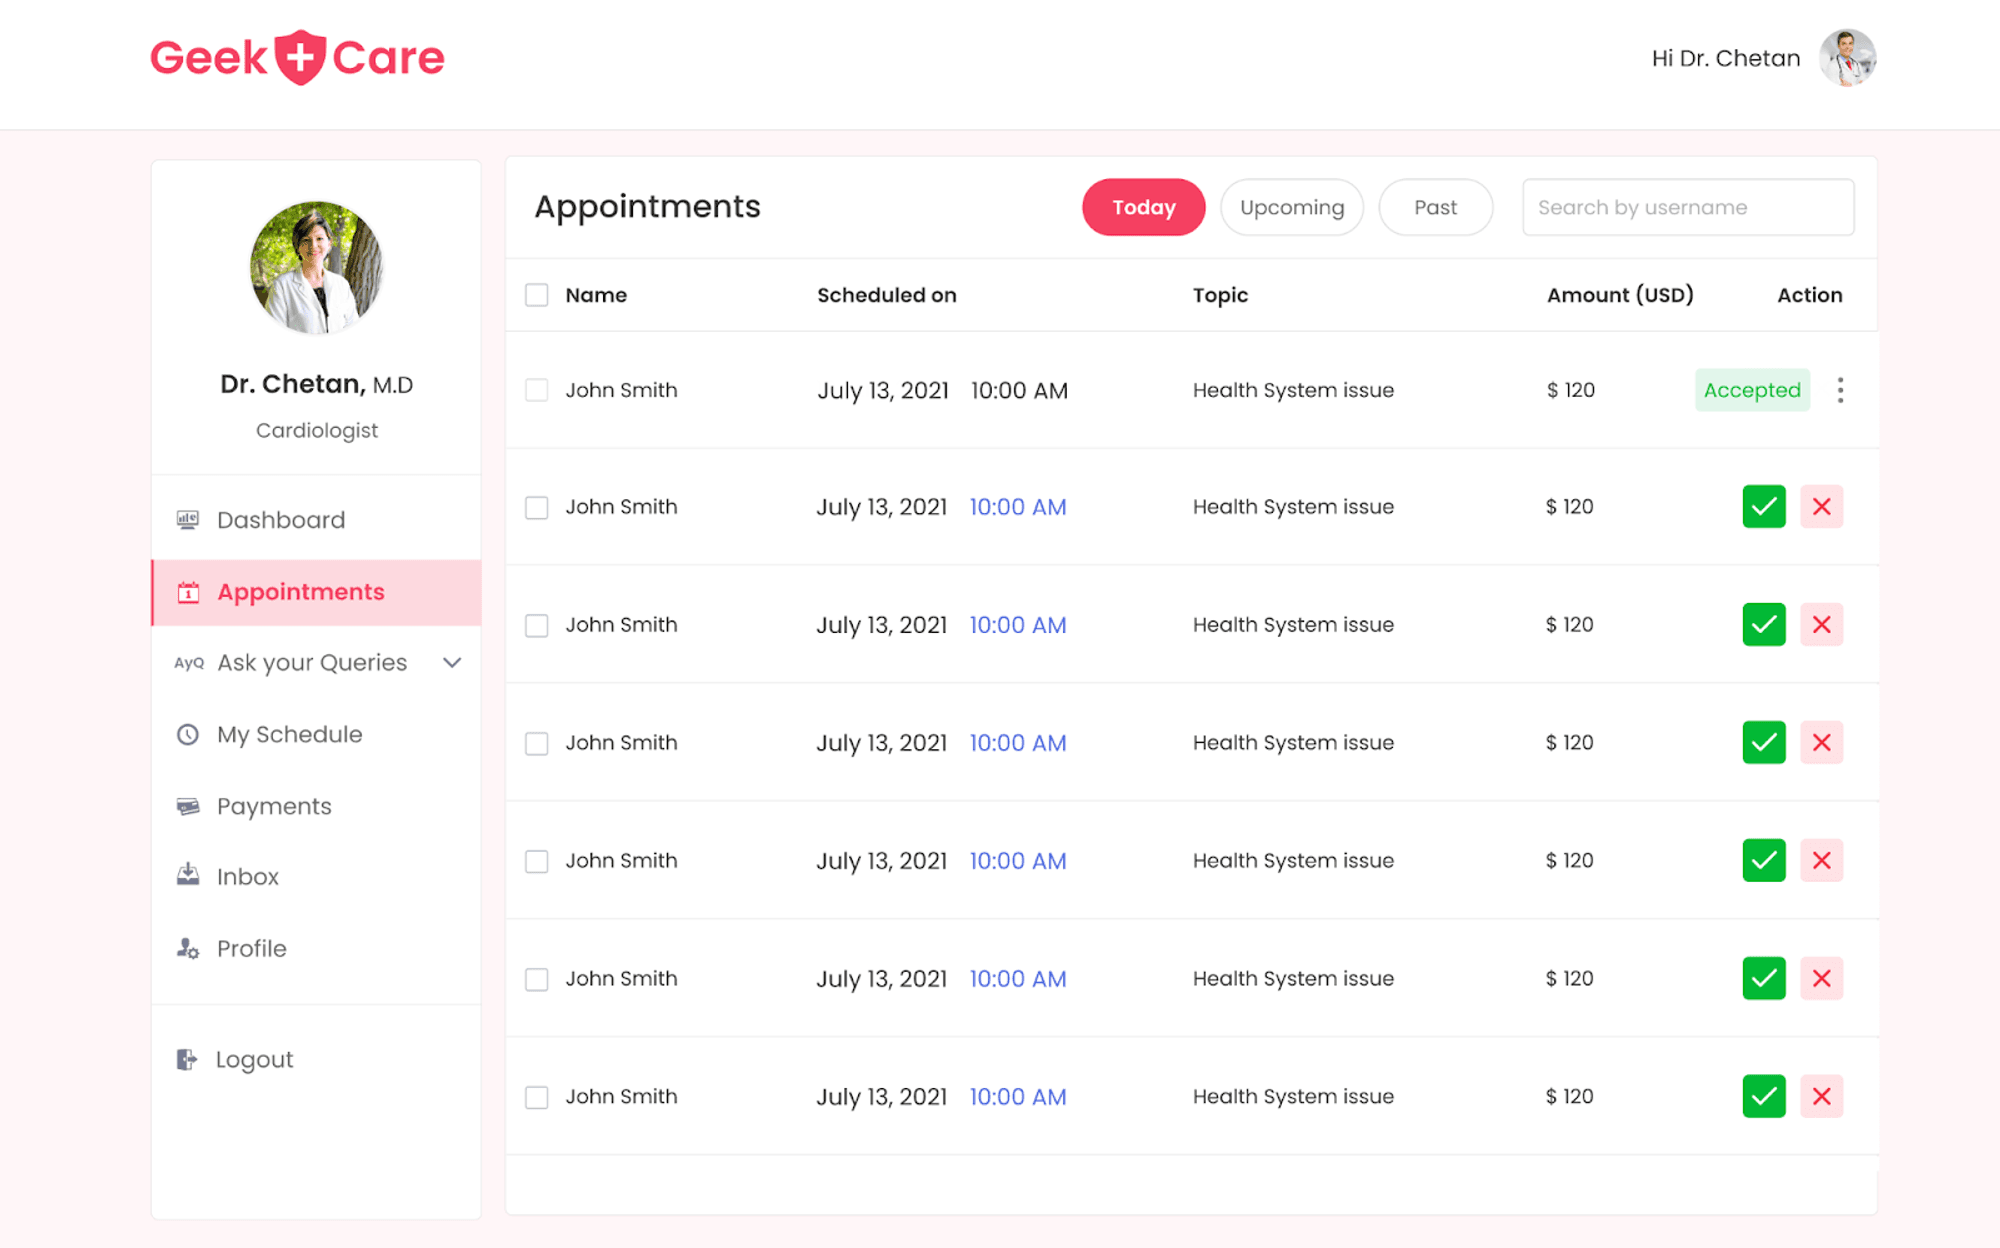
If a patient books an appointment with a doctor by selecting a timeslot, the doctor can view it by navigating to the "appointments" tab from the sidebar. The appointments tab will show today's, upcoming, and past appointments. All the appointments will be displayed and options like "select all", "approve all", "cancel all", and "filter out" options will be available.
The doctor can then approve, cancel, or reschedule to another date based on their availability. By clicking on any particular appointment, a modal with all the appointment details will open up. Additionally, after approving an appointment, the doctor will have the option to initiate a chat with the patient.
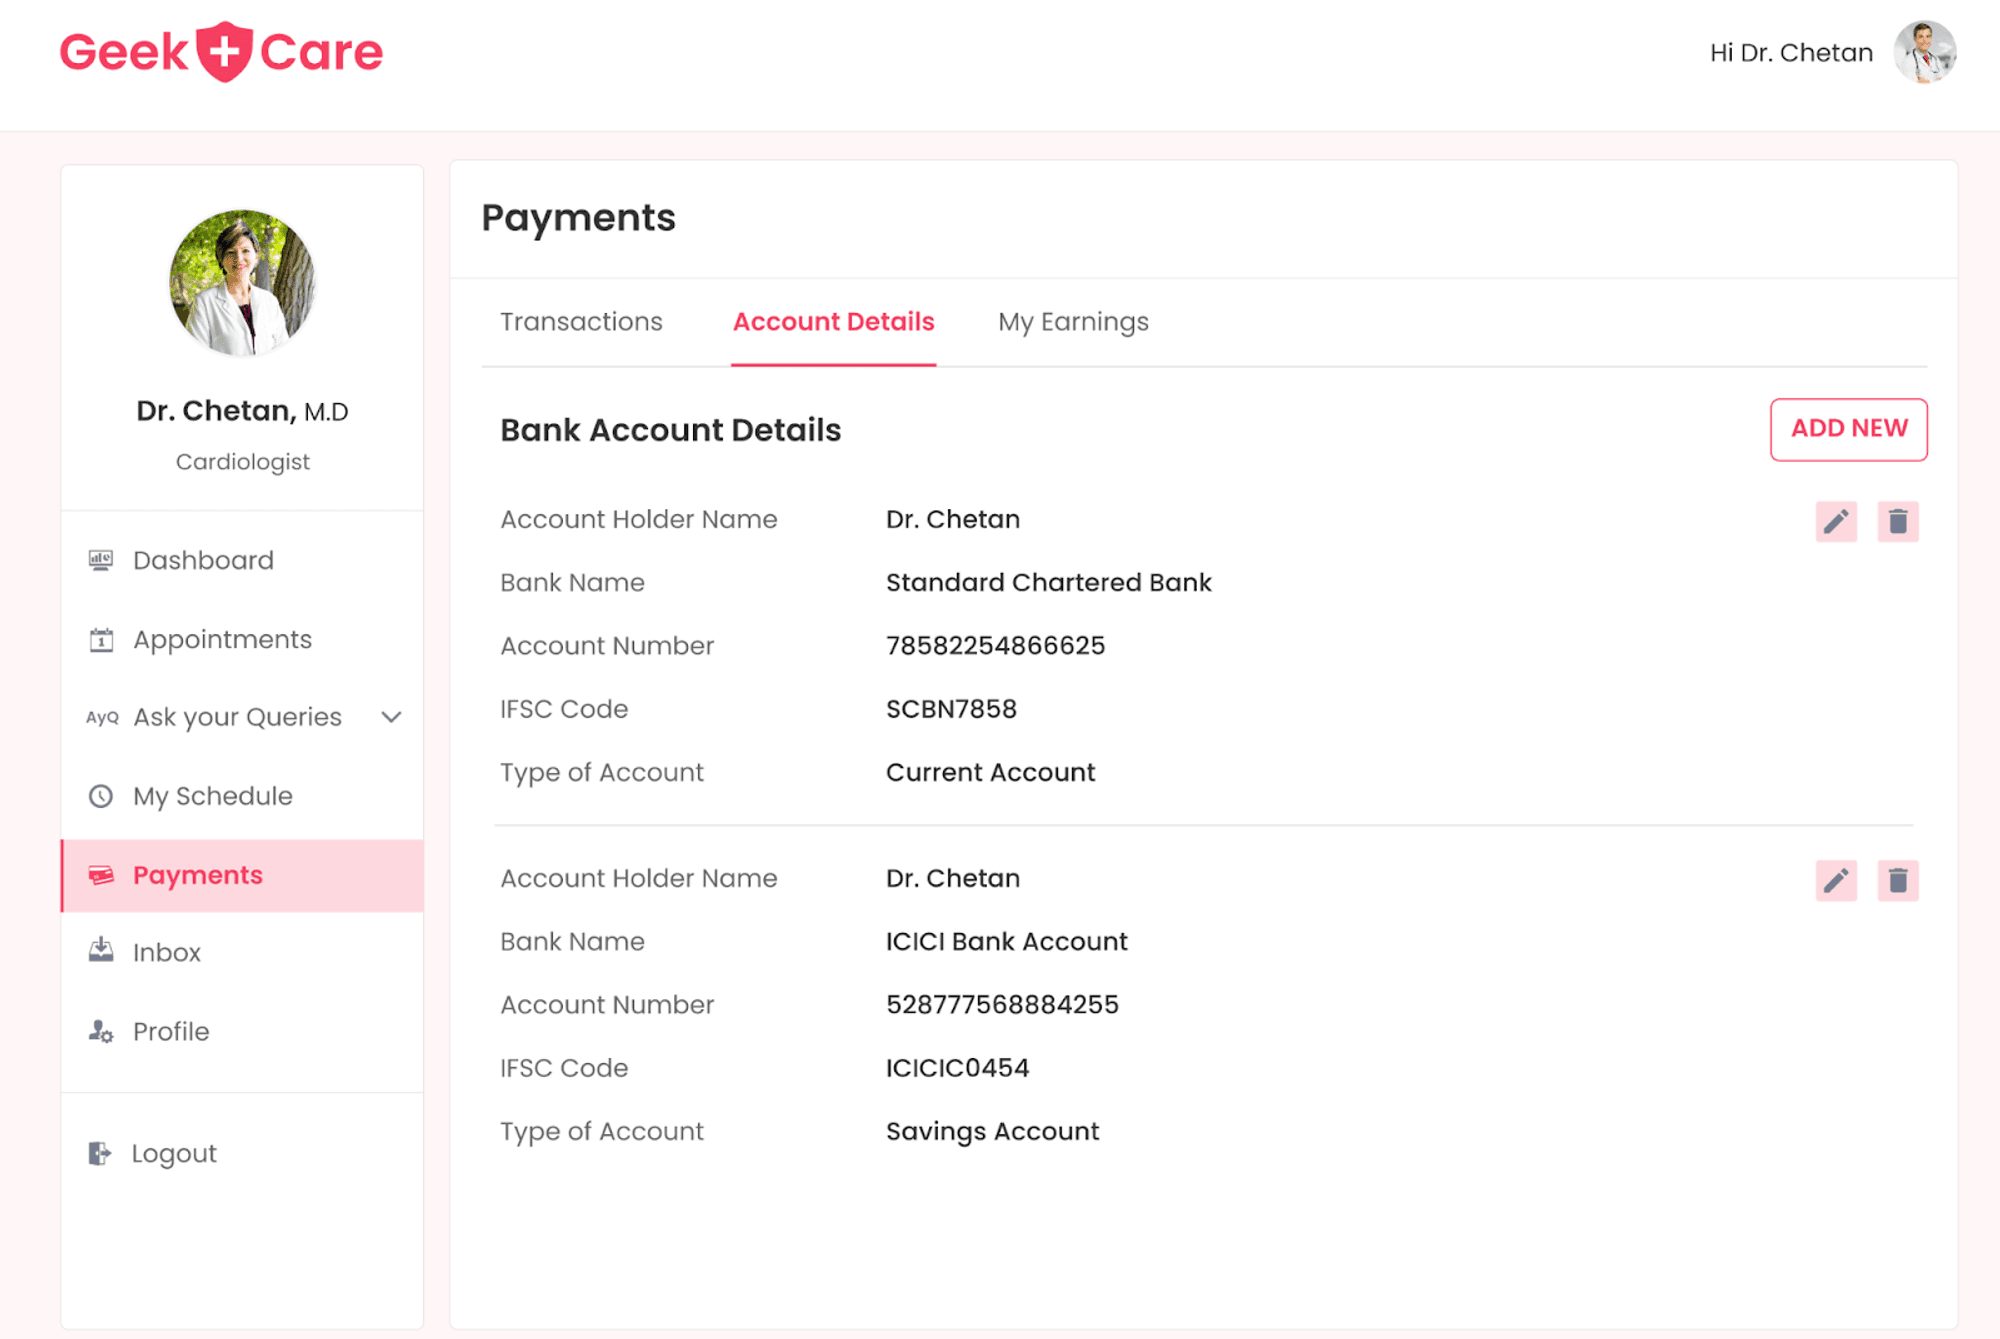
Payments
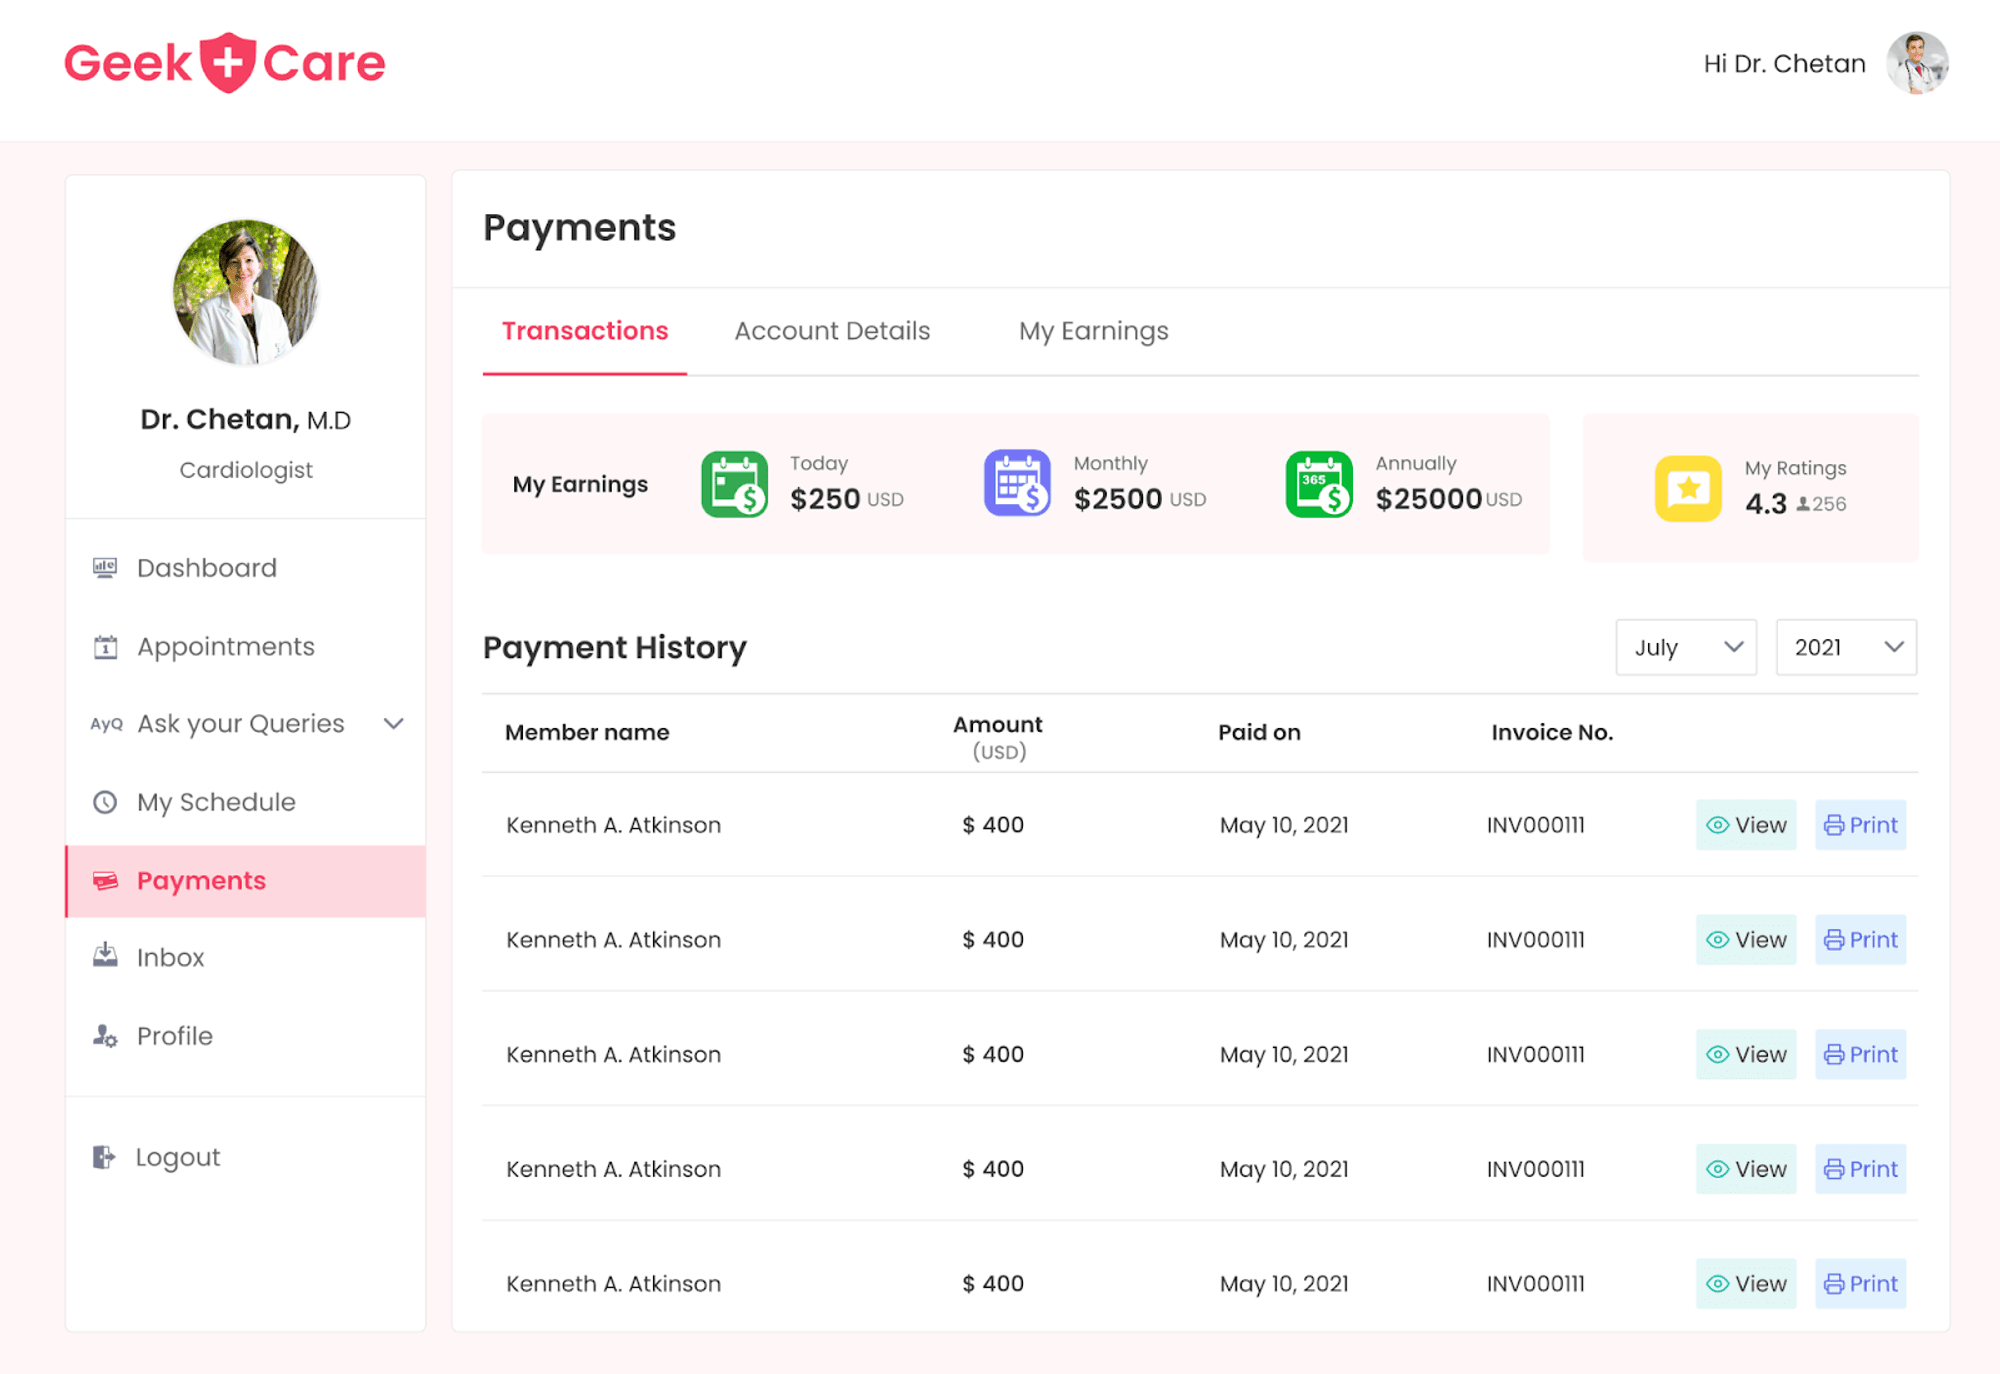
To keep track of all payments received and withdrawn, there is a "payment" tab available on the sidebar. When this tab is selected, a page with three tabs will open. The first tab, "transactions," will have detailed transaction information, including earnings on a daily, monthly, and yearly basis. If a doctor wants to view previous transactions, they also have the option to filter them out.
The second tab, "account details," allow doctors to view their bank account information, with options to add, delete, or edit any bank account. The third tab, "earnings," displays the available balance and the amount the doctor has withdrawn from their account, as well as a history of past withdrawals.
Patients User Flow
Home Screen
After logging in, members (patients) will be taken to the home screen, where they can search for a doctor using filters based on three main categories: specialty, price range, and available date. Once searched, members will be redirected to a page that displays the search results. Additional filters such as gender or language can also be used on this page to narrow the search results.
Based on their needs and preferences, members can click on "book appointment" to schedule an appointment with the doctor of their choice. This feature makes it easy for patients to find and book appointments with the right doctor for their specific needs.

Appointment Flow
Booking an Appointment
After clicking on "book an appointment" from search results, patients are redirected to the physician's profile, where they can view the doctor's information and schedule an appointment using the calendar. Patients can select a duration and starting time for the appointment and then fill out basic information about themselves or a loved one, including the reason for the appointment and any relevant details.
Payment Method
The member must make a payment for the appointment booking to be successful. We used Razorpay as a payment gateway to initiate any payments from members to physicians for appointments, and following a successful payment, the appointment was confirmed.
Member Dashboard
Members can access their dashboard by clicking on their profile picture on the navigation bar at any time. Moreover, after an appointment has been successfully confirmed, members can navigate to the appointment tab of their dashboard as well.
My Profile
The Member Dashboard has five main features, one of which is "My Profile." In this section, members can fill in their basic information and edit it if needed. They will also have the option to delete or change their password.
Medical History
In the "Medical History", members can add information about their medical history. This includes specific medications they have taken, allergies, and information about their health backgrounds, such as past surgeries or genetic conditions. They can also add images of lab reports to provide doctors with a more detailed view of their condition. Additionally, members can also provide information about their habits, like smoking or alcohol consumption, in this section.
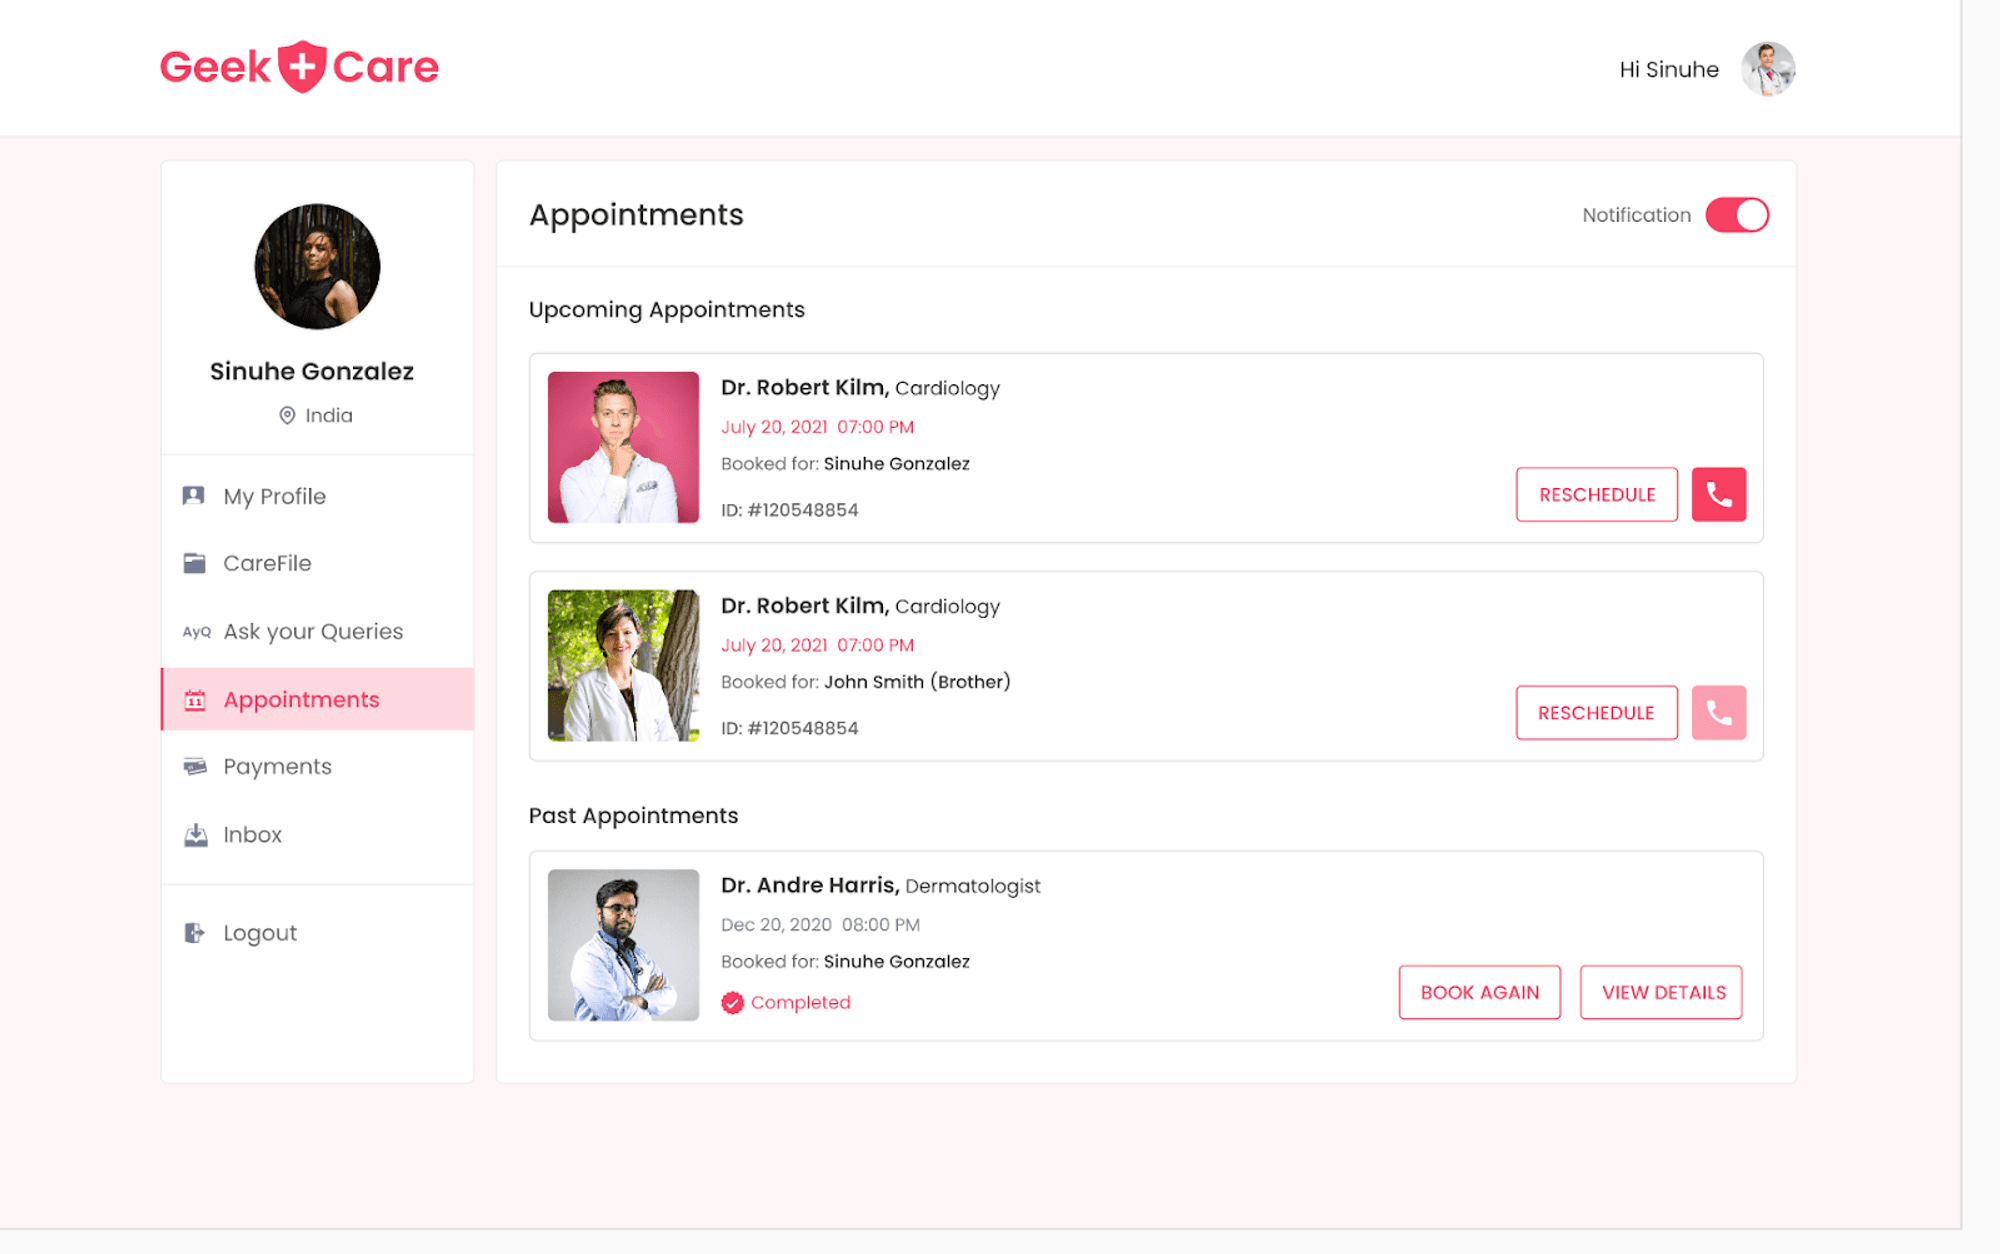
Appointments
The "Appointment" section of the Member Dashboard displays the details of any upcoming appointments and allows members to cancel or reschedule them if necessary. Additionally, there is an option for members to initiate a conversation with the doctor associated with the upcoming appointment.
By clicking on an appointment from upcoming appointments, members can view the entire appointment details and add any additional relevant information in the provided text area. This section also includes a record of past appointments, which members can use to book the same doctor again and provide ratings or reviews for past appointments.
Payments
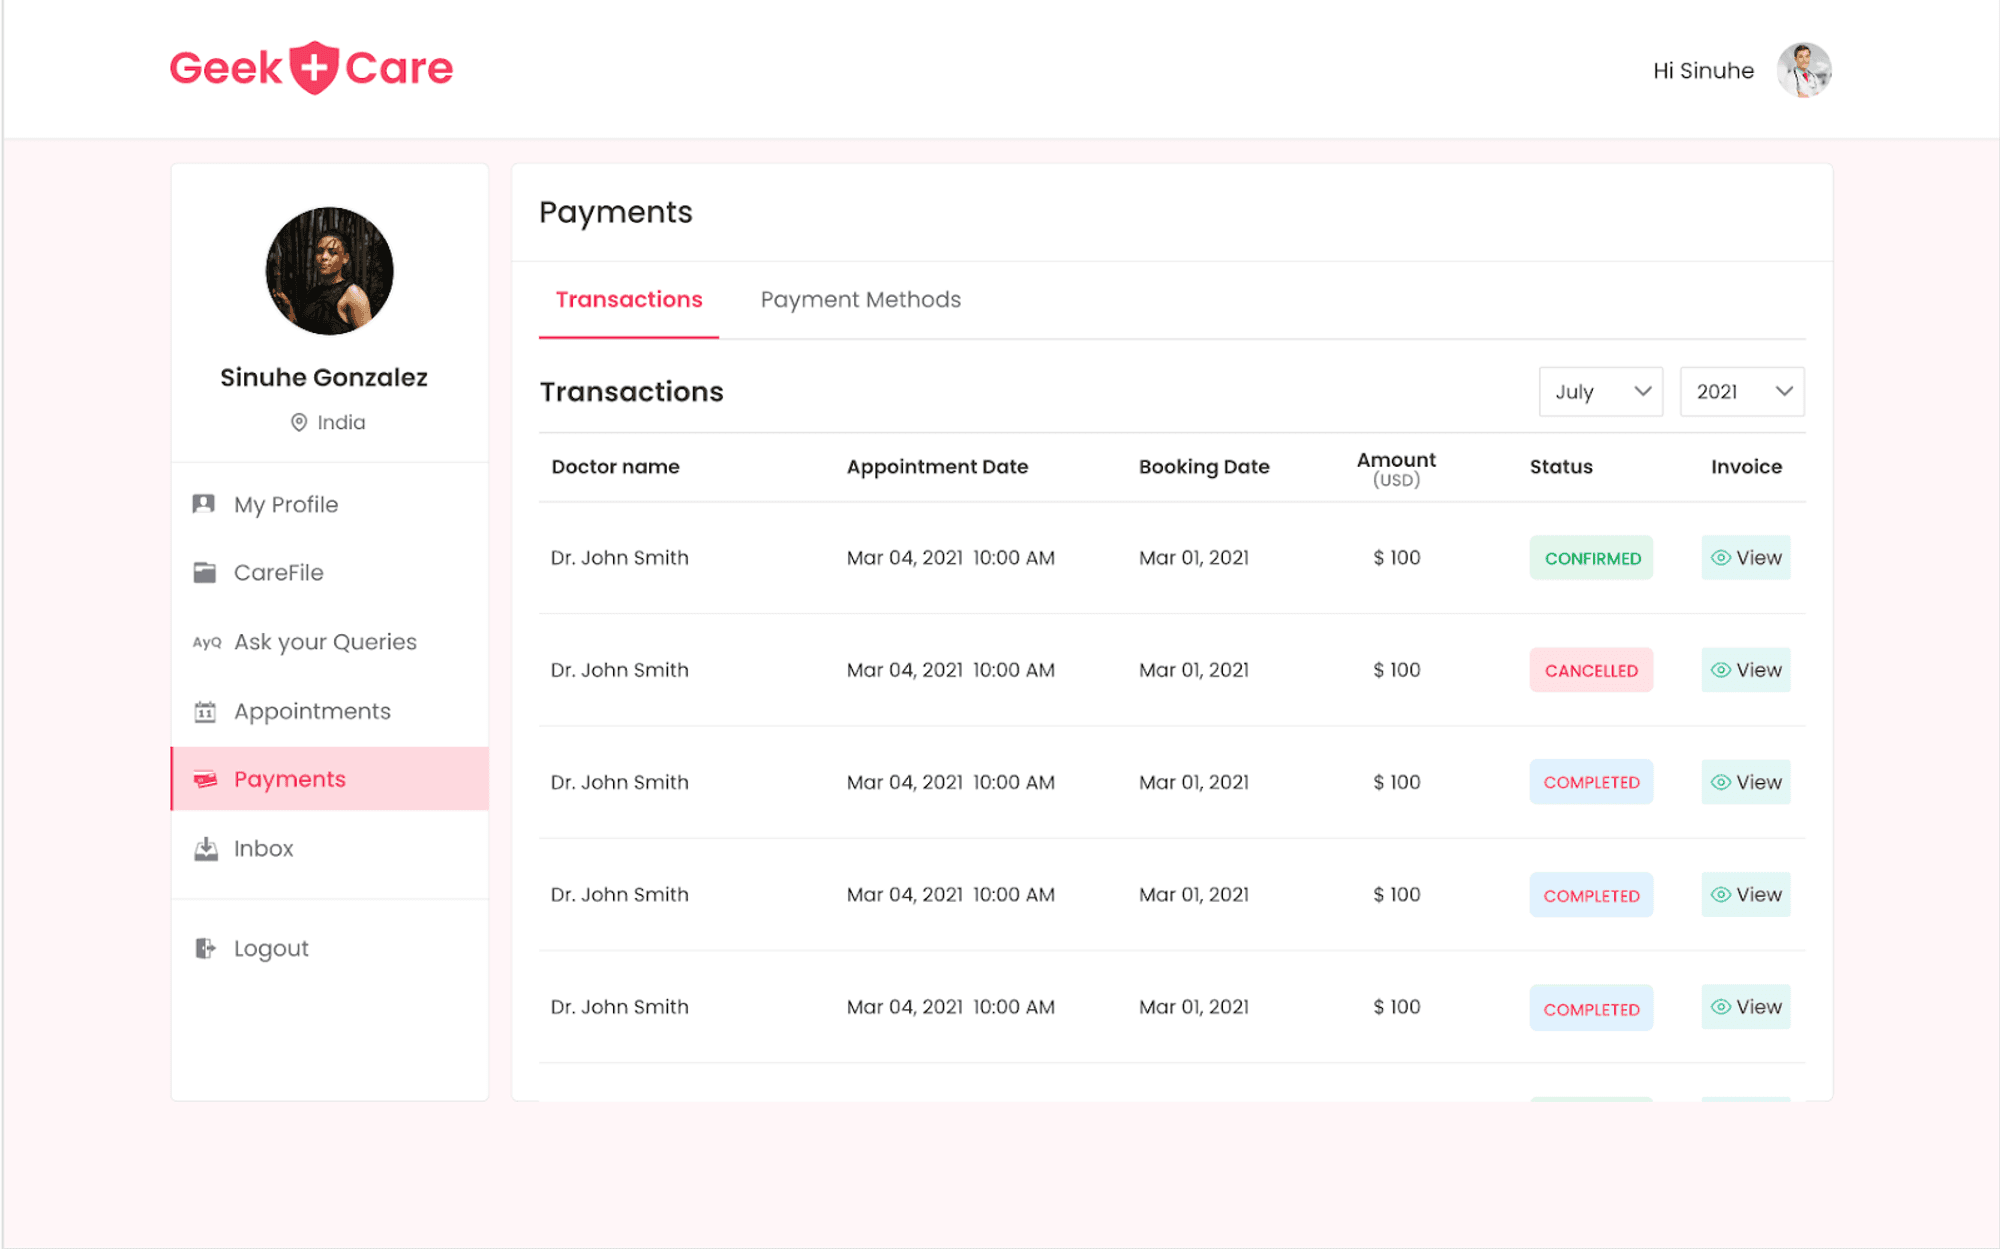
The "Payment" section of the Member Dashboard contains the transaction history of all appointments booked by the member. Members can filter transactions based on the month and year. Additionally, there is a tab in the Payment section where members can save their card information for future use.
API Calls : A Closer Look at the Flow of Data
The client sends a request to the server using an API call. This acts as a bridge between the client-side application and the server-side web server. When a user initiates an API call, the application is instructed to perform a specific action. In response, the application sends an API request to the web server, specifically to Hasura.
In our application, when an API is called from the front end with the required parameters for adding or retrieving data from Hasura, the code flow is directed toward the controller of the corresponding API.
From the controller, the API is invoked using Axios, along with the necessary options such as the GraphQL endpoint, the admin secret, the content type, the method for the API call, the query name, and the variables to execute the query. The request is then sent to the GraphQL endpoint through the POST method. The result of the executed query is received and returned to the front end with a valid status code and the data received from Hasura Cloud.
Chat Messages
The chat feature will allow both the doctor and patient to send messages one-to-one regarding any health issues and more.
The ChatMessages component uses the useSocket hook, which handles the functionality of sending and receiving messages in a chat room. The hook takes in the selectedChat object and a boolean isMember as props and returns an object with several properties, including chatMessages which contains the messages in the chat , handleSendMessage - a function to send messages , divRef - a reference to a DOM element , myId - the user's ID, inputValue and setInputValue.
The useSocket hook also takes in the 'room_id' as a parameter. The WebSocket connection will allow the client to perform real-time communication with the server. The WebSocket protocol provides a full-duplex communication channel over a single TCP connection. This means that the client and server can send messages to each other simultaneously without the need to establish new connections.
The useSocket hook handles the WebSocket connection and communication with the server. It uses the WebSocket API to establish a connection to a WebSocket endpoint provided by the server. It also uses the useState and useEffect hooks to manage the state of the chat messages and the WebSocket connection.
Once a WebSocket connection is established, the hook subscribes to a graphql subscription using the GET_ALL_MESSAGES query. It listens for incoming messages and updates the state of the chat messages with the received data.
The hook also includes a handleSendMessage function that uses the useMutation hook to make a post request to the server to send a new message. It takes the current input value and the logged-in user's ID as parameters.
The useSocket hook also includes a divRef and firstRender refs to handle scrolling to the bottom of the chat messages and an inputValue and setInputValue for handling the message input.
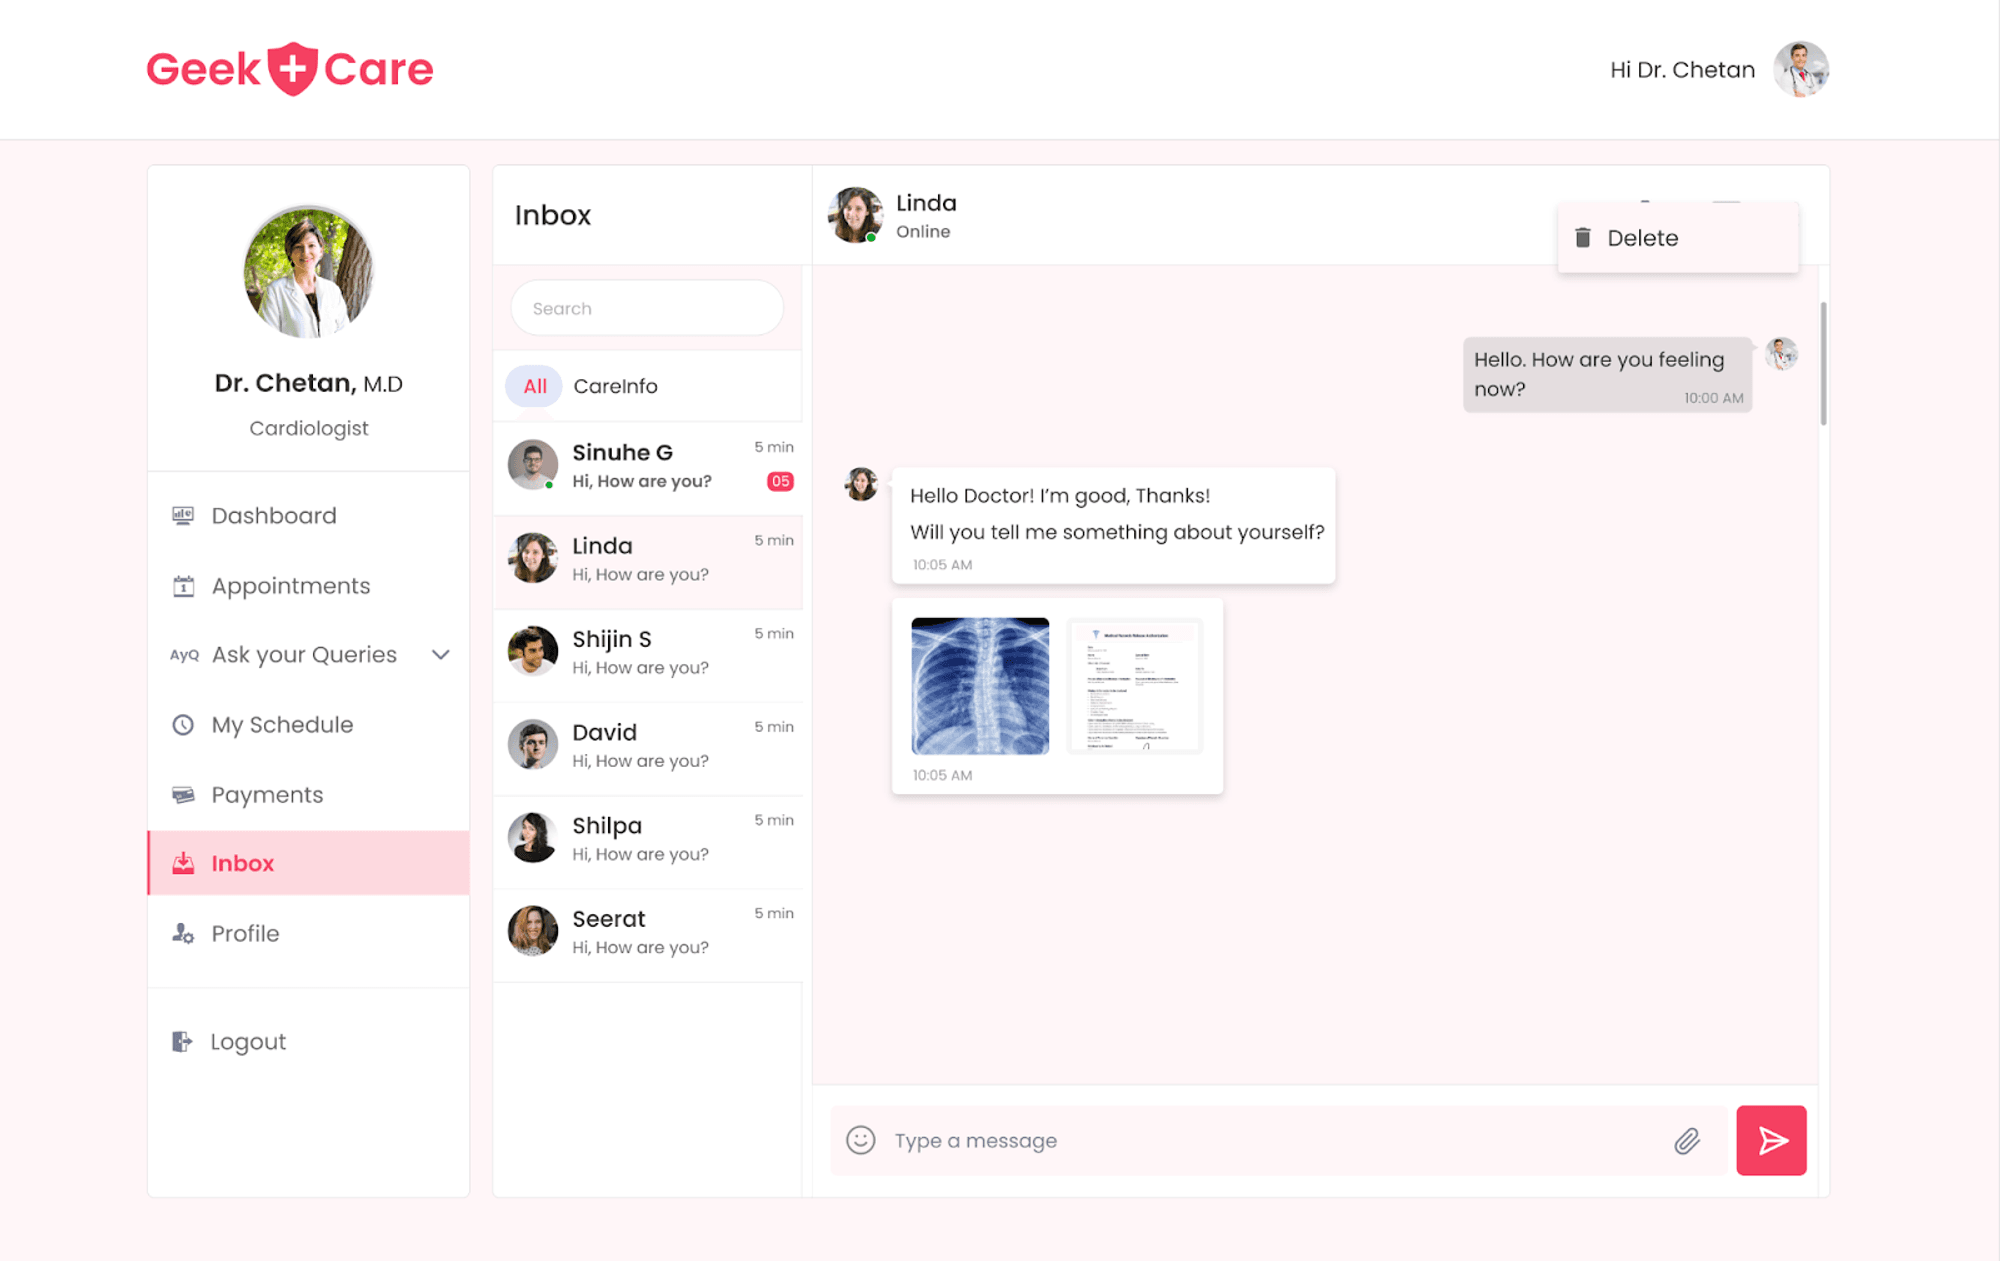
Inbox/Calls
The Member Dashboard has an "Inbox" tab where members can initiate a chat or view previous messages with physicians. This tab displays all previous and current conversations with physicians, and members can initiate a video call with the doctor directly from there.
If a doctor wants to initiate a chat with a patient or view previous messages, they can go to the "inbox" tab. This tab will show all the previous and current patient conversations, and the doctor can start a new chat or video call with the patient from there. The video call component of the chat allows the doctor to confer remotely with the patient, making it more comfortable for both parties.
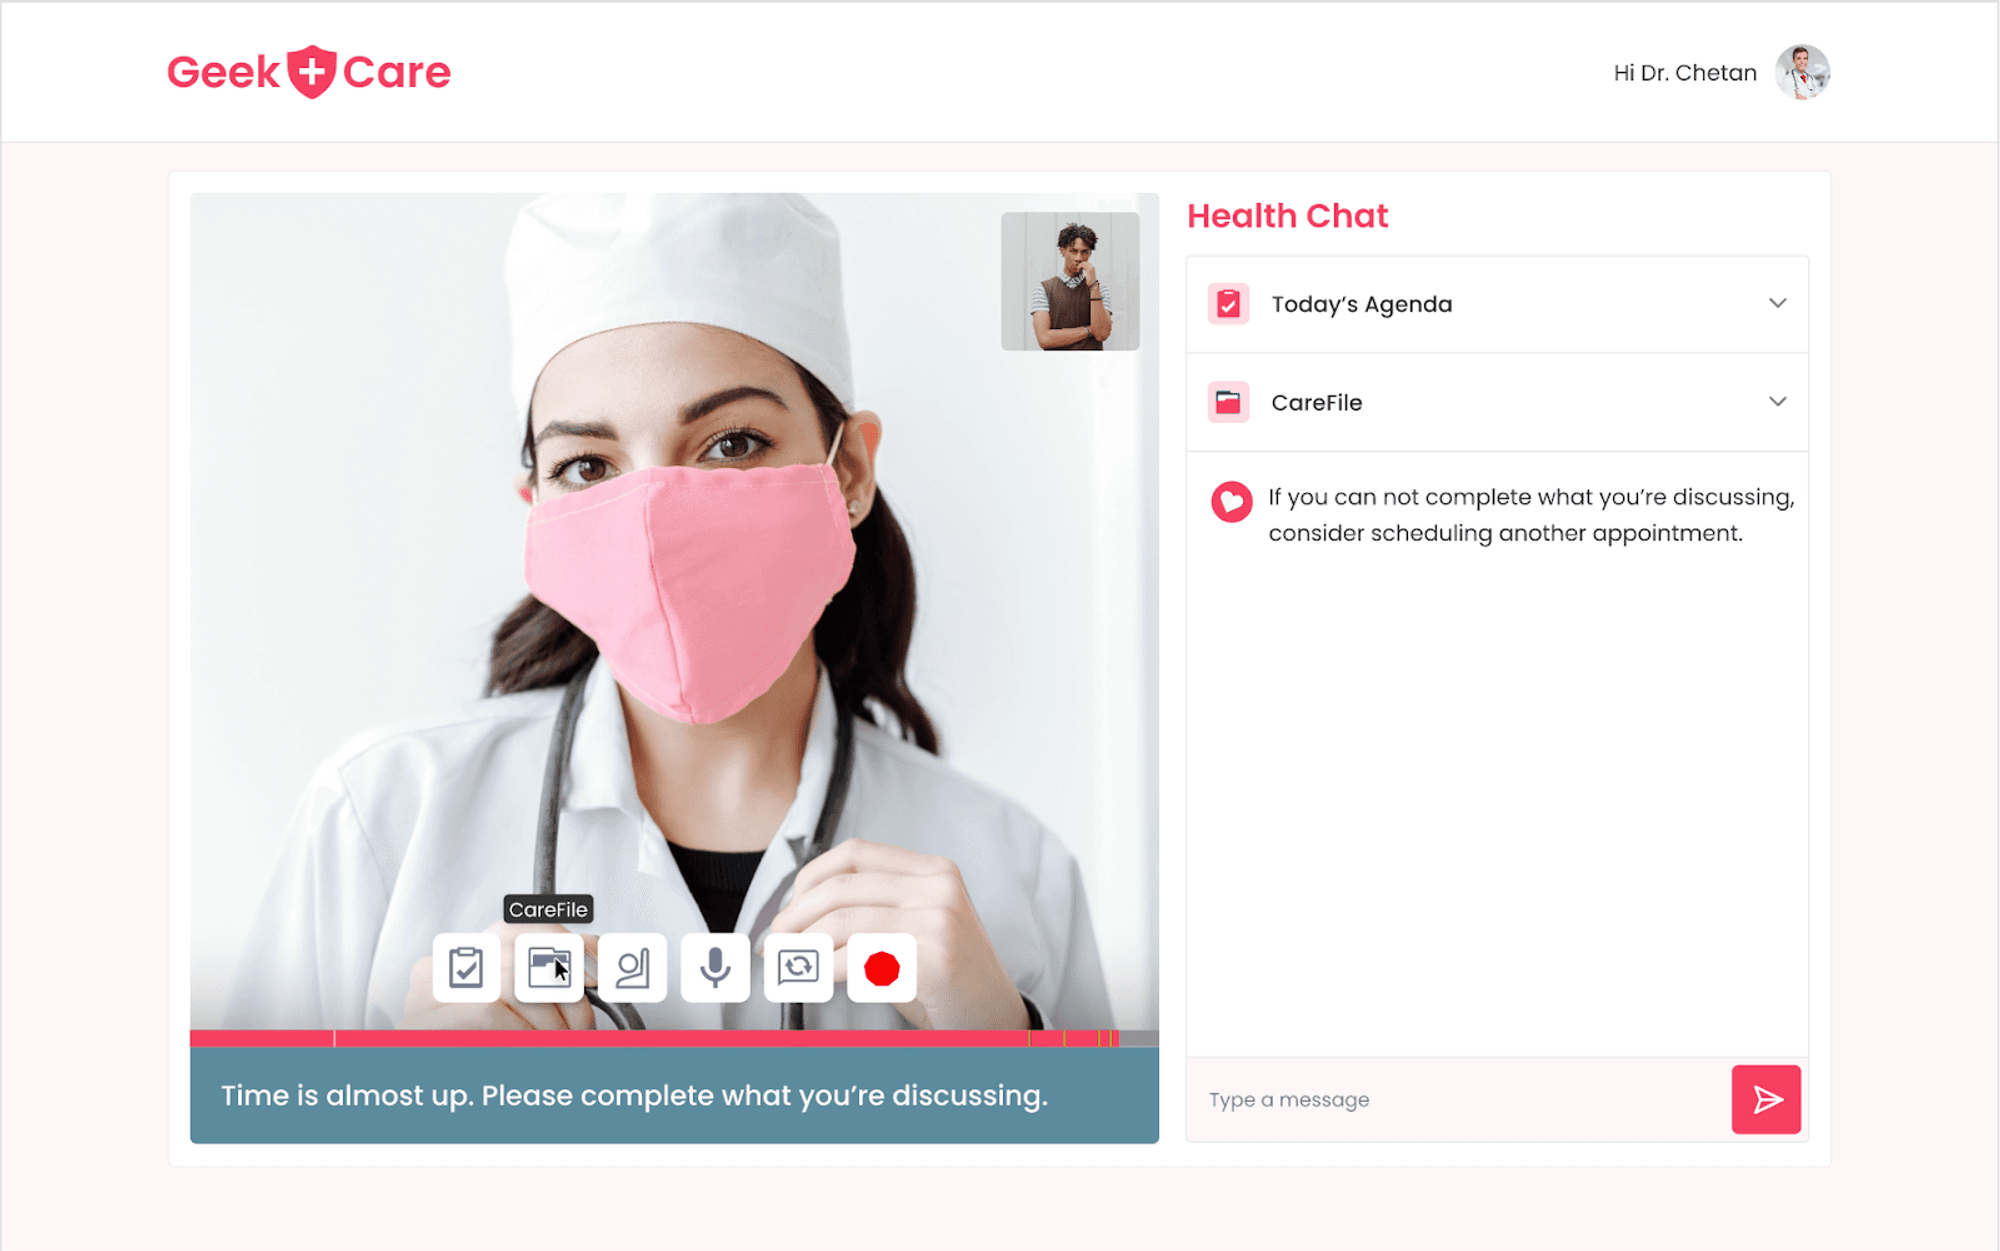
Video Calls
The video call feature of the chat allows the patient or doctor to have a face-to-face consultation with the other person remotely, making it more convenient for both parties.
We used Twilio in our application to enable video call functionality. Twilio is a cloud communications platform that provides various communication services, such as voice, video, and messaging.
Using Twilio's Video API, we can integrate video call functionality into our application and enable members to connect with physicians through a secure and reliable video call. Twilio also provides the necessary tools and infrastructure to ensure that video calls are of high quality and can handle a large number of users.
The useTwilio hook is a custom hook used to handle the video call functionality using the Twilio Video API. It uses the accessToken and name passed to it to connect to a video call room. Then, it sets up various event listeners for things such as connecting and disconnecting participants and handling local and remote video tracks.
It also sets up several state variables to keep track of the status of the call and the connected participants. The hook also makes use of useEffect, useState, and useRef hooks to handle the lifecycle of the component and to store information such as the current room, local and remote video tracks, and the current state of the call (muted, camera on/off, etc).
This code uses the createLocalTracks method from the Twilio-video library to create a new local audio and video track, with the video track set to the front camera. If the track creation is successful, it stores the tracks in a myLocalTracksRef ref, attaches the video track to a videElement, and appends the videElement to the myPreviewRef ref.
Finally, it calls the joinRoomWithPreAcquiredLocalTracks function and passes in the newly created tracks. This allows the user to see a preview of their video before joining the room and also to join the room with the local tracks.The function also handles media errors that may occur during the acquisition of local tracks by calling the handleMediaError function.
The function onParticipantConnect is a callback function that is triggered when a new participant connects to the room. It sets the user identity state, calls the renderParticipants function to display the participant's video stream, and sets the isRoomEmpty state to false.
Similarly ,the function onParticipantDisconnect gets triggered when a participant disconnects from the room. It sets the isRoomEmpty state to true and empties the userPreviewRef element, which is used to display the remote user video stream. This will remove the disconnected user's video stream from the page.
This Twilio-hook is responsible for managing the video call functionality, including connecting and disconnecting from the call, handling media tracks, and updating the user interface to reflect the current state of the call.Video.tsx page of NEXT JS:
This is the video call page of Next.js which uses the getServerSideProps function to fetch the data needed for the video call.The function first gets the user from the request object, then checks if the user is logged in; if not, it redirects to the login page. Then it checks if the appointment id exists; if not, it redirects to the appointment page.
Then it uses the appointment id to fetch the appointment details and check if the user is a member of the appointment. If the user is not a member of the appointment, it redirects to the appointment page. Finally, it calls the getAccessToken function and returns the user, isMember, and response as props to the page.
The video container component uses the useTwilio hook to handle the video call functionality and passes it the access token, isMember, and user props.
It also has state variables to track if the user's camera and microphone are on and whether the room is empty. The component uses refs to store the local and remote user streams and the duration bar component. The component also has several functions, such as onMute, onUnMute, onCameraOn, and onCameraOff, that handle muting or unmuting the microphone and turning the camera on or off. The component has a function to handle the duration of the video call as well.
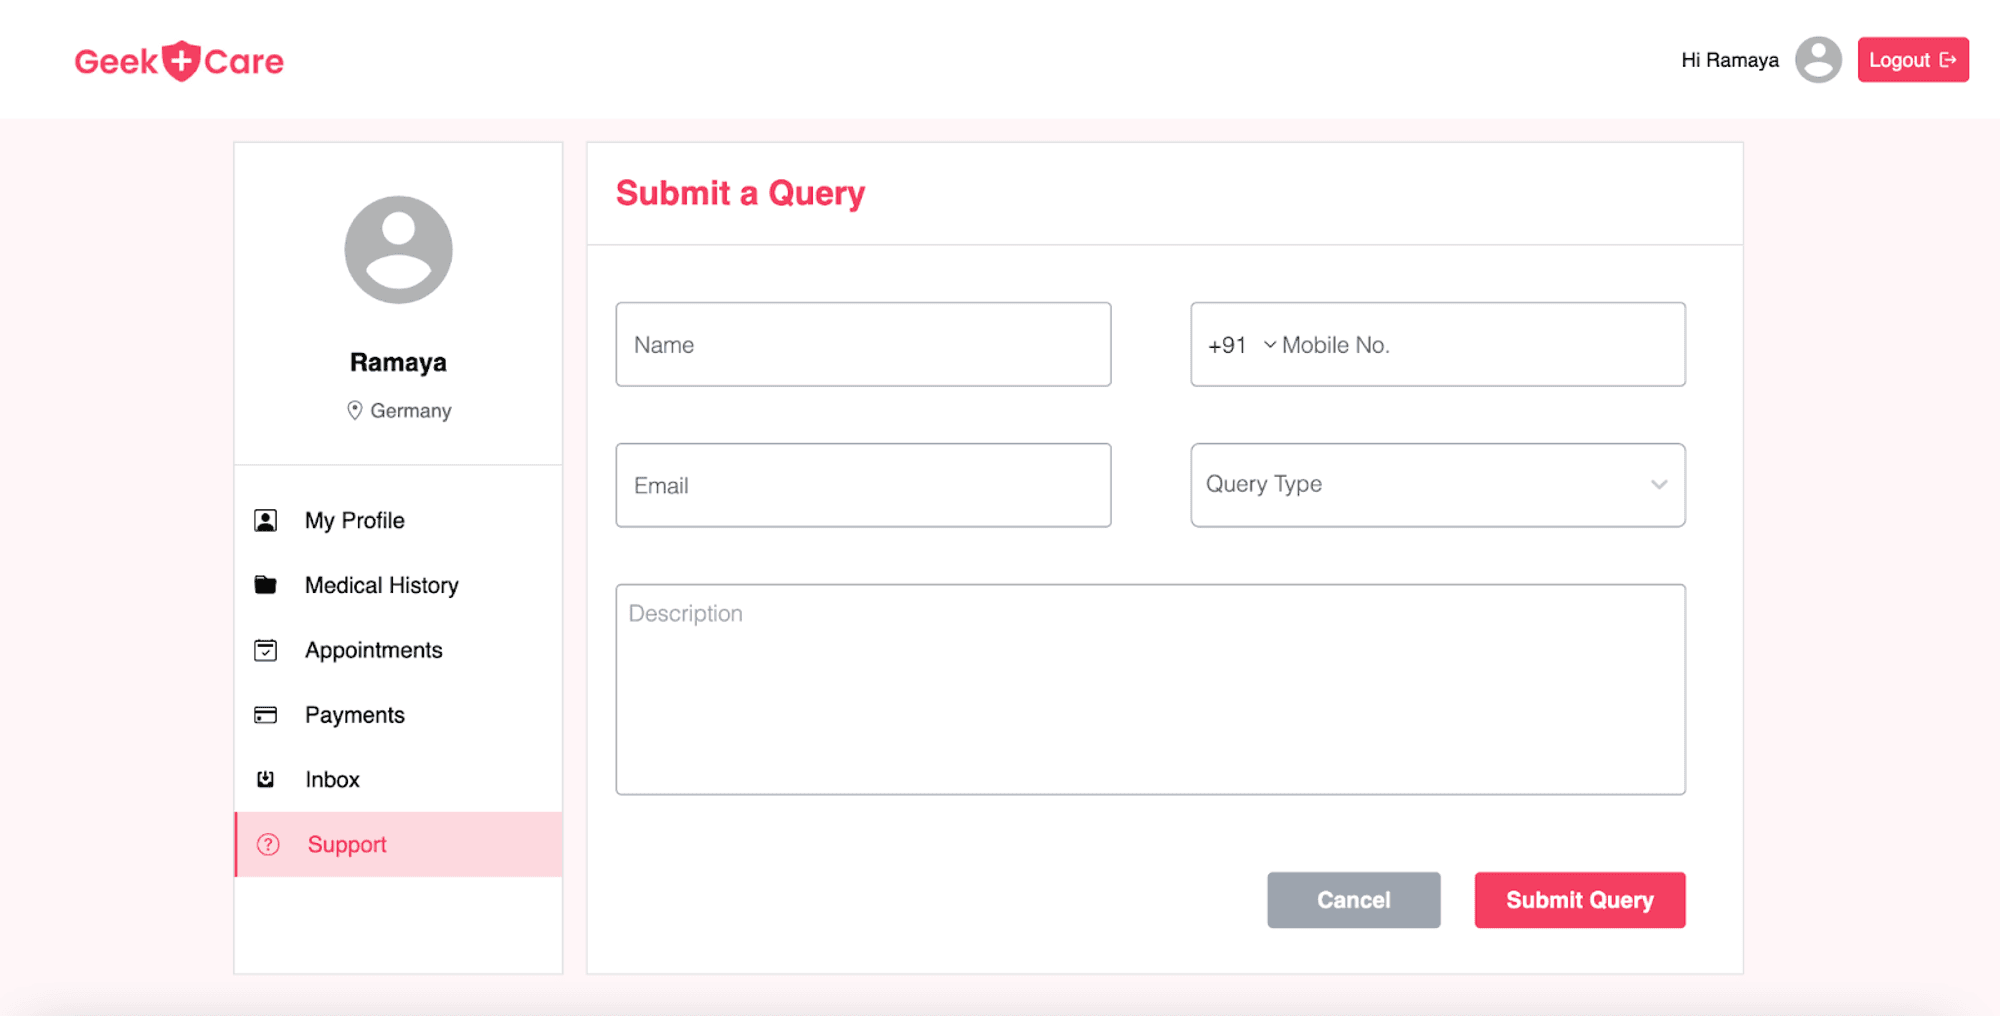
Support Screen
Geekcare also includes a support screen for users, whether patients or doctors, to address any issues they may have with the application. On this screen, users can fill out a form with their query, providing detailed information about the problem they are facing. This could include error messages, screenshots, or other relevant details.
Submitting this form will send the query to the Geekcare support team, who will review and respond to the user's issue in a timely manner. This feature helps ensure that users have the support they need to use the application effectively and resolves any technical issues they may encounter.
Future Scope
In the future, GeekCare could potentially include features such as:
- Doctors near you — This will allow patients to easily find and schedule appointments with doctors in their local area.
- An online pharmacy — Patients can purchase and have their prescriptions filled online.
- Lab test booking — Patients will be able to easily schedule and track their lab tests.
- Health tracking — Smart devices would allow patients to easily track and monitor their health using wearable devices and apps.
- Notification modules — This would send reminders to patients about upcoming appointments and medication schedules.
All these features will help increase the accessibility and convenience of healthcare services, making it easier for patients to manage their health and communicate with physicians.
To understand the architecture of GeekCare, check out our blog: LINK
Subscribe to Our Newsletter
Subscribe to RSS
Press & Media Hub RSS FeedRelated Articles.
More from the engineering frontline.
Dive deep into our research and insights on design, development, and the impact of various trends to businesses.

Jul 22, 2026
Why Healthcare Organizations Are Moving Beyond Telehealth Toward AI-Driven Care Systems

Jul 2, 2026
What Founders Must Evaluate Before Launching an AI-Built App

Jun 17, 2026
Google I/O 2026 Mobile Playbook: AI Studio, Android CLI, and Antigravity for App Development

Jun 16, 2026
Integrating AI with Wearable Healthcare Apps: Architecture, Compliance & ROI
Jun 16, 2026
HL7 and FHIR for AI Healthcare Platforms: What It Takes to Build for Production

Jun 9, 2026