LiveView With Phoenix
Author

Date

Book a call
A few months ago, I started learning Elixir because I wanted to get a good grasp of Functional Programming. While learning, I made a project called Github Identicon that you can check out here.
If you want to learn more about what Elixir is, check out this video.
It was a different world altogether for me and I liked my stay there, so the next obvious thing was to have a look at Phoenix.
What is Phoenix, you may ask?
Phoenix is a web framework built with the Elixir programming language. Elixir, built on the Erlang VM, is used for building low-latency, fault-tolerant, distributed systems which are increasingly necessary qualities of modern web applications. Phoenix breaks the myth of sacrificing performance in order to increase productivity.
I worked on Ruby and Rails a few years ago and I immediately fell in love with it. The idea was to basically build a CRUD application for homemade cooking recipes.
I had an experience of backend development with Ruby on Rails and I heard a lot about Phoenix in the RoR community, so I took a chance with it.
RoR vs Phoenix
From what I gathered, the major difference is the style of programming. Ruby is object-oriented, which in this case means everything is an object. You can send messages to objects via methods which can change the internal state of the object or return some values.
Elixir is "functional", which means that you end up calling functions and passing them data to operate on, which return a new changed version of whatever you wanted to modify. The entire language is optimized around this, so you get things in pipelines format.
The first thing I did was to learn how to make a simple CRUD API, that's the "Hello world" for any backend frameworks, I guess.
Then I came across Phoenix channels.
Channels in Phoenix is one of the best features you can ask for. It enables soft real-time communication with and between millions of connected clients. Channels bring interactive functionality to the web page. Usually, when you load a page, you are sending a request to a server and the server responds back with the HTML template. Once the rendering of the page is done, a server has no way to communicate back to your browser.
Channels operate differently. When you load a page, it can establish a connection between a client (your browser) and the server. Once the connection is established, they can send messages back and forth. Phoenix uses WebSockets as a transport protocol.
Now, after all this, I came across with something called Phoenix LiveView.
Let's directly jump into this.
Phoenix LiveView
As described in the article here — “Phoenix LiveView is an exciting new library which enables rich, real-time user experiences with server-rendered HTML. LiveView powered applications are stateful on the server with bidirectional communication via WebSockets, offering a vastly simplified programming model compared to JavaScript alternatives.”
If you are from a Laravel background, Laravel Live wire was inspired by Phoenix LiveView. As explained in Livewire's documentation on state management, the state is either stored in a back-end service like Redis or re-sent to the server with each request, depending on the type of property. With LiveView, a persistent WebSocket connection is used, and the state is stored in memory in an Erlang process.
Basically, LiveView enables you to enable the interactive, real-time app, without touching any JavaScript, as the application logic lives on the server.

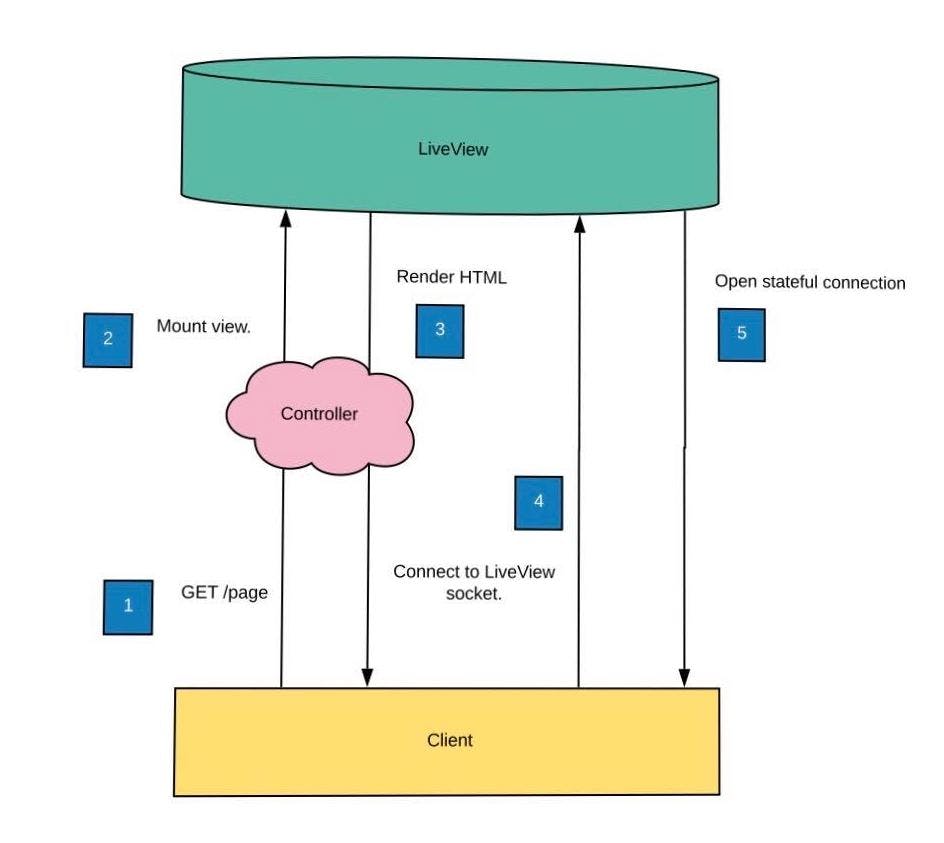
It’s a two-step process —
Step 1 (a combination of Step 1 2 & 3 in the above diagram) indicates the stateless connection where the entire static and dynamic HTML content is sent to browser from server and get rendered.
Step 2 (Step 4, 5 combined) establishes a stateful connection via WebSocket and further updates are sent for only the dynamically changed contents.
For more details, you can read this article.
Now let's build something and see what I actually meant by all this.
I am assuming you already have an Elixir Phoenix setup If you don't, go ahead and have that setup first.
Now let's start with creating a new project:
mix phx.new demo --live
The phx.new command with the --live flag will create a new project with LiveView installed and configured.
Now let's start by building a CRUD application.
mix phx.gen.live Timeline Post posts username body likes_count:integer reposts_count:integer
This command will basically generate LiveView, templates, and context for a resource. The first argument is the context module followed by the schema module and its plural name (used as the schema table name).
We will also create a table called posts like this:
Overall, this generator will add the following files to lib/:
- A context module in
lib/demo/timeline.exfor the accounts API - A schema in
lib/demo/timeline/post.ex, with anuserstable - A view in
lib/demo_web/views/post_view.ex - A LiveView in
lib/demo_web/live/post_live/show_live.ex - A LiveView in
lib/demo_web/live/post_live/index_live.ex - A LiveComponent in
lib/demo_web/live/post_live/form_component.ex - A LiveComponent in
lib/demo_web/live/modal_component.ex - A helpers modules in
lib/demo_web/live/live_helpers.ex
This command, at last, will ask you to add some things which are basically live routes. Go ahead and add them to your router.ex file. Now, before running the app, run the mix ecto.create command which will create the database and migration files for you.
Now go to localhost/4000/posts and you will have all the basic functionality and templates for your CRUD application.
Here are some changes and files to add:
https://github.com/GeekyAnts/phoenix-liveview-demo/blob/master/lib/demo/timeline/post.ex
In this file, we have broadcast and subscribe method:
https://github.com/GeekyAnts/phoenix-liveview-demo/blob/master/lib/demo/timeline.ex
https://github.com/GeekyAnts/phoenix-liveview-demo/blob/master/lib/demo_web/live/post_live/index.ex
Add them and run your project again. You will see something like this:

Now as you can see in the demo, we post all the other devices also get updated in real-time or if you like, it also updates all of them and Phoenix LiveView for you.
Go ahead and inspect the website you will see how it gets updated every time.
Here is Github Repo for the code.
Thank you for reading. You can ping me on Twitter. Let's build something together.
Cheers and keep experimenting.


