Sep 24, 2020
Spring Micro Service for Authorization
A RESTful Microservice that uses JWT token for authentication and authorization. Read about how it's implemented in Spring Boot.
Author


Book a call
In this article, we will build an app using Spring Boot, which provides an easier and faster way to set up, configure and run stand-alone web-based applications.
The objective to build this app is to develop production-ready Spring application for authentication and authorization with minimum configurations. Also being lazy to write API Docs, we will use HATEOAS (Hypermedia as the Engine of Application State) which allows the client to dynamically navigate to the appropriate resources by traversing hypermedia links.
This choice is influenced by a lot of factors, which are:
- There is no need to create a boilerplate. Spring Initializer works like a charm. There are plenty of Spring starters available to get up and running quickly.
- Customization of application properties is easy like I did here.
- No .xml configurations. Annotation based configuration helps to configure and implement dependency injections through programs.
@autowiredhelps a lot!
REST Architecture
REST completely changed software engineering after 2000. This new approach to developing web projects and services was defined by Roy Fielding. It is an interface between systems using HTTP to obtain data and apply operations on that data. This is an increasingly popular alternative to other standard data exchange protocols such as SOAP (Simple Object Access Protocol), which have high capacity but are also very complex. So, it is desirable to use REST for data processing.
REST Features- Stateless client : Each HTTP request contains all necessary information required to process the request which means that the server won't store any information related to the client of the previous requests as well of the current request after processing. Token based authentication plays a huge role here. You will find more about it as you proceed with the article.
- Uniform interface : To read or manipulate resources, there is a set of allowed transaction types (commonly known as request methods) which are GET,POST,PUT,PATCH & DELETE. There are other types of request methods as well, like HEAD, OPTIONS etc that deal with metadata.
- Layer system : It is the hierarchical architecture between components. Each layer has a functionality within the REST system.
- Hypermedia : There are a lot of articles that explain the concept of hypermedia. Its Wikipedia article is a good example. Another very good example is the Interactive Voice Response (IVR).
About the app.
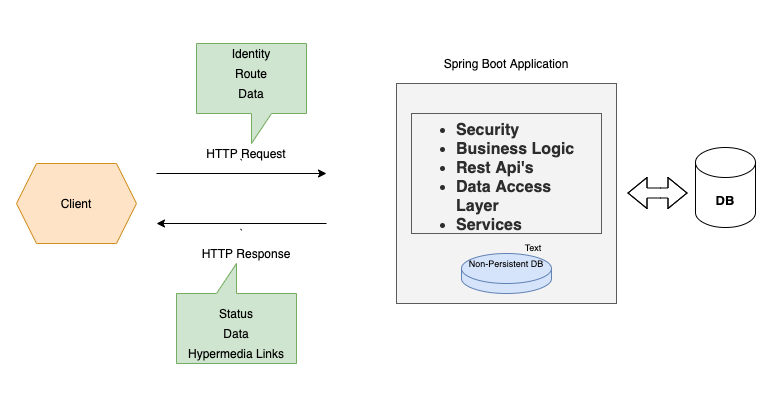
This Application demonstrates a REST Client implementing Custom Authentication and Authorization using JWT token, though Spring provides its own security also. It uses Spring's JPA Repositories in the data layer. For resource representation, Spring HATEOAS is used. Postgres is used for creating a persistent database.
Life Cycle of a Request.
Here, Spring Websecurity is customised to add the JWTRequestFilter as well as authorities are defined on the patterns using the antmatcher.
The filters can be executed before or after the servlet, but in our case we need to add it before the servlet execution. For accessing a secured resource, client authentication is done on the basis of JWT token in headers. The client can request for a JWT token with a POST /authenticate route with username and password. Obviously this route is permitted to all through SecurityConfig.
JWT token is just a string, which is generated by encrypting data like userdetails, expiry date etc with a secret key. The JWT is verified and decrypted in the filter and if the request is authenticated and has authority, it proceeds to the representation layer. This is done by overriding the Spring Security AuthenticationProvider through JWTUtil & CustomAuthenticationManager.
The request is then passed on to the Controller or Representational Resource. In Spring, routes can be easily added by using @Mapping annotation in the @RestController. I had the business logic for authentication and signup, so controllers are defined for them only. Mappings for other rest of the resources are handled by the Spring framework as it provides CRUD support. Hypermedia links are included in the response.
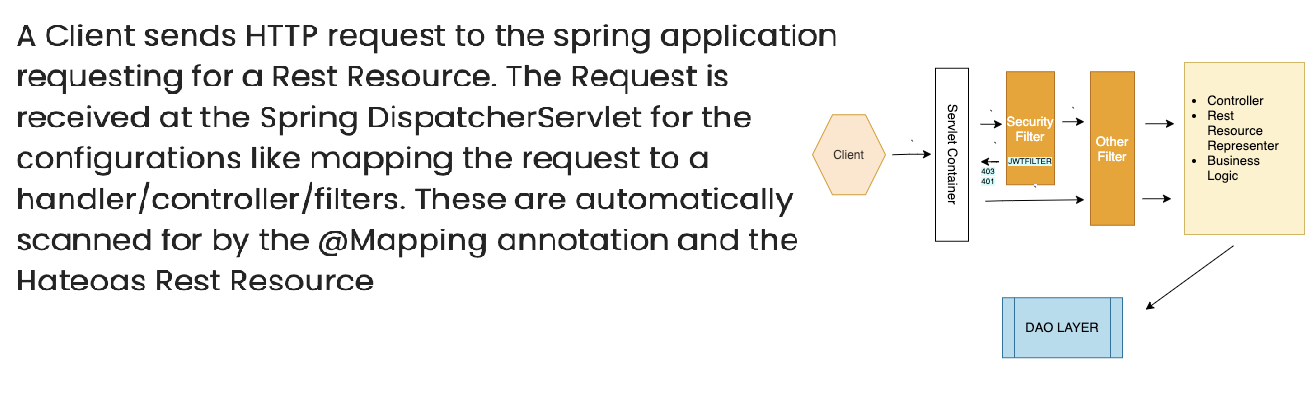
A Client sends HTTP request to the Spring application requesting for a REST resource. The request is received at the Spring DispatcherServlet for configurations like mapping, request to a handler/controller/filters etc. These are automatically scanned for by the @Mapping annotation and the HATEOAS REST Resource.

Hypermedia as the Engine of Application State (HATEOAS)
Hypermedia as the Engine of Application State (HATEOAS) is an architectural approach to enhance the usability of REST APIs for the applications consuming the APIs. It's main purpose is to provide information of other resources within a single API request. This helps in building systems with dynamic APIs. As I stated in the example of IVR, when we select an option, the response from the IVR includes other queries we may have and waits for input, but in Spring Boot, the sessions are not stored in memory. Any data that is required to fulfill the request should be sent with it.
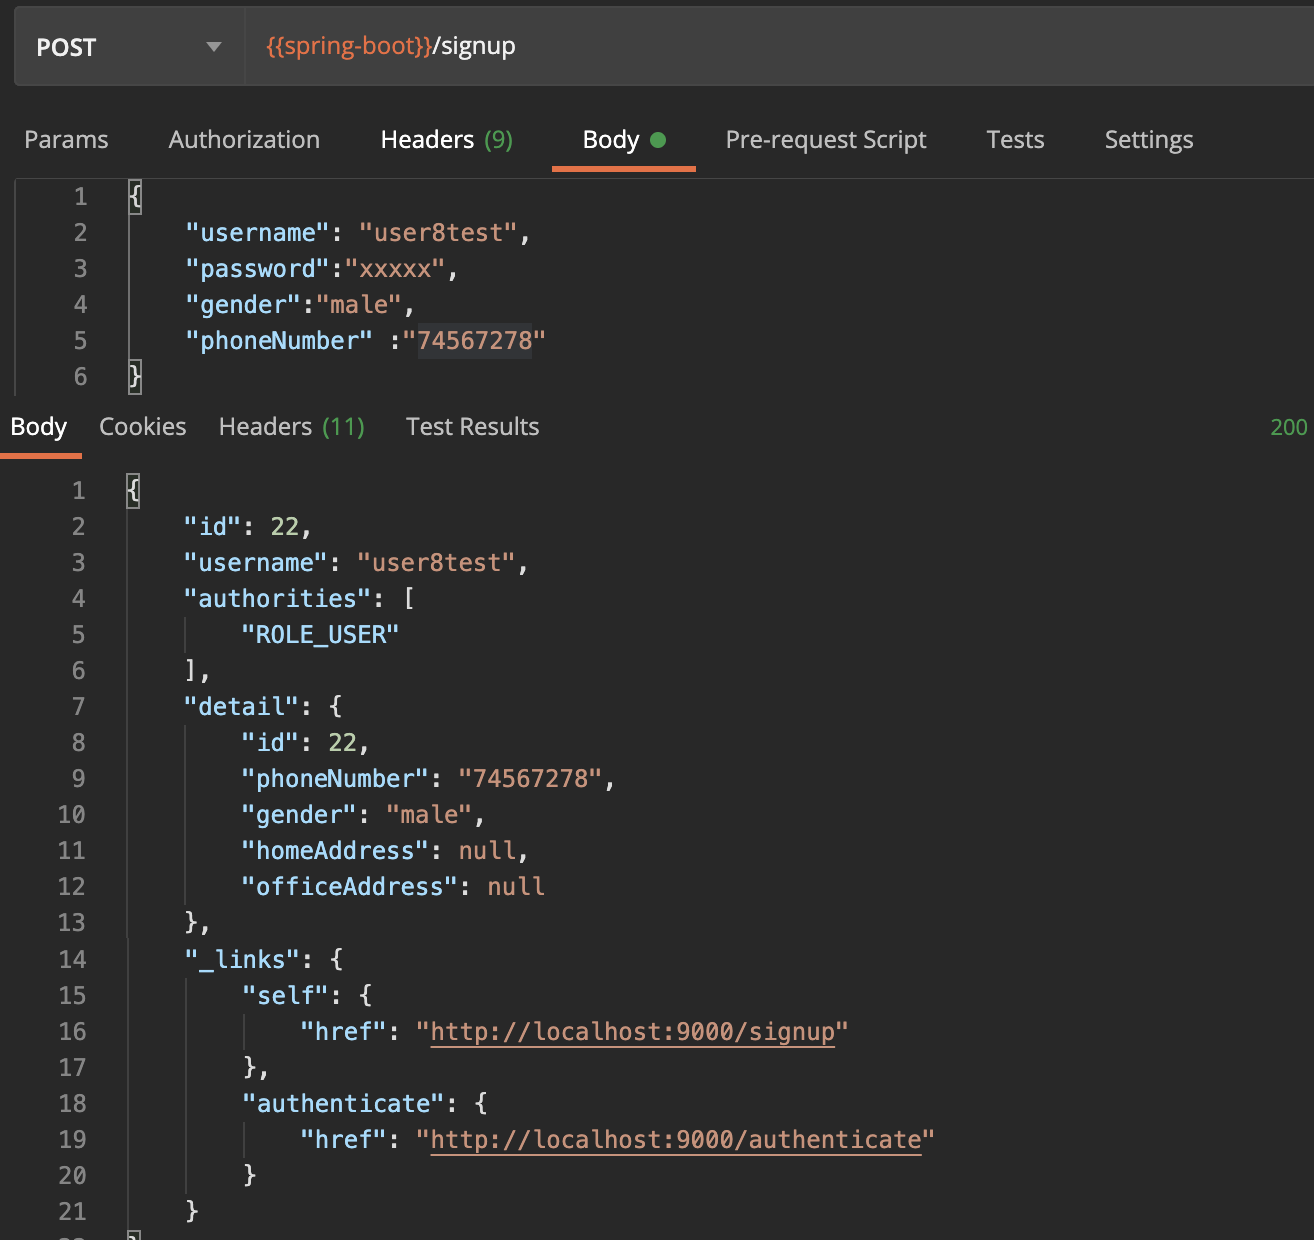
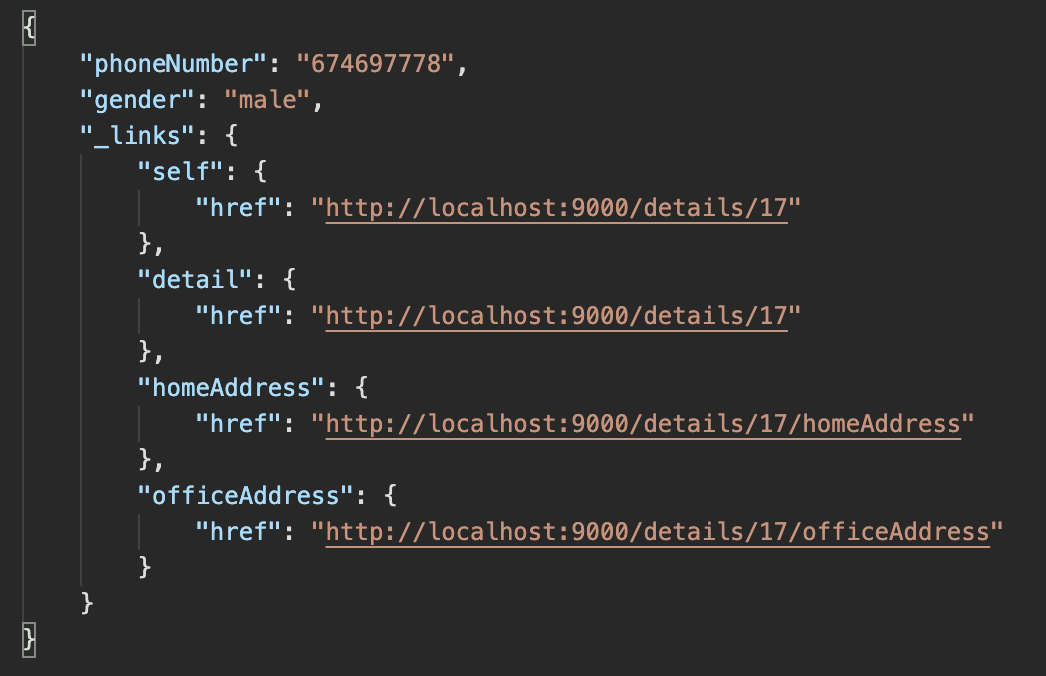
As shown in the signup response, the very next step is authentication, so the link to authenticate is added in the response. Spring provides such a support when we need to just extend a classes and for all REST resources, the framework will do the job. It builds and adds links automatically while respecting the relationships between the tables as in the entity or the Model Class. Eg. In Detail below, to get the homeAddress and officeAddress, the links are added.
Then the request is passed to the Repository Layer. Here, JPA repositories are used with @Repository and all the basic CRUD operations can be created with just this piece of code:
@Repository
public interface DetailRepository extends JpaRepository<Detail,Long> {
}
That's not it. We can have derived query methods as well, as shown below. We don't have to write a @Query by following the Spring Boot naming convention. We can just add it in the interface. It can be as complex as you want.
@Repository
public interface UserRepository extends JpaRepository<User,Long> {
    User findByUsername(String username);
    List<User> findUsersByAuthoritiesContaining(List<String> authorities);
}
It even includes pagination, sorting and search right out of the box. 😳
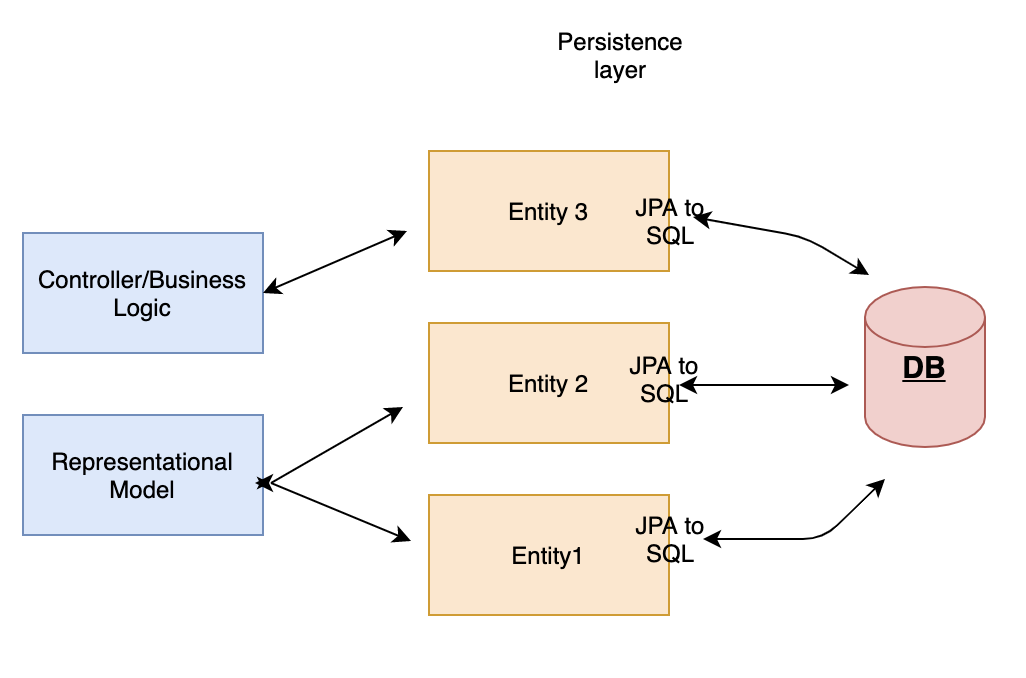
The JPAs i.e. repository layer works directly on the Data Layer and Spring Boot provides one place to define Model Classes, Migrations and SQL relations. The SQL relations like @OneToOne and @OneToMany in the Entity class are used by HATEOAS as well. The connections to the database are handled by Spring, so you don't have to worry about leaving a connection open. We just need to add the database configurations like platform, url and credentials and our database will be up and running while tables being created as defined in Entities.
@Entity is nothing but POJO's representing data that are persisted in the database. and Thanks to Project Lombok that we had to never write getter and setters. Which leads to a very clean and clutter free code.
Spring also handles the data access exceptions thrown by the Data Layer.

Let's come back to the request that was at the Representational Layer.
After querying the data from the database, a response is passed back to the representational layer. At this step, the HATEOAS links are embedded with the response and then again, we can add filters that work after the Representational Layer. These can be logging or designed to do 'cleaning', which isn't generally required in Spring as it disposes off the process itself. The response is received by the client.
So,that is how a request is served by a Spring Boot Application.
While reading, you might have seen very less code. Just more of annotation. That's how Spring is. All the repetitive and obvious code is removed and moved to the Spring framework, so the developer has to write more of the business logic rather than writing CRUD operations for the database.
You can check out this reference project of mine at GitHub. The link is shared below. If there are any questions or doubts, feel free to leave a comment at the repo and I'll get back to you.
Github project link : https://github.com/mukul7/spring-auth
Thank you for reading!
Subscribe to Our Newsletter
Subscribe to RSS
Press & Media Hub RSS FeedRelated Articles.
More from the engineering frontline.
Dive deep into our research and insights on design, development, and the impact of various trends to businesses.

Jul 10, 2026
How We Built the Missing Bridge from Code to Figma

Jun 27, 2026
Building a Resilient Hybrid-Cloud Network with WireGuard HA, Route-Based Failover, and Deep Observability

Jun 19, 2026
We Built a 114-Second AWS-to-Azure Failover. Here’s What We Learned

Jun 12, 2026
Cloud-Native and Cloud-Agnostic Are Not Ideologies; They Are Business-Stage Decisions

Jun 8, 2026
Geeklego: The Open-Source Design System Built to Work With AI

May 18, 2026