Table of Contents
Exploring Bluetooth Low Energy Connectivity in Flutter Using quick_blue
Author

Date
Book a call
Bluetooth Low Energy (BLE) has transformed how devices communicate wirelessly, particularly in mobile app development. In this blog, we delve into Bluetooth connectivity within Flutter using the quick_blue package. BLE operates in two main roles: peripheral and central. Peripherals advertise their presence, while centrals scan for nearby devices and establish connections. We will simulate peripheral behavior using “bleno“ and implement Bluetooth functionality in Flutter with quick_blue_package. By the end, you will be able to understand BLE basics and how to integrate Bluetooth connectivity seamlessly into Flutter apps.
A Quick Bleno Overview
This blog primarily focuses on implementing Bluetooth Low Energy (BLE) for a flutter project, but it is vital to understand how we are advertising from peripheral to create a proper working example for this blog.
Bleno is a library for implementing Bluetooth Low Energy (BLE) peripheral functionality in JavaScript. It allows developers to create virtual BLE devices, also known as peripherals, and simulate their behavior for testing or development purposes.
How Bleno Works
1. Advertising
Bleno enables the creation of virtual BLE devices that advertise their presence to nearby central devices, such as smartphones or tablets. These advertisements contain information about the peripheral, such as its name, services, and characteristics.
2. Peripheral Simulation
With Bleno, developers can define the services and characteristics offered by the virtual peripheral. These services represent different functionalities of the device, while characteristics are data points that can be read, written to, or subscribed to by central devices.
3. Interaction with Central Devices
When a central device scans for nearby peripherals, it detects the advertisements broadcasted by virtual peripherals created with Bleno. Once a connection is established, the central device can interact with the virtual peripheral by reading from or writing to its characteristics.
Using Bleno for Advertising on macOS
To implement Bleno on macOS for advertising virtual peripherals, you typically follow these steps:
1. Install Bleno
Use npm (Node Package Manager) to install the Bleno package in your JavaScript project.
2. Define Services and Characteristics
Define the services and characteristics that your virtual peripheral will offer. This includes specifying UUIDs (Universally Unique Identifiers) for each service and characteristic.
3. Start Advertising
Once your virtual peripheral is configured, start advertising its presence. Bleno provides APIs to begin advertising and customize advertisement data, including the peripheral's name and advertised services.
4. Handling Connections
Bleno also provides callbacks to handle incoming connections from central devices. You can define actions to take when a central device connects or disconnects from your virtual peripheral.
You can find the reference to the code here: https://github.com/SahilSharma2710/bleno_example/blob/main/bleno_demo.js
Overview of Bluetooth Low Energy (BLE)
Bluetooth Low Energy (BLE) is a wireless communication protocol designed for low-power consumption and short-range communication. In BLE, devices communicate through a client-server architecture, where one device acts as the central (client) and the other as the peripheral (server). Here is a breakdown of key concepts and operations in BLE:
1. Services, Characteristics, and Descriptors
- Services: Services represent different functionalities offered by a BLE peripheral. For example, a heart rate monitor peripheral might have a Heart Rate service.
- Characteristics: Characteristics are attributes within services that contain data. For instance, the Heart Rate service may have a characteristic to read the current heart rate.
- Descriptors: Descriptors provide additional information about a characteristic's value, such as metadata or configuration settings.
2. Reading, Writing, and Notifications
- Reading: Central devices can read the value of characteristics from peripherals. For example, a fitness tracker app might read the current heart rate from a heart rate monitor.
- Writing: Central devices can write data to writable characteristics on peripherals. This enables commands or configuration settings to be sent to the peripheral.
- Notifications: Peripherals can notify central devices when a characteristic's value changes. This allows real-time updates, such as receiving notifications from a smartwatch.
3. Service Discovery
- Before interacting with services and characteristics, central devices must discover them on the peripheral. This involves querying the peripheral to retrieve a list of available services and characteristics.
- Once discovered, central devices can access the desired services and characteristics for reading, writing, or subscribing to notifications.
4. Maximum Transmission Unit (MTU)
- MTU refers to the maximum size of data packets that can be transmitted over a BLE connection. It impacts the efficiency of data transfer and can be negotiated between the central and peripheral devices during connection establishment.
- Optimizing MTU size can improve data throughput and reduce communication latency in BLE applications.
Creating a Flutter App to Interact with Bluetooth
1. Adding permissions
Add permissions for Android (With Fine Location)
In the android/app/src/main/AndroidManifest.xml add:
Add permissions for iOS.
In the ios/Runner/Info.plist let us add:
2. Add the dependency
To add the quick_blue package to your project, run the following command :
3. Scan BLE peripheral
After setting up the project, we need to connect to the ble device. Before connecting, we need first to create a “StreamSubscription” of the “BlueScanResult” type and start listening to the stream. It will catch all visible ble devices upon stating the scanning, and we can connect to the desired device and access its details. The peripheral advertiser we have created should be visible with the name we gave.
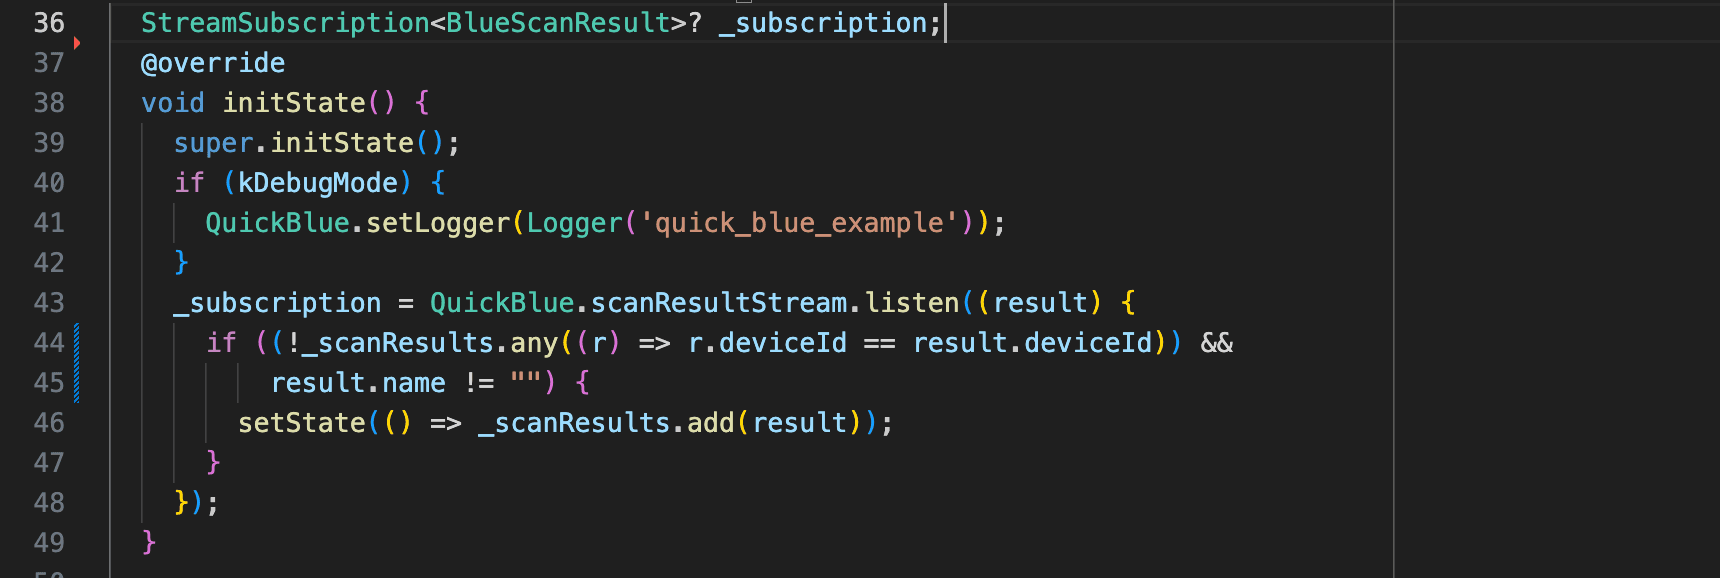
The scanning can be controlled using QuickBlue.startScan() and QuickBlue.stopScan() functions.
4. Connecting and handling services
After scanning, we can connect to the founded devices using their device id’s and set up the various functions to handle various events during the connection.
QuickBlue.connect(deviceId) can be used to establish the connection of your device with the advertising device

To handle all the connection-related logic, we can use the _handleConnectionChange. QuickBlue will send the deviceId and the connectionState in the arguments whenever there is a connection change.

Similarly, we can use _handleServiceDiscovery and _handleValueChange to handle the service discovery and value change during the entire connection.
5. Reading data over Bluetooth
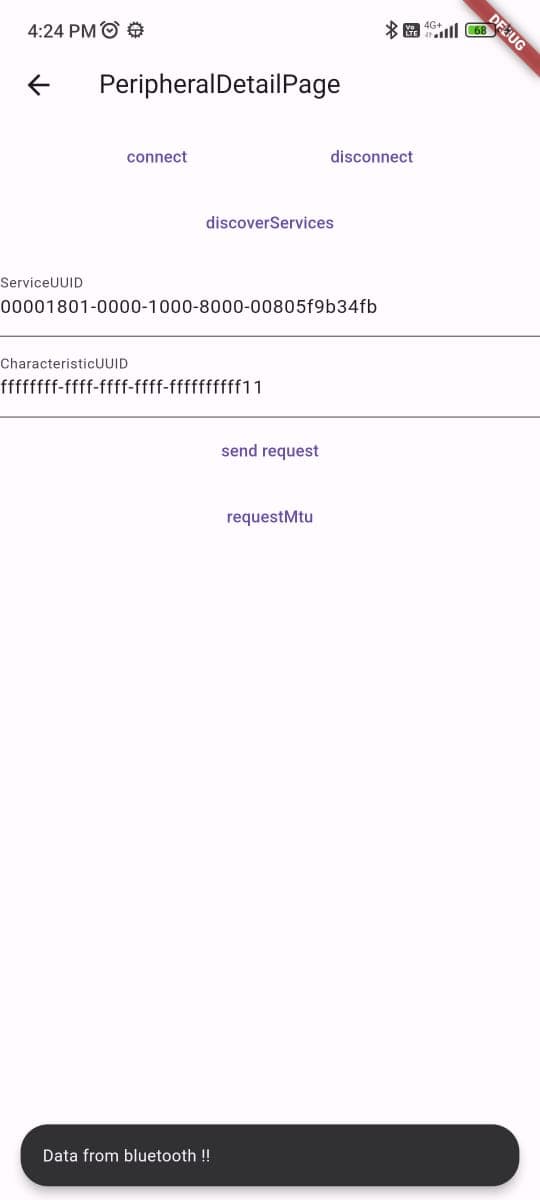
Now it’s time to read from the characteristic that we have set up to send the read request, when you send the read request over the read characteristics, the data from the ble is sent over the Bluetooth to the connected device. And we can catch the data in _handleValueChange . The data that we get over ble will be Uint8List type, we can decode it to get the data sent.

Tada! We have successfully established the connection with our advertiser and read the data from ffffffffffffffffffffffffffffff11 characteristics.
Summing Up
The app we created is just to understand the basic functionality of Bluetooth Low Energy and do some basic events. But in real-life scenarios, the data we share over ble can be complex and can be in any form, but now you have the idea of how things go here, and you can smash any type of ball out of the ground like Thala. Happy Learning!!
You can find the complete code for this Flutter app in this repo:
Related Articles
Dive deep into our research and insights. In our articles and blogs, we explore topics on design, how it relates to development, and impact of various trends to businesses.

