Sep 19, 2024
Data Streaming and Data Processing with Azure
Learn how to build a scalable data pipeline using Kafka, Azure Data Lake, Apache Spark, and Azure Synapse Analytics. This guide walks you through real-time data streaming, ingestion into Azure storage, and processing with machine learning models.
Author

Subject Matter Expert

Book a call
Table of Contents
Hey there! Have you ever wondered how massive amounts of data get handled and processed when they’re too big for traditional tools? You guessed it—we’re talking about big data!
Today, I will walk you through this fascinating process step-by-step, making it as simple as possible.
To help you grasp these concepts, I’ve prepared a hands-on mini Proof of Concept (PoC) that will demonstrate how data streaming works, how it’s ingested into storage, and finally, how we process it through machine learning models and visualize the results.
Think of it as turning raw, unstructured data into valuable insights—almost like digging through a mine to find diamonds!
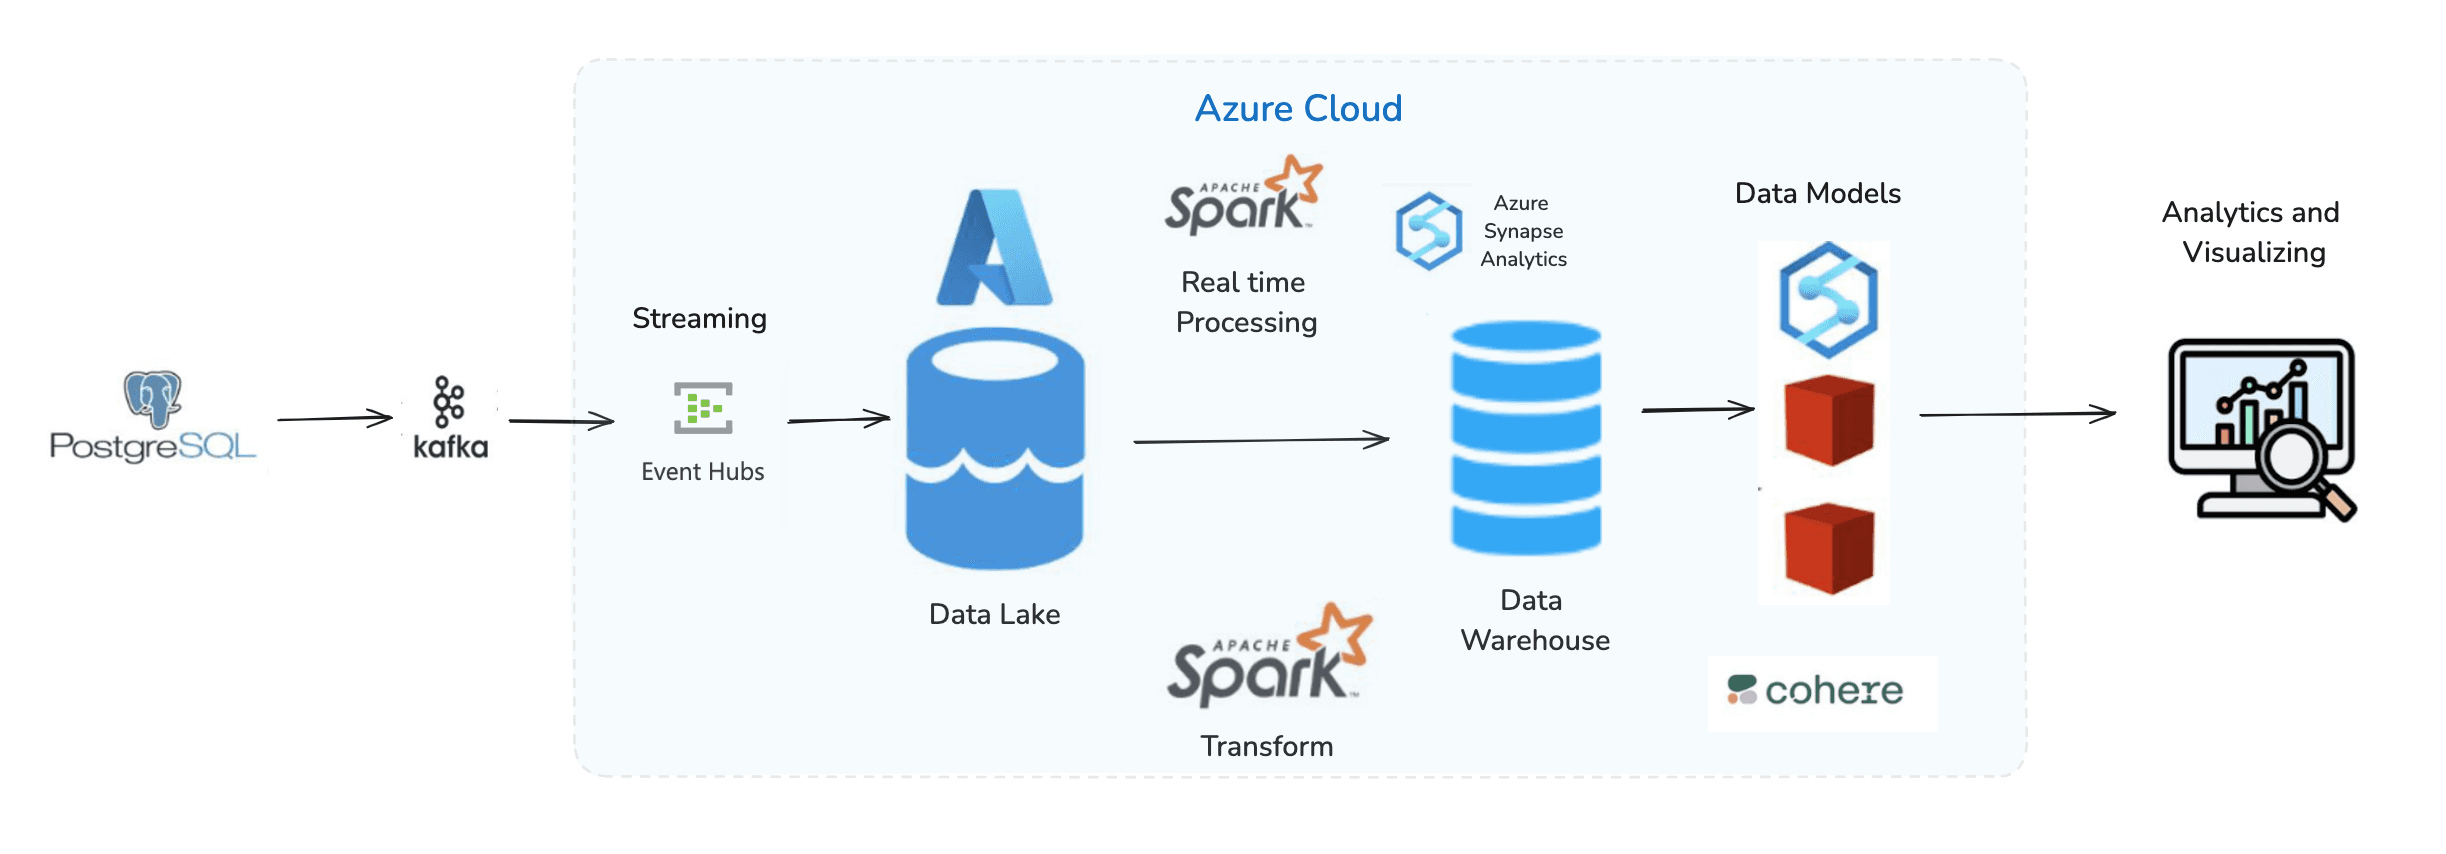
First, let's visualize the services of the PoC to make things easier to understand. Here’s a sneak peek at what we’ll be covering —
- Data Streaming: We'll use Kafka to stream data and connect it seamlessly with Azure's Event Hubs.
- Data Ingestion: From Event Hubs, the data will be ingested into Azure Gen2 Storage ie. Data Lake is where it is safely stored.
- Data Processing: We’ll process this data using Azure Synapse Analytics, transforming it into meaningful insights using powerful models and tools.
Data Structuring and Visualization: Finally, we'll structure the processed data in a dedicated SQL pool, i.e., a Data Warehouse, and visualize it, creating actionable insights that are easy to understand.
Let's Dive into the Architecture
Now that you have seen the architecture diagram, you might notice some heavy buzzwords.
Don’t worry—I’m here to break them down with simple introductions and explain their roles within the architecture.
Key Components in Our Big Data Architecture
- Apache Kafka: Think of Kafka as the engine that helps in streaming data. It products eve events and activities and streams them in real-time to various systems.
- Azure Event Hub: An Azure service that seamlessly integrates with Apache Kafka to consume and route streaming data within the Azure ecosystem.
- Azure Data Lake Storage (ADLS): This is where all the streamed data is stored. Azure Data Lake is a highly scalable storage service, perfect for handling big data.
- Apache Spark: A powerful data processing engine that runs PySpark notebooks to transform raw data into structured insights.
- Azure Synapse Analytics: This is our workspace for processing data. It comes with powerful tools and services, like notebooks and SQL pools, to help us transform raw data into meaningful insights.
Let’s Understand Apache Kafka
You might have heard about Apache Kafka. It’s a powerful tool for capturing events and activities from various sources, such as a Postgres database.
In our architecture, Kafka acts as the middleman, efficiently streaming data from our Postgres database to Azure Event Hub using a dockerized Kafka publisher.
This setup ensures real-time data flow, seamlessly bridging our database activities with Azure's robust storage and processing capabilities.
How does it work? It’s pretty simple! Imagine a PostgresListener.js script that listens for changes or events happening in the Postgres database. Every time an event occurs—like a new data entry—this listener captures it and sends it to Kafka, which then streams it further.<PostgresListener.js>
From here, we enter into Azure’s Cloud World
Now, we step into the Azure cloud environment; here we take our streaming data journey to the next level.
We’re using Kafka to stream data, but where is this data going? And what happens to it?
If we’re working with Azure, the data is definitely going to be streamed to some Azure storage, right? But before that, we need something in Azure that can consume the data from Kafka and then stream it to Azure Storage.
Enter Azure Event Hubs!
Azure Event Hubs acts as the ingestion layer that consumes data streamed by Kafka and then sends it to Azure Storage. Think of it as a bridge between Kafka and Azure services. Here’s how you can set it up:
Steps to Configure Azure Event Hub
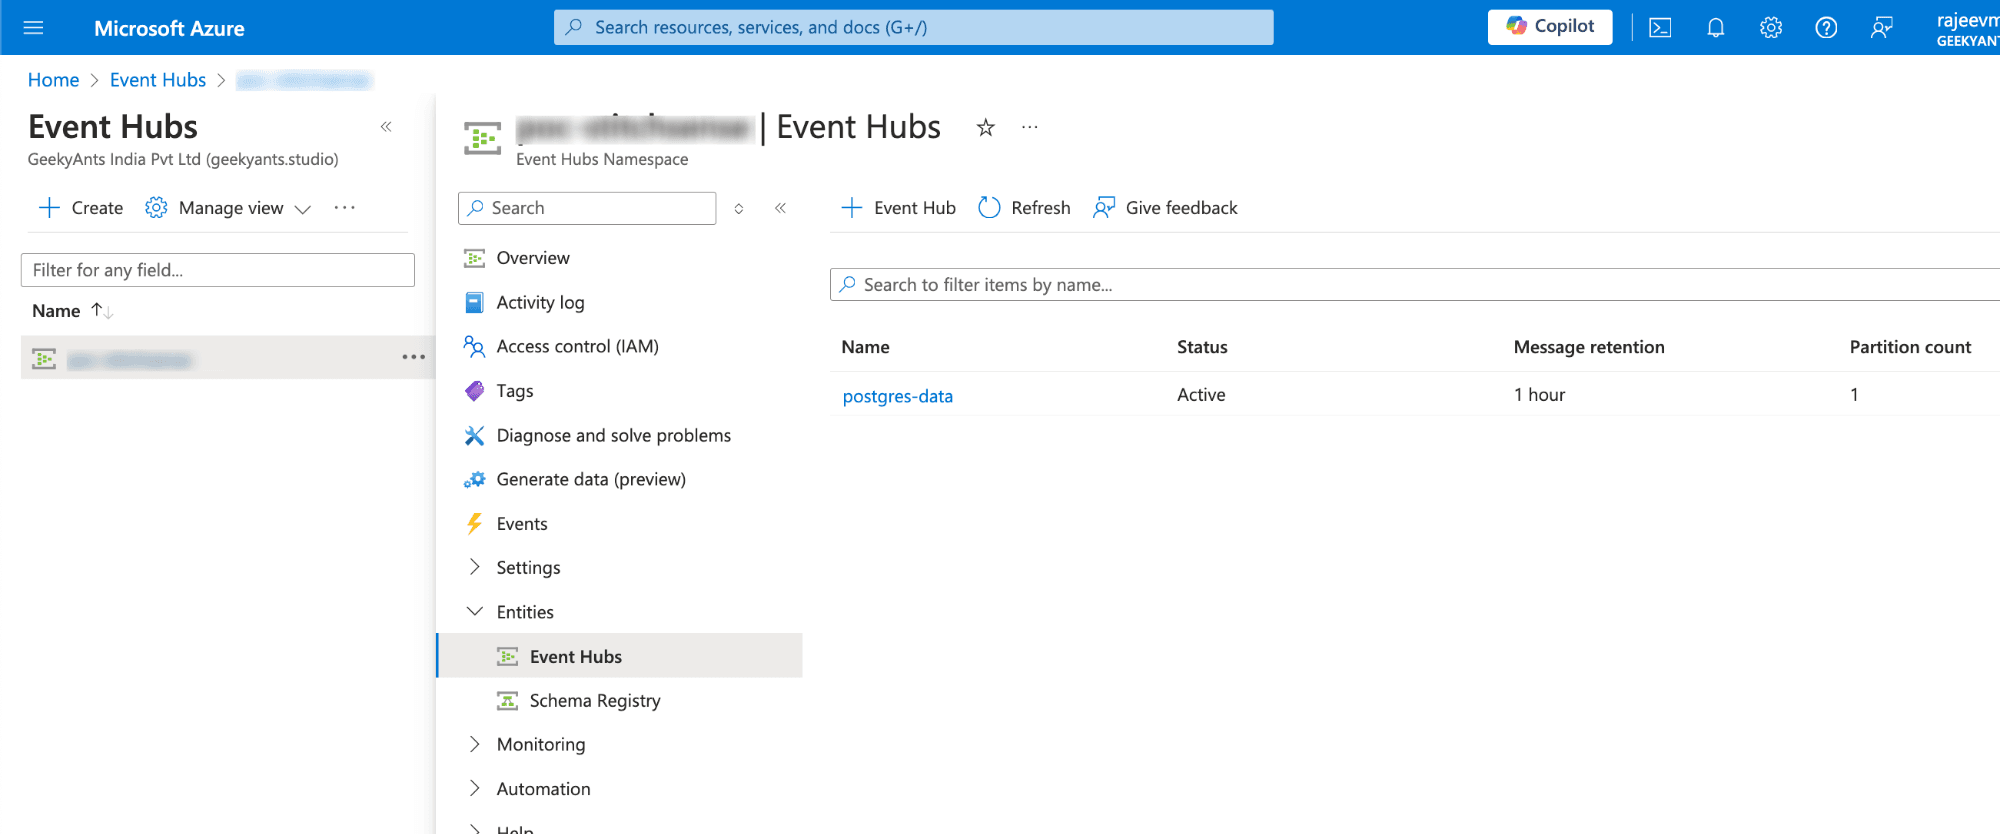
- Navigate to the Azure Portal and go to "Event Hubs".
- Click on "Create" and fill in the details for your Event Hub namespace (Name, Region, Pricing Tier, etc.).
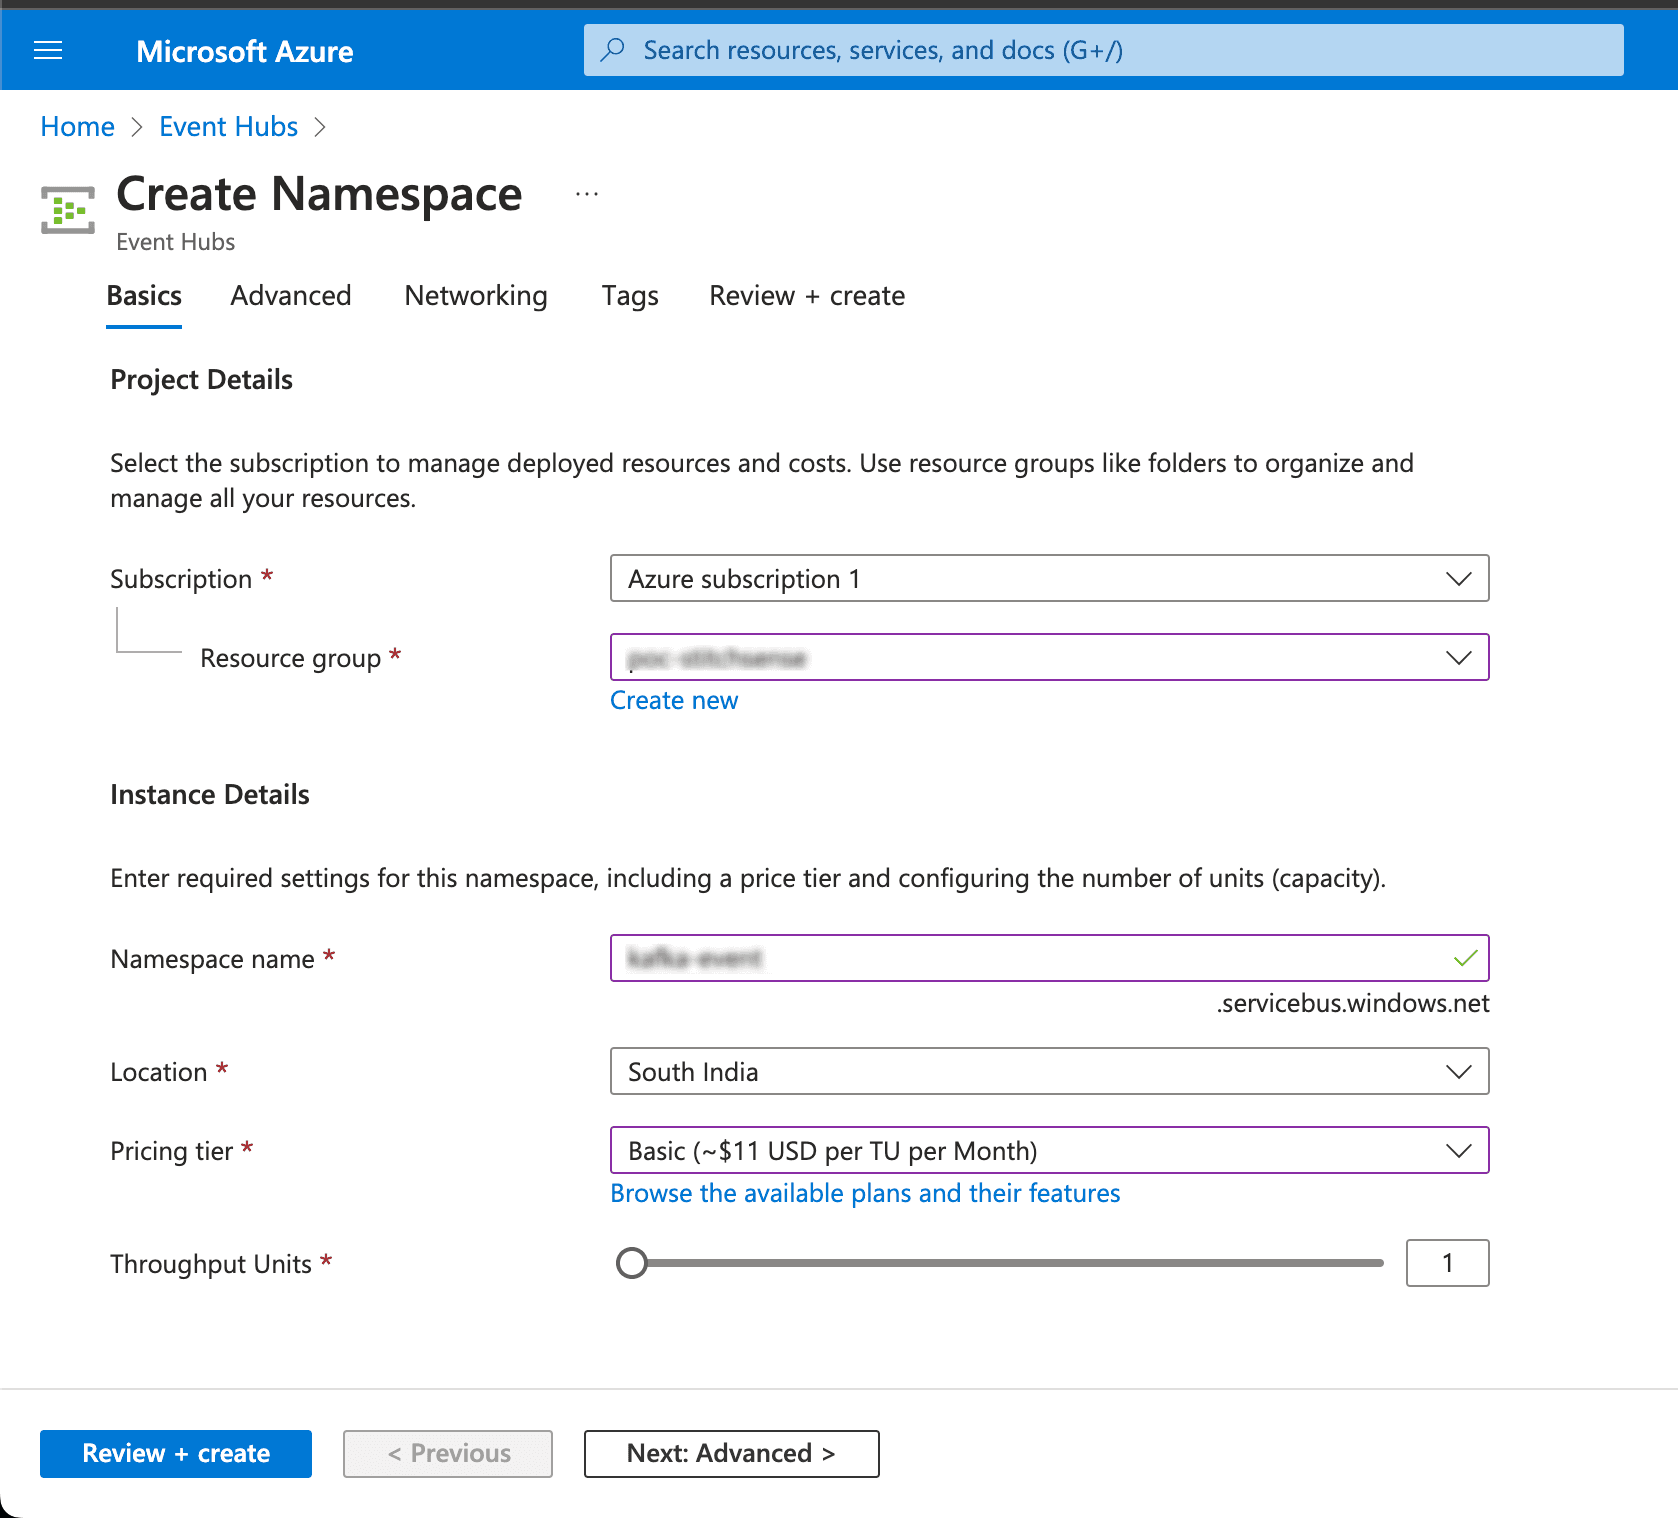
- Create an Event Hub under the namespace to receive the data.
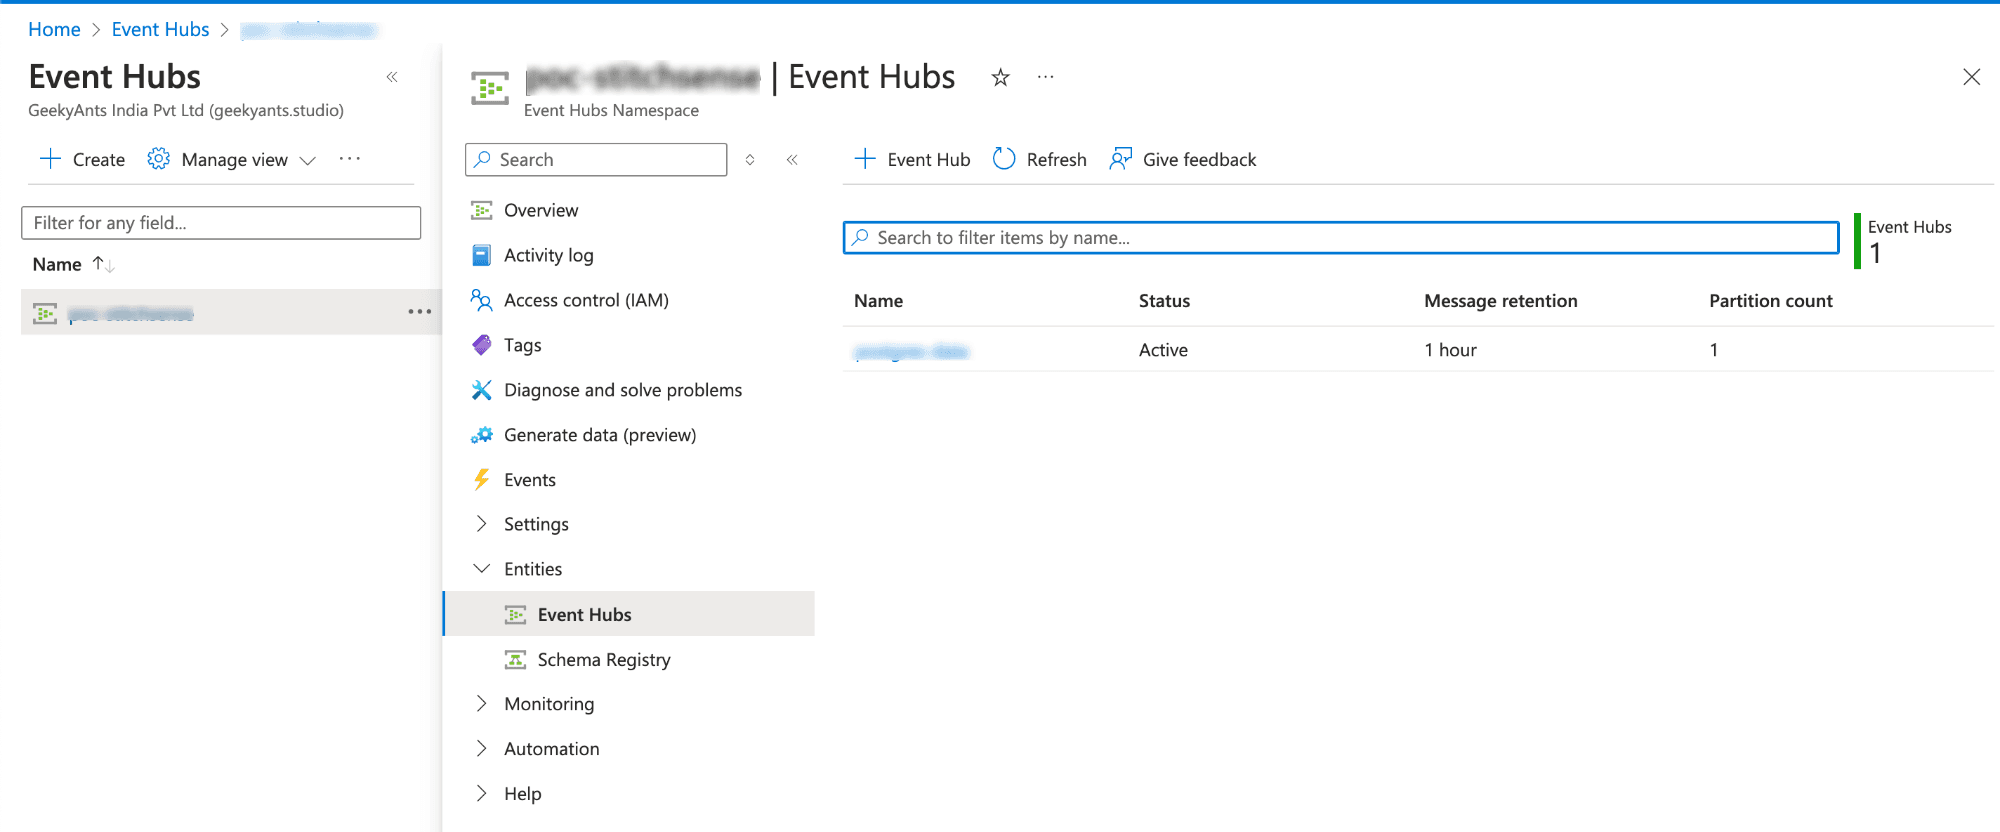
- Under "Shared access policies," create or use an existing policy with Send and Listen permissions.
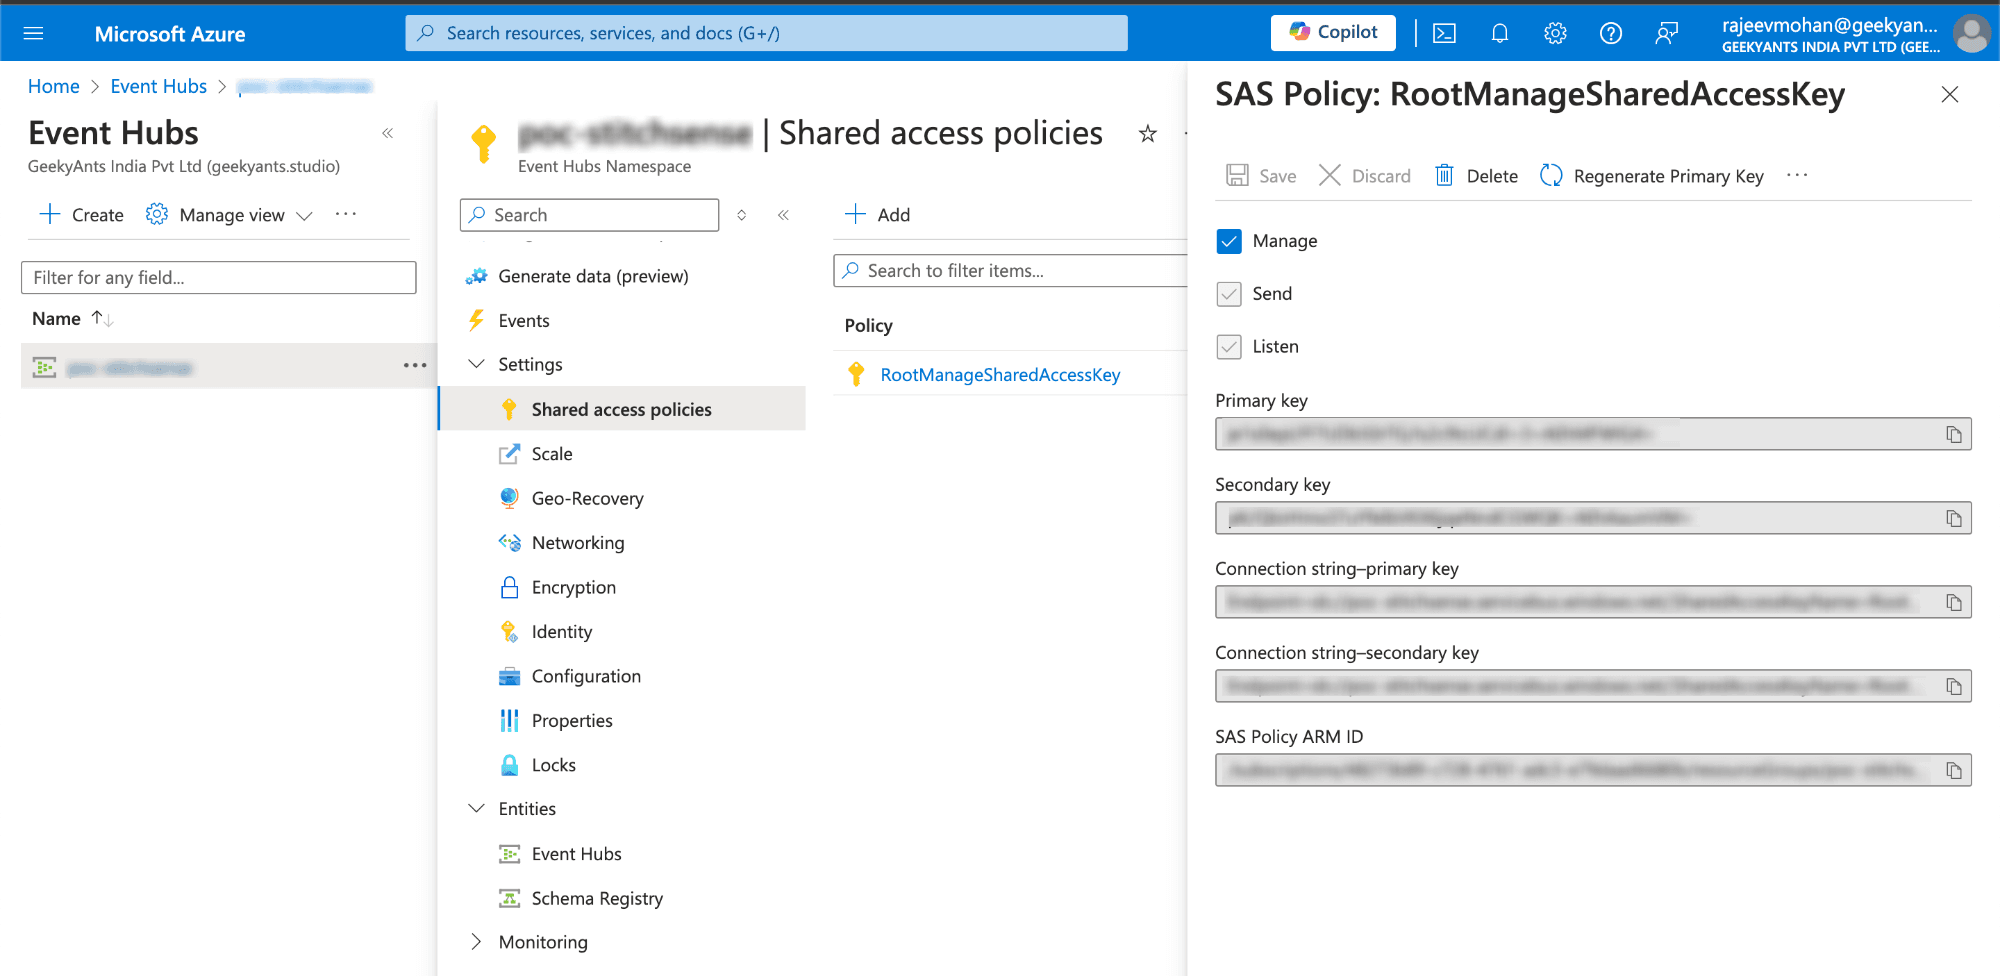
In above you have seen some connection string, we use these as a kafka endpoint in the PostgresListener.js and change connection string.
This small change allows your Kafka producer to stream data directly to Azure Event Hubs.
Now, as you know, we’ve been talking about storage in our blog. Yeah! It’s none other than Azure Data Lake Storage (ADLS). This is where all the events streamed by our Azure Event Hub are stored. ADLS acts as a massive reservoir for all the incoming data, ready to be processed and turned into valuable insights.
Azure Data Lake Storage (ADLS)
Alright! So far, we’ve set up our Apache Kafka to capture events from a Postgres database, and we’ve used Azure Event Hubs to act as a bridge, streaming that data into Azure. Now, where does all this data end up? In our very own Azure Data Lake Storage (ADLS)!
What is Azure Data Lake Storage (ADLS)?
Think of ADLS as a gigantic digital warehouse where all the streamed data gets stored. It's highly scalable and perfect for big data analytics. Once the data is here, we can process it, analyze it, and generate valuable insights.
Why do we need ADLS?
Simple—ADLS provides the capability to store huge volumes of data in any format, structured or unstructured. It's like having a massive hard drive in the cloud but with superpowers! We can easily integrate it with various Azure services for advanced data processing and analytics.
Setting Up Azure Data Lake Storage to Stored Streamed Events
To get all those event streams from Azure Event Hubs into ADLS, we need to set up a pipeline that ensures a smooth flow of data from Event Hubs to our storage. Follow these steps to set up ADLS and connect it to Event Hubs:
Step-by-step guide to configuring ADLS
- Create an Azure Data Lake Storage Account:
- Go to Azure Portal and search for "Storage accounts."

- Click "Create" and choose "Azure Data Lake Storage Gen2" under the Advanced tab.
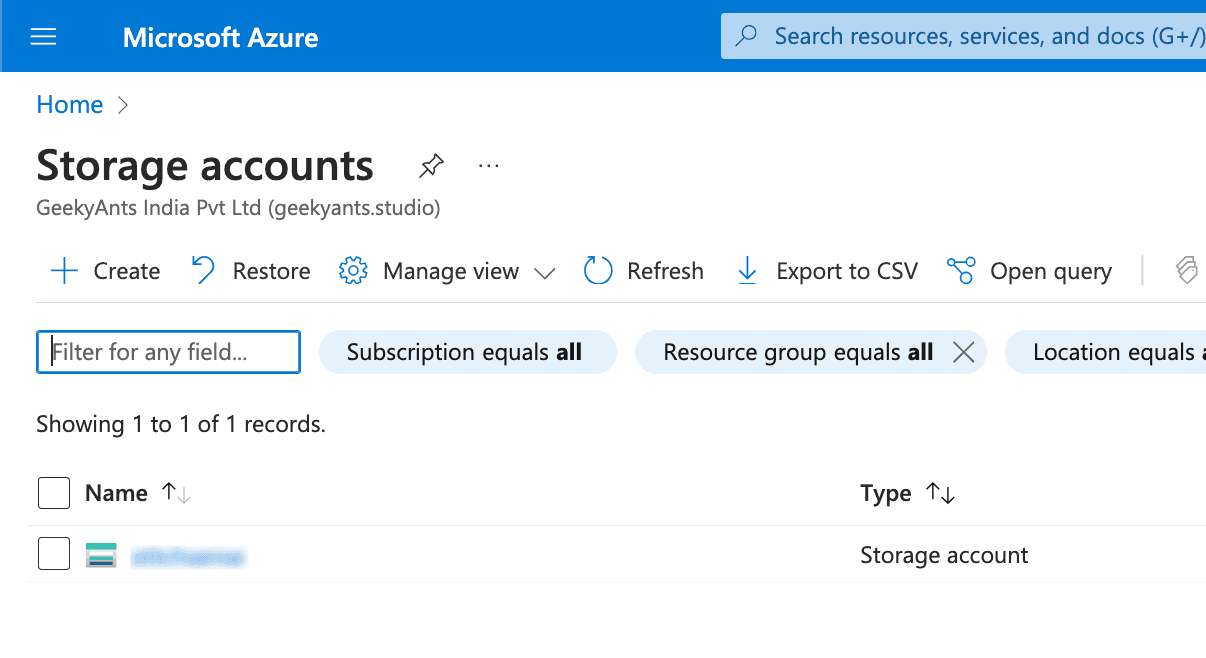
- Fill in the necessary details like Resource Group, Storage Account Name, and Region.
- Click "Review + Create" to finish the setup.
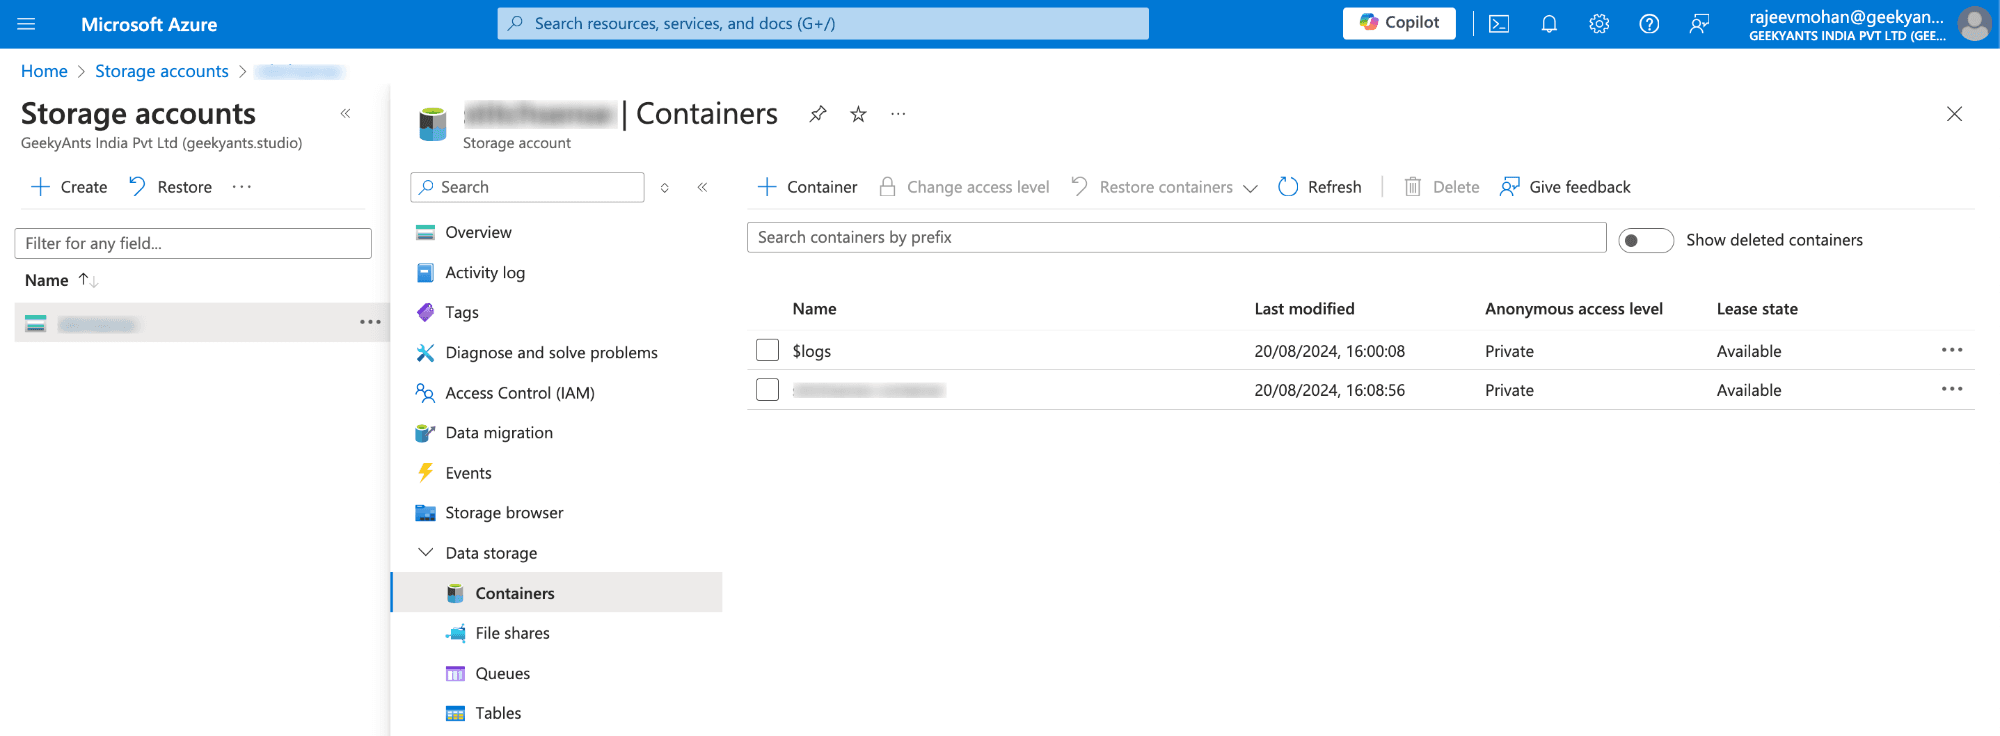
Set Up Containers in ADLS:
- Once your storage account is created, navigate to it and click on "Containers".
- Create a new container where all the streamed data from Event Hubs will be stored. You can name it something meaningful like
streamed-events.
Screenshot : Display the Containers section with an option to create a new container.
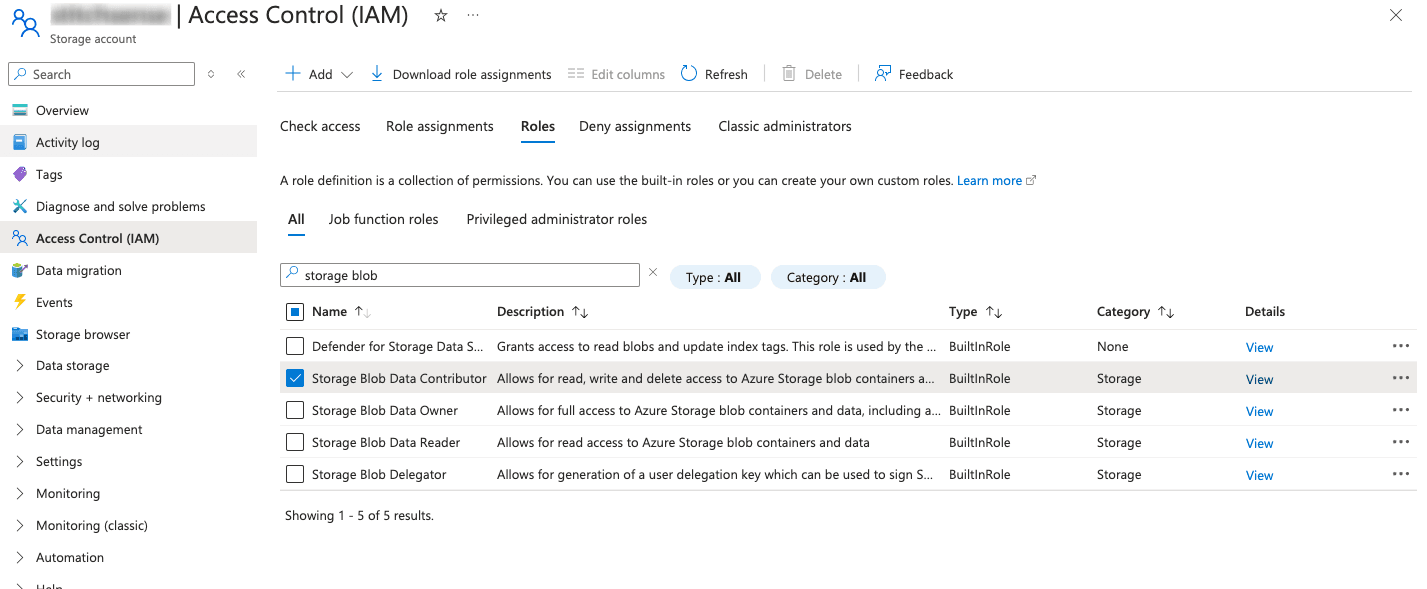
- Grant Permissions to Azure Event Hubs:
- Go to the "Access Control (IAM)" tab in your ADLS storage account.
- Click on + Add > Add role assignment, select a role such as Storage Blob Data Contributor or Storage Blob Data Reader, and assign it to users, groups, or managed identities that require access to the storage account.
- Account Level Access

4. Configure Event Hub to Send Data to ADLS:
- Go to your Azure Event Hub Namespace and then Event Hub which is created in the Azure Portal.
- Under the "Features" tab, find the "Capture" section.
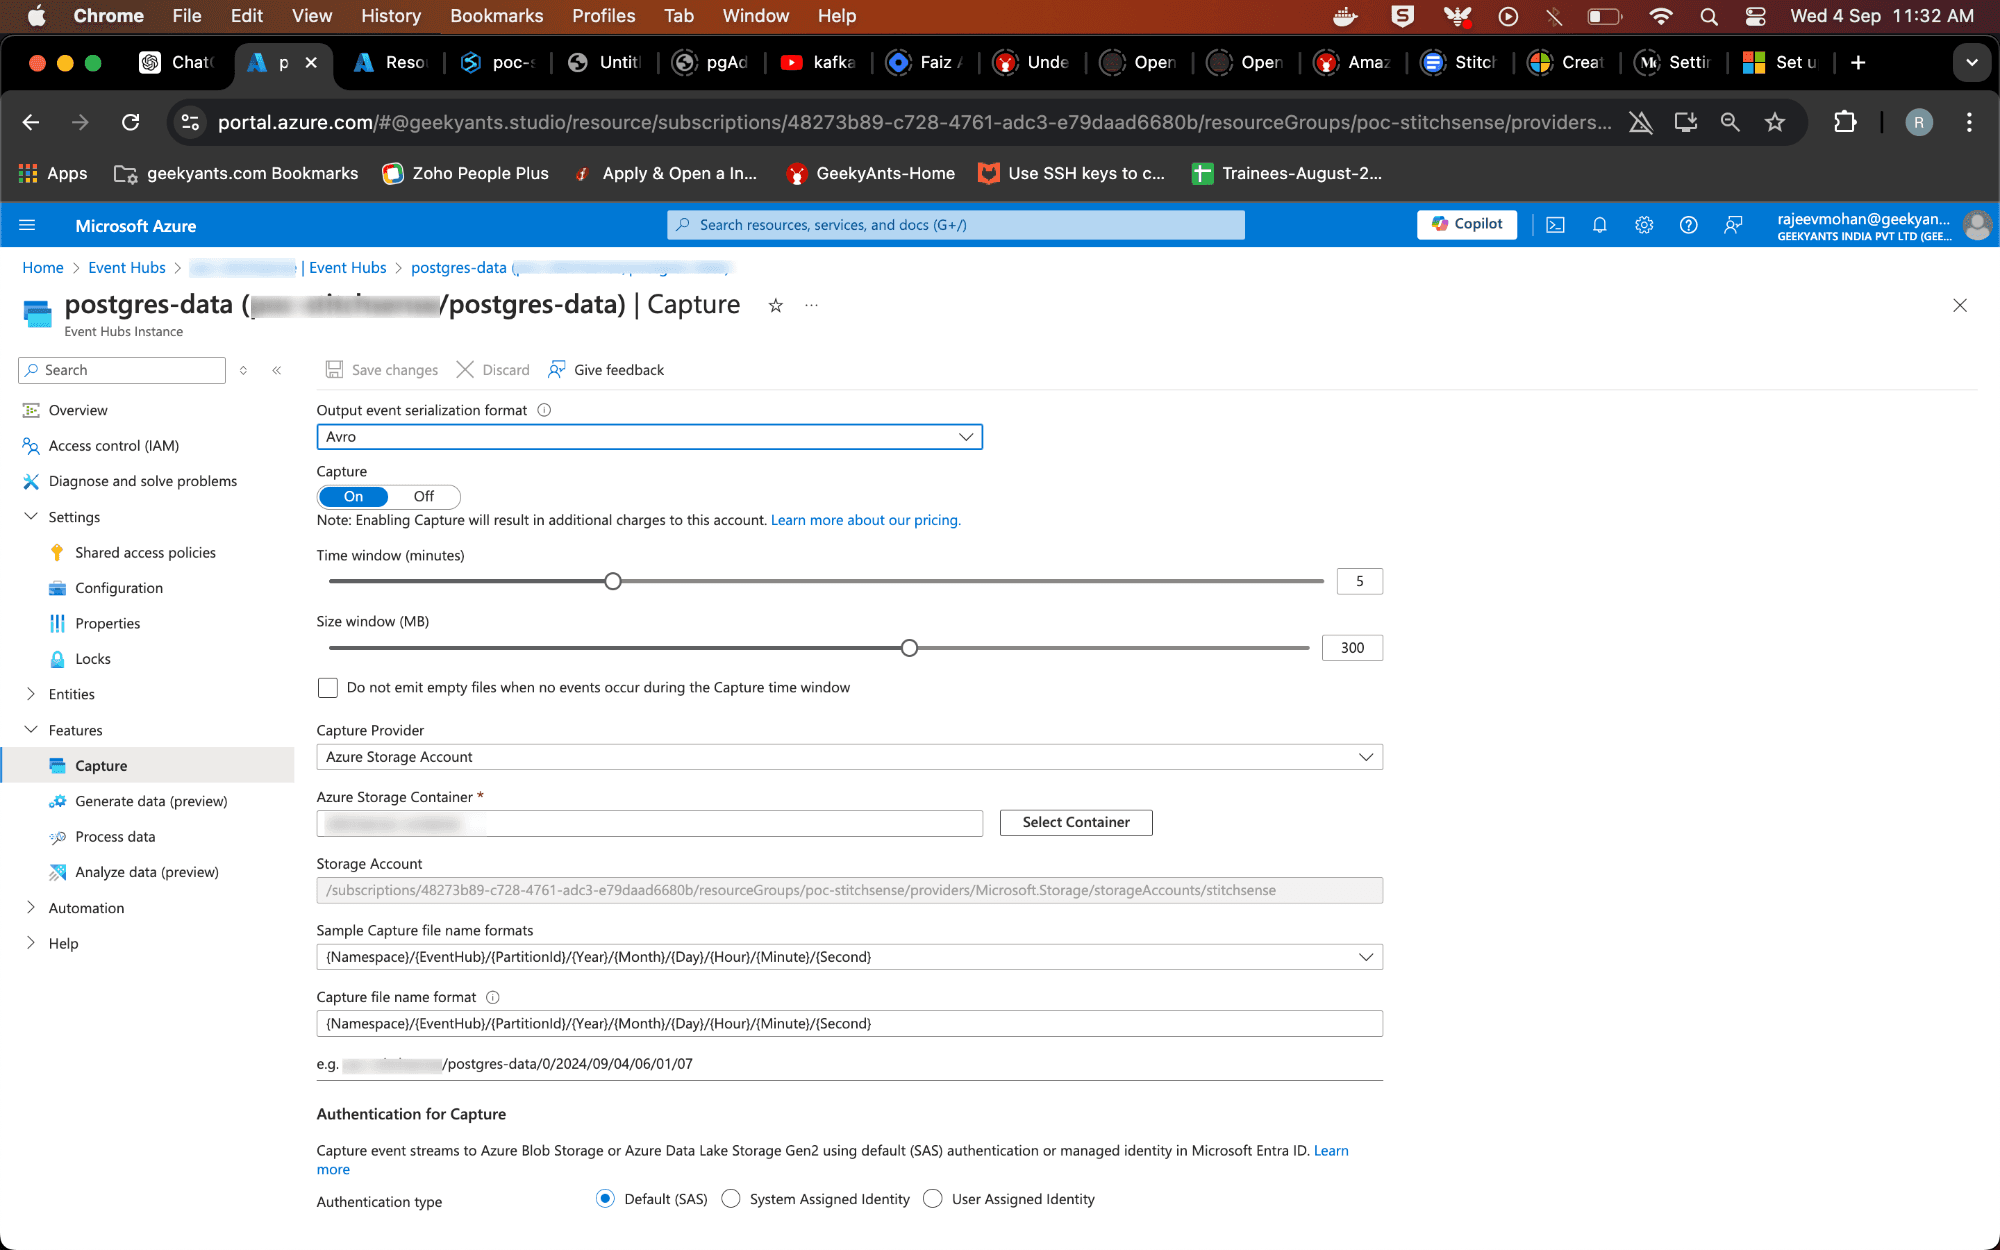
- Enable Capture and choose Azure Data Lake Storage as the destination.
- Enter the container details you just created in ADLS. Set the Capture file path, format, and time interval for capturing events. This will tell Event Hub where and how to store the streamed data in ADLS.
Note: Event Hub typically stores data in the Apache Avro (.avro) format. Avro is a popular data serialization system that is compact, fast, and supports rich data structures. It’s ideal for big data storage and analytics because it helps maintain the schema alongside the data, ensuring consistency and ease of processing later.
Data Processing using Apache Spark with Azure Synapse
Now that all the streamed data from our Event Hub is stored in Azure Data Lake Storage, we need to process this data to extract valuable information. For that, we turn to Azure Synapse Analytics, a powerful analytics service that brings together big data and data warehousing. Within Synapse, we'll leverage Apache Spark with Apache Spark, a widely-used framework for big data processing.
Why Use Apache Spark in Azure Synapse Analytics?
Imagine you’re running a factory where massive amounts of raw material (our data) need to be processed. The more efficient your machines, the better the results. In the data world, Apache Spark is one of those super-efficient machines, designed to process massive datasets swiftly and effectively.
Using ApacheSpark in Azure Synapse Analytics provides the following benefits:
- Scalability: Spark’s distributed computing engine allows for processing large volumes of data quickly and efficiently.
- Integration with Azure Services: Synapse seamlessly integrates with ADLS, Azure SQL Database, Power BI, and other Azure services, enabling a streamlined data workflow.
- Rich Analytics and Machine Learning Support: Synapse provides rich libraries for data manipulation, machine learning, and more through Apache Spark.
- Interactive Notebooks: Azure Synapse provides notebooks where you can write Apache Spark code interactively, making it easy to visualize and explore your data.
Setting Up Data Processing with ApacheSpark in Azure Synapse Analytics
Let's go through the steps to process the data stored in Azure Data Lake Storage (ADLS) using ApacheSpark in Azure Synapse Analytics.
Step-by-step guide to Data Processing in Synapse Using ApacheSpark
- Create an Azure Synapse Workspace:
- Navigate to the Azure Portal and search for "Azure Synapse Analytics."
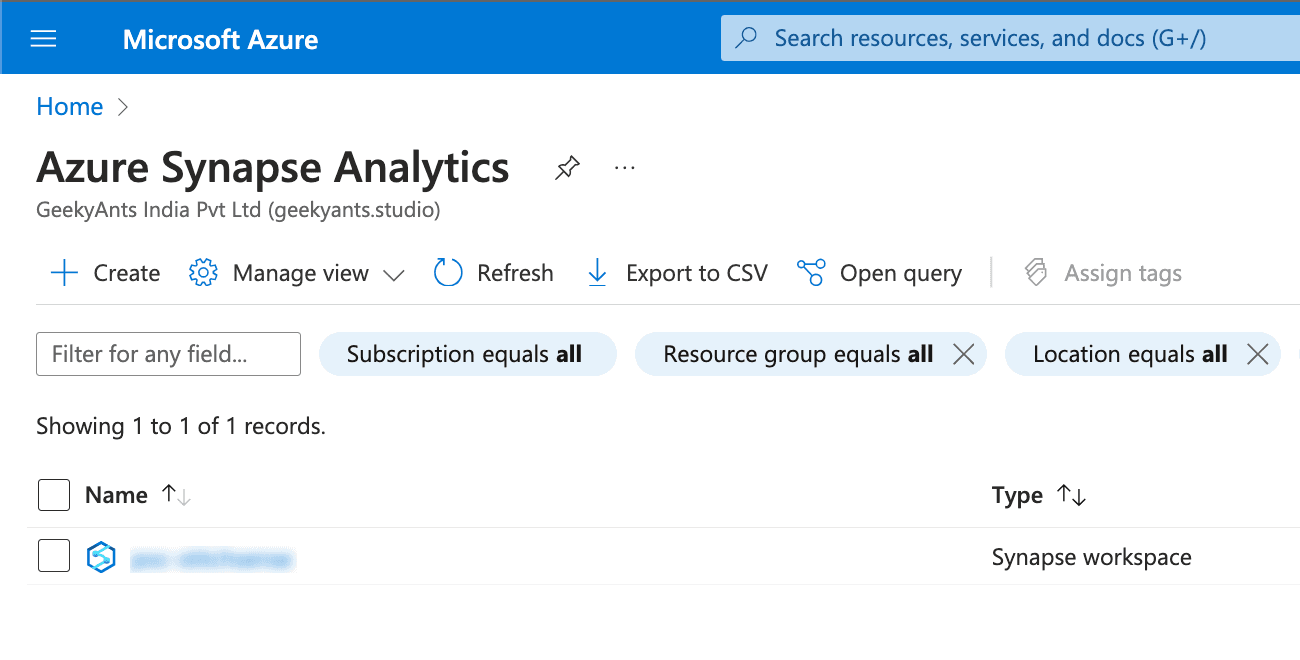
Click "Create" and fill in the necessary details like Resource Group, Workspace Name, Region, and Data Lake Storage (Gen2) Account. Ensure the ADLS account is linked to your Synapse workspace.

- Click "Review + Create" to set up your Synapse workspace.
Create a Spark Pool in Azure Synapse:
- Go to the overview in the Synapse workspace you found.
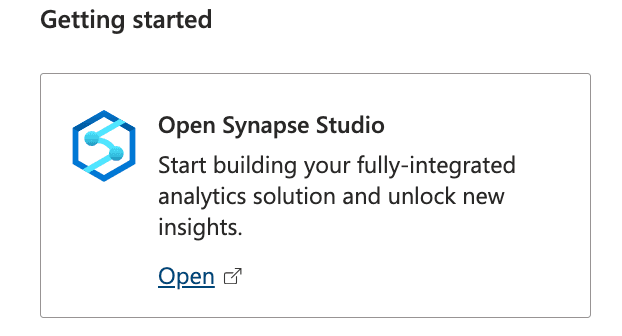
- Once your Synapse workspace is ready, go to the "Manage" hub.

- Under "Apache Spark pools," click "New" to create a new Spark pool.
- Provide the Spark pool name, choose the Node size, and set the Number of nodes. Click "Review + Create" to provision the Spark pool.
Screenshot suggestion: Display the screen for creating a Spark pool, with fields for the pool name and node configuration highlighted.
- Create a Apache Spark Notebook in Synapse Studio:
- Open Synapse Studio from the Azure Synapse workspace blade in the Azure Portal.
- Go to the "Develop" hub and click "+ (New)" -> "Notebook."
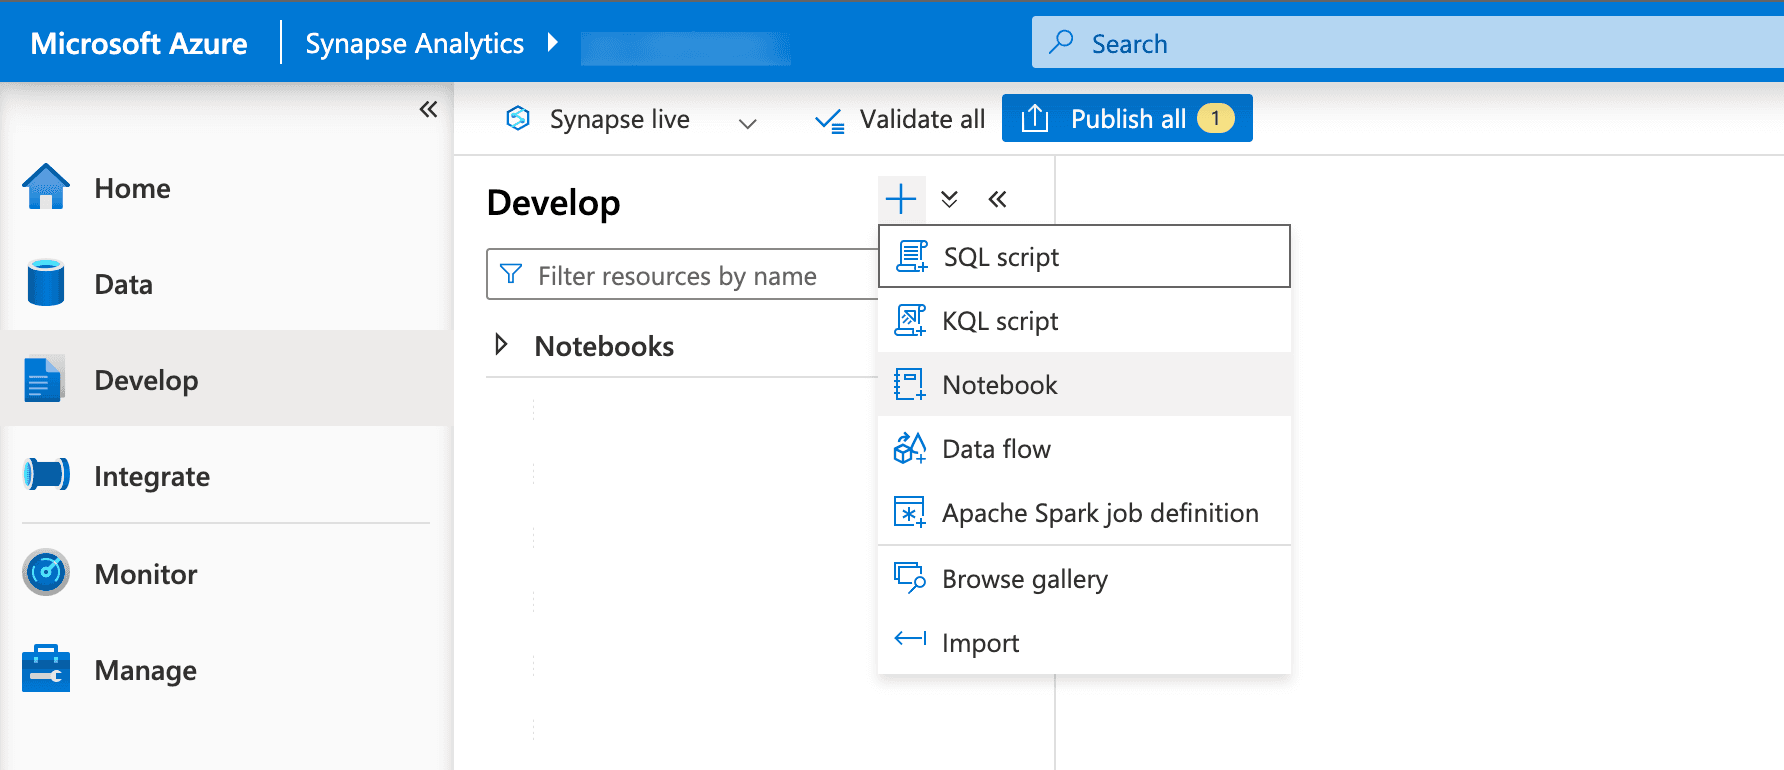
- Set the language to Apache Spark and attach it to the newly created Spark pool.
- Schedule and Monitor Spark Jobs:
- Use Synapse Pipelines to automate the scheduling and monitoring of Spark jobs to run on a predefined schedule or in response to specific events.
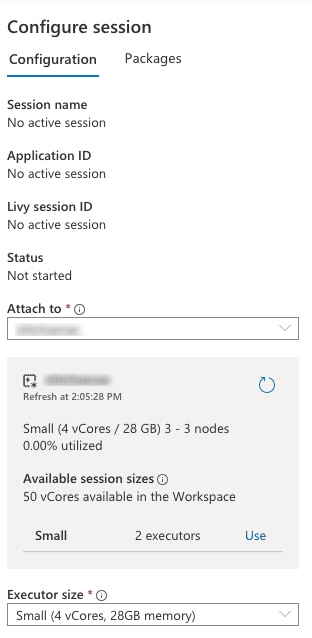
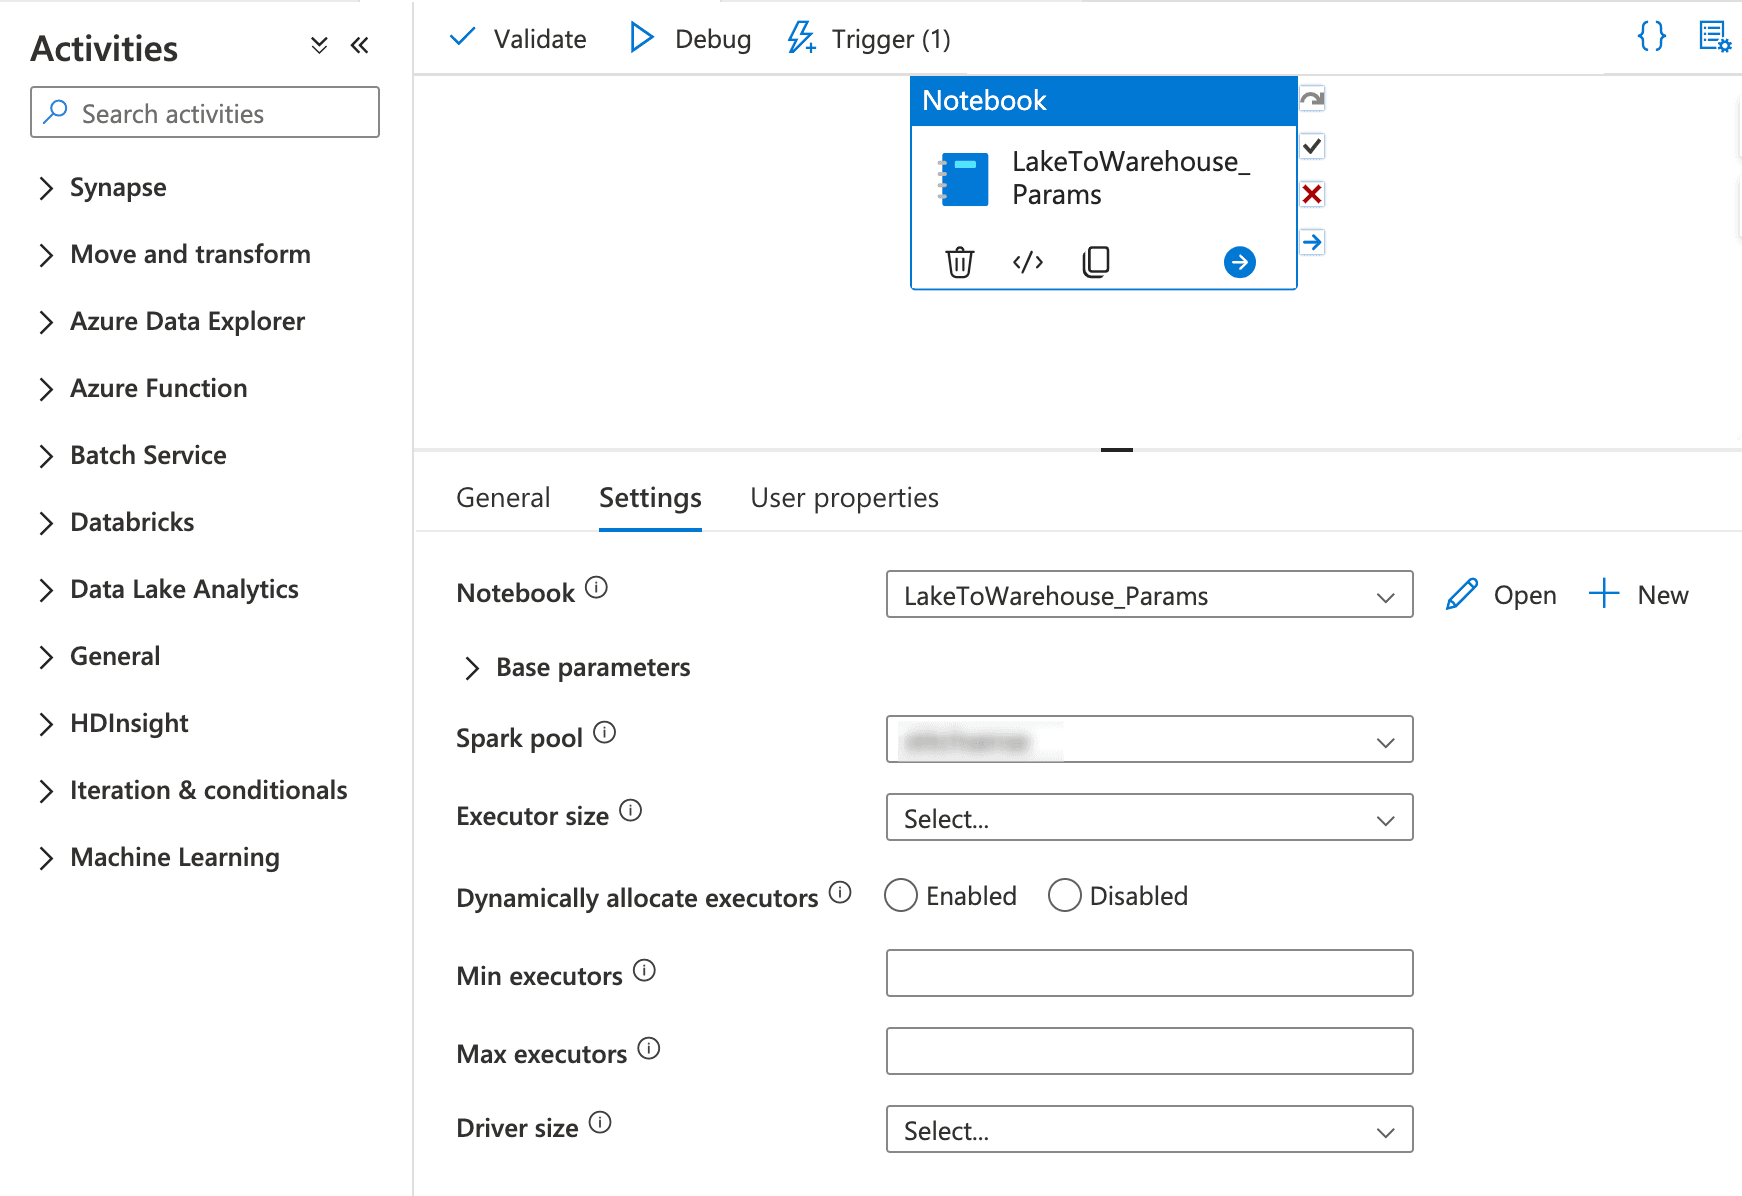
- First create a notebook which has the activites and task for processing data comming from the ADLS .
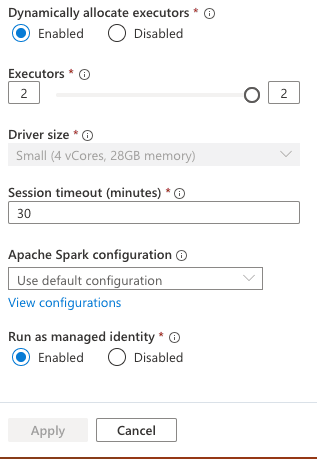
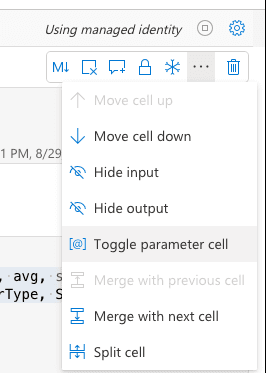
- Go to notebook now on right side you seen Settings icon select that which open the Configure Session and scroll Down Enable the Run as Manage Identity. Because while we adding the event trigger to our pipeline it runs on automatically by some identity which will mange by azure :
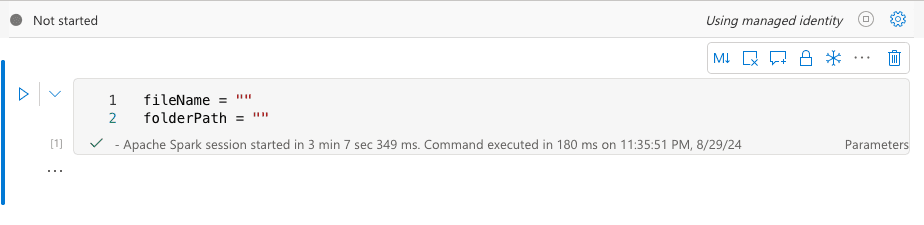
- Create parameters Cell first also as you can see below: Now you can also see that notebook Using managed identity. Make you cell parameters cell using the below.
You can check below our notebook code:
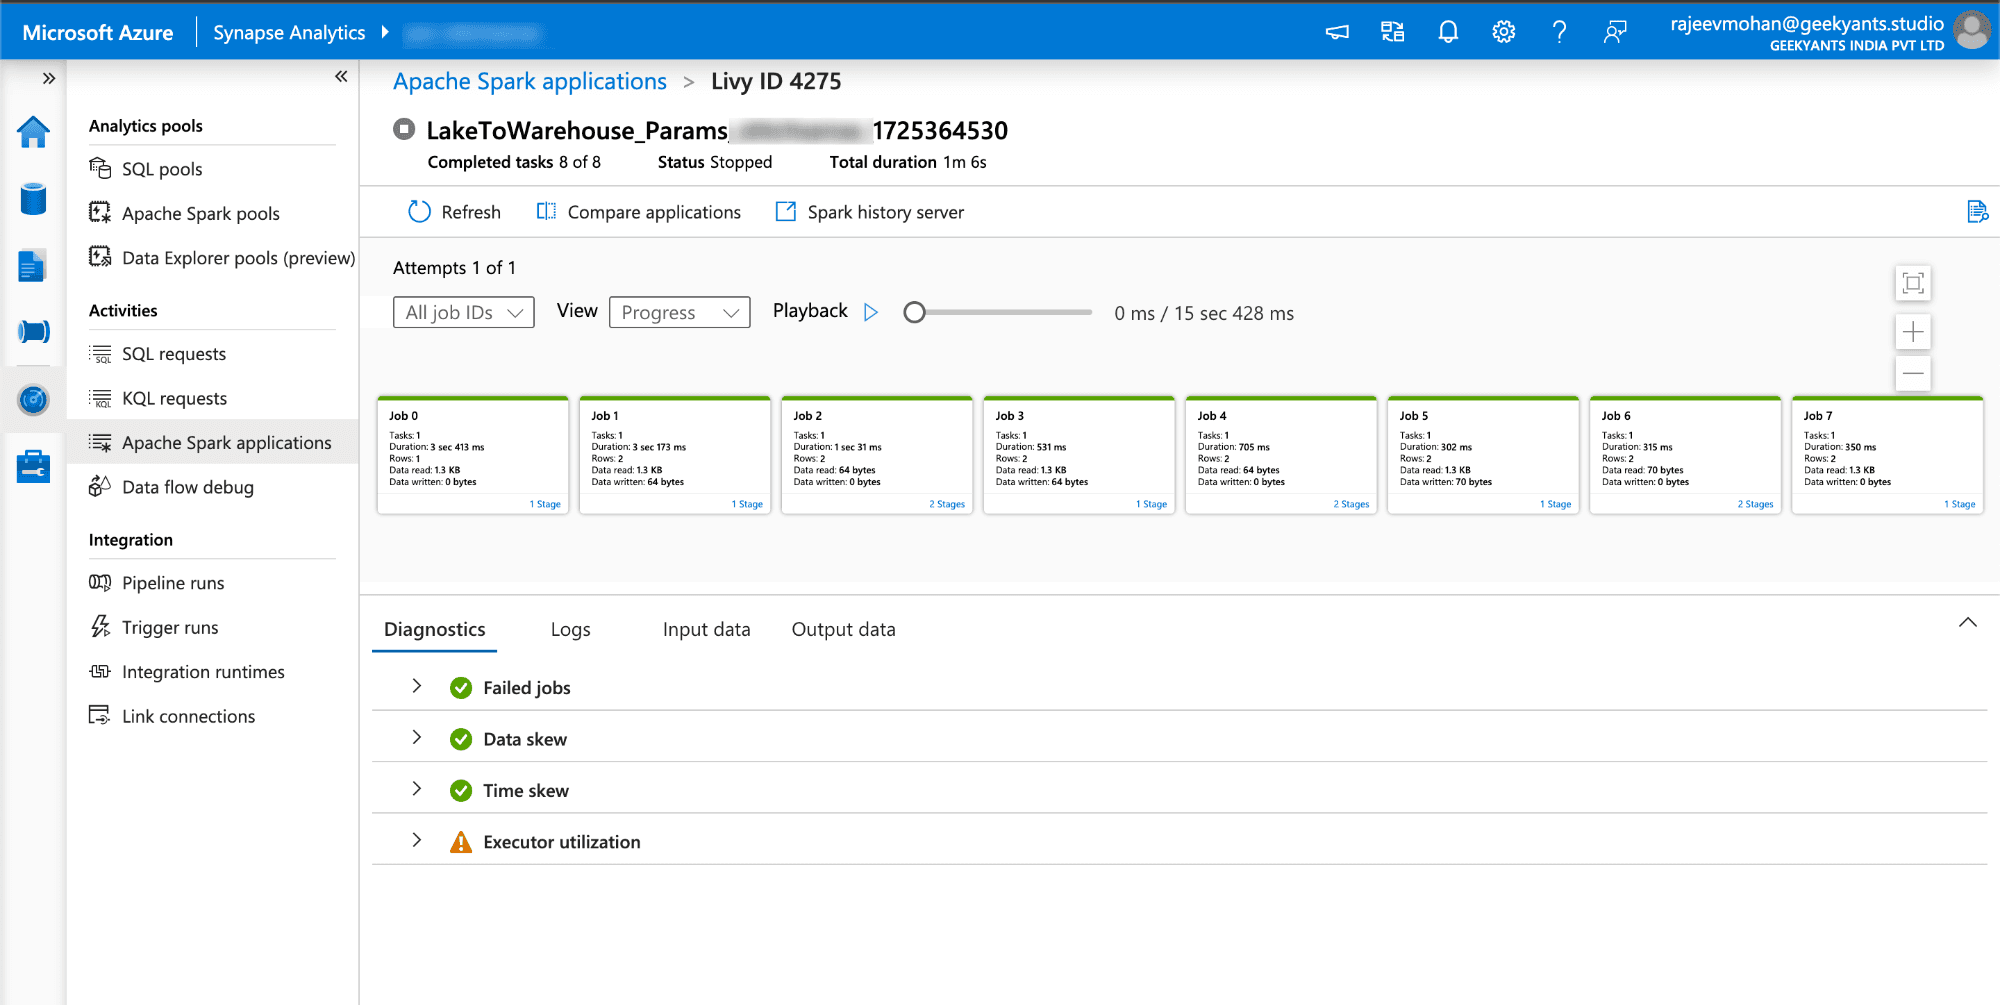
What’s Synapse Notebook Doing?
So, what’s all the buzz about our notebook? It’s the unsung hero of our data pipeline, handling a critical task: transforming raw data into structured insights and preparing it for analysis. Let’s break down its role:
1. Fetching the Data
First things first—our notebook dives into Azure Data Lake Storage (ADLS) to fetch .avro files. Imagine it as a data explorer, sifting through vast amounts of raw information to gather what we need.
2. Processing the Data
Once the data is loaded, the notebook performs several tasks:
- Sales Data Analysis: It processes sales data to perform sentiment analysis on customer reviews, map customer demographics, and aggregate sales data by category and age group.
- Sentiment Analysis: Reviews are analyzed to get sentiment using Cohere’s Classify API, categorizing them into positive, neutral, or negative.
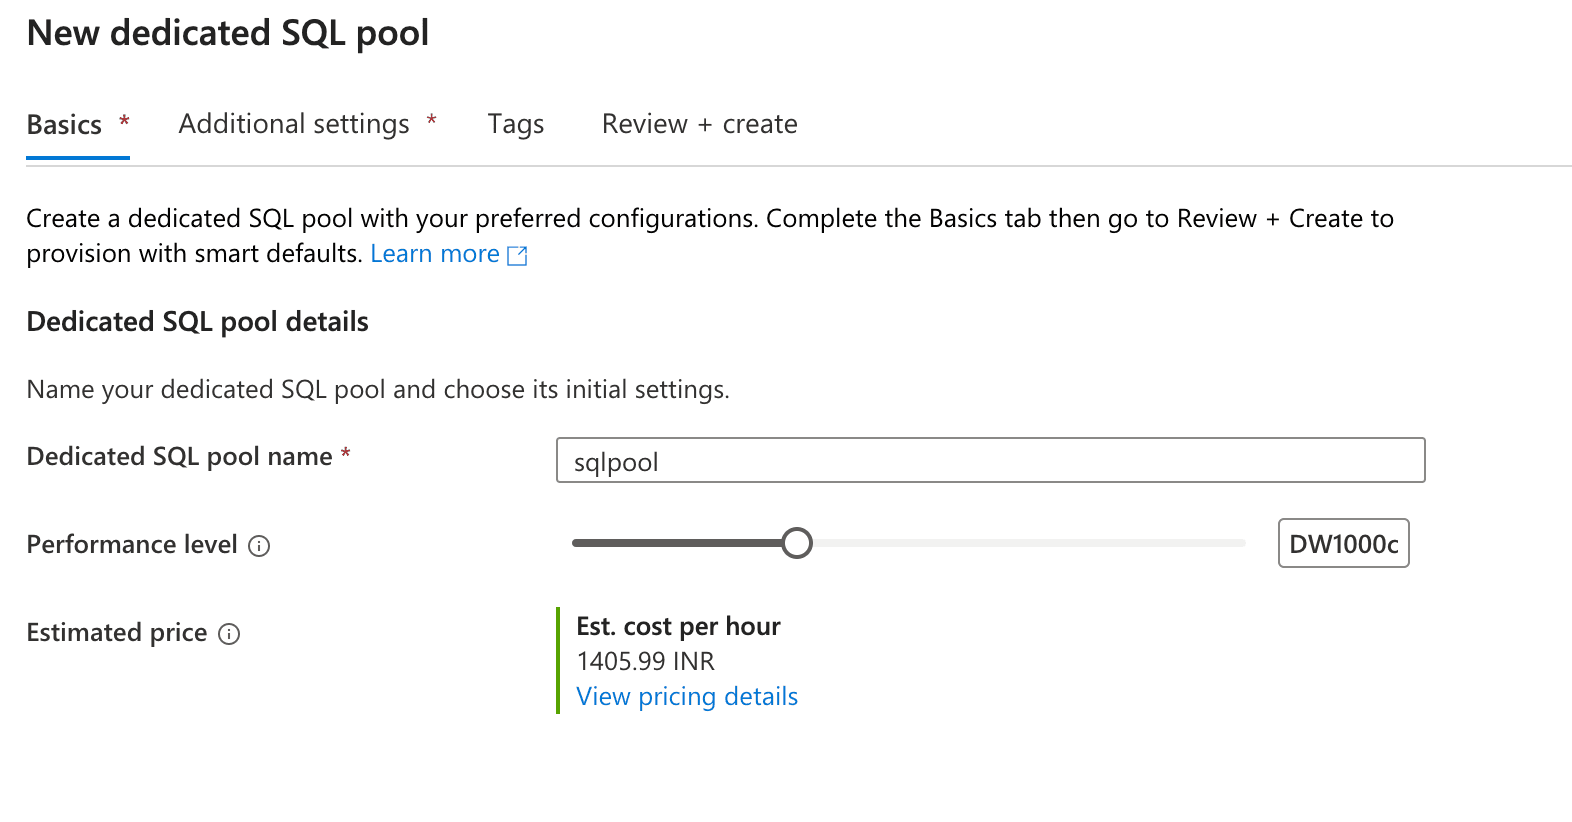
3. Saving Data to the SQL Pool
After processing, the notebook saves the structured data into an Azure Synapse SQL Pool. This SQL Pool acts as a data warehouse where all our processed data is stored in a structured format, ready for further analysis or reporting.
Automating Data Processing in Azure Synapse: No More Manual Effort!
Imagine this: You’ve set up a fantastic data processing pipeline with Apache Spark in your Azure Synapse Notebook. It’s crunching data, transforming it, and saving it neatly back into your Azure Data Lake Storage (ADLS) or Dedicated SQL Pool. But there’s just one thing missing—automation. What if new data arrives in ADLS? Do you have to jump in every time and manually trigger the pipeline? That sounds like a lot of work, right?
Luckily, Azure Synapse offers a way to automate this process, ensuring that as soon as new data lands in your ADLS, it triggers the data processing workflow automatically. Think of it like a conveyor belt that detects new items and starts the sorting and packaging process without any human intervention. Let’s set up this conveyor belt with Event Triggers and Synapse Pipelines!
Step-by-Step Guide to Automating Data Processing in Synapse with Event Triggers and Pipelines
Create a Pipeline in Azure Synapse—Your Automated Workflow
First things first, let's create a pipeline in Azure Synapse. This pipeline will be like the master controller that orchestrates the data processing steps.
- Open Synapse Studio from your Synapse workspace.
- Go to the "Integrate" hub and click on "+ (New)", then select "Pipeline".
- Name your pipeline something like "Automated Data Processing Pipeline".
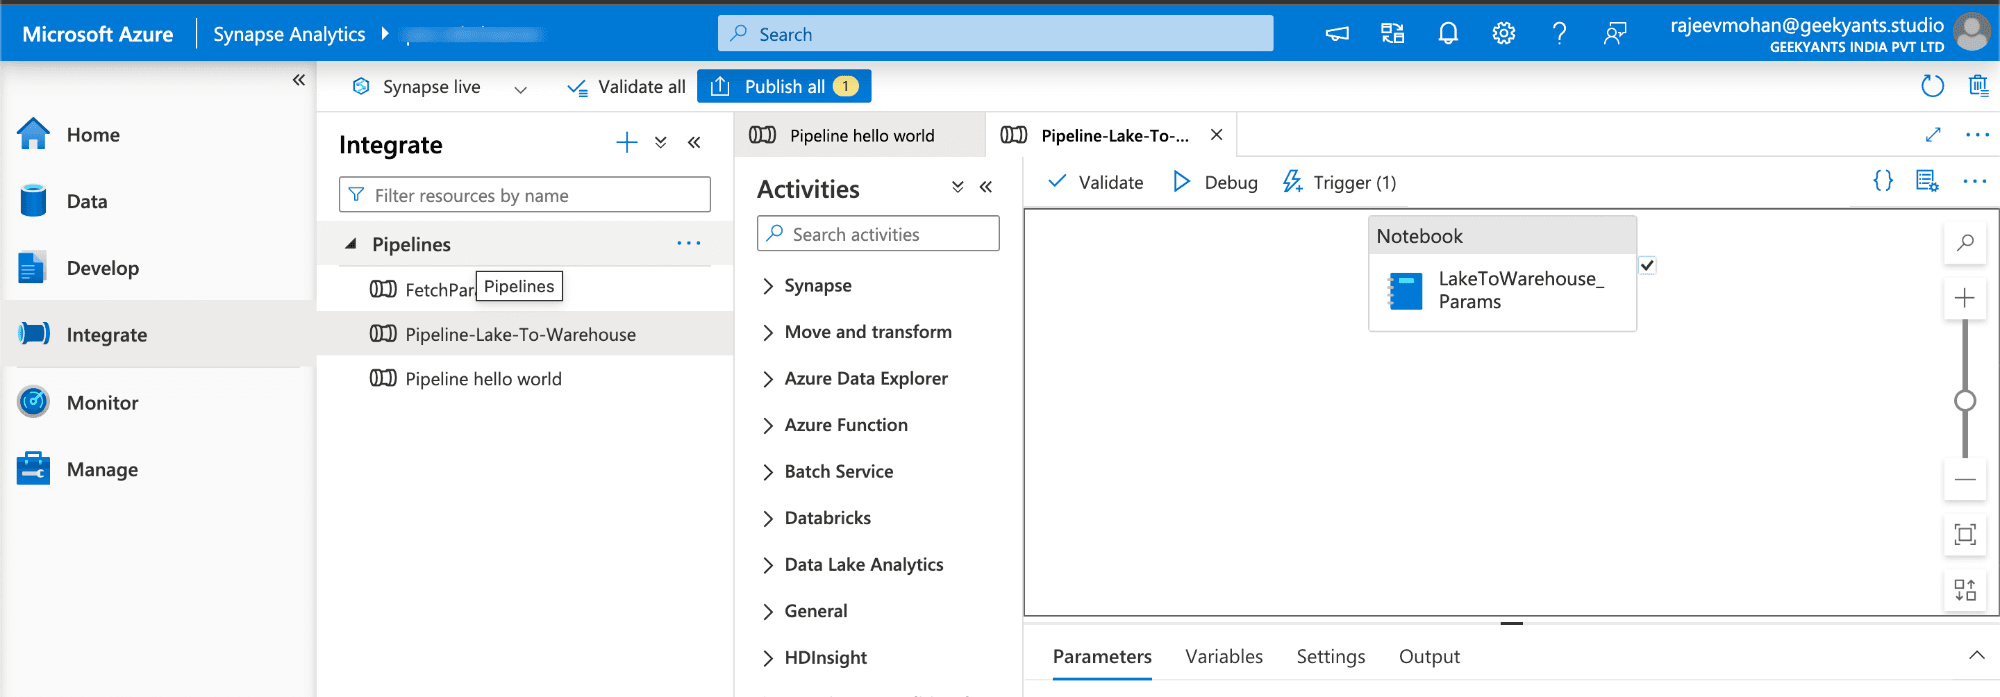
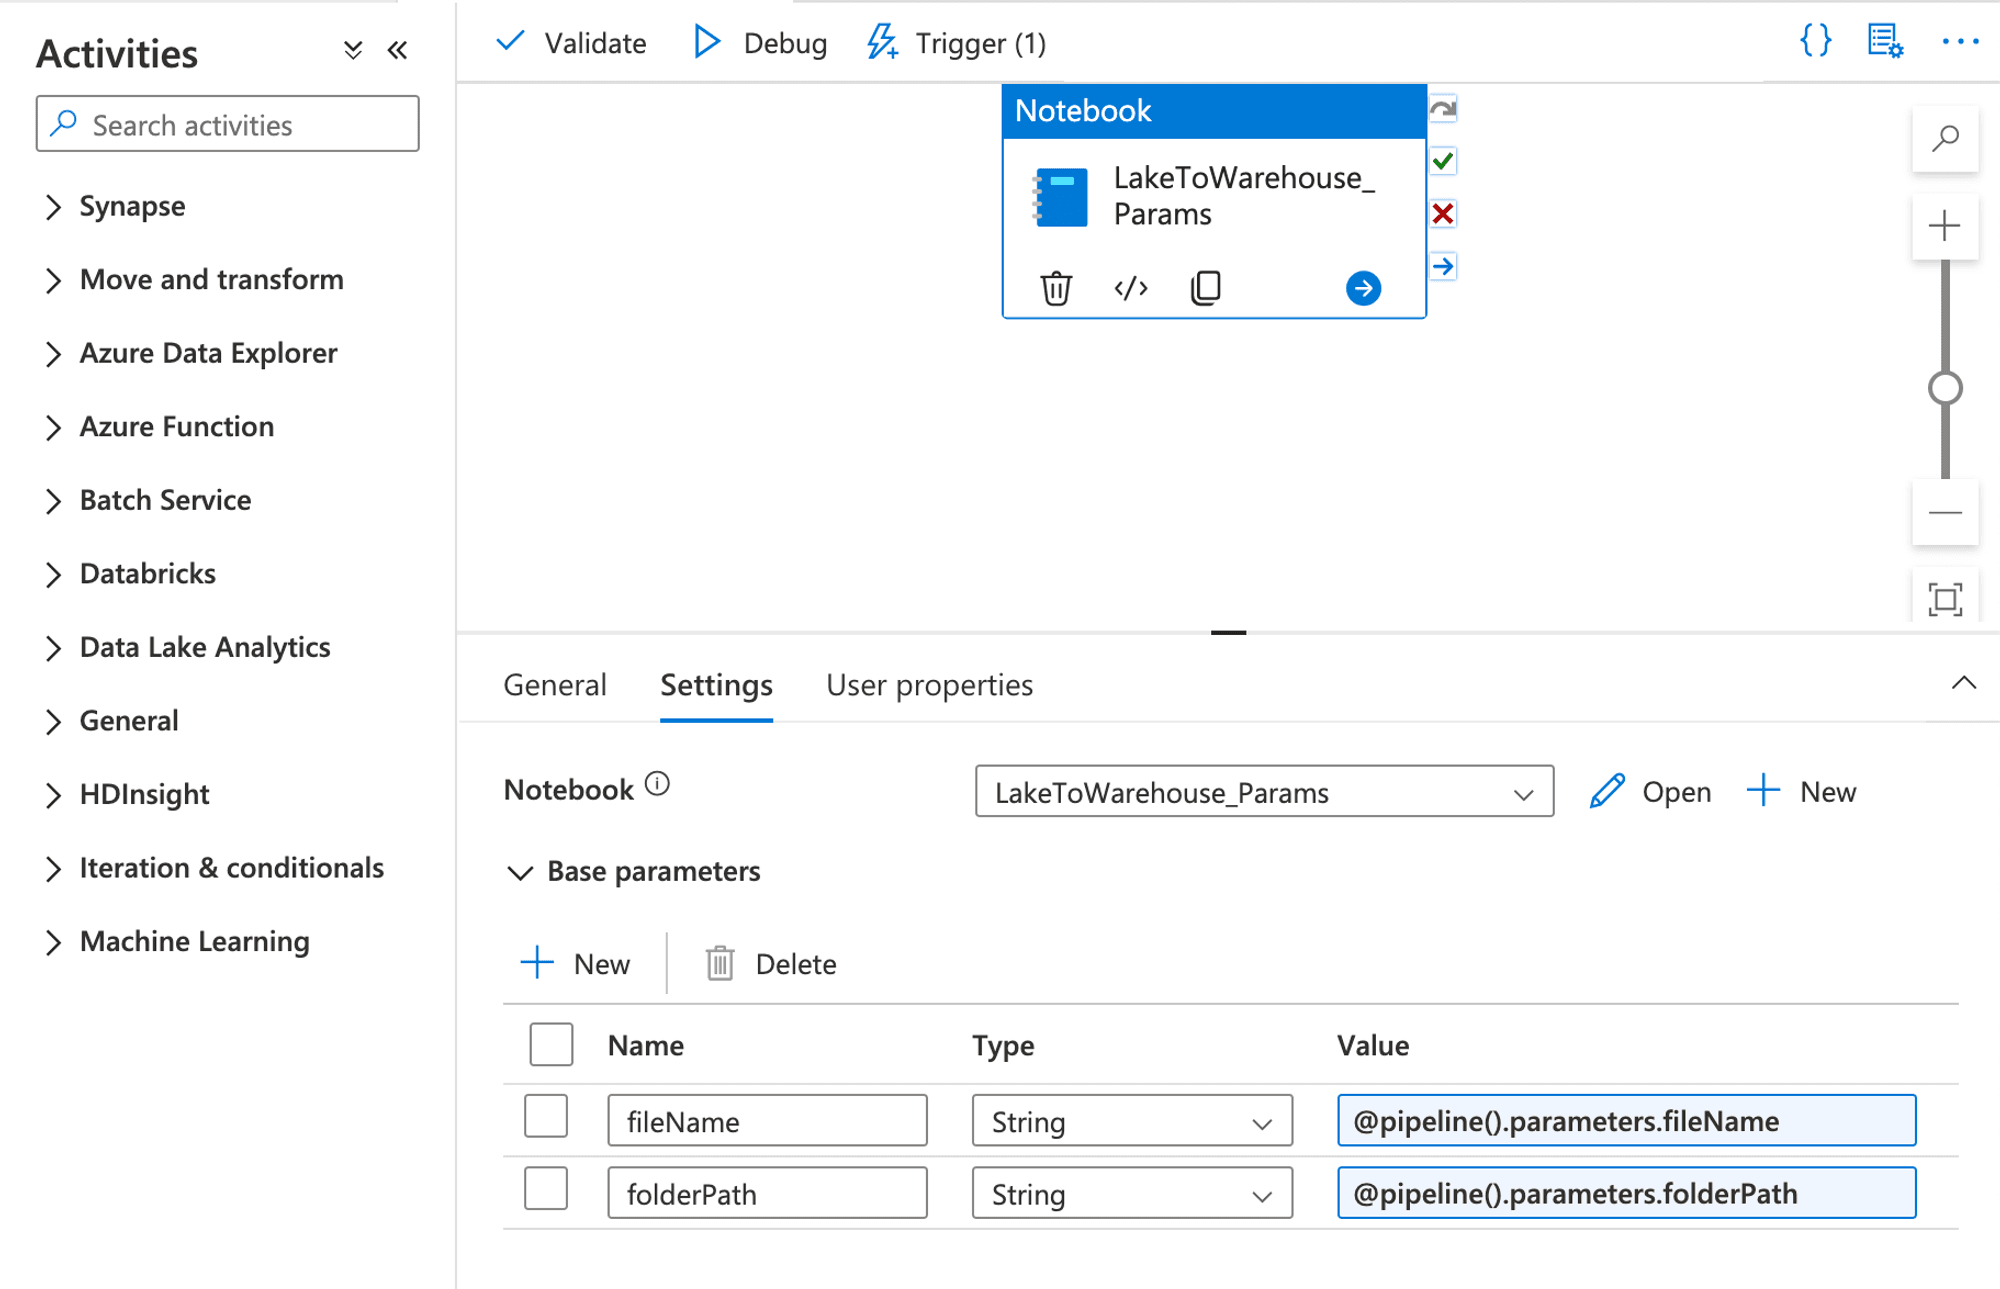
Add a Notebook Activity to Your Pipeline—Connect the Dots
The magic happens in the notebook we created earlier, where we wrote our PySpark code to process the data. We need to connect this notebook to our pipeline.
- In the pipeline canvas, search for the "Notebook" activity in the Activities pane on the left.
- Drag and drop the Notebook activity onto the pipeline canvas.
- Click on the Notebook activity and configure it by selecting the PySpark notebook you created earlier from the "Settings" tab.
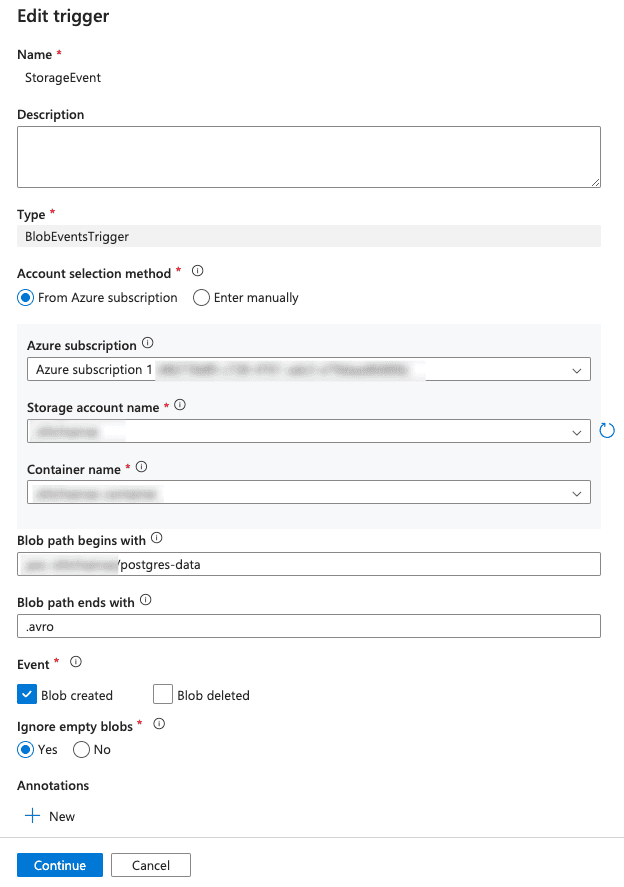
Add an Event Trigger to the Pipeline—Detect New Data Automatically
Now, let’s set up an Event Trigger. This trigger will automatically start your pipeline whenever new data lands in your ADLS container. Think of this as setting up a motion sensor in your warehouse that starts the conveyor belt whenever new items are detected.
- Navigate to the "Manage" hub in Synapse Studio and select "Triggers."
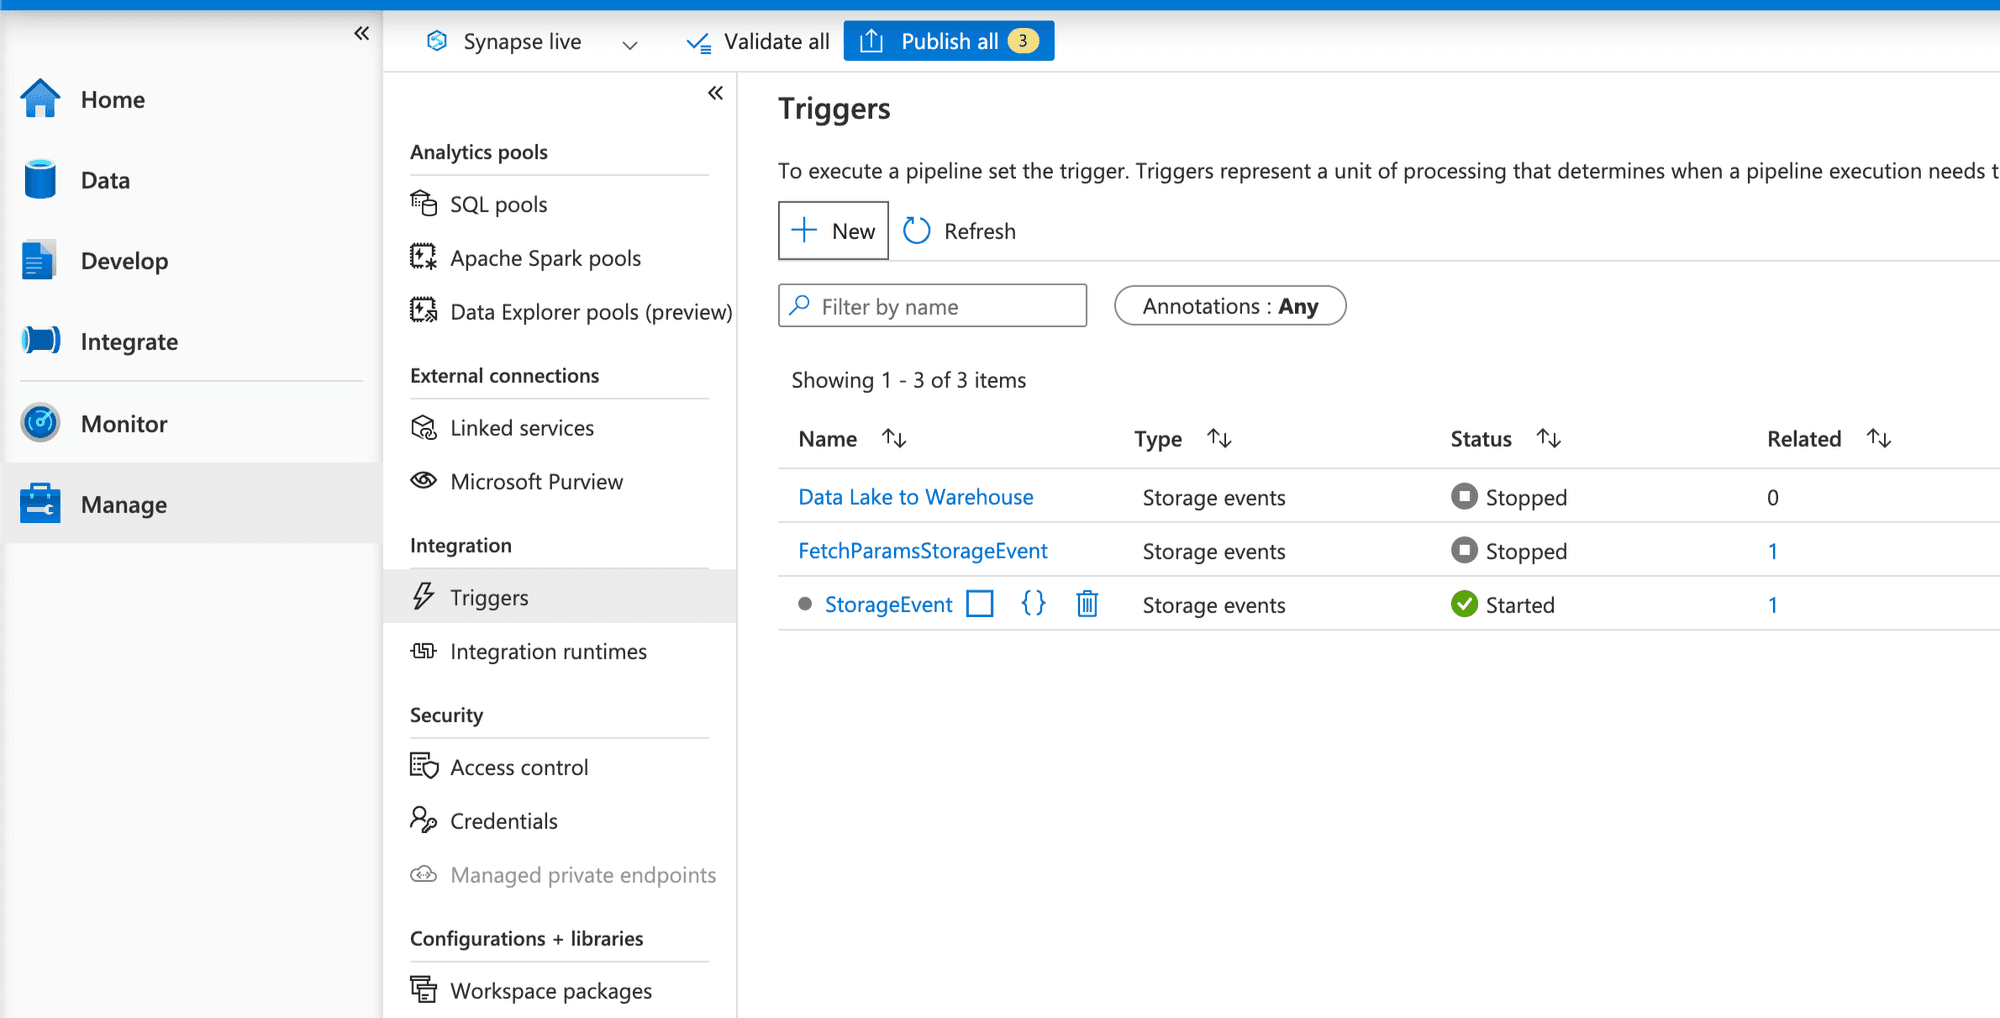
- Click on "+ (New)" and choose "Event" as the trigger type.
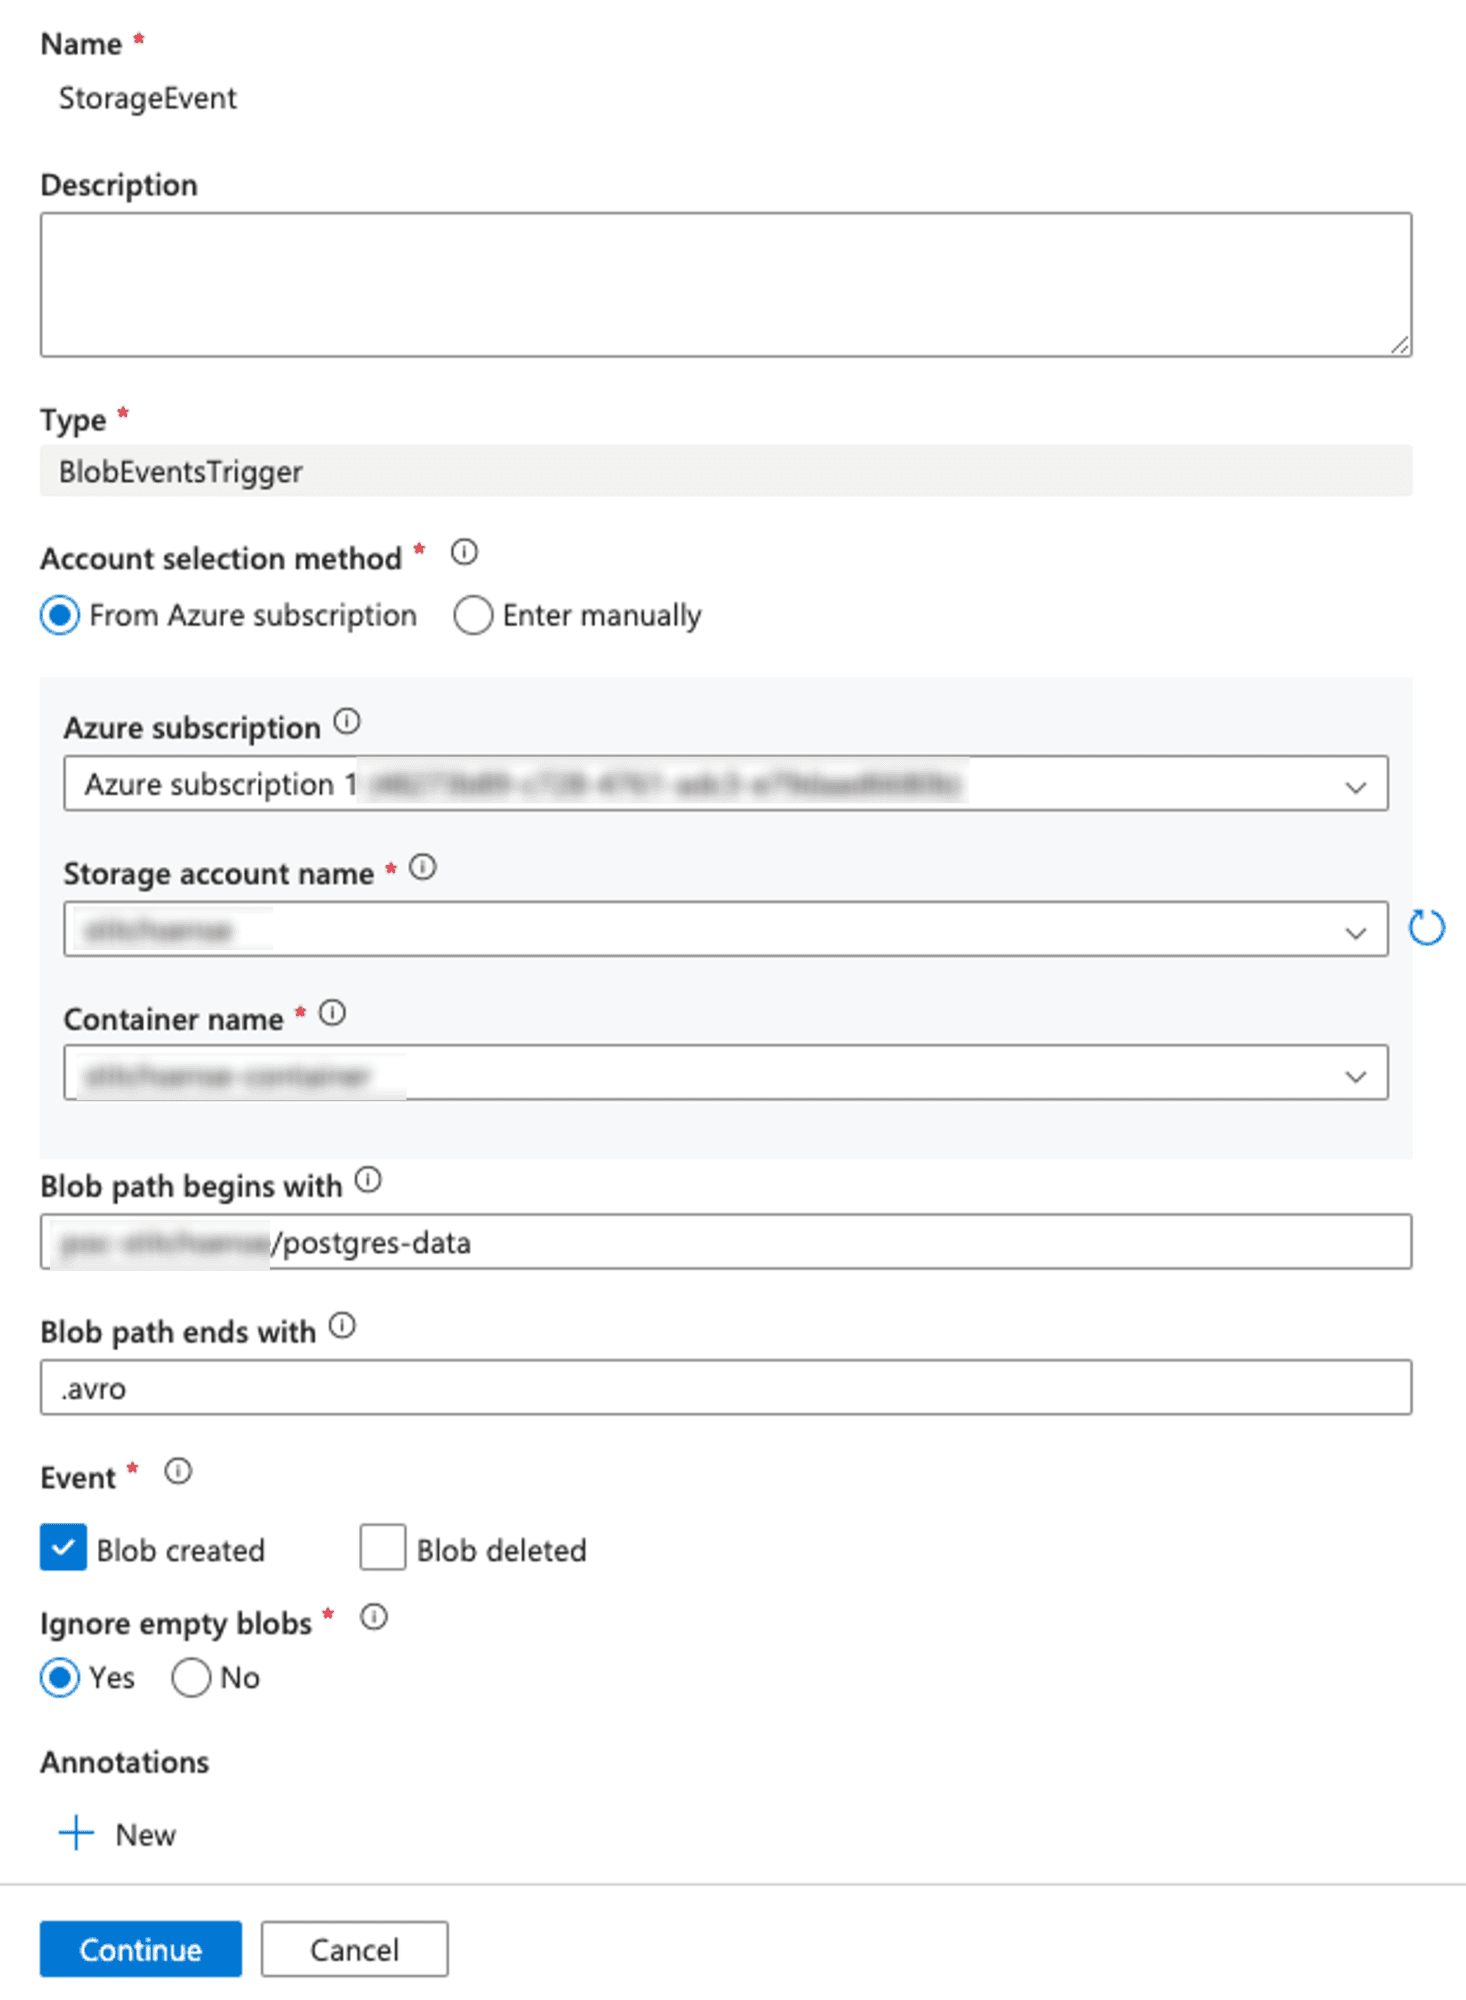
- Configure the event trigger with the following details:
- Storage account connection: Choose your linked ADLS account.
- Container: Select the specific container where new data will arrive.
- Event Type: Select "Blob created" (this triggers the pipeline whenever a new blob, such as a new data file, is added to the container).
- Event Filter: You can specify a prefix (e.g.,
raw_data/) if you only want to trigger files within a specific folder.
- Click "Next" and associate this trigger with the pipeline you created earlier.
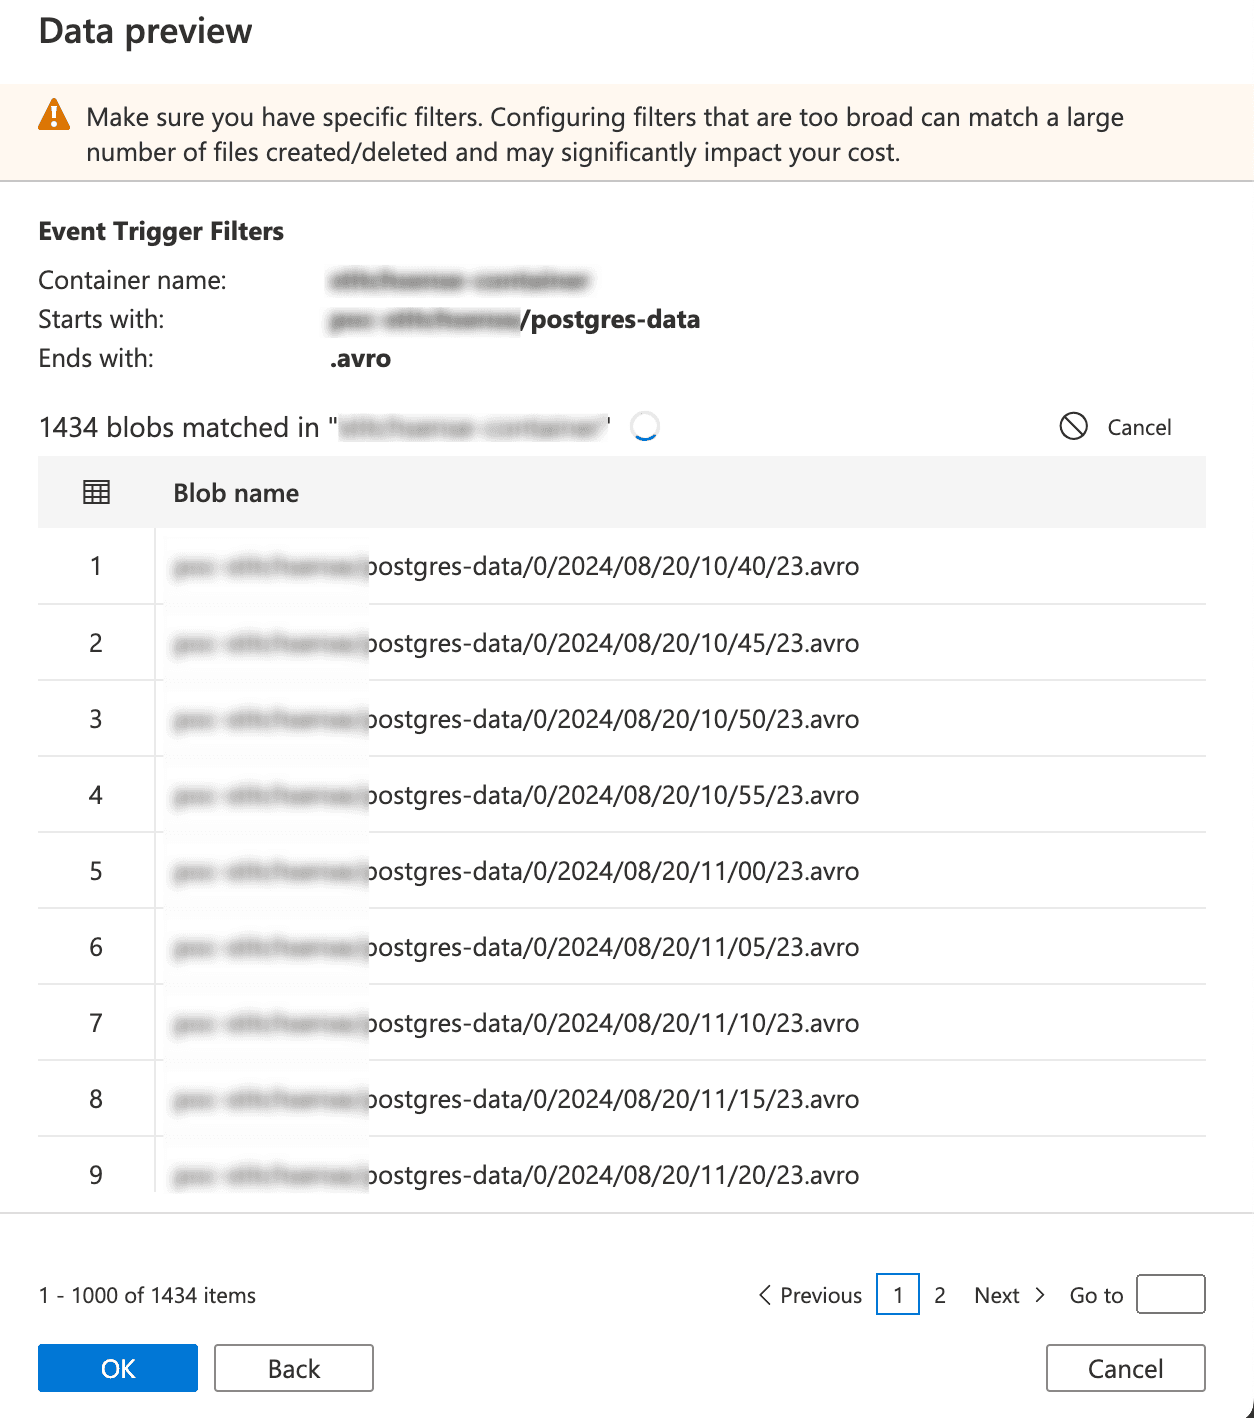
- If you fill in all the details correctly, it try to connect the storage and fetch them as below.
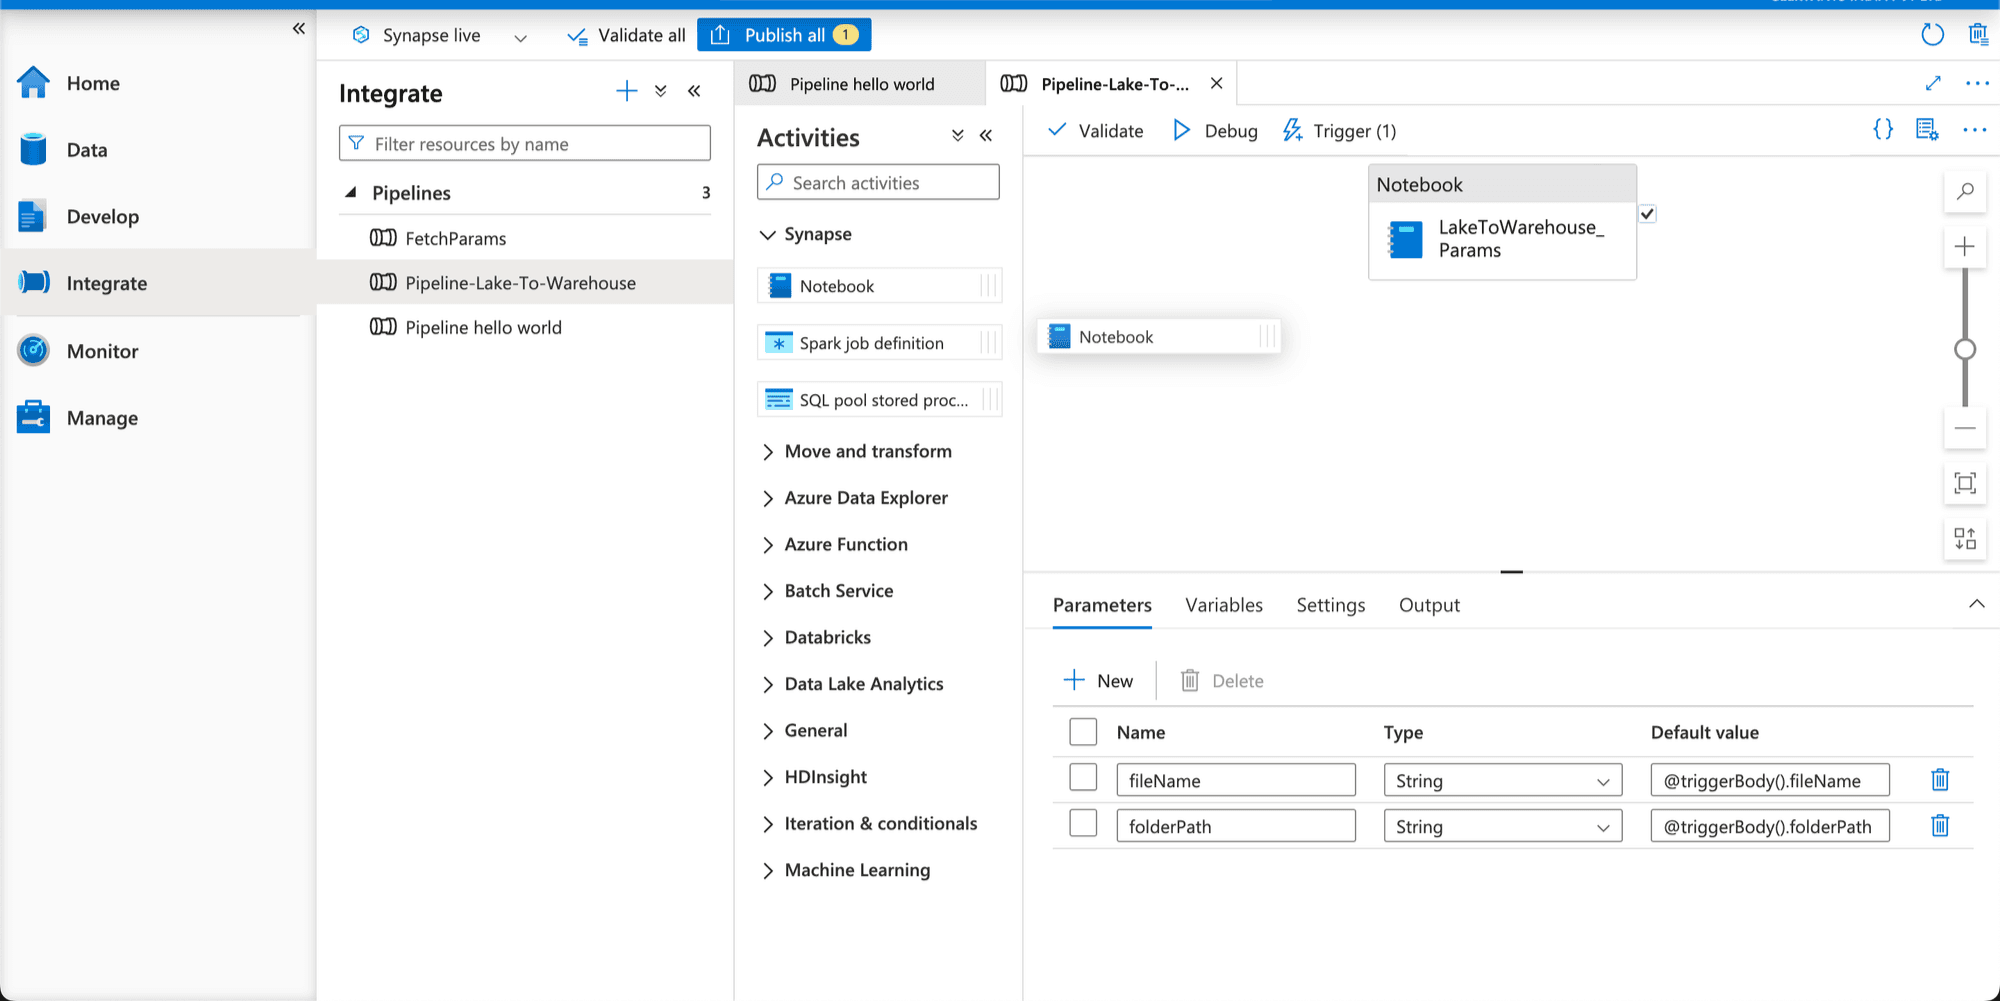
Parameterize Your Pipeline (Optional but Powerful)
If you want to make your pipeline more dynamic, you can use parameters. For instance, you could parameterize the file path or processing logic based on the event data.
- In the Pipeline settings, go to the "Parameters" tab and add parameters such as
fileNameorfolderPath.
- In the Pipeline settings, go to the "Parameters" tab and add parameters such as
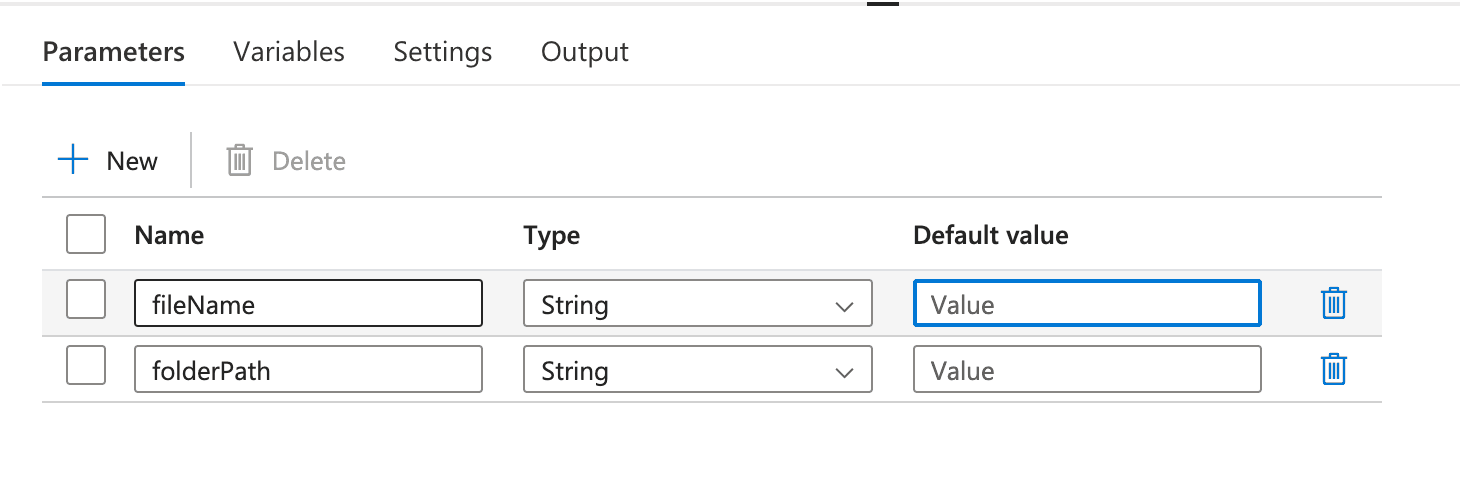
- Modify your Apache Spark notebook to accept these parameters, and configure the Notebook Activity in the pipeline to pass the parameter values dynamically using expressions like
@pipeline().parameters.fileNameand@pipeline().parameters.folderPath.
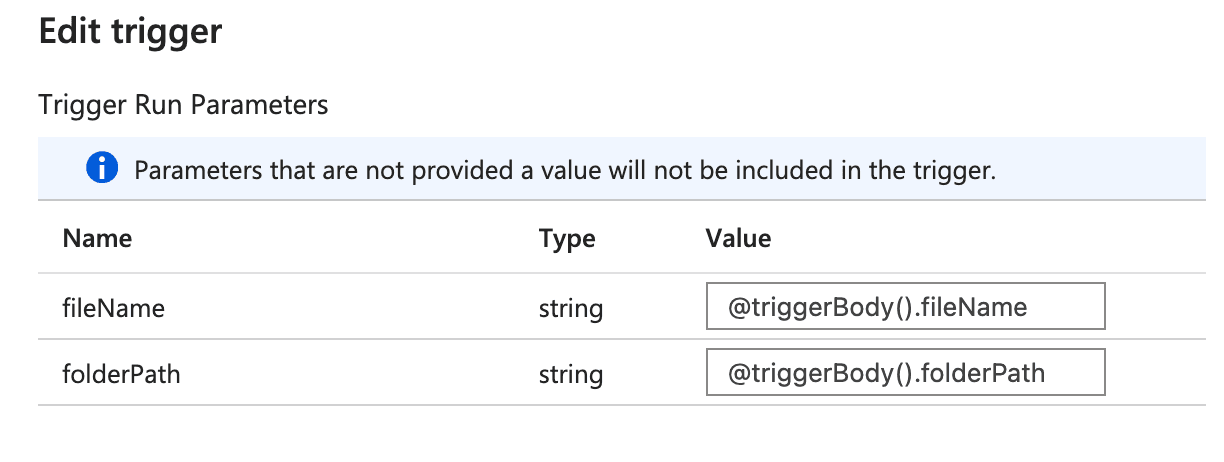
- You have see Trigger > New/Edit > now you seeing your created trigger open it
Now added below parameters. @triggerBody().fileName and @triggerBody().folderPath.
Publish and Test—Let the Automation Begin!
Once everything is set up, click "Publish All" to save your changes. You can test the pipeline by manually uploading a new data file to your specified ADLS container. If all goes well, you’ll see the pipeline triggering automatically, running the PySpark notebook, and processing the new data without any manual intervention!

Congratulations! Your Data Processing Pipeline is Now Automated
You've now set up an automated pipeline that processes new data as soon as it arrives in ADLS. No more manual triggers or checks—just seamless, real-time data processing!
Note: Automating Data Processing with Event Triggers
This setup is especially powerful in a real-time analytics scenario where data is continuously being ingested, and you need near-instant processing. By automating this workflow, you're turning your Synapse workspace into a smart factory that processes data autonomously, freeing you up to focus on deriving insights rather than managing processes.
Putting down Screenshots and Demo video of Pipeline in working state —
As you know we put Storage Event Trigger on our pipeline which fire the pipeline on whenever new events happened. And we fetch two parameters folderPath and fileName from the trigger event and then it pass them as pipeline parameters and using them while running our notebook. you can see below :
Pipeline is triggerd by storage event you can see.
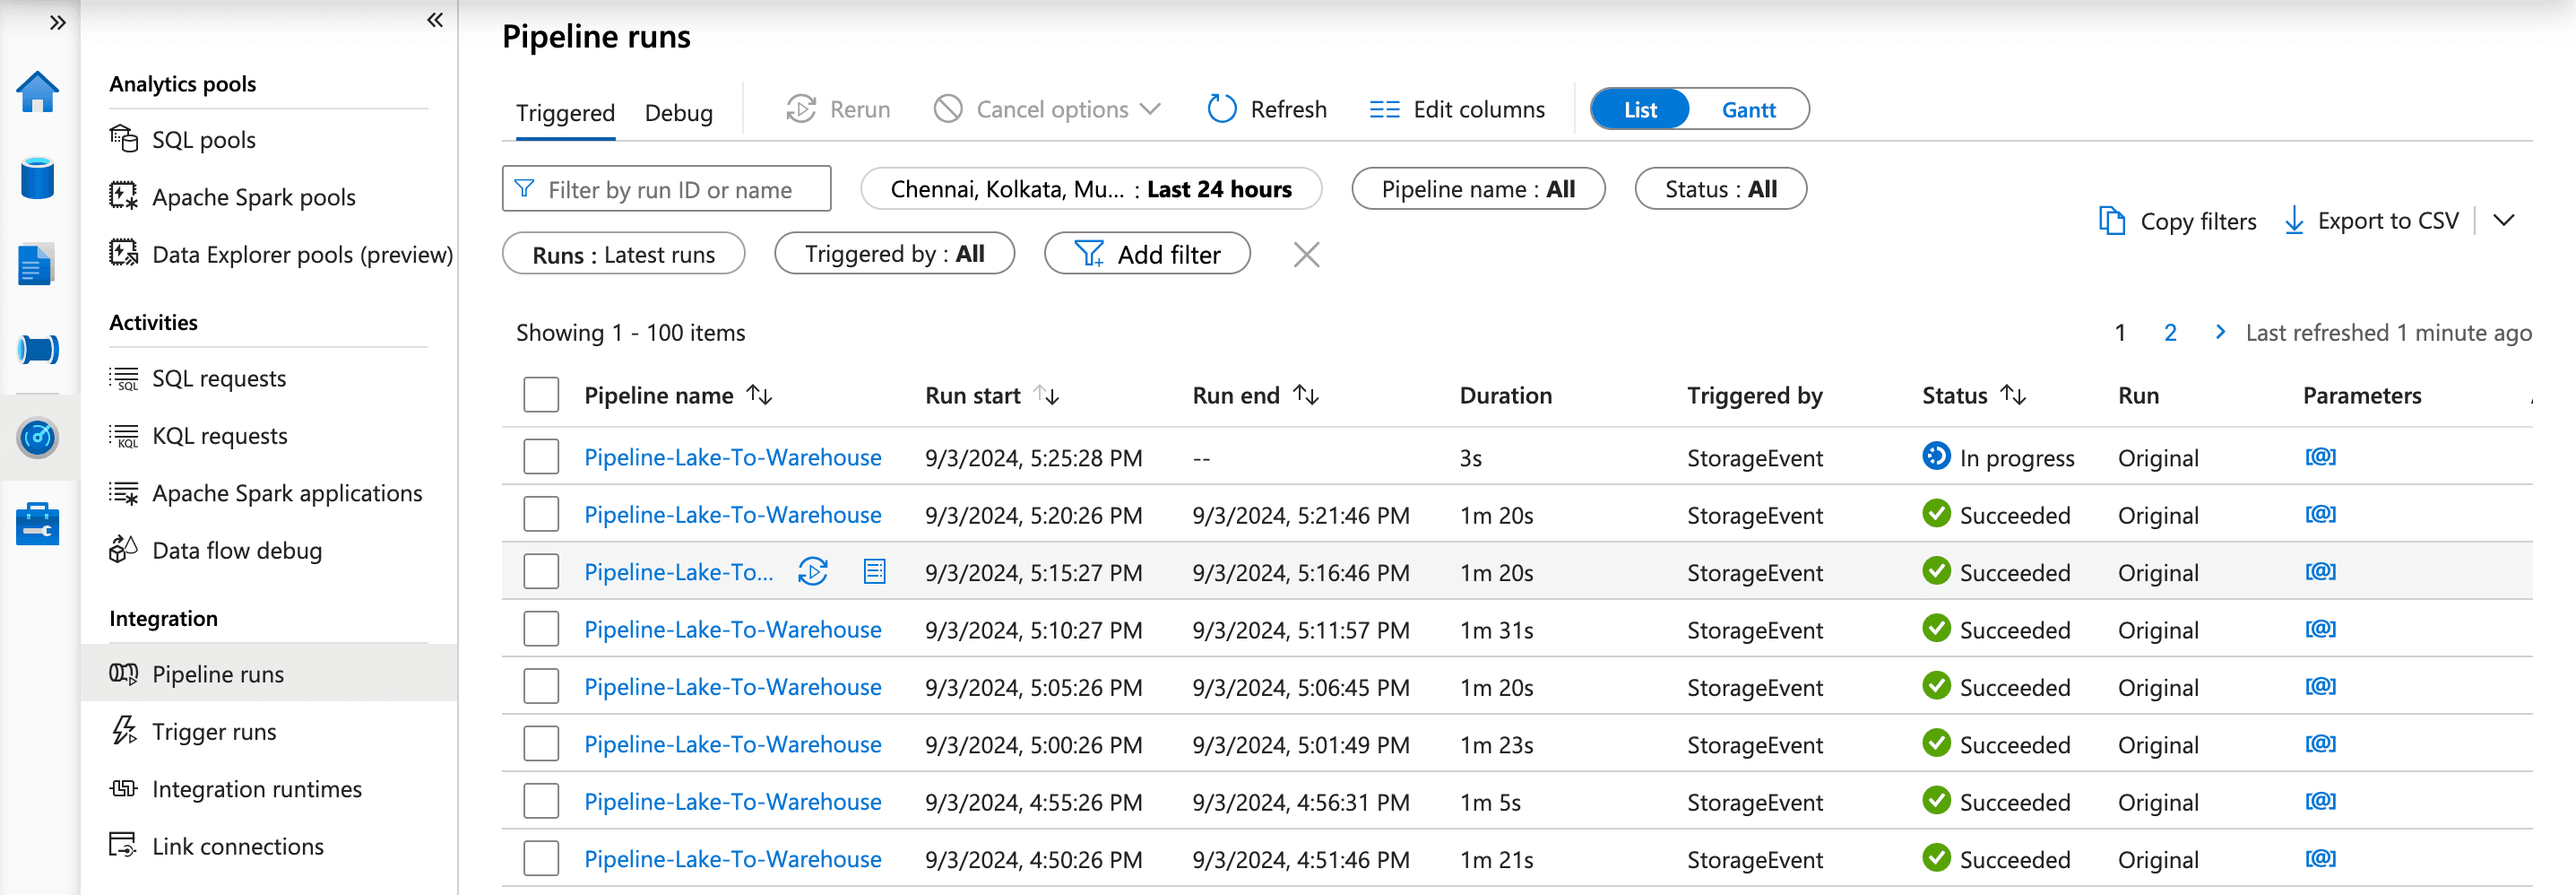
You can view by clicking on the pipeline name.
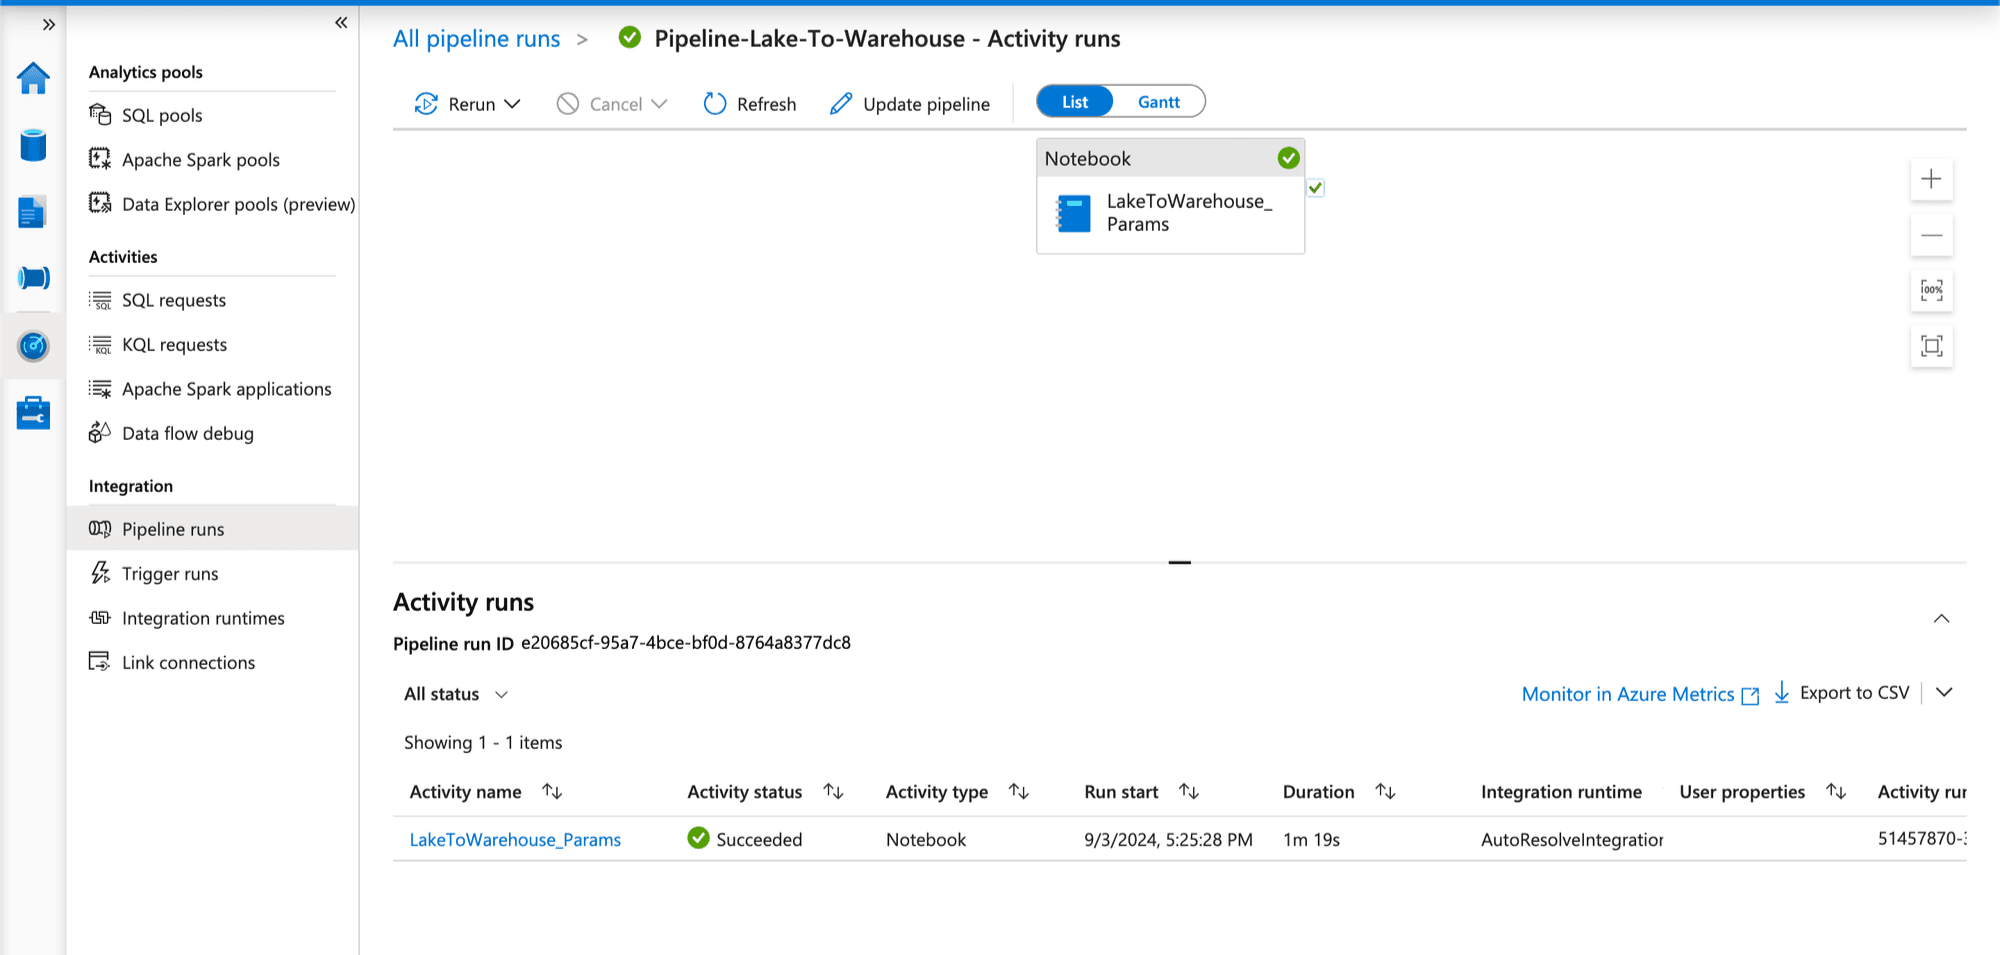
I have added some logs that we can see which showing the parameters that we passed through the trigger folderName and folderPath.
Capturing DB Events And Load to kafka Publisher
Here you can see pipeline triggered and completed.
Summary: Bringing It All Together
Wow! Look at the journey we’ve taken. From the moment, data is generated to the point where it transforms into valuable insights, we’ve explored a complete end-to-end solution for handling big data using Azure Synapse, Apache Kafka, and Azure Data Lake Storage. Let’s take a quick look back at what we’ve achieved:
- Data Streaming with Apache Kafka and Azure Event Hub: We began by capturing events from a PostgreSQL database, streaming them using Apache Kafka, and seamlessly integrating this stream with Azure Event Hub. This setup allowed us to handle real-time data effortlessly.
- Storage with Azure Data Lake (ADLS): Our streamed data found a home in Azure Data Lake Storage, a highly scalable and secure storage solution. With data stored in
.avroformat, we ensured optimal storage efficiency and data schema preservation. - Data Processing with Apache Spark in Azure Synapse Analytics: Our notebook jumped into action to fetch, transform, and analyze the data. It leveraged powerful Apache Spark capabilities to perform essential tasks such as sentiment analysis, data aggregation, and more, before saving the structured results into a dedicated SQL Pool.
- Automation with Synapse Pipelines: We took it up a notch by setting up event triggers and pipelines in Azure Synapse. This step turned our data processing pipeline into a fully automated machine—processing data as soon as it arrives in ADLS, with zero manual intervention.
- Storing Processed Data in SQL Pools: Finally, all the processed and analyzed data was stored in dedicated SQL pools, acting as a centralized data warehouse where the structured data could be accessed, queried, and utilized for future analysis.
Conclusion: The Power of a Well-Orchestrated Data Pipeline
In this guide, we've built a scalable, automated data pipeline that handles vast amount of data in real time. By leveraging Azure's powerful tools—Event Hub, Data Lake Storage, Synapse Analytics, and more—we've crafted a solution that efficiently transforms raw data into valuable insights.
This setup allows organizations to effortlessly manage big data and unlock new possibilities. Now that you have the blueprint, it's your turn to build, innovate, and elevate your data capabilities to new heights!
Reach out to us for help and discuss it more further.
About Me 👨💻
I'm Rajeev Mohan. Software Engineer from Bengaluru, India.
Find out more about me @RajeevMohan
Subscribe to Our Newsletter
Subscribe to RSS
Press & Media Hub RSS FeedRelated Articles.
More from the engineering frontline.
Dive deep into our research and insights on design, development, and the impact of various trends to businesses.

Jul 10, 2026
How We Built the Missing Bridge from Code to Figma

Jun 27, 2026
Building a Resilient Hybrid-Cloud Network with WireGuard HA, Route-Based Failover, and Deep Observability

Jun 19, 2026
We Built a 114-Second AWS-to-Azure Failover. Here’s What We Learned

Jun 12, 2026
Cloud-Native and Cloud-Agnostic Are Not Ideologies; They Are Business-Stage Decisions

Jun 8, 2026
Geeklego: The Open-Source Design System Built to Work With AI

May 18, 2026