Jun 24, 2024
AWS WAF - Protect Your Web Applications From Common Exploits
Explore how AWS WAF helps you protect your web applications against common web exploits and bots that can affect availability, compromise security, or consume excessive resources.
Author

Book a call
Table of Contents
Why AWS WAF?
AWS Web Application Firewall (WAF) is a security tool that helps you to protect the application against web attacks. WAF monitors and controls unusual bot traffic, and blocks common attack patterns, such as SQL Injection or Cross-site scripting, etc. It also lets you monitor the HTTP and HTTPS requests that are forwarded to an Amazon API Gateway API, Amazon CloudFront, or an Application Load Balancer.
How Does It Work?
- Amazon WAF allows you to control your content by using an IP address from where the request originates.
- Three things make Amazon WAF work – Access Control Lists (ACL), Rules, and Rule Groups.
- Amazon WAF manages Web ACL capacity units (WCU) for rules, rule groups, and web ACLs.
- Amazon WAF includes a full-featured API that you can use to automate the creation, deployment, and maintenance of security rules.
AWS WAF Features
Amazon Web Application Firewall offers lots of features to its users:
- Protection Against Web Attacks: With minimum latency impact on incoming traffic, WAF AWS offers many rules to inspect any element of a web request. WAF AWS protects web applications against threats by filtering traffic according to the rules created.
- Establish Rules Accordingly: WAF AWS is a versatile and valuable tool for protecting the infrastructures of applications. This is because it allows users to establish rules according to their needs and vulnerabilities that they wish to stop. We can consider it a great solution to protect any web application environment at the enterprise level.
- Web traffic filtering: WAF allows users to create rules to filter web traffic. It filters IP addresses, HTTP headers, HTTP bodies, or URI strings from a web request.
- Flexible Integration With AWS Services: AWS Firewall offers easy integration with other AWS services like Amazon EC2, CloudFront, Load balancer, etc.
- Monitor Rules: Web Application Firewall AWS allows us to create rules and review and customize them to prevent unknown attracts.
Common Web Attacks
Before protecting your applications, you need to know about the most common web attacks.
DDoS (Denial-Of-Service) attacks: This is probably the most common attack. Attackers overload an application by sending bulk requests to the web servers. Thousands of hosts infected with malware are used in this attack, which utilizes more than one unique IP address or machine. This slows down the application and significantly hurt the value of a brand.
SQL injections: SQL injection is a code injection procedure that might destroy your SQL database. Attackers can run malicious SQL queries on your web applications.
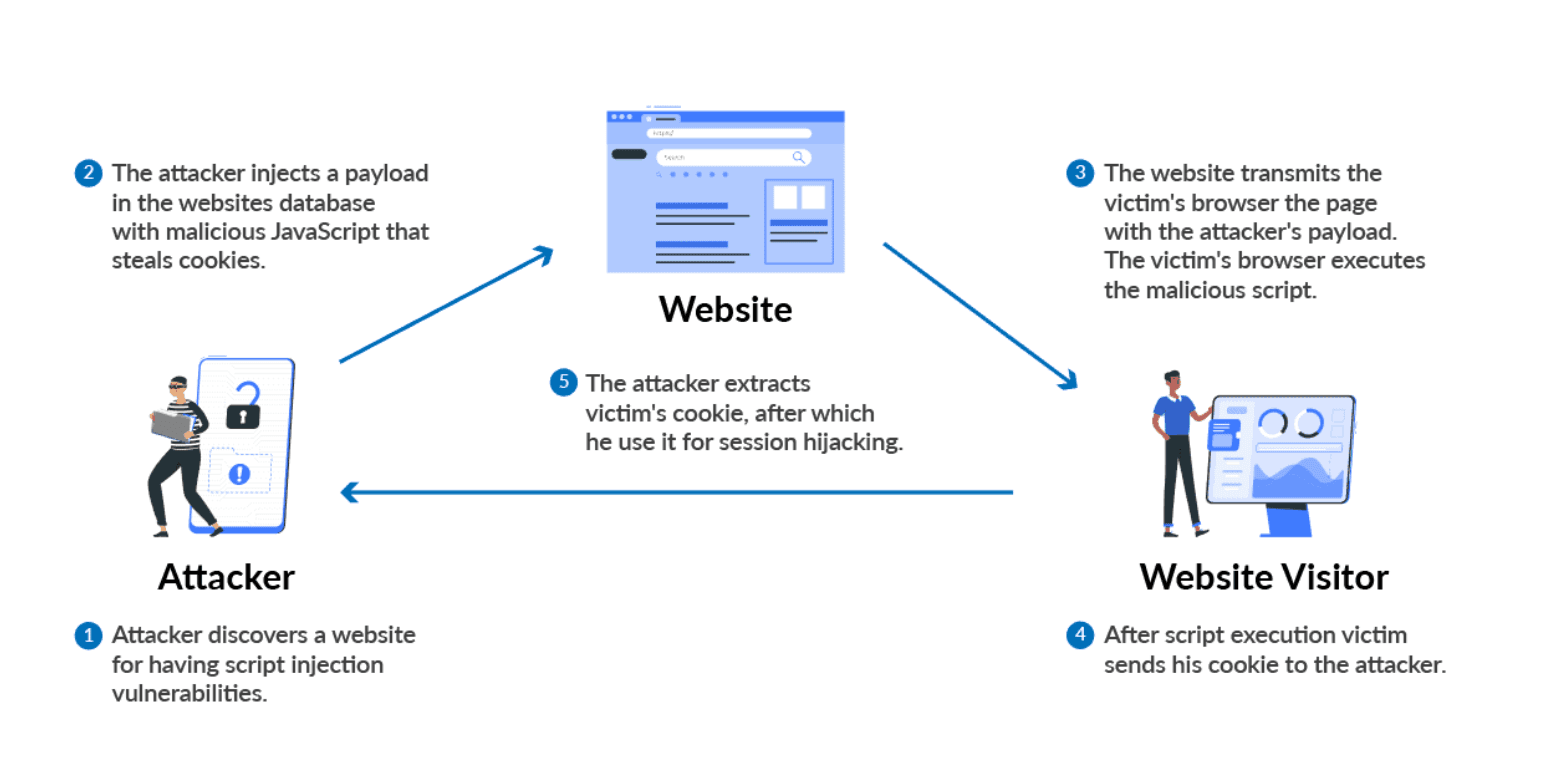
Cross-Site Scripting: If your application is vulnerable to cross-site scripting, then the attacker can run or inject malicious scripts, generally in the form of a browser-side script. These scripts can even rewrite the content of the HTML pages.
Why AWS WAF?
With AWS WAF, you can create security rules that control bot traffic and block common attack patterns such as SQL injection or cross-site scripting (XSS).
How does AWS WAF block or allow traffic?
As the underlying service receives requests for your web sites, it forwards those requests to AWS WAF for inspection against your rules. Once a request meets a condition defined in your rules, AWS WAF instructs the underlying service to either block or allow the request based on the action you define.
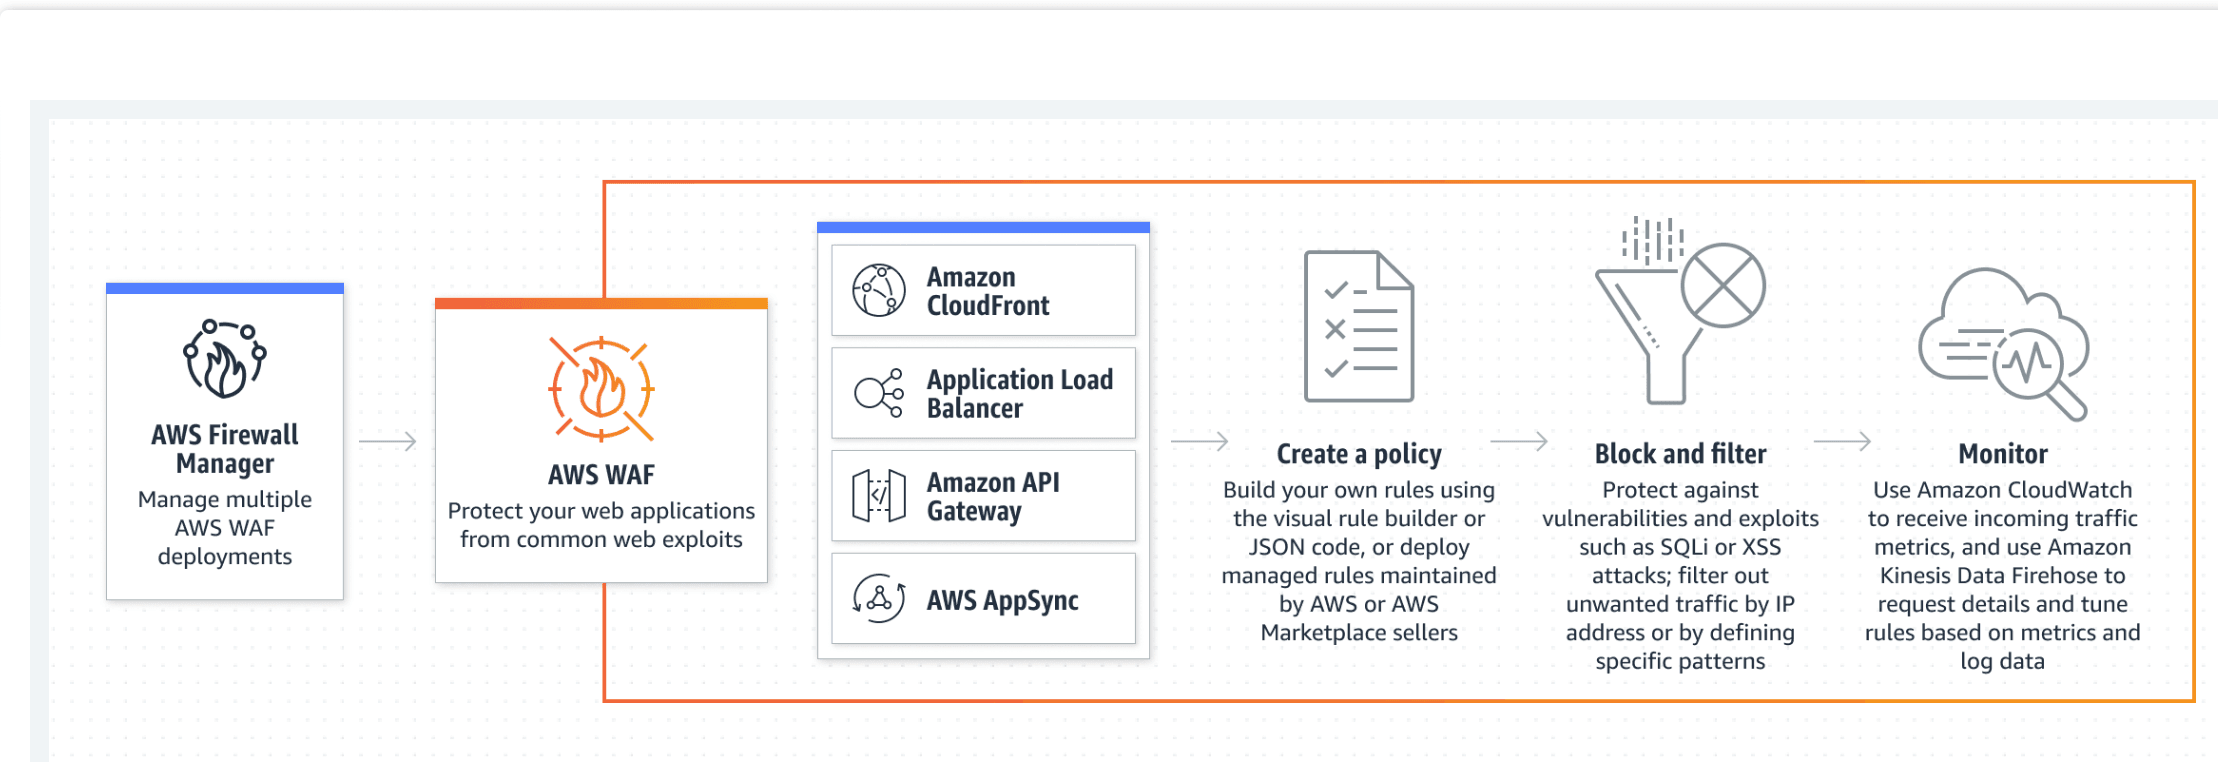
How Does AWS WAF Protect My Web Site or Application?
AWS WAF is tightly integrated with Amazon CloudFront, the Application Load Balancer (ALB), Amazon API Gateway, and AWS AppSync – services that AWS customers commonly use to deliver content for their websites and applications. When you use AWS WAF on Amazon CloudFront, your rules run in all AWS Edge Locations, located around the world close to your end users. This means security doesn’t come at the expense of performance. Blocked requests are stopped before they reach your web servers. When you use AWS WAF on regional services, such as Application Load Balancer, Amazon API Gateway, and AWS AppSync, your rules run in region and can be used to protect internet-facing resources as well as internal resources.
Filter web traffic
Create rules to filter web requests based on conditions such as IP addresses, HTTP headers and body, or custom URIs.
Prevent account takeover fraud
Monitor your application’s login page for unauthorized access to user accounts using compromised credentials.
Administer AWS WAF with APIs
Create and maintain rules automatically and incorporate them into the development and design process.
What are WAF Rules?
An AWS WAF rule defines how to inspect HTTP(S) web requests and the action to take on a request when it matches the inspection criteria. You define rules only in the context of a rule group or web ACL.
Rules do not exist in AWS WAF on their own. They are not AWS resources, and they do not have Amazon Resource Names (ARNs). You can access a rule by name in the rule group or web ACL where it's defined. You can manage rules and copy them to other web ACLs by using the JSON view of the rule group or web ACL that contains the rule. You can also manage them through the AWS WAF console rule builder, which is available for web ACLs and rule groups.
Getting Started With AWS WAF
WAF AWS monitors all the web incoming and outgoing requests that are forwarded to API Gateway, Amazon CloudFront, and Application Load Balancer. We will see how to get started with WAF and create web ACL in some steps.
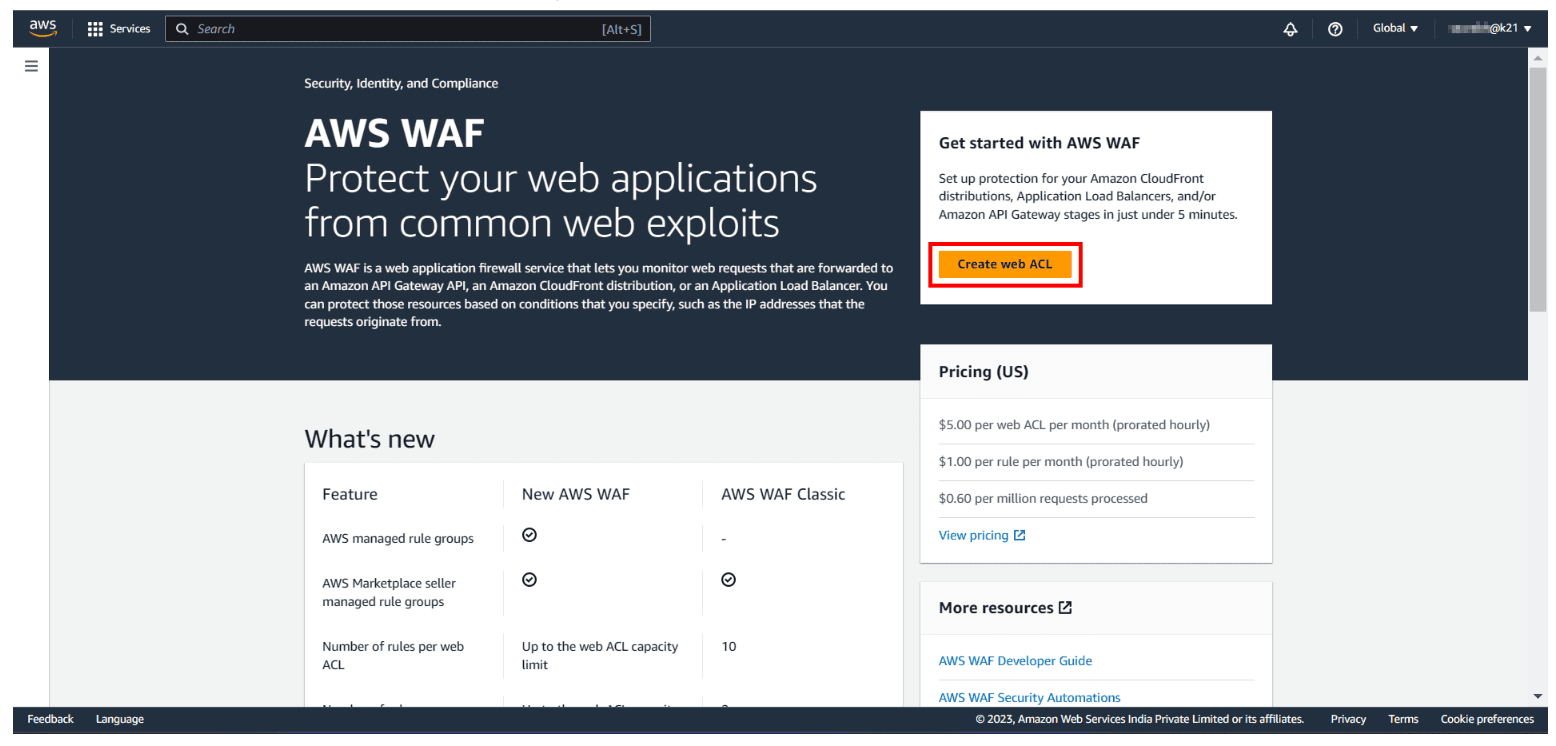
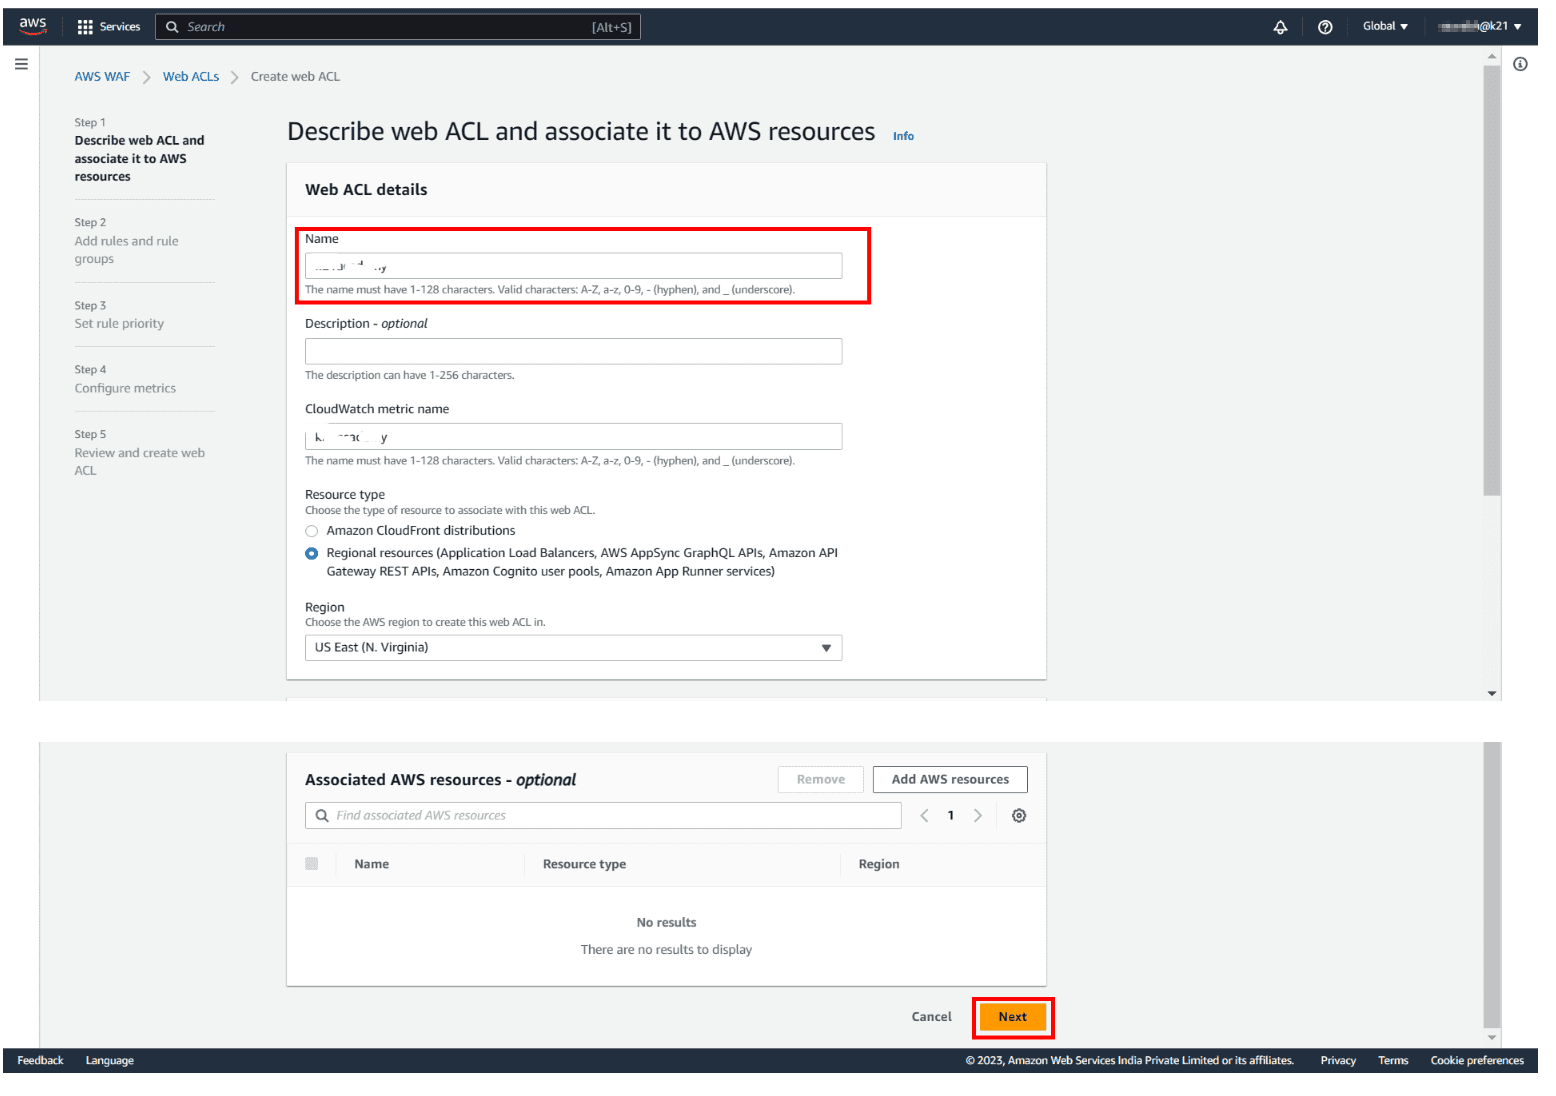
Step 1: Create web ACL: First, sign-up for an AWS account, then go to AWS Console and search for Web Application Firewall. You will land on the WAF home page, and choose to Create Web ACL.
Step 2: Give a Name: Type the name you want to use to identify this web ACL. After that, enter Description if you want (optional) and then hit Next.
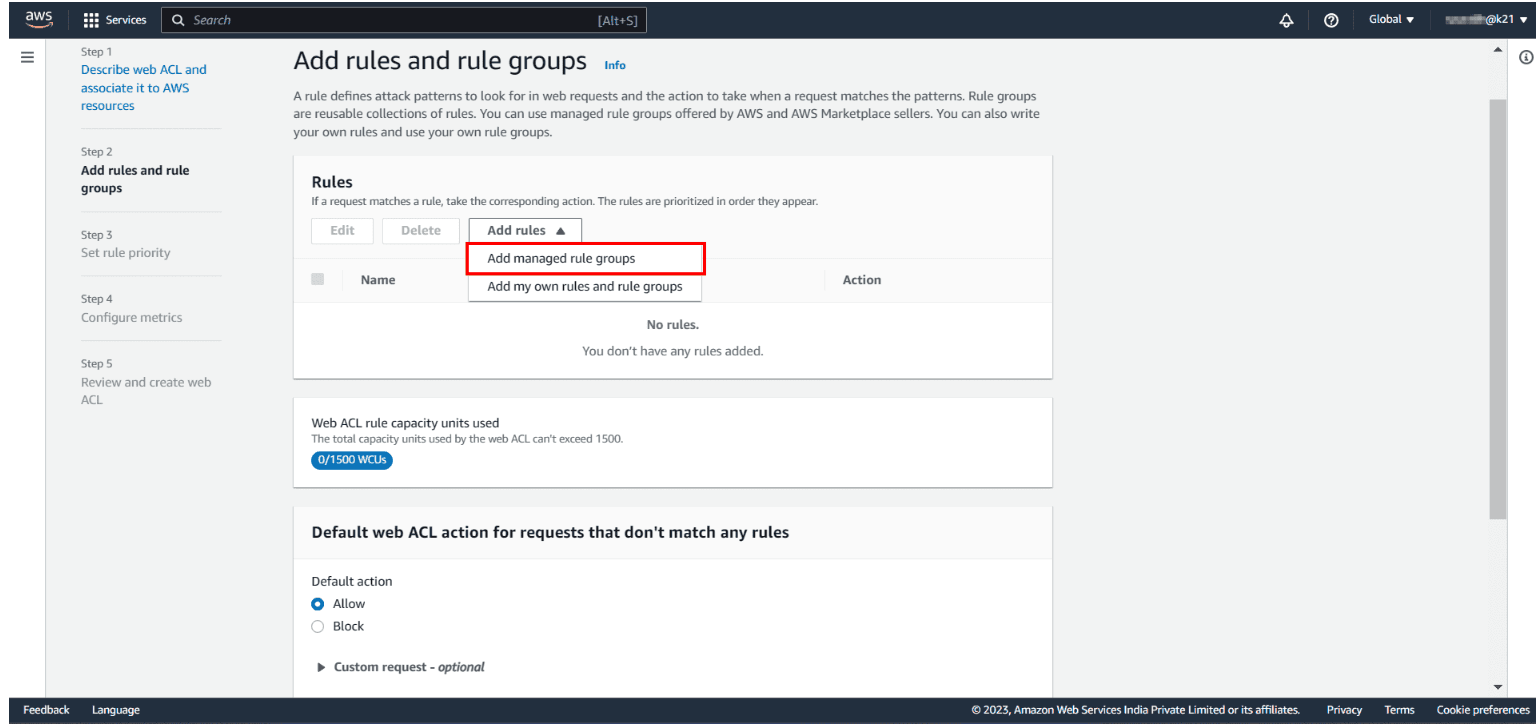
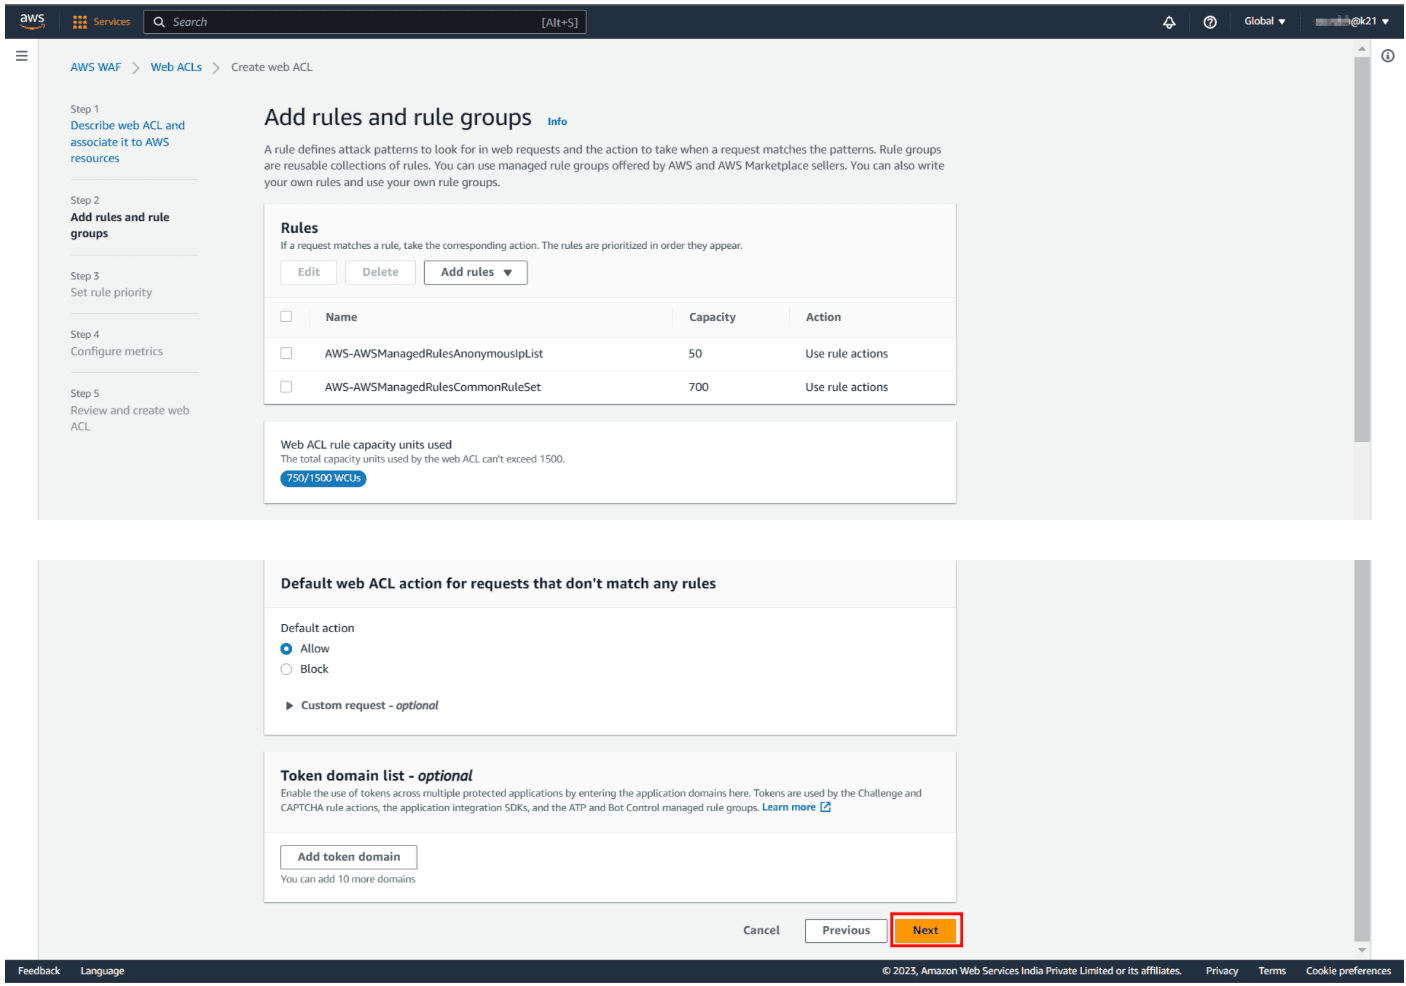
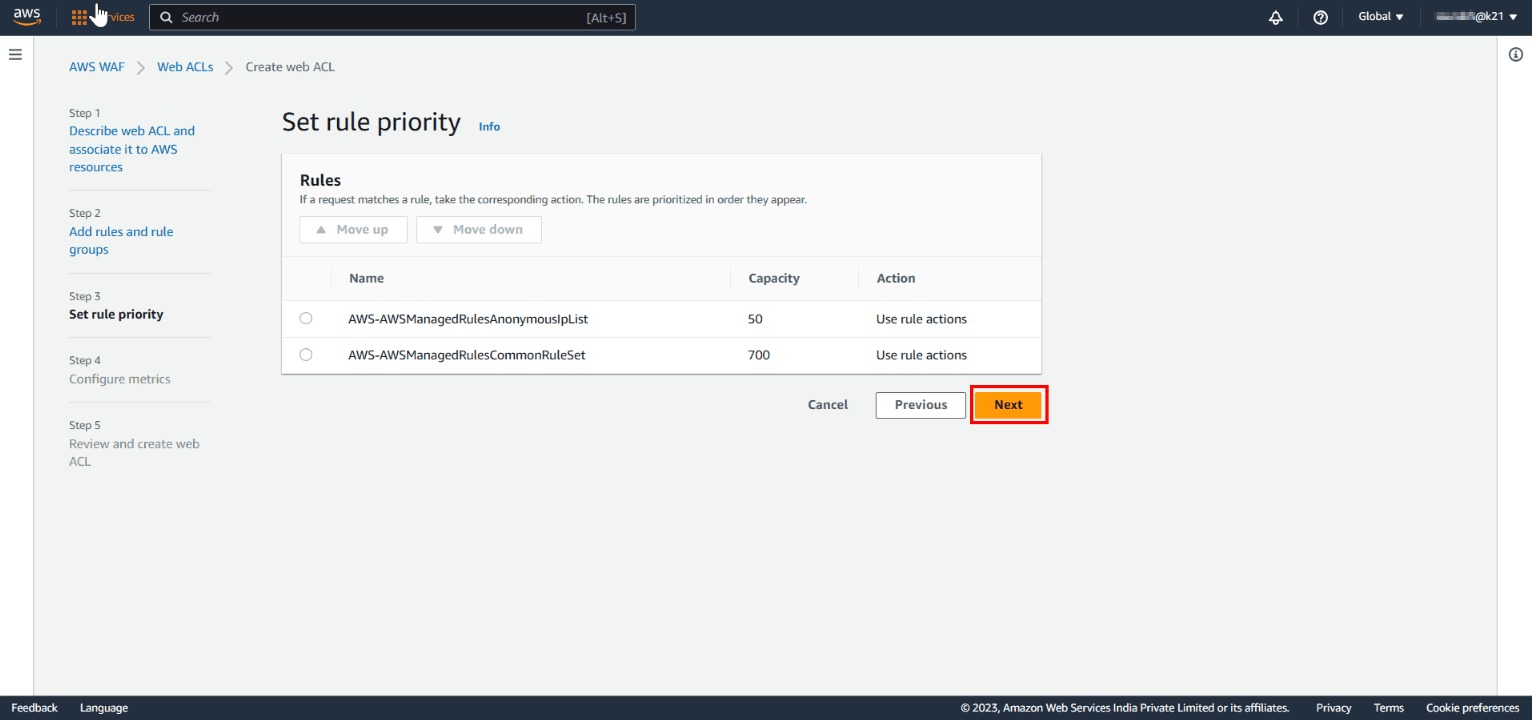
Step 3: Add an AWS Managed Rules rule group: In the next step, you need to add rules and rule groups. Click on Add managed rule groups. You will land on a new page to manage the ruling group mentioned in snapshot 2.
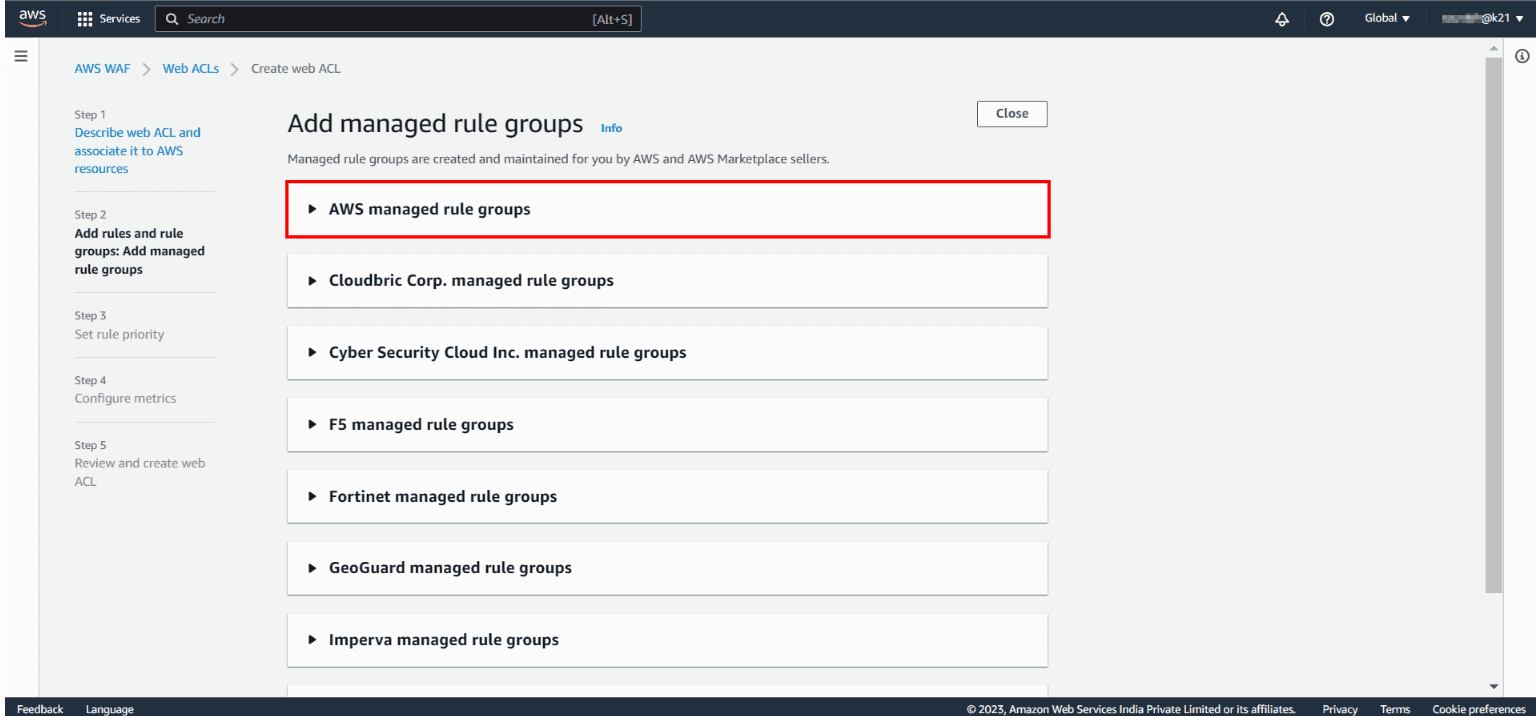
AWS Managed Rules provides you with a collection of managed rule groups. The majority of these are free for Amazon WAF users. After adding managed rule group, choose to save the rule.
The rules we are going to create will define the patterns we want to allow/block. We will add 2 rules only.
- Regular rule: This rule protects the application from SQL injection attacks. It will check if the URI path contains an SQL injection.
- Rate-based rule: This rule blocks the requests made from the same IP address after they exceed a certain limit in a time period.
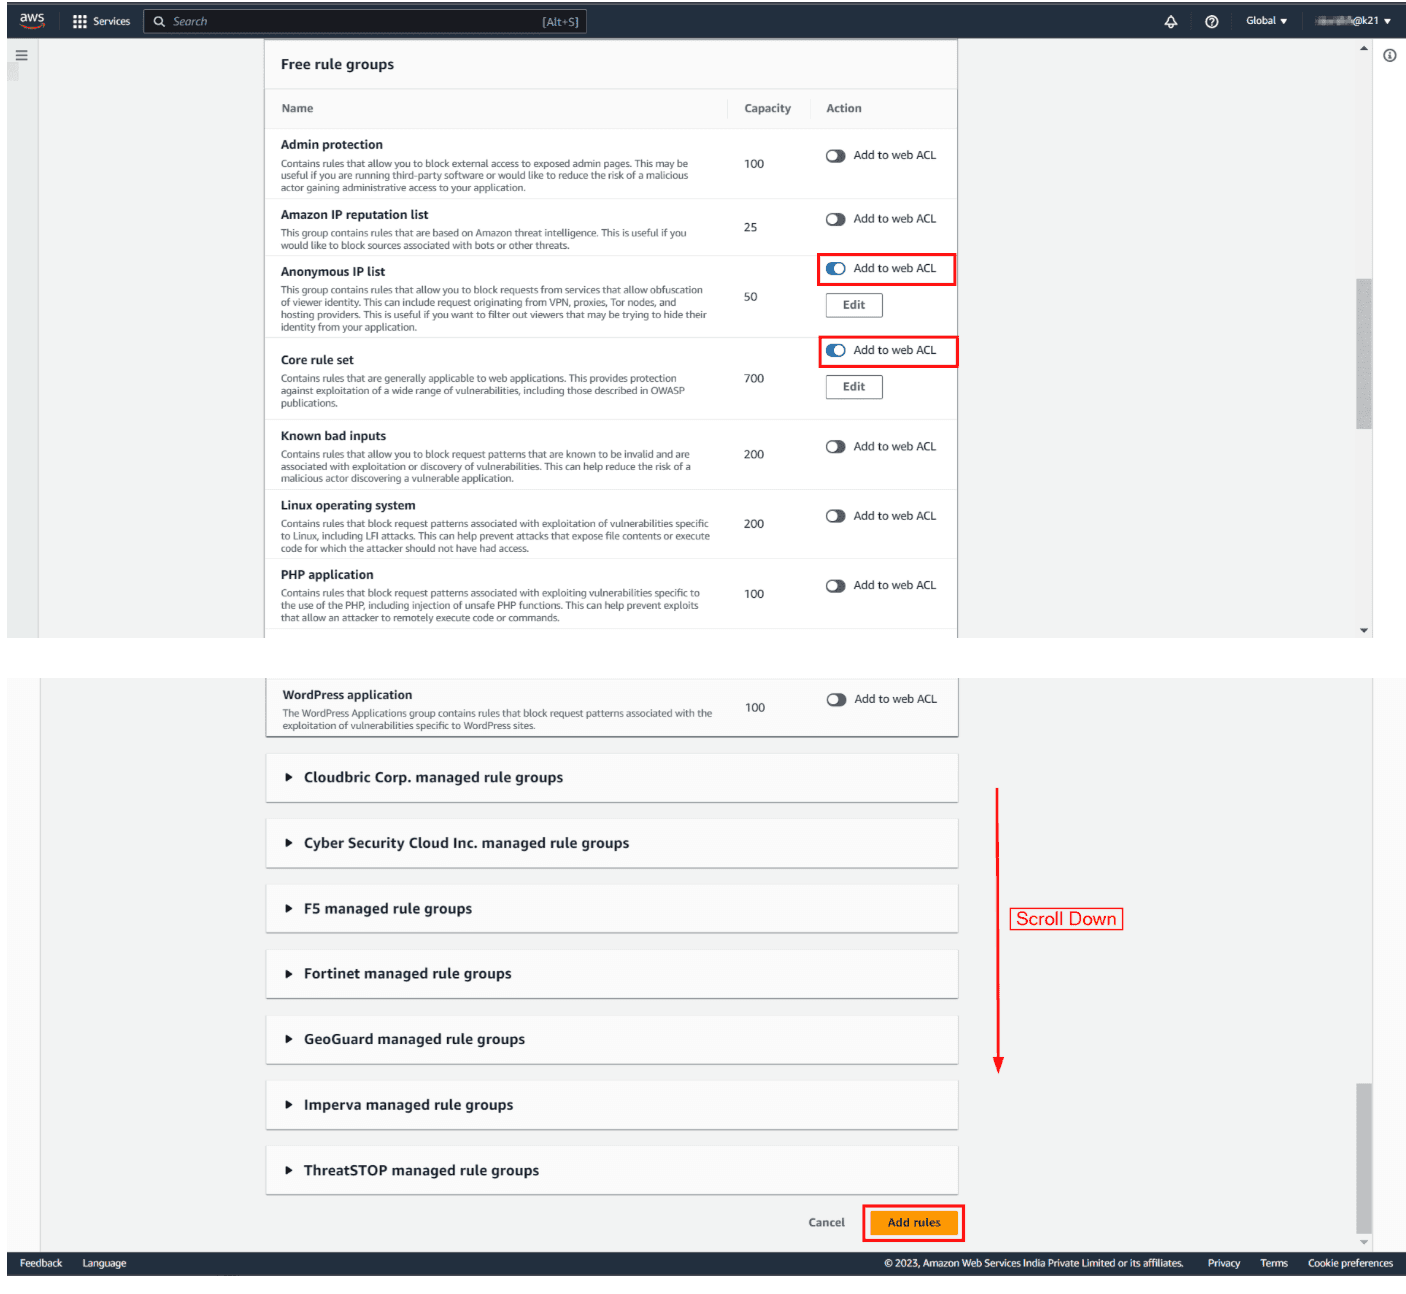
After that, check the added rules and hit Next.
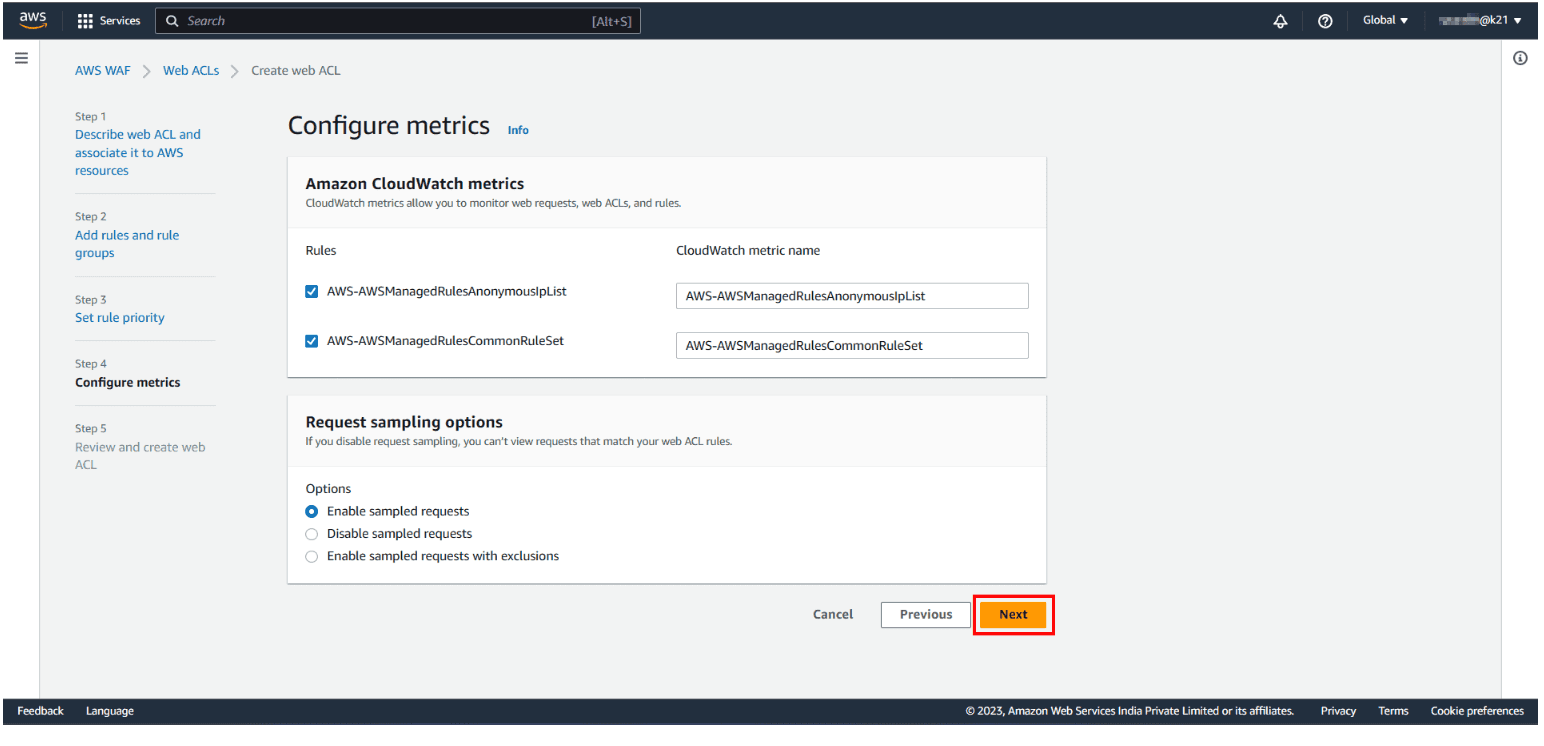
Step 4: Configure Cloudwatch Metrics:
Step 5: Review WebACL Configuration: In the final step, check all the rules and managed groups and hit on create web ACL.
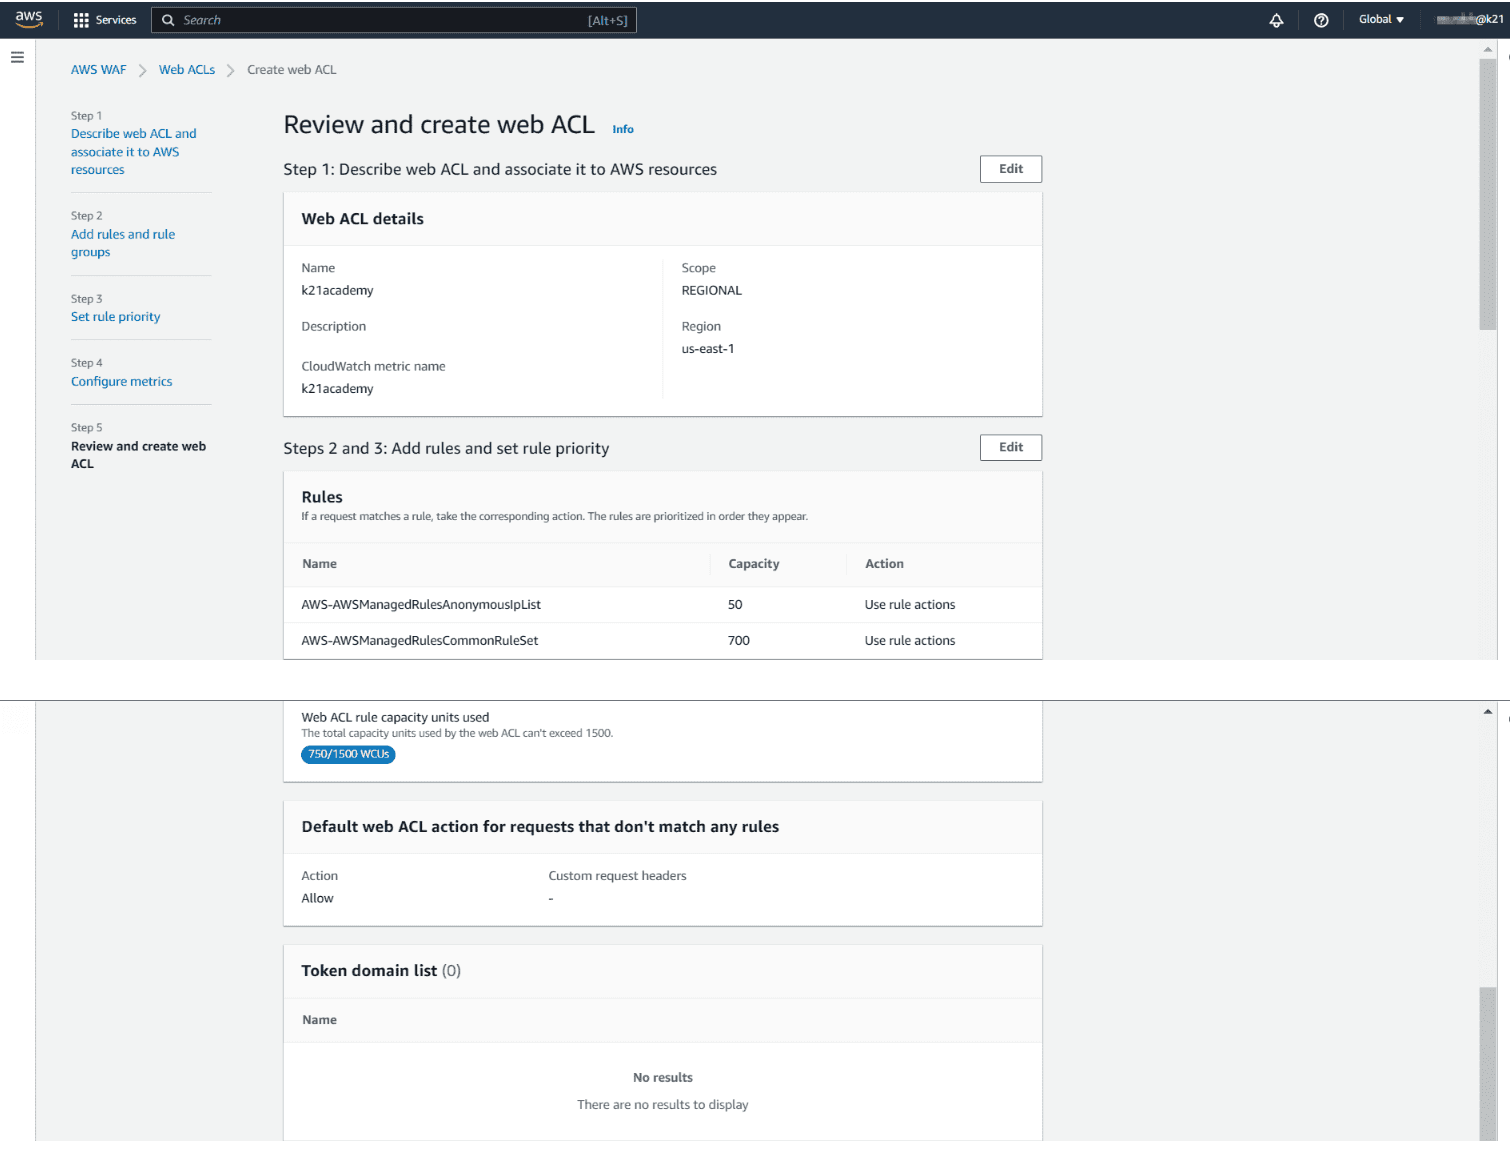
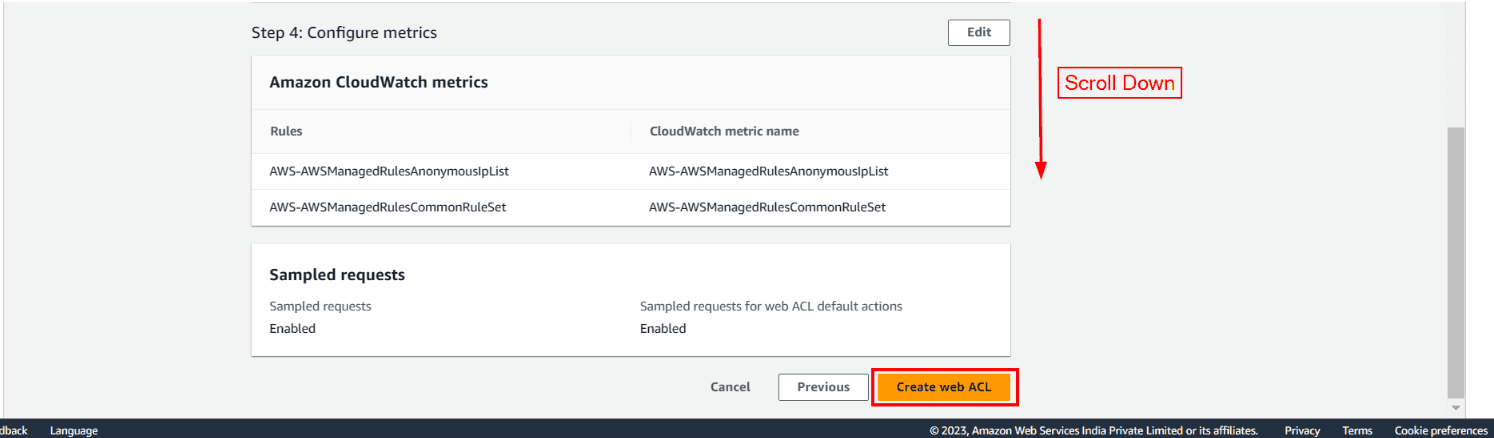
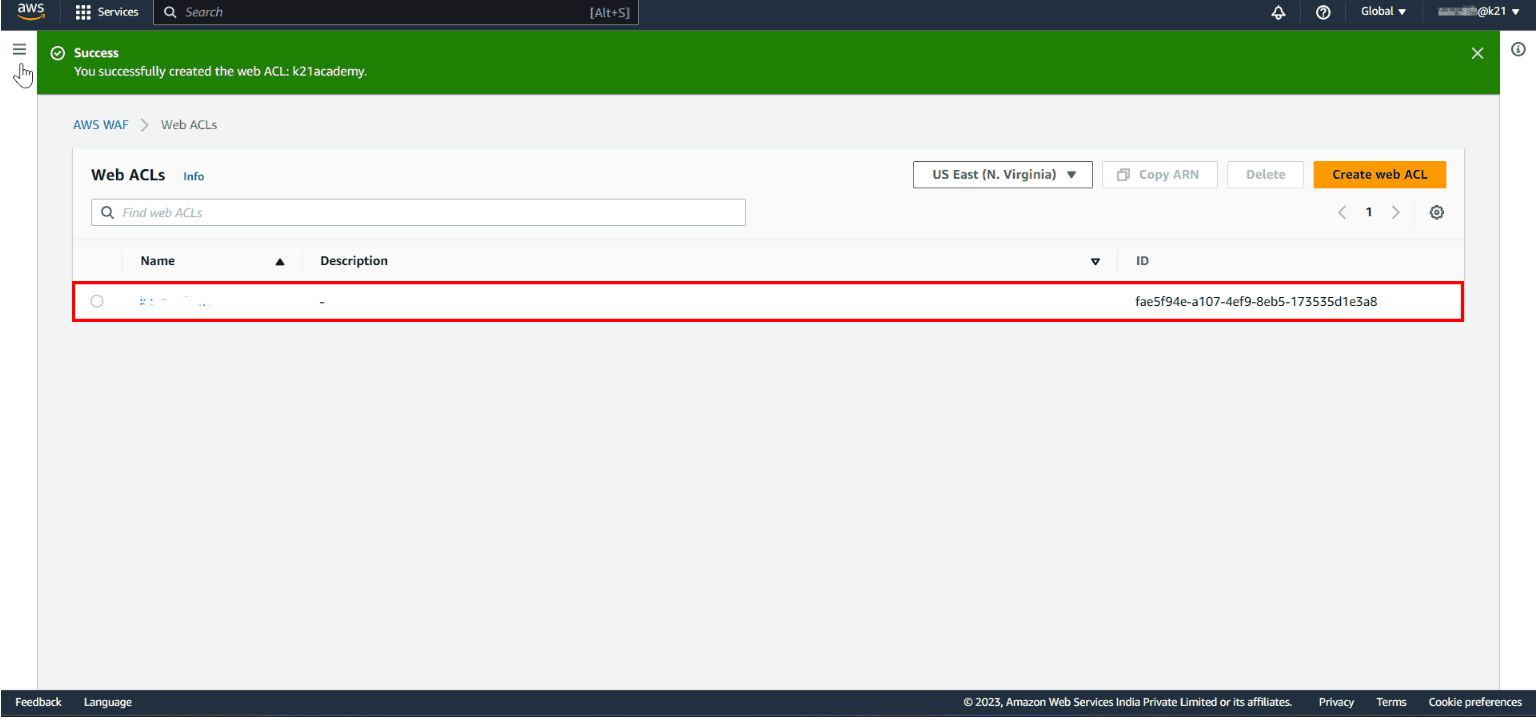
Finally, a message will pop up: You Successfully created web ACL: ACL-name.
Why We Switched to AWS WAF
Our client is from the banking domain so we need to secure the application from malicious activities as this can incur monetary losses. We have an architecture of six backend and admin-panel services running on ECS Fargate with load balancers. For this, we are using Postgres DB’s and ElastiCache for Redis cluster.
Incident: We were getting hack attempts like DDOS attacks, SQL injections etc on services to compromise the Database and hack our systems. So, we did a POC and got to know AWS WAF can be helpful for this.
Process and Rules Implemented
WAF WebACL for Admin Panel
Attaching screenshot of demo Admin Panel rules for reference.
WebACL Creation Process:
Goto WAF→ Region: Select region.
Create WebACL → Name: Name the WebACL.
AWS resource: Select Load Balancer/ CloudFront/ AWS API/ AWS App sync.
Add rules: Rules are attached in the screenshot below:

Rules
1. clientips:
Allow IPs for Third Party Services- We need to provide access to IPs.
Process:
Create an IP set with IPs which has to be allowed.
Add my own rules and rule groups → IP set —> Select IP set added from top IPs → Select Source IP address → Action: Allow → Create rule
2. Clients_IPs_Paths:
Allow Domain Paths of:
https://www.google.com https://mail.google.com/mail/u/0/#inbox
Process:
Create a rule group with Paths which has to be allowed. (google.com/ & mail/ etc)
Add my own rules and rule groups → Rule group —> Select Rule group added from top Paths →Name: Clients_IPs_Paths → Create rule.
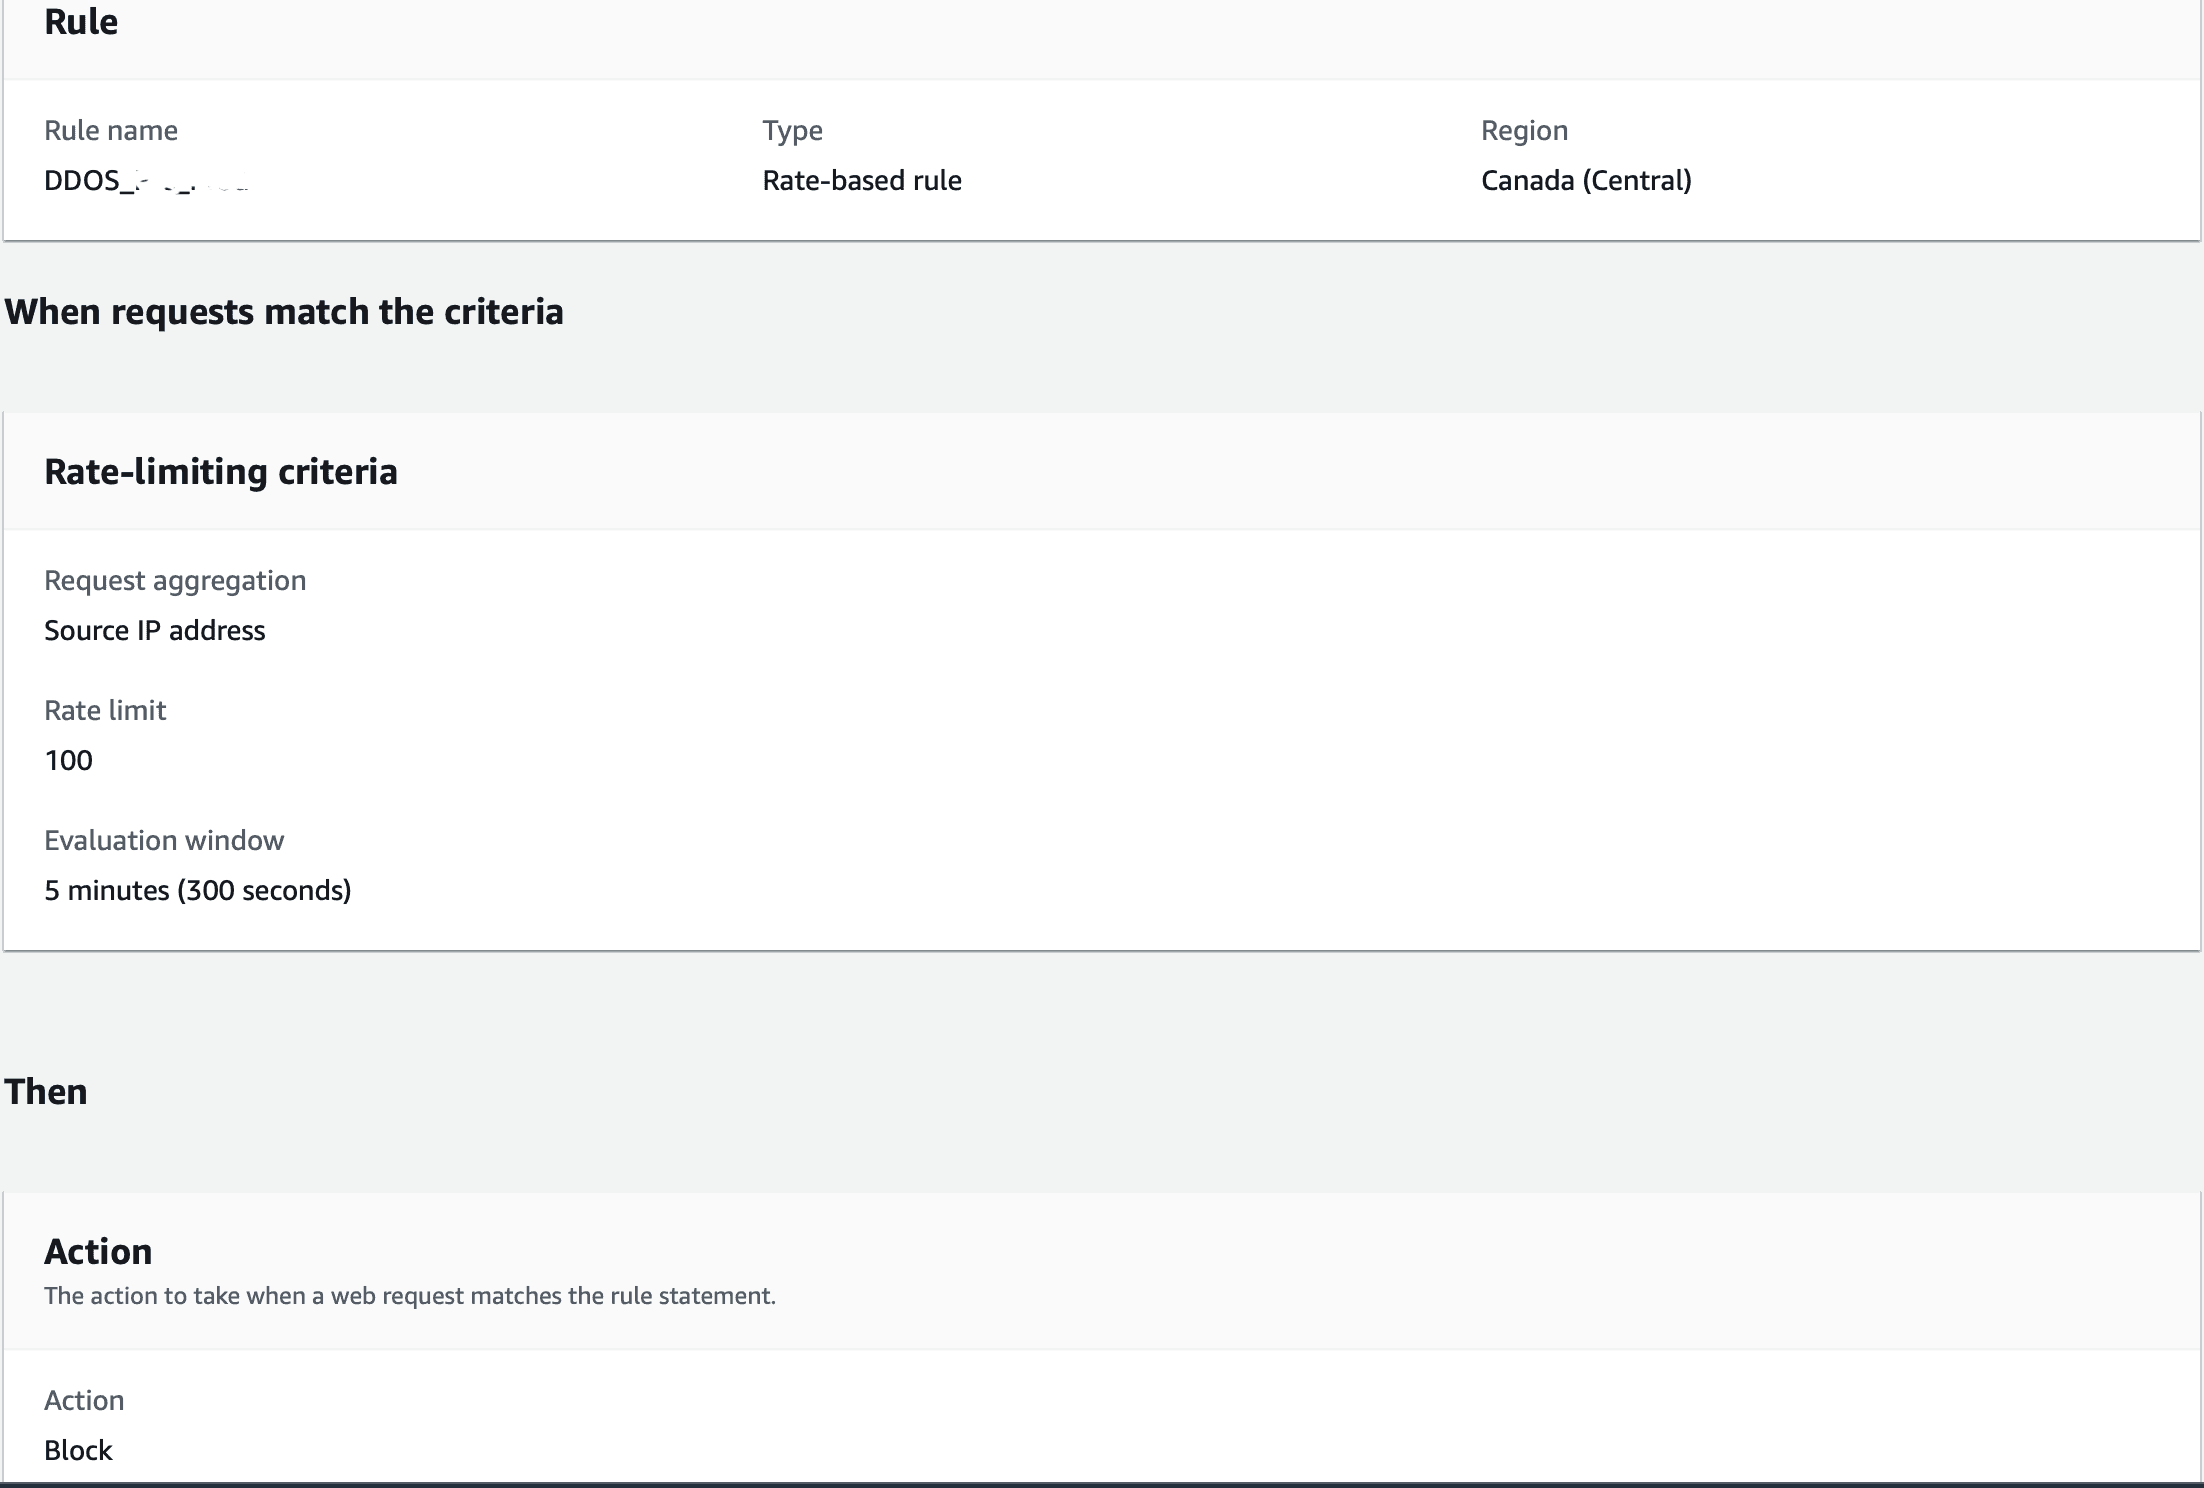
3. DDOS:
DDOS attacks are attempts by an attacker to disrupt the availability of targeted systems.
For infrastructure layer attacks, you can use AWS services such as Amazon CloudFront and Elastic Load Balancing (ELB) to provide automatic DDoS protection.
Use rate-based rules
You can create blanket or a URI-specific rate-based rules to protect your web application against DDoS attacks
Create a blanket rate-based rule from the AWS WAF console
A blanket rate-based rule allows you to set a threshold for the number of requests IPs can make to your web application.
- Open the AWS WAF console.
- Select the Web ACL that doesn't have an RBR defined, then select Rate-based rule.
- Enter a Name for your rule.
- Enter a Rate limit. The rate limit is the maximum number of requests allowed in any five-minute period from any single IP address. After this limit is reached, the rate-based rule action is applied to the IP address. When the requests from the IP address fall below the limit, the action is discontinued.
Note: The rate limit threshold is a representation of how many requests from a single IP address are considered too much and potentially malicious. Otherwise you might block good requests. If you're not sure what limit to set, it's a best practice to set the rule action to count and monitor your request pattern. - For IP address to use for rate limiting, select Source IP address or IP address in header.
IP address in header: When a request comes through a CDN or other proxy network, the source IP address identifies the proxy and the original IP address is sent in a header. Use caution when using the IP address in header option because headers might be handled inconsistently by proxies. And, headers can be modified to bypass inspection.
Source IP address: For Criteria to count request towards rate limit, choose count requests that match the criteria of a rule statement.
- Set the rule action to count or block requests from IP addresses while their request counts are over the limit. The application and removal of the rule action might take effect a minute or two after the IP address request rate change.
- Select Add Rule.
- Select Next. Limits - we kept 100 request for 5 minutes.
4. CountryOriginrule:
Country based --> Allow specific country requests.
Country based Access for Admin panel. (Country - India)
Process:
Create a rule with countries which has to be allowed.
Add my own rules and rule groups → Rule builder —>Name: CountryOriginrule → Select Originate from a country in→Add country codes: Select countries → Create rule
5. AWS-AWSManagedRulesBotControlRuleSet:
Bot Protection:
Process:
Create a rule with countries which has to be allowed.
Add my managed rules → Bot Control —>Edit rules: Allow or block request → Save rule
6. AWS-AWSManagedRulesAmazonIpReputationList:
IP reputation list rule --> Anonymous IPs wont access our LB.
https://docs.aws.amazon.com/waf/latest/developerguide/aws-managed-rule-groups-ip-rep.html
Process:
Create a rule with countries which has to be allowed.
Add my managed rules → Amazon IP reputation list —>Edit rules: Allow or block request → Save rule.
7. AWS-AWSManagedRulesAnonymousIpList:
https://docs.aws.amazon.com/waf/latest/developerguide/aws-managed-rule-groups-ip-rep.html
Process:
Add my managed rules → Anonymous IP list —>Edit rules: Allow or block request → Save rule.
8. AWS-AWSManagedRulesKnownBadInputsRuleSet:
Known bad inputs rule --> reduce the risk of a malicious actor discovering a vulnerable application.
https://docs.aws.amazon.com/waf/latest/developerguide/aws-managed-rule-groups-baseline.html
Process:
Add my managed rules → Known bad inputs —>Edit rules: Allow or block request → Save rule.
9. AWS-AWSManagedRulesPHPRuleSet:
This will block exploiting vulnerabilities specific to the use of the PHP, including injection of unsafe PHP functions.
https://docs.aws.amazon.com/waf/latest/developerguide/aws-managed-rule-groups-use-case.html
Process:
Add my managed rules → PHP application —>Edit rules: Allow or block request → Save rule.
10. AWS-AWSManagedRulesSQLiRuleSet:
This will stop SQL injections.
https://docs.aws.amazon.com/waf/latest/developerguide/aws-managed-rule-groups-use-case.html
Process:
Add my managed rules → SQL database —>Edit rules: Allow or block request → Save rule.
Logging: Enable logging this will show each request accepted and blocked
Process: Goto WebAcl rule —> Select Logging & Metrics —> Enable logging —> Add name with aws-waf-logs.
aws-waf-logs-admin-xxx
WAF WebACL for BE
Attaching screenshot of BE rules for reference.
WEbACL Creation Process:
Goto WAF→ Region: Select region.
Create WebACL → Name: Name the WebAcl.
AWS resource: Select Load Balancer/ CloudFront/ AWS API/ AWS App sync.
Add rules: The rules Screenshot is attached below:
Rules:
1. clientips:
Allow IPs of Third Party services - we need to provide access to IP addresses for third-party services.
Process:
Create an IP set with IP’s which has to be allowed.
Add my own rules and rule groups → IP set —> Select IP set added from top IPs → Select Source IP address → Action: Allow → Create rule
2. Clients_IPs_Paths:
Allow Domains Paths of
https://www.google.com https://mail.google.com/mail/u/0/#inbox
Process:
Create a rule group with Path’s which has to be allowed. (google.com/ & mail/ etc)
Add my own rules and rule groups → Rule group —> Select Rule group added from top Paths →Name: Clients_IPs_Paths → Create rule
3. DDOS:
DDOS attacks are attempts by an attacker to disrupt the availability of targeted systems.
For infrastructure layer attacks, you can use AWS services such as Amazon CloudFront and Elastic Load Balancing (ELB) to provide automatic DDoS protection.
Use rate-based rules
You can create blanket or a URI-specific rate-based rules to protect your web application against DDoS attacks.
Create a blanket rate-based rule from the AWS WAF console
A blanket rate-based rule allows you to set a threshold for the number of requests IPs can make to your web application.
- Open the AWS WAF console.
- Select the Web ACL that doesn't have an RBR defined, then select Rate-based rule.
- Enter a Name for your rule.
- Enter a Rate limit. The rate limit is the maximum number of requests allowed in any five-minute period from any single IP address. After this limit is reached, the rate-based rule action is applied to the IP address. When the requests from the IP address fall below the limit, the action is discontinued.
Note: The rate limit threshold is a representation of how many requests from a single IP address are considered too much and potentially malicious. Otherwise you might block good requests. If you're not sure what limit to set, it's a best practice to set the rule action to count and monitor your request pattern. - For IP address to use for rate limiting, select Source IP address or IP address in header.
IP address in header: When a request comes through a CDN or other proxy network, the source IP address identifies the proxy and the original IP address is sent in a header. Use caution when using the IP address in header option because headers might be handled inconsistently by proxies. And, headers can be modified to bypass inspection.
Source IP address: For Criteria to count request towards rate limit, choose count requests that match the criteria of a rule statement.
- Set the rule action to count or block requests from IP addresses while their request counts are over the limit. The application and removal of the rule action might take effect a minute or two after the IP address request rate change.
- Select Add Rule.
- Select Next. Limits - we kept 100 request for 5 minutes.

4. CountryOriginrule:
Country based --> Allow specific country requests.
Country based access for BE services:
Austria
Belgium
Canada
Process:
Create a rule with countries which has to be allowed.
Add my own rules and rule groups → Rule builder —>Name: CountryOriginrule → Select Originate from a country in→Add country codes: Select countries → Create rule.
5. AWS-AWSManagedRulesBotControlRuleSet:
Bot Protection:
Process:
Create a rule with countries which has to be allowed.
Add my managed rules → Bot Control —>Edit rules: Allow or block request → Save rule
6. AWS-AWSManagedRulesAmazonIpReputationList:
IP reputation list rule --> Anonymous IPs won’t access our LB.
https://docs.aws.amazon.com/waf/latest/developerguide/aws-managed-rule-groups-ip-rep.html
Process:
Add my managed rules → Amazon IP reputation list —>Edit rules: Allow or block request → Save rule.
7. AWS-AWSManagedRulesAnonymousIpList:
https://docs.aws.amazon.com/waf/latest/developerguide/aws-managed-rule-groups-ip-rep.html
Process:
Add my managed rules → Anonymous IP list —>Edit rules: Allow or block request → Save rule.
8. AWS-AWSManagedRulesKnownBadInputsRuleSet:
Known bad inputs rule --> reduce the risk of a malicious actor discovering a vulnerable application.
https://docs.aws.amazon.com/waf/latest/developerguide/aws-managed-rule-groups-baseline.html
Process:
Add my managed rules → Known bad inputs —>Edit rules: Allow or block request → Save rule.
9. AWS-AWSManagedRulesPHPRuleSet:
This will block exploiting vulnerabilities specific to the use of the PHP, including injection of unsafe PHP functions.
https://docs.aws.amazon.com/waf/latest/developerguide/aws-managed-rule-groups-use-case.html
Process:
Add my managed rules → PHP application —>Edit rules: Allow or block request → Save rule
10. AWS-AWSManagedRulesSQLiRuleSet:
This will stop SQL injections.
https://docs.aws.amazon.com/waf/latest/developerguide/aws-managed-rule-groups-use-case.html
Process:
Add my managed rules → SQL database —>Edit rules: Allow or block request → Save rule.
Logging: Enable logging this will show each request accepted and blocked.
Process: Goto WebAcl rule —> Select Logging & Metrics —> Enable logging —> Add name with aws-waf-logs —> Save.
aws-waf-logs-be-xxx
Reference: https://docs.aws.amazon.com/AmazonCloudFront/latest/DeveloperGuide/distribution-web-awswaf.html
Summing Up
AWS WAF is an essential tool for enhancing the security of your web applications. By effectively monitoring and managing HTTP and HTTPS requests, it safeguards against common attack patterns like SQL injection and cross-site scripting. With robust features such as Access Control Lists, Rules, and Rule Groups, AWS WAF provides comprehensive protection and control. Its full-featured API further facilitates seamless automation and maintenance of security rules, ensuring your application remains secure and resilient against evolving threats.
Thank you for reading this article. Keep learning 😃.
Subscribe to Our Newsletter
Subscribe to RSS
Press & Media Hub RSS FeedRelated Articles.
More from the engineering frontline.
Dive deep into our research and insights on design, development, and the impact of various trends to businesses.

Jul 10, 2026
How We Built the Missing Bridge from Code to Figma

Jun 27, 2026
Building a Resilient Hybrid-Cloud Network with WireGuard HA, Route-Based Failover, and Deep Observability

Jun 19, 2026
We Built a 114-Second AWS-to-Azure Failover. Here’s What We Learned

Jun 12, 2026
Cloud-Native and Cloud-Agnostic Are Not Ideologies; They Are Business-Stage Decisions

Jun 8, 2026
Geeklego: The Open-Source Design System Built to Work With AI

May 18, 2026