Widget Testing - The Untold Story
Author

Date

Book a call
If you do not wish to test your Application, your customers also ain't gonna do so!
I strongly believe most people will accept the fact that testing your application is a prominent and integral part of your application building. Since our primary goal is to produce a robust and perfect product, testing becomes a key part before the product gets delivered to make it ideal.
Before diving deep into Flutter testing, I would like to discuss so general things about Development phase testing. I know most folks in our development community name the development phase testing unanimously as unit testing, but development phase testing not only succumbs to unit-level testing but has a lot more to do than that. Hence, I think naming it as 'Development Phase Testing' will give it the justice it deserves!
General Trivia on Testing
Most people in our developer community have this particular question rolling inside their heads.
I'm a busy Developer. How can I/Why should I?
Being a part of the community, I too ask the same question, but more than that, I think the best thing to do is to perform testing in the initial stages because Developing a product is an Art. It requires a lot of patience and strength to deliver the robust and ideal product as is expected. Hence, I strongly believe that it is a great practice to jot down test cases in the initial stages itself. By then you can ensure all your building processes are going fine step by step.
Flutter Testing: The Army
Now it’s time to get Fluttered. As everyone knows, Flutter has proven its power of building high quality, highly feasible UI apps and now has been growing as one of the giants in its own market. Testing Flutter apps is also one of the processes to build the sculpture properly from the preamble. To consummate the same, we have the following methods:
- Unit Testing - The Soldier
- Widget Testing - The Colonel
- Integration Testing - The Field Marshal
Unit Testing - Testing the bits and pieces of everything in the project. Here you will be testing every unit in the code like variables, methods etc.
Widget Testing - This is very special to Flutter. As you know, Flutter is made up of widgets. This helps us test the actions, reactions and functionalities of the widgets used.
Integration Testing - Integration testing refers to testing a process or flow. Here, we dive deep into automating the entire action play of the app features in all possible scopes available. There are some special packages similar to automation testing tools like selenium,appium etc.
Testing Rulesets
Know the rules better, so you can break them effectively - Dalai Lama
There are some general rulesets that you have to follow while writing the test cases. This gives you a better foundation, improved readability and clear structures. Those rules are listed below:
- Folder Structures - The Family Tree
- Naming Conventions - The Core Members
Folder Structures - All the files in the library folder for which the testing is to be performed is to be added with the same structure inside the test folder. Since all our test files are written inside a separate directory called test, which is also a part of the Flutter project directory, we need to follow the same structure we do inside the lib folder.
Naming Conventions - Naming the test files well is one of the key parts of the process. Every test file you are naming must be suffixed with the word '_test' in order to let Flutter test package identify the test file and run the same and it also helps us to differentiate between the different files on its nature, like models, services or whatsoever it may be. After naming the file in the same method, you are able to run the entire test suite by running the command flutter test from the root level of your project, which identifies and runs all the files ending with the phrase '_test.dart'.
Packages
Now comes the helper hand - packages for testing. These packages help us to test each prominent features we are integrating with the Flutter application based on its functionalities:
- test - The Common Man
- flutter_test - The Framework Man
- flutter_driver - The Automation Man
- bloc_test - The Special Man
test - This is a package used for testing native dart related components like methods and other components. This can be fetched from https://pub.dev/packages/test
flutter_test - This is an inbuilt library that comes with Flutter SDK. You can test all the specific components related to Flutter and it helps us to create an entire test suite that corresponds to test Flutter features. There is some example code for the flutter_test package inside the example folder of Flutter official GitHub repository. One such can be referred here - https://github.com/flutter/flutter/blob/master/examples/hello_world/test/hello_test.dart
flutter_driver - Automation testing can be assisted through this package. This resembles the market pioneers like Selenium or Appium and works in the same way to test the Flutter application. This comes in play after the entire application is finished and when you have to create an automated suite that tests the permanent features after each release.
bloc_test - This is a special test package that helps us to test Bloc (the highly standard State Management technique). When a project is conceived with the Bloc State Management system, we can use this package to test the states emitted, order of states and the lot. The package link is https://pub.dev/packages/bloc_test
Implementation: The Live Show
Without further delay, we can get into the implementation of writing test cases for a working Flutter application.
For the demonstration, I have created a sample application which is a fancy version of the counter application which is popular among the Flutter dev community. A small demo of the app functionality is below:
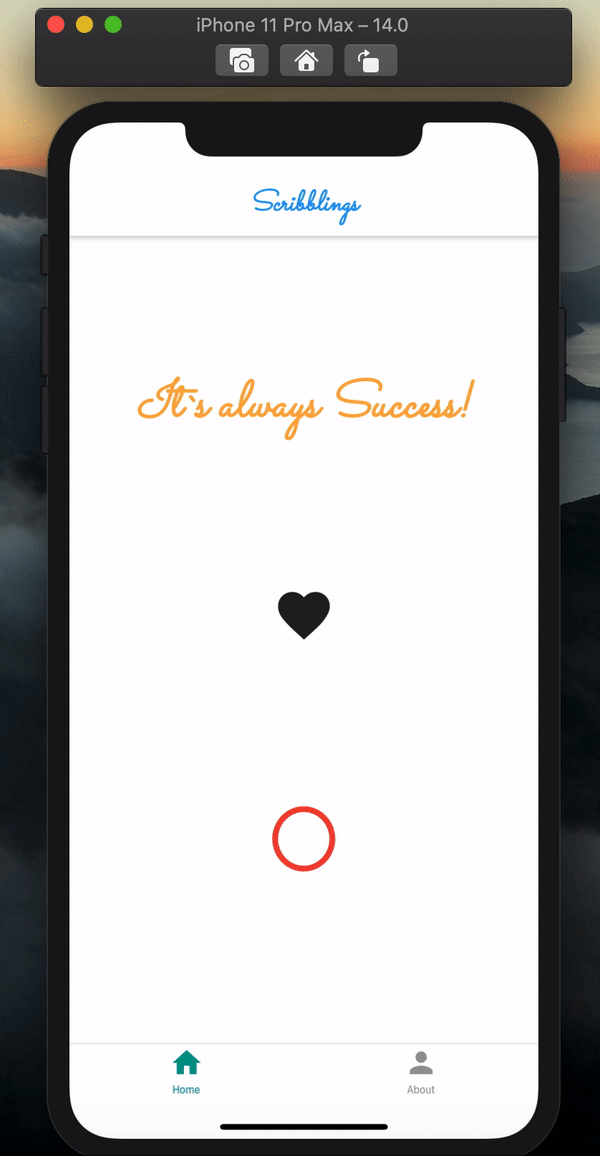
In the application, we have three simple components - one text widget with the string "It`s Always success" and an IconButton of heart shape which increments the number of likes received and shows it using the number of likes displayed. We use the setState({}) method to show the changes in the local state while clicking on the button and incrementing the number of hearts received.
Code Structure
- Since we need to write multiple test cases, we use the
groupmethod given by the package. It takes two parameters - a string for the description of test cases and an anonymous function where we jot down the test cases.
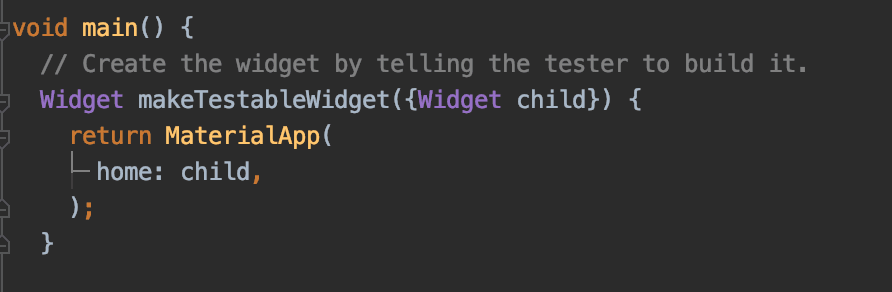
Main method
- For any action to happen in our code, we need a
mainmethod to execute. Hence, the test script also expects themainmethod from where all the actions kickstart. Here, we need to note one thing that, for any test script to run, we need a virtual UI to ratify the test execution. Hence inside the main method, we create a methodmakeTestableWidget. This method takes a widget as a parameter and renders it inside theMaterialAppwidget which is embedded inside the method. Hence the child widget is received as a parameter and sent inside theMaterialAppto create a virtual UI, all happening at the backside. Our test script will run over the virtual UI and produce the results based on the action executed.
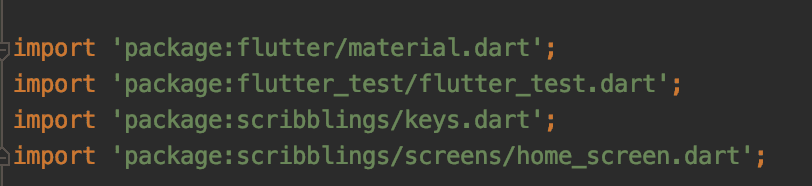
Import Statements
- Also, it is important to import all the packages and files where we need to execute the testing - Here we are importing the
flutter_testpackage for performing our testing,materiallibrary from dart to execute the virtual UI,home_screen.dartfile to fetch the widgets and pass it to themakeTestableWidgetmethod insidemainmethod as child parameters andkeys.dartfile where we have declared Keys used to reference the widgets inside the application.
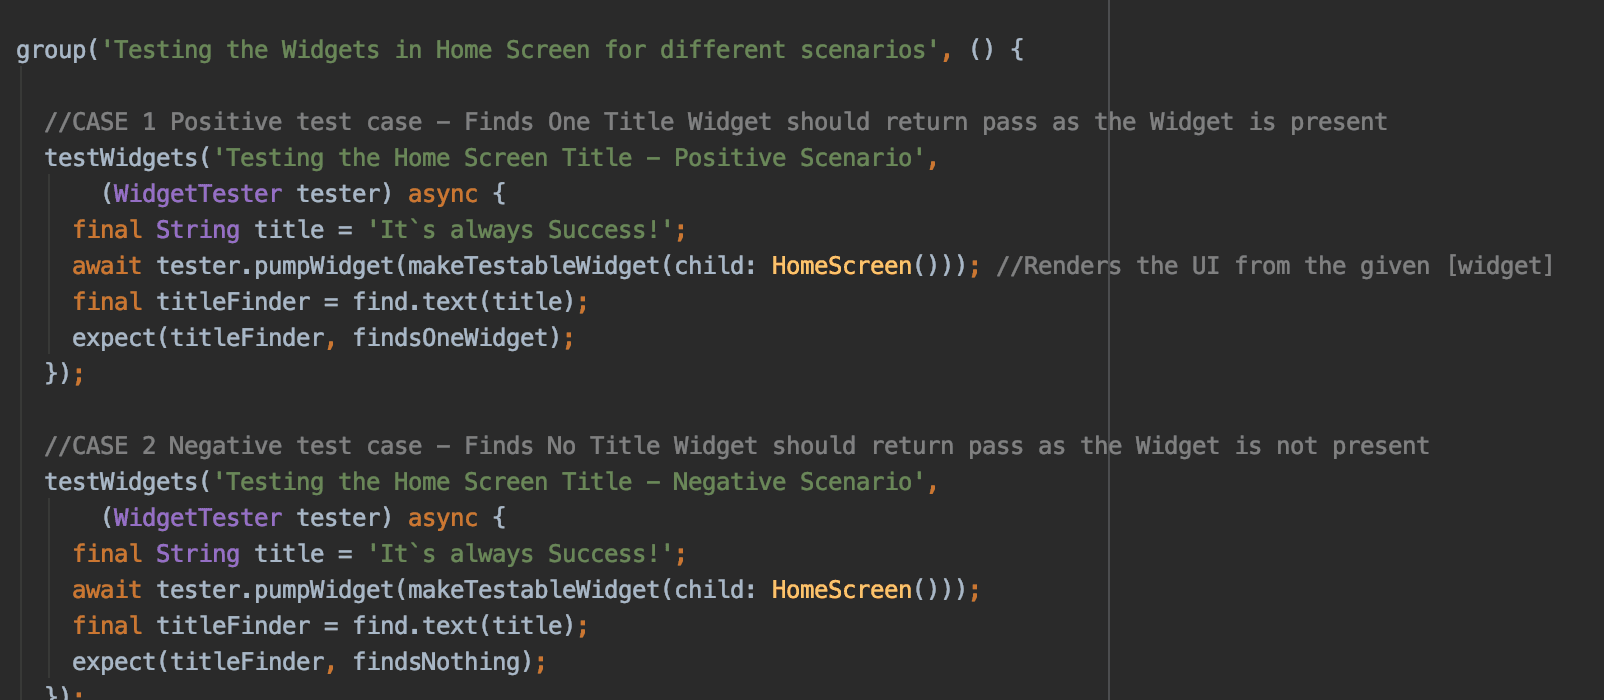
Test Case -1: Finds One Title Widget: Positive Scenario
In this test case, we are going to check whether the title widget is present are not. For this, we need to use the testWidgets method. This method helps us to perform the Widget test to see if the title widget("Its Always Success" - Text widget) is present or not. Contemporarily, the testWidgets method also takes two parameters - one description string and an anonymous method inside where we write the test case execution scripts. This anonymous method takes up a parameter object - tester of class WidgetTester. This is the key point of the test script which helps us to take the reference of test methods and execute all actions like drawing the virtual UI frames.
We will go through the steps one by one and see how a test case execution code is been sculptured:
- At first, we need to check the title Text widget which is internally a string. Hence we take up the reference of the title caption in a local variable
String title = 'It`s Always Success'; - Now with the help of the
tester, we call a method calledpumpWidget. This helps us to render the virtual UI and can be considered as an alternatebuildmethod that we use quite a lot inside our Flutter development code. Hence we call themakeTestableWidgetmethod inside the main method from here and pass theHomeScreenwidget which we want to render virtually as a child. Hence, the method invocation goes tomainmethod and embeds theHomeScreenWidget inside theMaterialApp. By then we have the virtual UI ready to execute the test. -await tester.pumpWidget(makeTestableWidget(child: HomeScreen())); - Now we have the UI ready and the text to be found. Its time to find the
title Text widget using "find.text(title)".As the name implies, we are fining the title Text widget and storing the reference inside the variabletitleFinderandfind.text()method helps in finding the reference using the passed text. In a similar way we havefind.byKey(),find.byWidget()etc. to get the reference of the corresponding widgets. Now, if there is a widget with the sent title, you will store the reference in thetitleFindervariable. Even if there is no widget, you ll never get any exception -final titleFinder = find.text(title); - Generally, testing is expecting. Hence now we use a method
expect()which takes two parameters, the actual result on the left side and the expected result on the right side. Hence now we have the Text widget referencetitleFinderon the left-hand side andfindsOneWidgetmethod on the right side. What happens apparently is thefindsOneWidgetmethod checks for one widget with the referencetitleFinderpassed on the left side. Hence if the reference is there, we will get the test script result as passed, else the script fails. This marks the end of the test case which can be seen at the IDE run panel or in the terminal if it runs inside there. -expect(titleFinder, findsOneWidget);


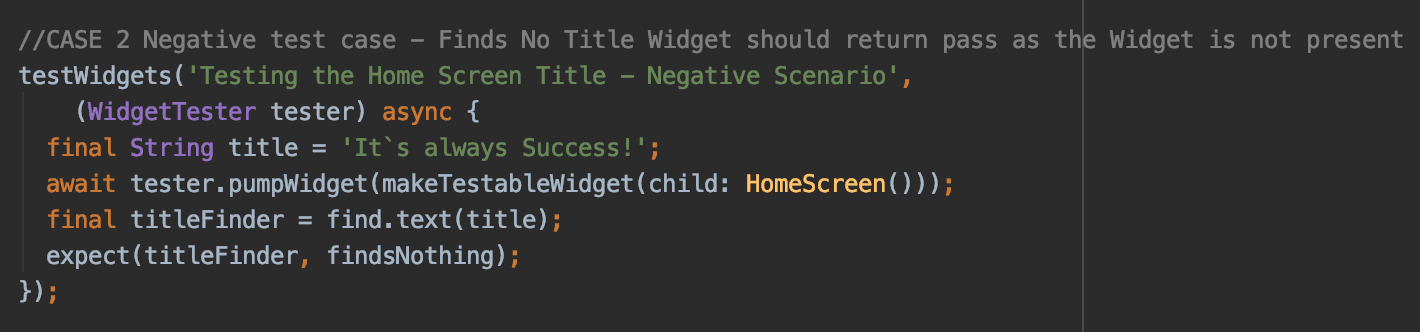
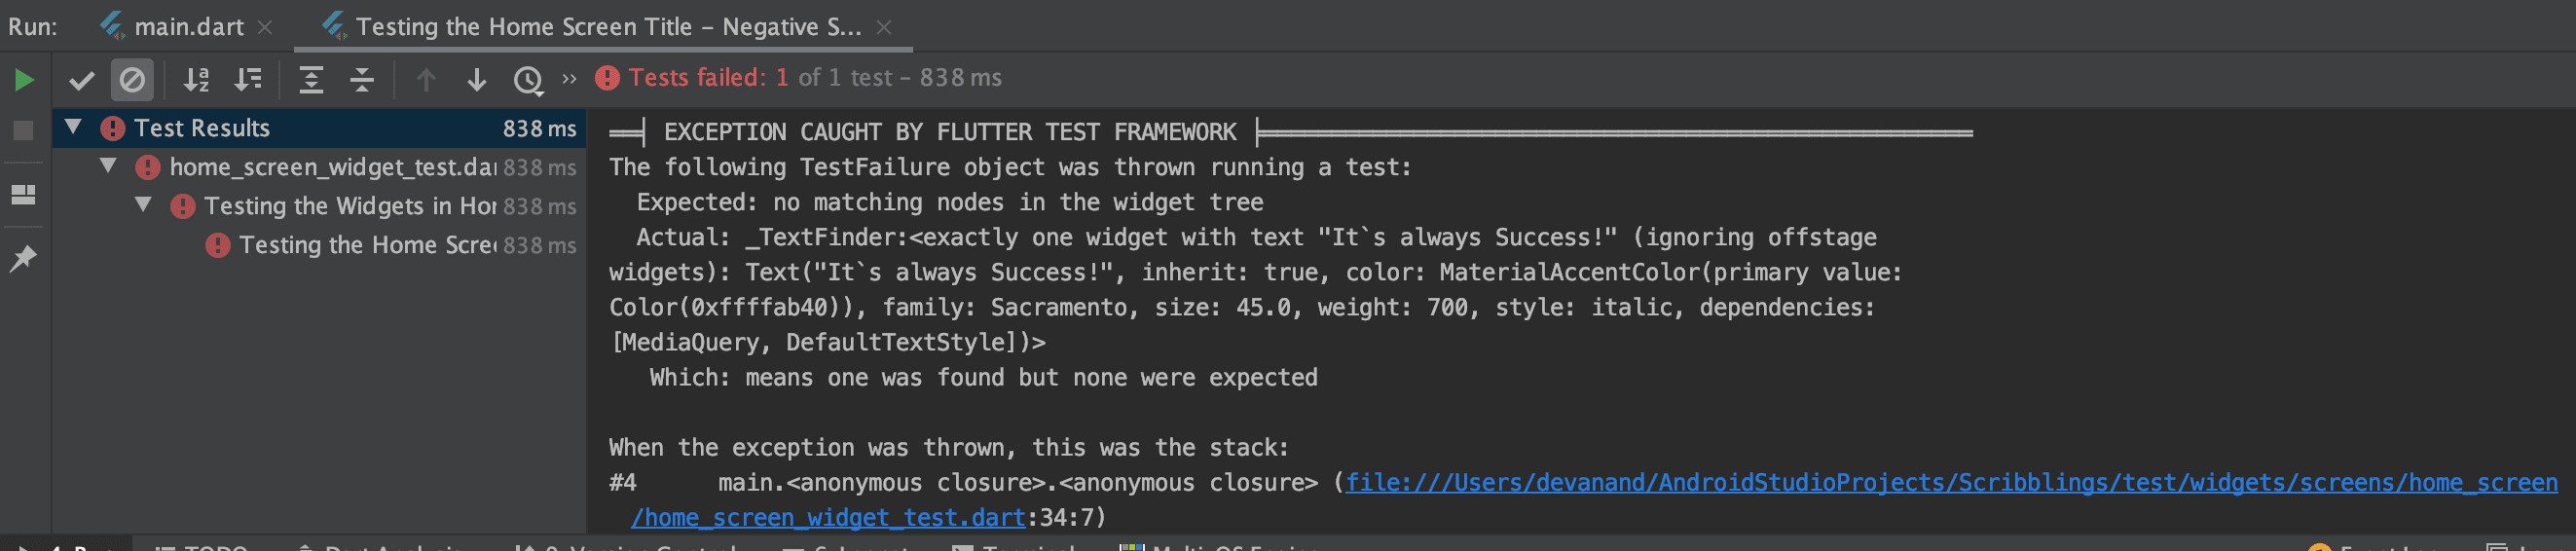
Test Case -2: Finds One Title Widget - Negative Scenario
It's evident that for a Testing engineer, covering the negative scenarios is just as important as covering up the positive scenarios. Here in this test case, I will follow all the steps described for Test Case 1, except for the expect method that we are trying to achieve. The ideology behind this test case is that now we have a widget Title which has the String "It`s Always Success" and we have proven it in the previous test case. What if we try to deceive the tester component by saying there is no such widget - expecting findsNothing and passing the titleFinder. Now actually the findsNothing method will expect nothing of such reference passed to the left side (titleFinder) but the widget is already there. Hence you will see the test case failing and this is also a prominent confirmation that your app does not act out of box as expected.
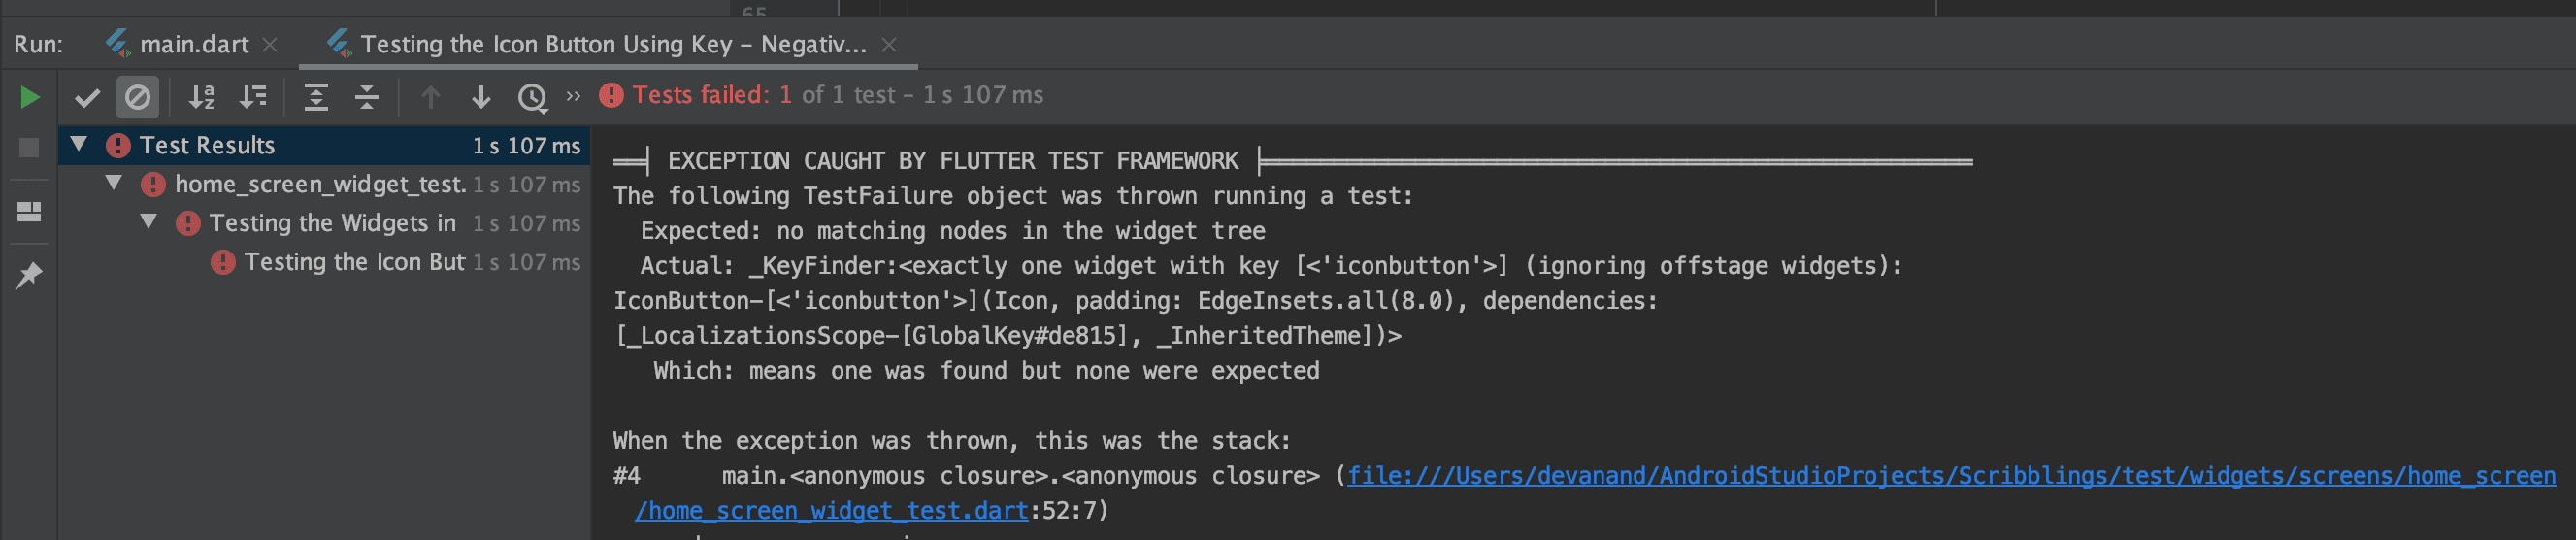
Test Case -3: Testing the Icon Button Using Key - Positive Scenario
This test case defines finding the button available (The Heart IconButton Widget). Here the difference is to refer the button using a Key - the boon of Flutter. Using a key, we can refer the widgets on a global scale and hence we will see how to get the widgets referred to using a key inside test scripts.
First of all, I have defined a separate file keys.dart where I have defined the string values for all the keys I'm using to refer the widget as follows:
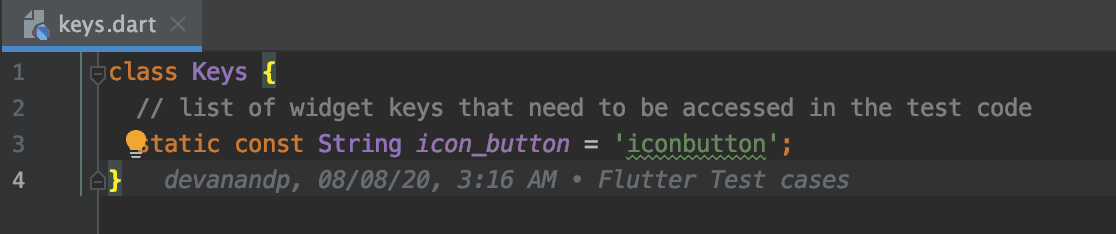
I have made the strings static so that I`m able to refer them globally.
Now inside the test script, I'm following the same steps described for the previous test cases. The change happens only at the place where we find the widget reference and here I`m using find.byKey() method to get the widget reference using the key. I define a variable buttonKey where I create a Key object by sending the static reference of the string we created- final buttonKey = Keys(Keys.icon_button);. Now I'm passing the buttonKey variable inside the find.byKey method to get the expected reference of the heat IconButton in the HomeScreen. final buttonFinder = find.byKey(buttonKey); and finally we use expect method and findsOneWidget to see whether one widget is present in the HomeScreen and the test case passes.


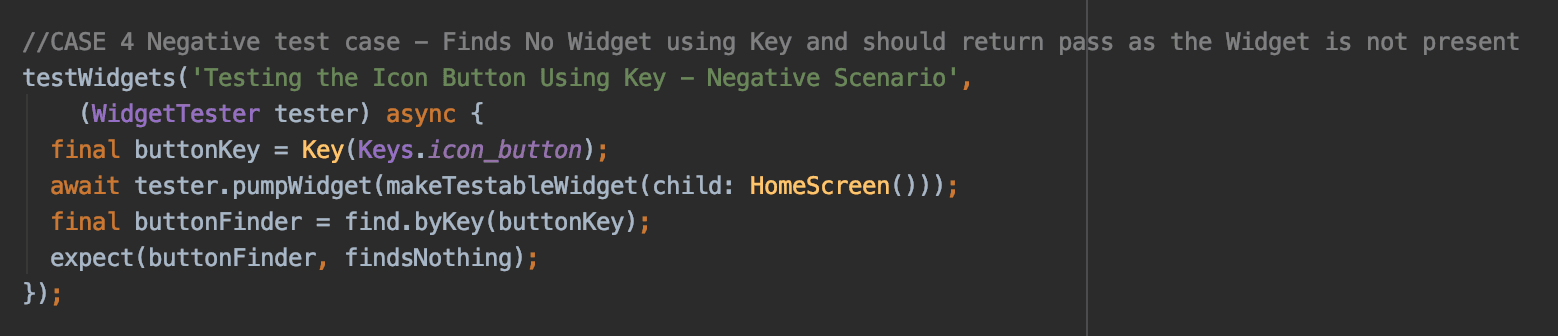
Test Case - 4: Testing the Icon Button Using Key - Negative Scenario
As illuminated previously, we try to cover up a negative scenario for the previous case by expecting nothing using expectsNothing widget for the widget which is already landed.
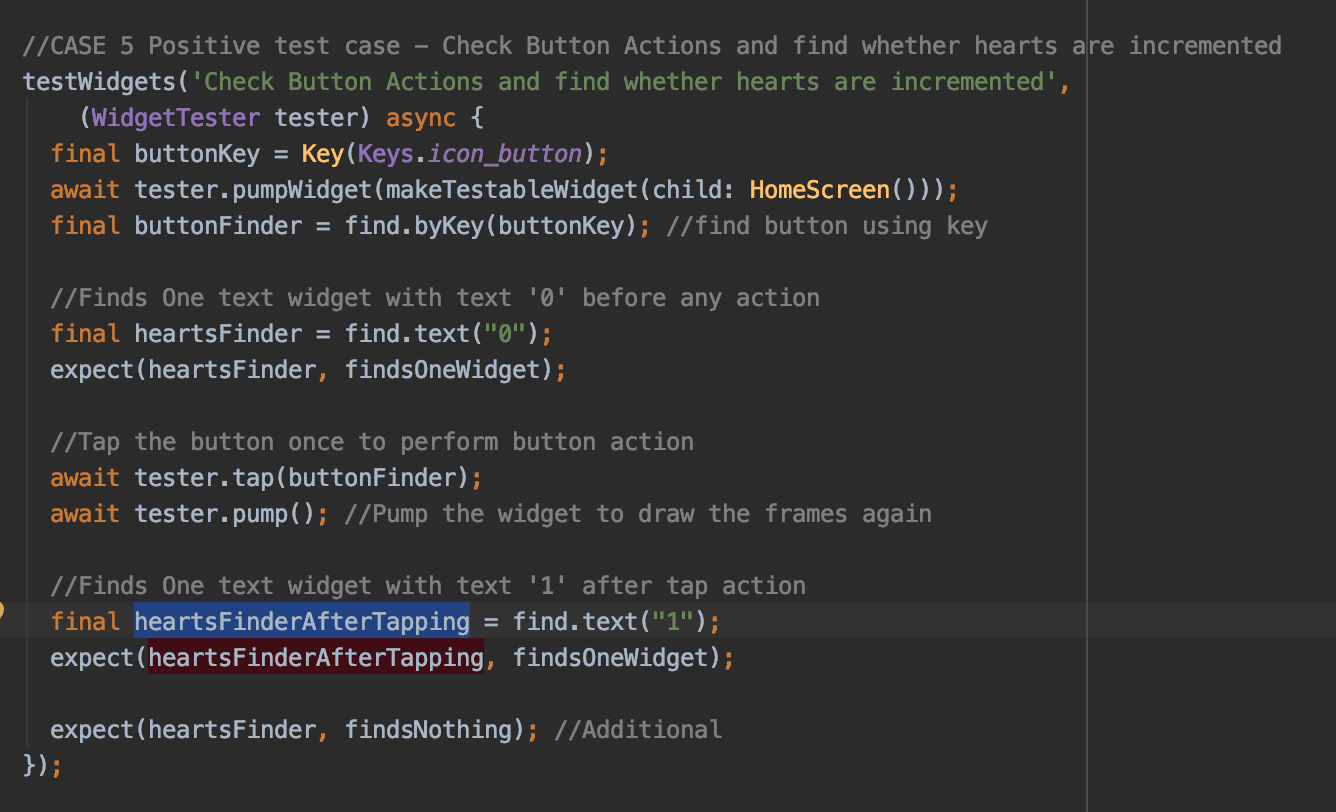
Test Case -5: Check Button Actions and find whether hearts are incremented - Positive Scenario
Its time to get into some action. Here, let's look into some of the actions taken on the HomeScreen and test whether the re-actions are proper. Putting it in a statement, we are going to click on the heart Icon button and see whether the hearts are incremented and the number widget adds up one on each click.
- At first, we will take the button reference to make click action on it. I will use the same Key methodology to get the reference of the heart button and save it in the variable
buttonFinder. - Now before any action happens, the number text will be '0'. Hence for taking reference of the same, we use the
find.text("0")method and store its reference in the variableheartsFinder. - For the action to happen now, we have a method called
tapwhich comes along with thetesterobject. This method helps us to make a tap action on the reference passed. Hence we pass the reference of thebuttonFinderinside the tap method to make a button action -await tester.tap(buttonFinder); - After the tap action for the button has happened, it's mandatory to re-render the widget, which we do in the real-time application using
setState({})to re-render the local state changes. Analogously, for the virtual UI we created to the test scripts, we have a method calledpumpwhich helps to rebuild the HomeScreen widget. Hence we call the pump method using tester object reference and re-render the UI, where now the number widget will have been transformed to "1" -await tester.pump(); - Now for checking the change of the number, we create a new reference variable called
heartsFinderAfterTapping. Here, we find the text widget with the string "1". Using thefindsOneWidgetmethod, now we confirm that there is one widget holding text "1" with the help ofexpectmethod and passingheartsFinderAfterTappingreference. - You can cover up an additional case, by passing the older reference
heartsFinder(reference for "0") the methodfindsNothingto re-confirm no older widget exists now and the UI has changed after calling the pump method. You will be excited to see now all the two scenarios are passed now.

Group Test Running:
We can run the group method on top level to get the consolidated results of all the test cases described inside. In our case, 3 cases have passed (Positive scenarios) and 2 cases have failed(Negative scenarios), which is expected.

Running tests from terminal:
You can use the command flutter test from the project root level to run all the files in your test folder. This command will identify the files suffixed with "_test.dart" and run the test cases enriched inside the files. The terminal result for our test script will be as follows:

An ideal test suite must give hope to the developers that they can rely on results. Hence, it's very important to carefully write the test cases and make sure it gives hope to make the application a robust one. In that way, development phase test script writing becomes one of the important features, not only for a Flutter project but for any application developed in any coding language.
The link for GitHub Repository for the complete Flutter project along with the test script is available in the testing branch here - https://github.com/devanandp/Scribblings/tree/testing.
Star the repo and give us a clap to invigorate us contributing to the technology world. Sending the readers a Thanks and 👋 until we meet next time!
Dive deep into our research and insights. In our articles and blogs, we explore topics on design, how it relates to development, and impact of various trends to businesses.