Table of Contents
ServerPod
Author

Date

Book a call
Introduction
Serverpod is a fantastic backend tool written in Dart. This lets a flutter developer quickly begin backend development and include it into their tech stack. This framework is currently under development and primarily serves as an open source scalable app server. As a result, one may become a Full Stack Dart Developer by utilizing Flutter for the UI and Serverpod for the backend.
We may use it to build EndPoints (APIs), Job Schedulers, Authentication Systems, and much more. The boilerplate code that appears once you create the project is a great place to start. The package also includes pre-built AWS Deployment Scripts.
Installation & Getting Started
Pre-requisite : Docker Desktop & Flutter
To get started with Serverpod, run the following command to enable the CLI:
dart pub global activate serverpod_cli
The above command enables the Serverpod CLI, and we are now ready to create our first project.
serverpod create project_name
Three folders will now be created for us.
project_name_flutter: This has a default flutter application generated with the serverpod client to demonstrate how we may call the endpoints directly created in the server without using any external HTTP client.
project_name_client: This is an auto-generated client that allows you to communicate with the server's endpoints. This client is used to call the endpoints in the flutter application.
project_name_server: This is the serverpod-created backend server. It is made up of example endpoints and future callbacks (replica of cron jobs or task schedulers).
To run the created project run the following commands:
Serverpod is equipped with a number of tools and functions. Let me go through some of them:
1. Database Support: Serverpod incorporates PostgreSQL and Relic integration. The Docker Desktop is used to pre-configure the database. We can turn off the Relic DB by following the methods outlined below. The SQL queries are produced automatically when Model Classes are created using ORM. As a result, creating tables in the database gets easier.
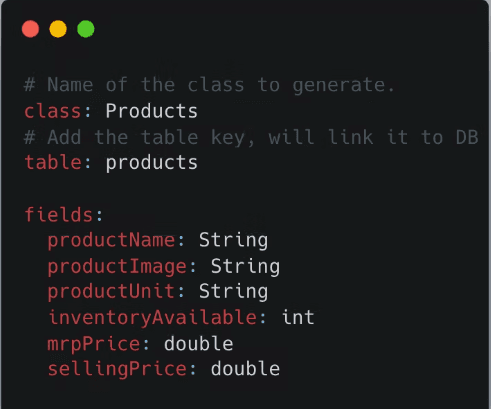
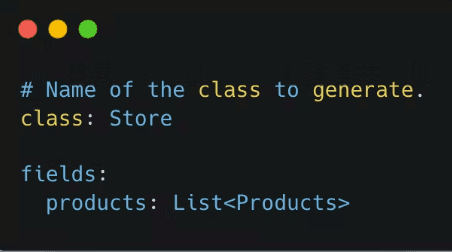
2. ORM & Serialization: It contains the ORM functionality. We just need to produce suitable YAML files that provide the table and row names, along with an index if necessary. It creates the SQL for table creation, which may then be performed manually on the Docker-created pgSQL server. All database functionalities required to conduct CRUD activities are included in the autogenerated serialised class. We can also create modal classes without using a database; simply comment out the table key in the YAML file. As a result, the resulting class will not have any SQL functions.
Products class representing products table in DB
Example class with no interaction with Database
3. Caching: Serverpod also has the ability to cache data. Sometimes static data is requested repeatedly by the client, thus we need to keep it in the cache to save database queries and load. As a result, serverpod has functionality for caching the database using a key-value approach. We can also include the expiration date. There are two kinds of cache: Regular and Priority.
4. Authentication: This functionality is primarily intended for usage in a Flutter application. For the time being, it supports Google, Apple, and Email SignIn. The client code may transmit the instance of sign-in straight to the server, and the server can immediately access user credentials from there.
5. Logging: Because this involves session logging, we may log the data using the function session.log. The logs are immediately placed in the serverpodlogs database, which is automatically generated when a new project is established. In the upcoming new release, we will also have a UI for checking logs, making it faster than the old ways of looking directly in the database.
6. Future Calls: The most astonishing feature is the ability to schedule any job in the future. The calls are saved in the database, so they remain even if the server is restarted. For example, if we want to send a push message to all new users 7 days after they register, we can easily execute the function and schedule it.
7. Deployment: We obtain the AWS boilerplate code. The deployment scripts are generated automatically by the project. GitHub with Terraform configuration makes it extremely simple. More information about the deployment may be found here.
How to Create a New Endpoint and Call Them?
Follow the steps to create a new EndPoint / API :
Create a new dart file inside lib/src/endpoints/ . Try to follow the naming convention as
name_endpoint.dart.Create a new class that extends the class EndPoint.
Create different methods that we need as endpoints. The methods should return a
Future. The argument list must contain one session argument and you can add as many arguments as you want in theAPI. Named parameters are not yet supported.Run the
serverpod generatecommand to generate the protocols and client class.Now we can access the
APIsdirectly using the client in flutter apps.To access the
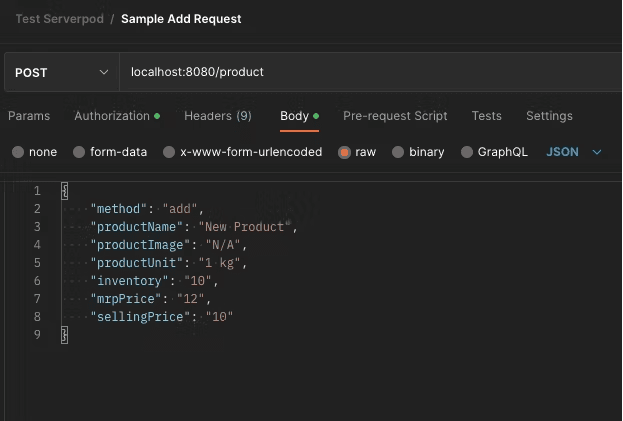
APIsin any other application which is not created in flutter we need to do aPOSTrequest in the given below format:
POST Request to access the endpoint
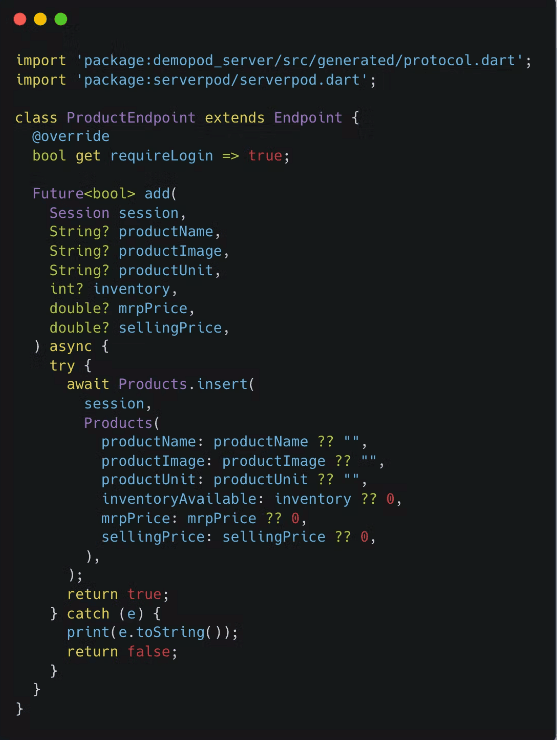
Sample Endpoint
PS - To check the name of the endpoint, which you may need to access using a POST request, check the project_name_server/lib/src/generated/endpoints.dart file for the autogenerated endpoint file.
How to Create a New Future Event and Call Them?
We have the power to create Cron Jobs or Schedule a task for future events in Serverpod.
Follow the steps to create a Future call:
Create a new dart file inside lib/src/future_calls/ . Try to follow the naming convention as
name_future_call.dart.Create a new class that extends the class
FutureCall.Override the invoked method having two parameters :
Session - Can be used to access the database (mandatory)
Serializable Object - Object of any Model Class (optional)
Write the body of invoke method, and perform all the needed actions.
For example - sending emails, pushing notifications or any database operations etc.Now we need to register this future call in the
server.dartfile which is located insidelibfolder using the given syntax:pod.registerFutureCall(ExampleFutureCall(), 'exampleFutureCall');Now we can call the
Future callback anywhere, using the session parameter in the endpoints. Syntax to call it is given below:
Syntax to call a Future call
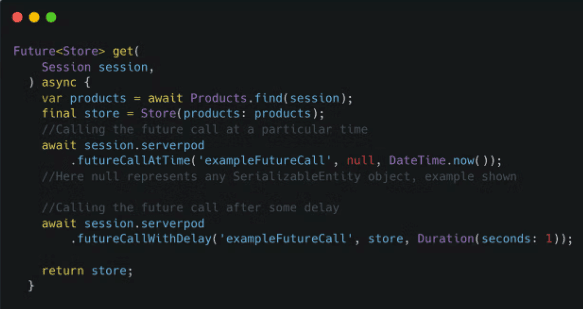
This is how we can create a Task Scheduler in Serverpod.
How to Disable the Relic Web Server?
If you just want to run the endpoint server and not the web server, then just remove all the added routes to the webserver in server.dart file.
How to Disable the Redis Db Service?
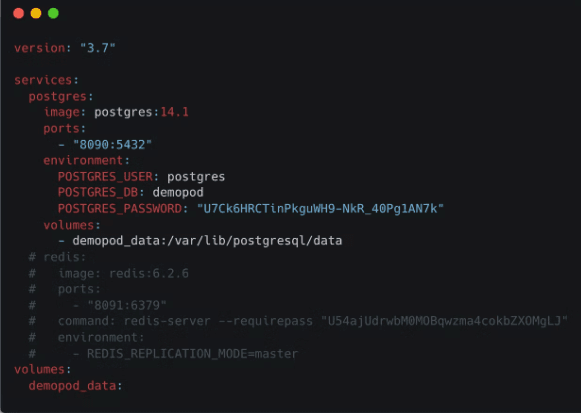
According to official documentation, we need to have both Redis as well as PostgreSQL in the docker image but there is a way to switch off the use of Redis if not required. We just need to remove the part of Redis configuration from docker-compose.yaml file and then run the command.
Sample of docker-compose.yaml with Redis removed
docker-compose up --build --detach dart bin/main.dart
Conclusion
This is how we can utilise ServerPod to leverage Dart as backend support. There are still certain constraints regarding the sorts of arguments and other minor issues that folks are working on, but v1.0 will be accessible to us as a stable version suited for production-type projects very soon.
Thank you for reading, and if you have any questions or recommendations, please contact me on Twitter at @rohitag2503. Looking forward to more ServerPod articles.
References
Dive deep into our research and insights. In our articles and blogs, we explore topics on design, how it relates to development, and impact of various trends to businesses.


