Mar 5, 2020
React to Vue - A Non-Intimidating Journey
The Journey Of Moving From React To Vue & Things Learnt Along The Way
Author


Book a call
Change is inevitable, but that doesn’t mean it has to be hard. Sometimes, it is difficult to switch between technologies or frameworks and we try to find associations between the former and the latter. React has been used to create brilliant user interfaces, specifically for single-page applications and has created quite a stir in web development. The popularity of React made me explore new similar frameworks. My curious mindset and a bit of “googling" brought me to the uncharted territory of Vue.js. As a beginner, I want to share how moving to Vue.js from React went for me, and how knowing some things might get you a “walk in the park” experience when getting started with Vue.js.
New Boy In Town
The web became a completely different place with the introduction of Single Page Applications along with the frameworks that were used to create beautiful UIs for the SPAs. React and Angular, backed by Facebook and Google respectively, have helped in creating powerful web applications. Among these two titans of the web development industry, Vue.js has created its own place. Vue.js is a rapidly growing sensation and it promises to make our lives easier by combining the sugar and spice of React and Angular.
Give Me Cold, Hard Facts
It is evident by the market trends that Vue.js is indeed amongst the most popular frameworks. Vue has gained huge popularity in a short span of time. The graph below depicts the popularity of various JS frameworks and the steep slope shows the rapid growth of Vue in the market.
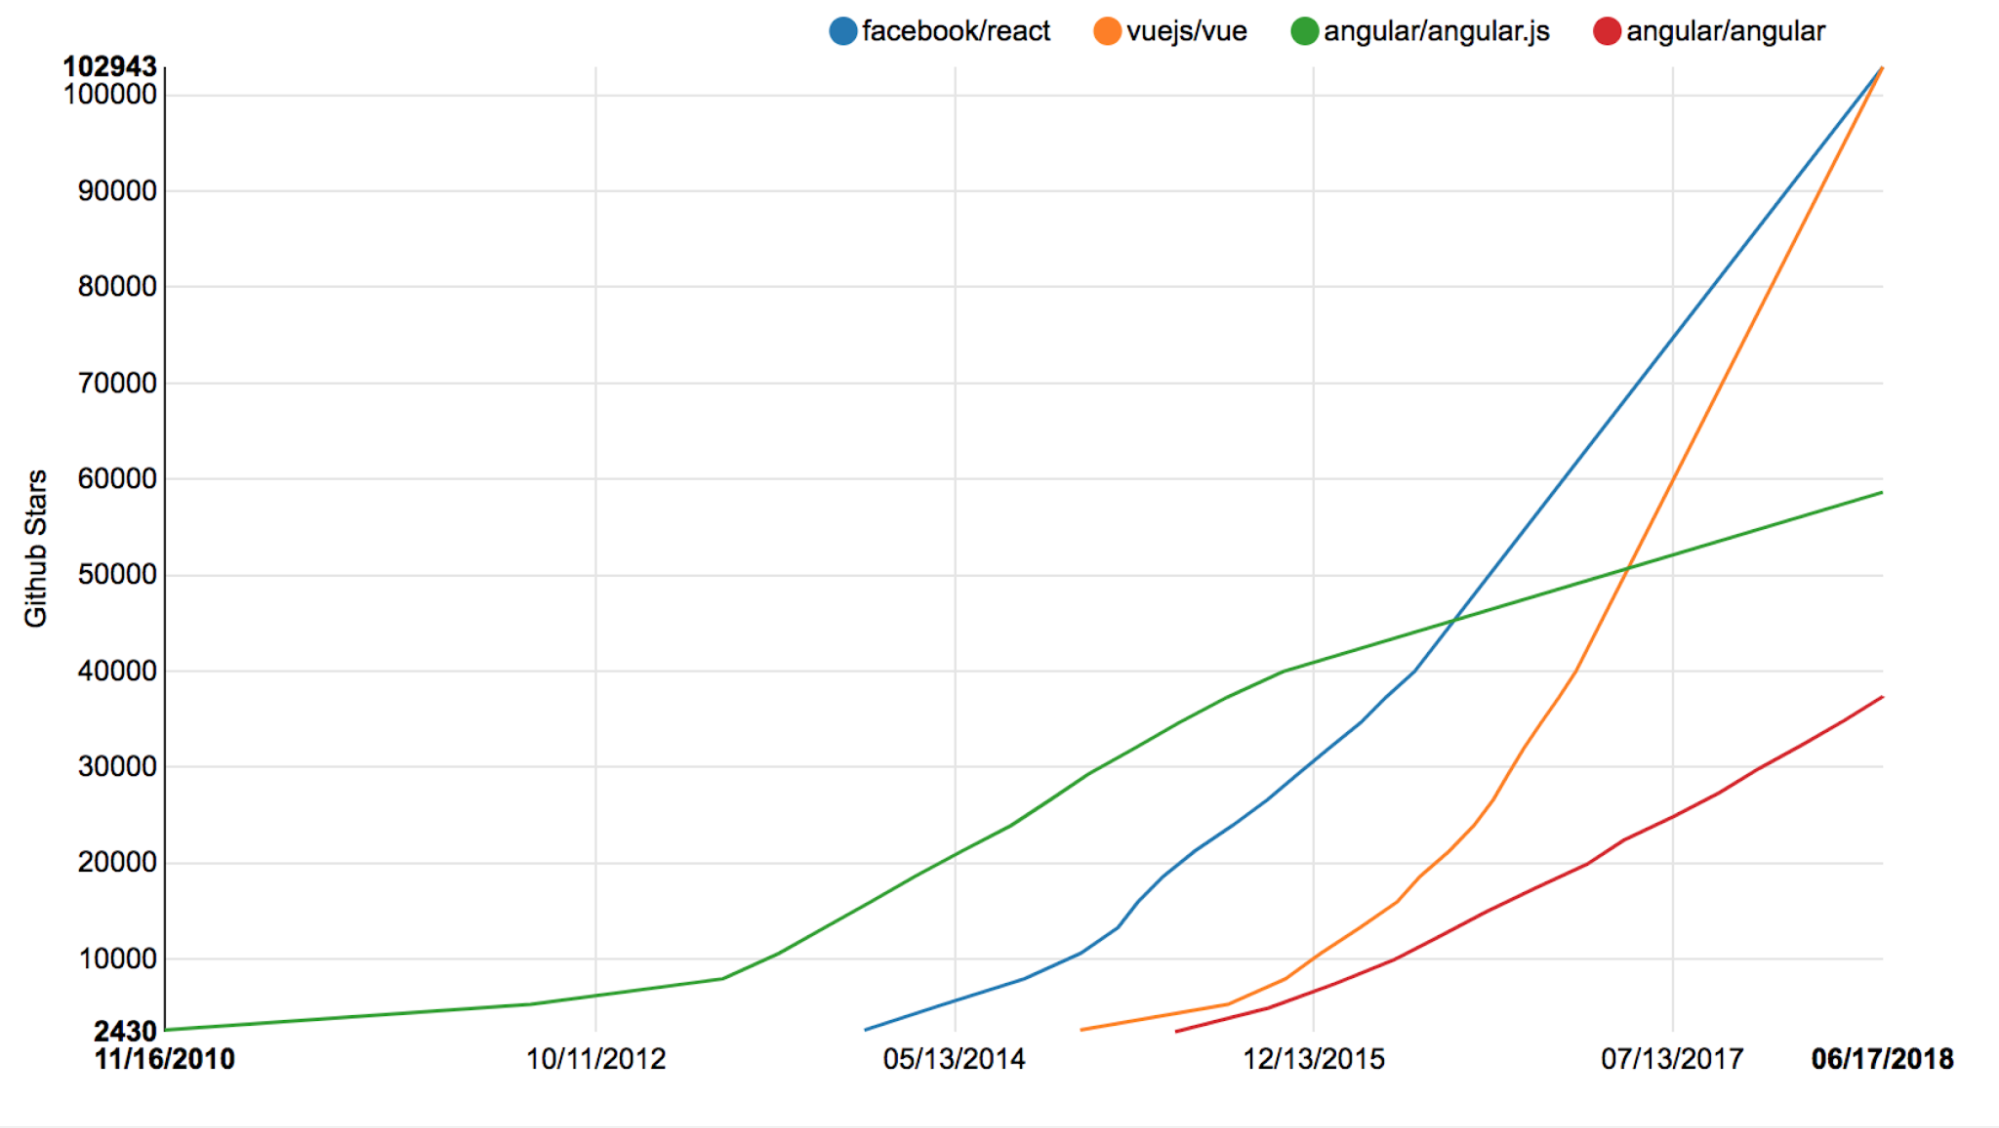
Not that it’s a competition, Vue.js also surpassed React in terms of GitHub stars in 2018. Currently, the former’s Github repo has around 150k stars. The community support of Vue.js is also pretty decent.

Knowing it all, one can’t simply stay away from it for long.
Get Your Feet Wet
Diving into the code is the best way to understand something new. Playing with code and making random changes to see how it affects the output is a good way to get the hang of it. A simple “.vue” file is divided into three parts - Template, Script, and Style. Vue.js uses straightforward HTML-like templates, using which we can declaratively render data to the DOM.
Okay, now as the tradition of our programming world goes, we’re gonna display “Hello World” in our app.
<template>
<div> {{message}} </div>
</template>
  <script>
	export default {
       name : "FirstApp", //The name of the component
       data(){
          return {
            Message : "Hello World"
          },
       },
    };
</script>
<style>
</style>
Bingo, you have your “Hello World” waiting for you at localhost:8080, because that’s where your Vue app runs by default.

Time To Dive In
The sea looks beautiful from the outside, but it’s even more mesmerizing on the inside. Vue.js does a lot of work under the hood for you. The data and the DOM are linked making everything reactive. At the core of a Vue application is a root instance which is the Vue instance. This is created using the Vue function when a Vue application starts.
var vm = new Vue ({
   //options
})
A Vue instance acts as an intermediate between your view and data and it contains optional objects which we’ll discuss later. The design of Vue is partially inspired by the MVVM (Model-View-View-Model) pattern.
I Speak React, Can You?
As I mentioned earlier, we tend to find associations between technologies/frameworks when moving to a new one. So from now on, I’m going to talk in terms of React and that will help you get the hang of Vue quickly and easily. Vue instance contains optional objects and they are somehow similar to React so we’re gonna understand Vue using our existing knowledge of React.
React’s State to Vue’s Data
The local state of an app is maintained for a page in React as well as Vue.js. React uses State and Vue.js uses data in it’s Vue Instance for that purpose. Suppose, you have to store a value and use it throughout the page. It can be done in React and Vue in the following way:
React
class ReactApp extends Component{
  constructor(props){
    super(props);
    this.state = {
      value = “This is a stored value”;
    };
  }
}
Vue.js
export default{
  name: “ReactApp”;,
  data(){
    return{
      value: “This is a stored value”;,
    };
  }
}
React’s Lifecycle to Vue’s Lifecycle methods
Every component in React and Vue.js goes through a lifecycle of events. It’s very important to understand these methods to get an insight into the flow of the program and also put logs in your code to debug the app (*wink*). You might wanna put some piece of code in your app at a certain point in the lifecycle and knowing the React lifecycle methods will help you in understanding the ones of Vue.js.
React’s componentDidMount() and Vue.js’ mounted()
These methods are called when the component has been mounted and is ready. You can preferably use these methods to initiate API calls after a component mounts.
React’s componentDidUpdate() and Vue.js’ updated()
These methods are invoked when the updates to the component start happening. Every time an update is made in the component, this method will be called. The most common usage of this method is setting changes to the DOM in response to an API call.
React’s componentWillUnmount() and Vue.js’ beforeDestroy()
Just before the teardown of child components and event listeners, these methods are fired. They are basically cleanup methods invoked before the component is removed from the DOM.
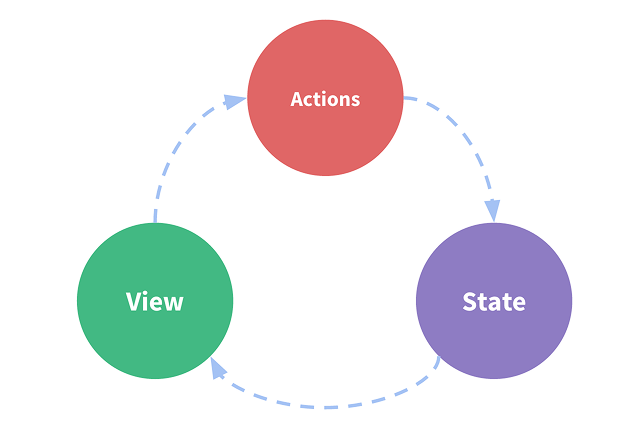
In Vue.js, there are other lifecycle methods apart from the ones mentioned above. beforeCreate(), created(), beforeUpdate(), and destroyed() make it pretty much evident when they would be called given their names are so self-explanatory.
A picture paints more than a thousand words, here is one such picture:
Routing
React and Vue.js use React Router and Vue Router respectively to allow the user to navigate between pages in the application. In Vue.js, the routes for corresponding components are first specified in a file (router.js) and then the navigation is initiated.
You can use <router-link> to perform declarative navigation and router.push for programmatic navigation.
<h2> Declarative Navigation </h2>
  <p>
    <router-link to=’/foo’> FOO </router-link>
    <router-link to=’/bar’> BAR </router-link>
  </p>
</h2>
In programmatic navigation, if you are using a router inside of a Vue Instance, you can access it as $router. The router can be called by this.$router and the path can be specified as an argument of the push method.
// literal string path
this.$router.push(‘/foo’)

// object
this.$router.push({path: ’/foo’})

// named route
this.$router.push({name: ’foo’})

// with params
this.$router.push({name: ‘foo’, params: {id: ‘1’} })
Tip : Use this.$router.go(-1) to go back.
State Management
The combination of React and Redux is a great one for managing the state of a React Web App. Similarly, Vue.js also comes with Vuex which provides a smooth state management system for Vue Apps. React and Vue.js uses a single state tree, which is an object that contains all the application-level state and acts as a “single source of truth”. The complete application has a single store that has all the data which is to be shared between the components. The store can only be manipulated using special methods called actions invoked from the components.
Core Concepts Mapping
Let’s see how things work in React-Redux:
Now comes Vuex:
Remember that the actions cannot directly manipulate the Store’s state, they must commit a specific mutation method to change the state. Besides, I haven’t felt a need to use any middleware in Vuex so far, to manage the asynchronous things as we do in Redux.
Vuex also has a property called Getters which is used to compute a derived state value from the store’s state. Let’s say the store’s state contains two values - firstName and lastName, then we can use the getters to compute the full name.
A typical Vuex store file looks like this:
const store = new Vuex.Store({
  state: {
    count : 0
  },
  mutations: {
    incrementCount(state){
      state.count++
    }
  },
  actions: {
    incrementCountAction(context){
      context.commit(‘incrementCount’)
    }
  }
})
Piece of cake right?

Some Extra Things You Need To Know
With experience in a technology/framework, you get to know some things which you should or shouldn’t do, some shorthands and other tricks. Here are some of them which might be useful:
<button v-on:click=”;someMethod()”;> Click me </button> // Method 1

<button @click=”;someMethod()”;> Click me </button>     // Method 2
<h2 v-bind:data=”;someData”;> Heading </h2> // Method 1

<h2 :data=”;someData”;> Heading </h2>     // Method 2
<h2 :style=”;{color:’#fff23d’}”;> Heading </h2>
<h2 :style=”;[someCondition ? {color: ‘red’} : {color: ‘blue’}]”;> Heading </h2>
Packing up
Vue.js promises to be a game-changer in the Web Development community. Tomorrow there will be something else and this will go on. Go and try Vue.js to experience this non-intimidating journey and make something awesome.
Did I miss something? Let us know about your experience and other new things in Vue.js, and your valuable feedback is most welcome.
Thank you for reading! Stay Awesome.
Book a Discovery Call
Subscribe to Our Newsletter
Subscribe to RSS
Press & Media Hub RSS FeedRelated Articles.
More from the engineering frontline.
Dive deep into our research and insights on design, development, and the impact of various trends to businesses.

Jul 10, 2026
How We Built the Missing Bridge from Code to Figma

Jun 27, 2026
Building a Resilient Hybrid-Cloud Network with WireGuard HA, Route-Based Failover, and Deep Observability

Jun 19, 2026
We Built a 114-Second AWS-to-Azure Failover. Here’s What We Learned

Jun 12, 2026
Cloud-Native and Cloud-Agnostic Are Not Ideologies; They Are Business-Stage Decisions

Jun 8, 2026
Geeklego: The Open-Source Design System Built to Work With AI

May 18, 2026