


In this blog, we will learn how to mutate and query many-to-many relations in AWS Amplify using React.
Prerequisites:
Before moving ahead, I highly recommend you to go through the official docs of AWS Amplify to get a know-how and be in a better position to understand the process that follows below.
Let’s understand the scenario with the help of an example:
In a university, there are many clubs and each club has many students. A student can also be a part of more than one club. So, we have an M: M (many-to-many) relationship.
There are many techniques to understand and decode this relationship. Here, we will do this with the help of an auxiliary table.
This is also shown in the data model below:
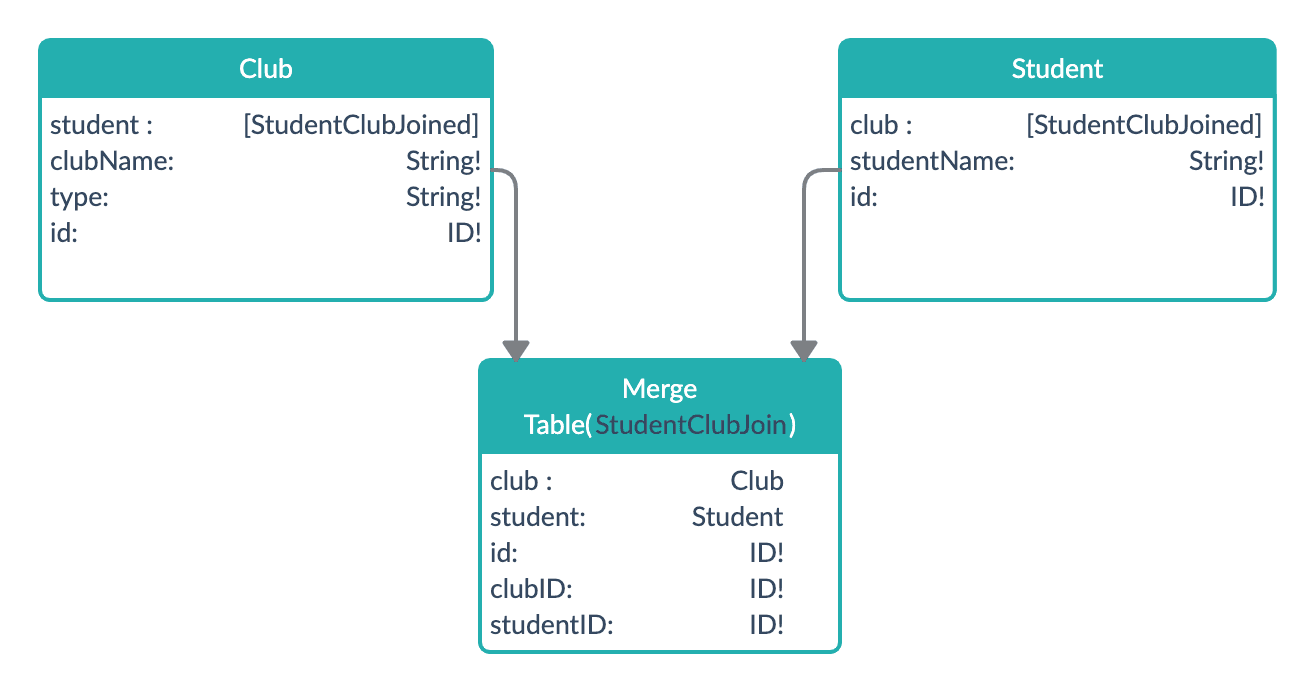
Suppose we have 2 clubs, Technovation and Codechef which have 20 students and 15 students respectively. Out of these students, there may be many who are a part of both clubs.
Before getting started with mutations and queries in this example, let’s brush up on the technologies used and a few common terms and directives that we are going to use.
1. Technologies:
GraphQL: GraphQL is a query language that is used to create, modify, and fetch data from the data sources. With GraphQL, the client gets exact data that is queried, nothing more, and nothing less. (That’s one of the main reasons behind using GraphQL over REST).
DynamoDB: We will use DynamoDB as our Data Source. Data sources are basically resources with which APIs interact. DynamoDB stores data in key-value pairs or as documents. It is a NoSQL database and has single-digit millisecond latency.
GraphQL Schema: GraphQL APIs are defined by the schema. The schema defines the data that will flow through our API and how operations (query, mutation, and subscription) will be performed on our data sources. The syntax followed by Schema is SDL(Schema Definition Language). As soon as the schema is changed, run the command amplify push.
- On running the
amplify pushcommand, GraphQL schema is converted into a set of AWS CloudFormation templates that are uploaded in the cloud. These changes can be found atamplify/backend/api/YOUR-API-NAME/build. - If you change any category(API, Auth, Storage)and run the
amplify pushcommand, AWS CloudFormation API is called to make changes in the cloud and based on those changes,aws-exports.jsupdates.
2. Directives
- @model: This directive creates a table in the DynamoDB and automatically creates resolvers (
create,read,update,delete,list,get,onDelete,onUpdate,onCreate) which can be configured through queries, mutations, and subscription, found undersrc/graphql. - @key: This directive allows us to create additional data access patterns. For example: If we have a table of Clubs which has a field “type” (supposing a club can be technical or non-technical) then the @key directive can help us to fetch clubs based on its “type”(technical or non-technical).
To sort or fetch data using @key:
The fields argument can have any number of values. The first entry in the list will always be a Hash Key. If there are two entries, then the second field is sort Key and if there are more than two entries, then a single composite sort key is created for all fields, which can be found in the table as secondEntry#thirdEntry. Remember, the first entry is always a hash key.
By using the @key directive, any data can be accessed with just a single line code.
//schema
type Club @model
 @key (name:"SortbyType", fields:["type"], queryField: "SortByType"
{
  id: ID!
  clubName: String!
  type: String!
}
//appsync
query sort {
  SortByType(type: "Technical") {
    items {
      id
      clubName
    }
  }
}
//code
async function searchClubsbyType(){
  await API.graphql(graphqlOperation(sortByType,{type:"Technical"}))
   .then((data)=>{
           console.log(data)
      	 }
 ).catch((err)=>console.log(err))}
- @connection: This directive helps to specify relationships between different tables. This directive supports one-to-one, one-to-many, and many-to-one relationships. For many-to-many relationships, we need to use two one-to-many relationships
@connectionand a@model.
3.1 GraphQL Schema-
Club- This table contains information about our clubs(name, ID, type).
Student- This table contains information about our students(name and ID).
StudentClubJoin- This table contains information about our connections and stores the reference of connected tables.
We will establish a one-to-many relationship between the Club table and StudentClubJoin table. Similarly, between the Student table and StudentClubJoin table and then connect both tables through StudentClubJoin.
//schema.graphql
type Club @model
@key (name:"SortbyType", fields:["type"], queryField: "SortByType"){
  id: ID!
  clubName: String!
  type: String!
  student:[StudentClubJoin]!@connection(name: "clubTableJoin")

 }
type Student @model{
  id: ID!
  studentName: String!
  club: [StudentClubJoin]! @connection(name: "studentTableJoin")
}
type StudentClubJoin @model{
  id: ID!
  club: Club!   @connection(name: "clubTableJoin")
  student: Student! @connection(name: "studentTableJoin")
}
Note: Fields marked with “!” are mandatory.
On running the amplify push command, the @model directive will create DynamoDB tables and resolvers.
@connection directive will help connect the Club table with the StudentClubJoin table by creating the index StudentClubJoinClubId in the StudentClubJoin table. Similarly, the Student table is connected to the StudentClubJoin table by the StudentClubJoinStudentId index.
This is the older way of connecting tables where indices are created by @connection directive.
The recommended way is to use keys where the index structure is created by @key directive and connection resolvers by @connections. So, let’s now design a schema using two 1-M @connections, a @key and a joining @model.
The recommended way is as follows:
//schema.graphql
type Club @model
@key (name:"SortbyType", fields:["type"], queryField: "SortByType"){
  id: ID!
  clubName: String!
  type: String!
  student:[StudentClubJoin]!@connection(keyName: "byClub", fields: ["id"])
 }
type Student @model{
  id: ID!
  studentName: String!
  club: [StudentClubJoin]!@connection(keyName: "byStudent", fields: ["id"])
}
type StudentClubJoin @model
@key(name: "byClub", fields: ["clubID", "studentID"])
@key(name: "byStudent", fields: ["studentID", "clubID"]){
  id: ID!
  clubID: ID!
  studentID: ID!
  club: Club!   @connection(fields: ["clubID"])
  student: Student!  @connection(fields: ["studentID"])
}
When we run amplify push, @key directive will create a clubID index for the club table and studentID index for the student table as a reference in the StudentClubJoin table.
In the @connection directive, the fields argument is provided to indicate the fields that will be used to get connected objects. The fields argument can only have ID type data because we will use this data to query connected objects.
The keyName argument (in @connection directive) and the name argument in @key directive should have the same value.
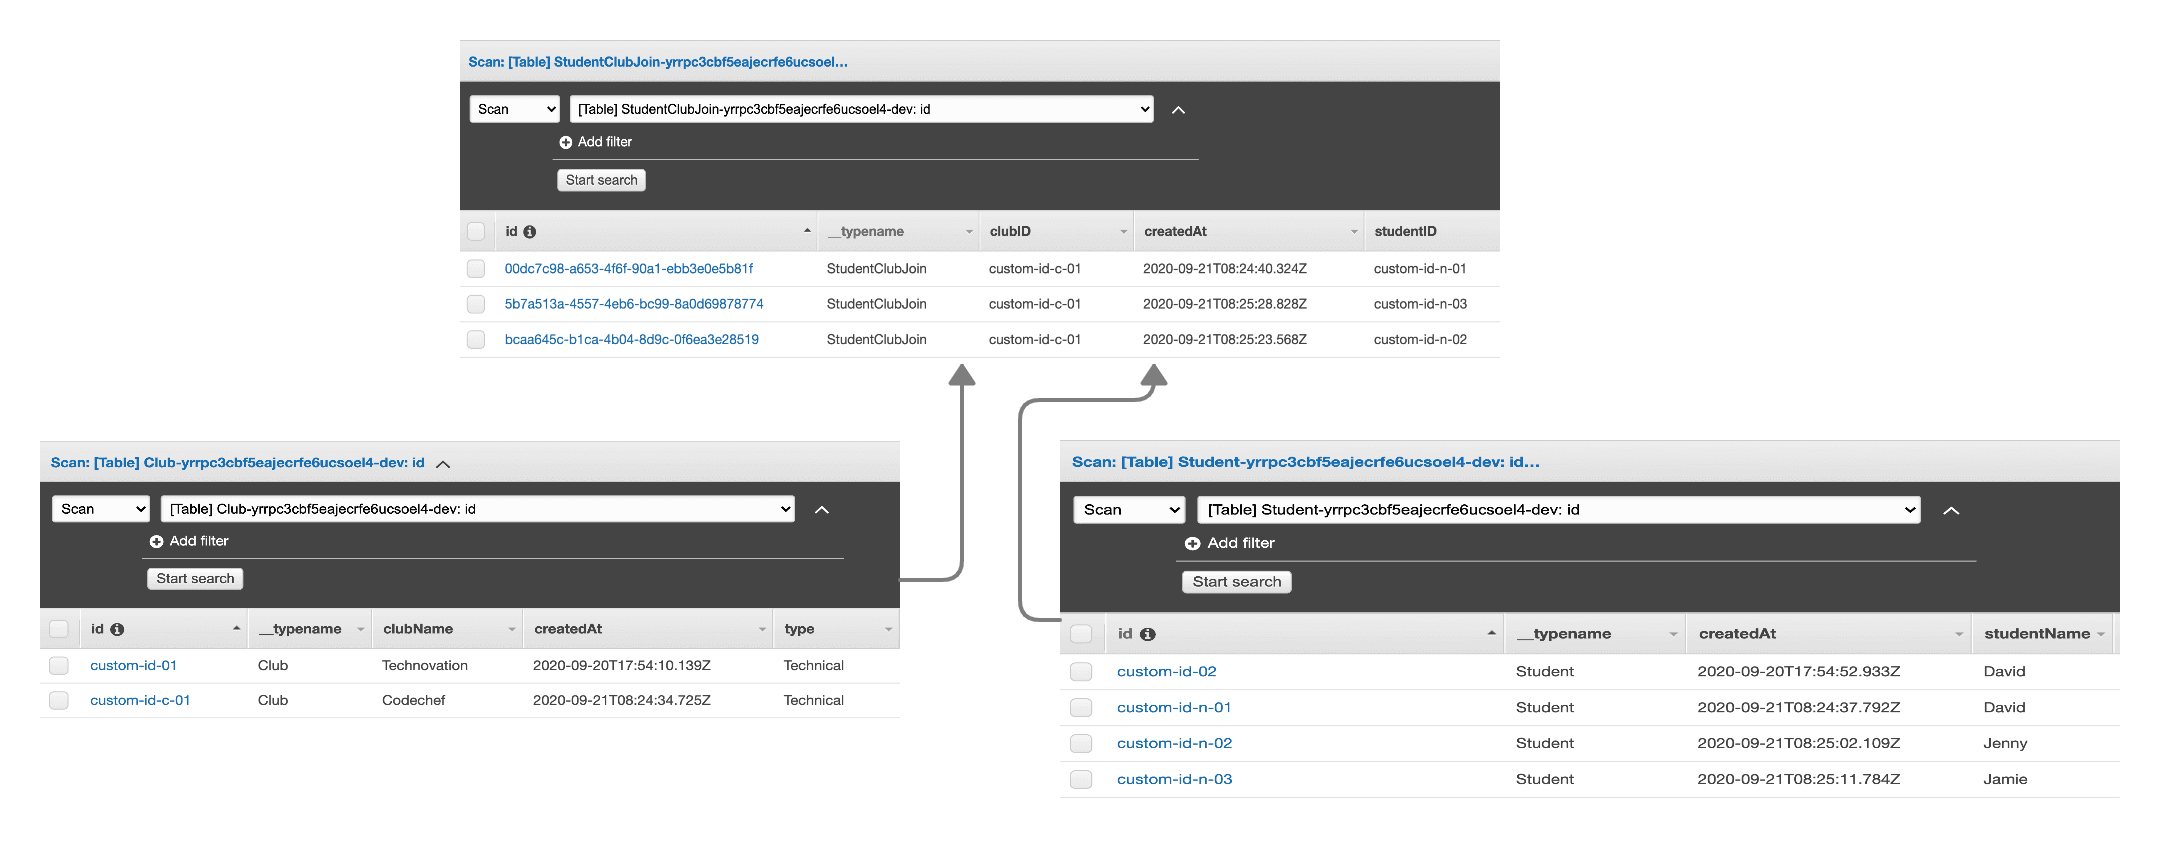
Above is a screenshot of the Club table, Student table, and StudentClubJoin table (using keys). As you can see, the ID of the Club entry is stored in the StudentClubJoin table as clubID and that of the student is stored as studentID.
Without keys (schema-1), the indexes will be StudentClubJoinClubId and StudentClubJoinStudentId respectively.
3.2 Mutations-
Since our tables are connected, we will now create a club and save its ID. Similarly, we will create a student and save its ID. Then, we need to pass both the IDs to our connecting table i.e. StudentClubJoined table.
//AppSync
mutation CreateClub {
  createClub(input: {clubName: "Technovation", id: "custom-id-01", type: "Technical"}) {
    clubName
  }
}

mutation CreateStudent {
  createStudent(input: {id: "custom-id-02", studentName: "David"}) {
    studentName
  }
}

mutation JoinTables {
  createStudentClubJoin(input: {clubID: "custom-id-01", studentID: "custom-id-02"}) {
    id
  }
}Note: If you want to use the first schema, then change clubID to StudentClubJoinClubId and studentID to StudentClubJoinStudentId everywhere (except for schema because @connections directive has already done that for you).
//code
async function createStudents(){
  const clubInput={
    clubName: "Codechef",
    type: "Technical",
    id: "Club-custom-id-2"
  }
  const studentInput={
    studentName: "David",
    id: "Student-custom-id-2"
  }
  //create new club
  await API.graphql(graphqlOperation(createClub,{input:clubInput}));
  // create new student
  await API.graphql(graphqlOperation(createStudent,{input:studentInput})).then(
    // join student and club
    async()=>{
     await API.graphql(graphqlOperation(createStudentClubJoin,{
       input:{
         clubID: clubInput.id,
         studentID: studentInput.id
       }
     }))
    }
  );
}
Note: If we don’t pass the ID while mutating, a unique ID is generated automatically.
3.3 Queries
To query data we have- listClubs/listStudents and getClub/getStudent. By using listClubs:, we get the whole list, whereas, by using getClub, we get data specific to the particular ID entered. getClub doesn’t work if no ID is provided.
//using listClubs
query listAllClubs {
  listClubs {
    items {
      clubName
    }
  }
}
//getClub
query GetClub {
  getClub(id: "custom-id-01") {
    clubName
    type
    student {
      items {
        student {
          studentName
        }
      }
    }
   }
}
In our club model, we have a student field, which is connected to the StudentClubJoin table and in the StudentClubJoin table, Student’s ID and Club’s ID is stored. Now, when we want to fetch all the students enrolled in a particular club, we have 2 options:
- Use
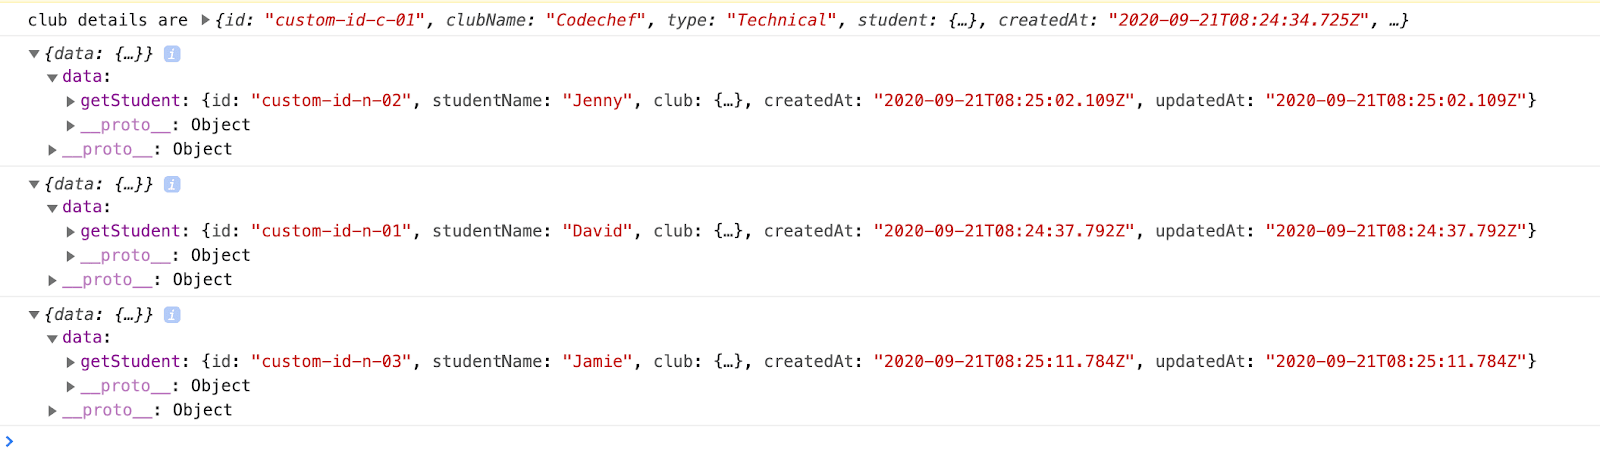
getClubsto get the details of a particular club.getClubswill give us club details (clubName, id, createdAt,updatedAt, type ) and student details (id, studentID, clubID, createdAt and updatedAt). We can then usegetStudentto fetch details of students by passingstudentIDas its required input ID.
async function getClubDetails(){
  try{
    await API.graphql(graphqlOperation(getClub,
      {id: "custom-id-c-01"})).then((club)=>{
        console.log('club details are',club.data.getClub);
        const list= club.data.getClub.student.items;
        list.map(async(element)=>(
          await  API.graphql(graphqlOperation(getStudent,{id: element.studentID})).then((data)=>console.log(data))
          ))})
  }
  catch(err){
    console.log('err',err )
  }
}
- In
src/graphql/queries.js, we havegetClubwhich we will need to change but we can’t change this inqueries.jsbecause queries, mutations, and subscription files are updated whenever we make changes ingraphql.schema(and by runningamplify pushcommand).
//original
export const getClub = /* GraphQL */ `
 query GetClub($id: ID!) {
   getClub(id: $id) {
     id
     clubName
     type
     student {
       items {
         id
         clubID
         studentID
         createdAt
         updatedAt
       }
       nextToken
     }
     createdAt
     updatedAt
   }
 }
`;
So, we can make a custom file inside src/graphql by any name and change it to the following code:
//new
export const getClub = /* GraphQL */ `
 query GetClub($id: ID!) {
   getClub(id: $id) {
     id
     clubName
     type
     student {
       items {
         id
         clubID
         studentID
       	 student {
       	 studentName
       	 }
         createdAt
         updatedAt
       }
       nextToken
     }
     createdAt
     updatedAt
   }
 }
`;
Now, if we run the following code, we will get the required result:
async function getClubDetails(){
  try{
    await API.graphql(graphqlOperation(getClub,{id: "custom-id-c-01"})).then((club)=>{
      console.log('club details are',club.data.getClub);
    })
  }
  catch(err){
    console.log('err',err)
  }
}
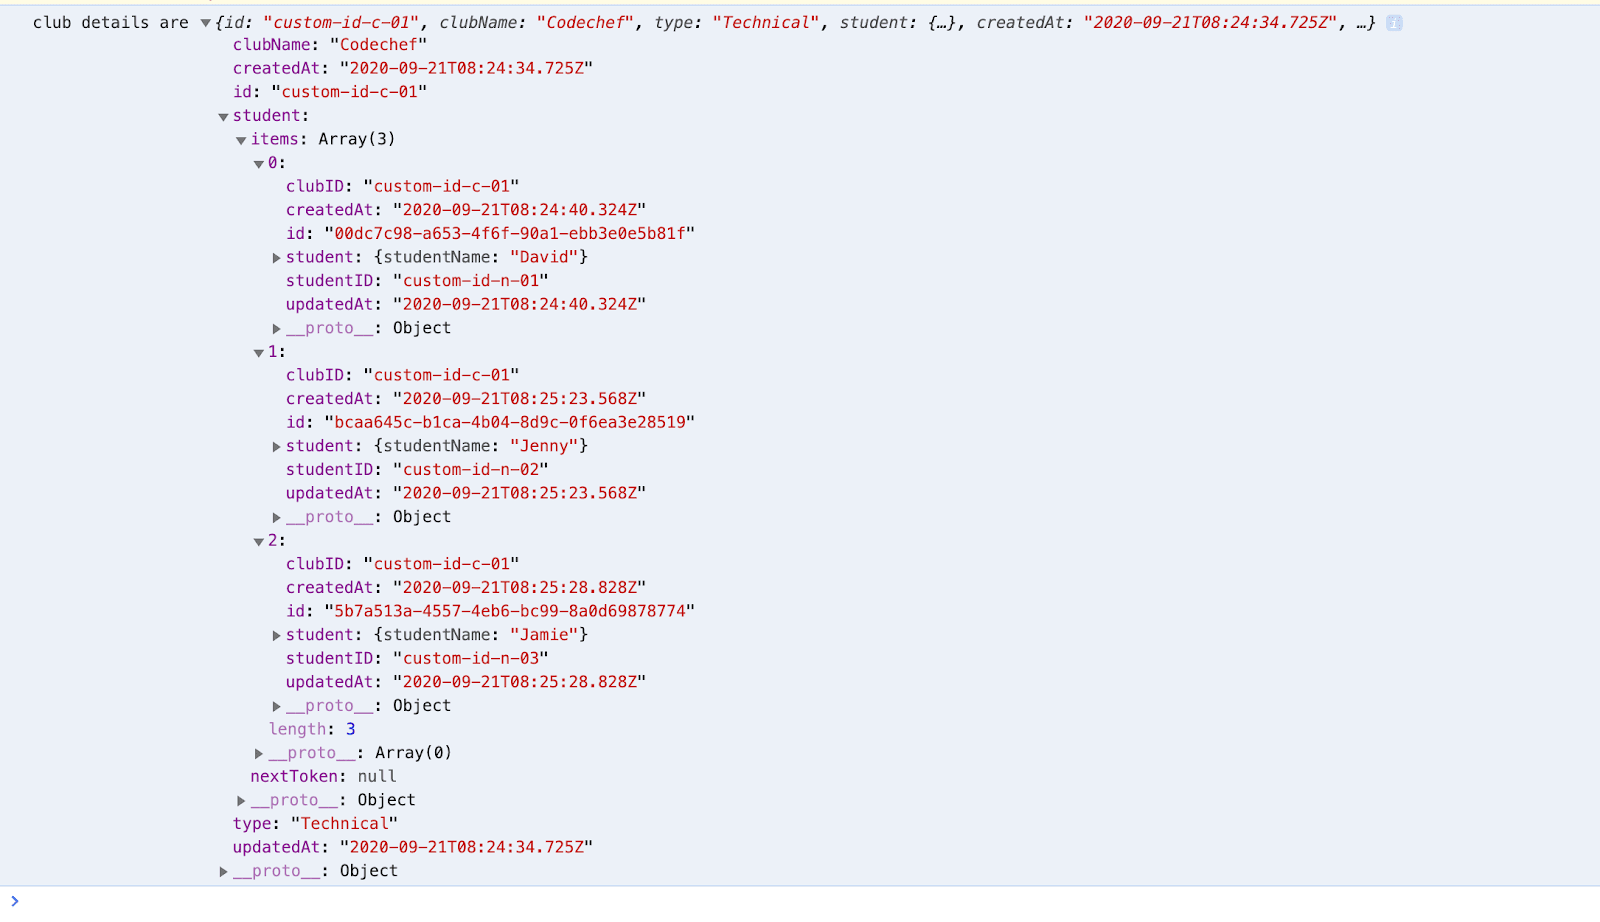
The second approach is preferred because it provides data in the required format and also reduces the network calls, however, the first method can also be used.
...and that is how you develop, mutate and query many-to-many relations in AWS Amplify using GraphQL.
Hope this article helps!
Thanks for reading :)







