Laravel Third Party Package - Laravel Permission (Spatie)
Author

Date

Book a call
Defining Laravel Permission (Spatie)
It is a third-party package of Laravel that allows us to manage user permissions and roles in the database smoothly.
Installation and Setup:
In a Laravel project (Laravel 6 or higher is required to use Laravel permission (Spatie) v5), we have to follow the following steps:
- Install Laravel permission (Spatie) package via composer:
2. After installing, the service provider will automatically get registered. If not, we may manually add that in the config/app.php file. For this, we have to add “Spatie\\Permission\\PermissionServiceProvider::class” under providers.
3. Next, we need to publish migration and configurations by running.
After running this command, two things will happen:
- A new configuration file named permission.php will be created under the config folder, and the content of “/vendor/spatie/laravel-permission/config/permission.php” file will be copied to this new file(/config/permission.php).
- Another new migration file will be created under /database/migrations folder, and the content of “/vendor/spatie/laravel-permission/database/migrations/create_permission_tables.php.stub” file will be copied to this new migration file.
4. If we have been caching configurations locally, we must clear the config cache, as Laravel permission(Spatie) requires access to the permission config. We can clear the config cache by running either one of the following commands:
After this, we have to run the latest migration to create the tables in our database for this package. To do so, we will run the following:
Once this migration is successful, we can see permissions, roles, model_has_permissions, model_has_roles, role_has_permissions - these new tables in our DB.
Now, let’s use this package in our project.
Create Roles and Permissions:
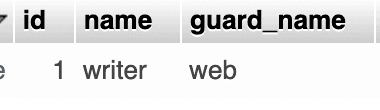
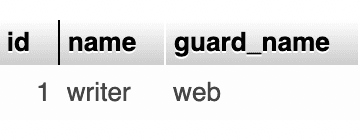
First, let’s see how we can create roles and permissions. Role and Permission are regular Eloquent models. To make a role, we can do the following:
Once the role has been successfully created, we can see this in the roles table in our DB, which was created in 5th step of our installation process:
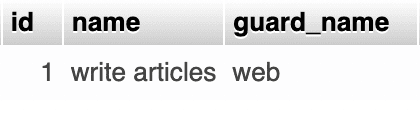
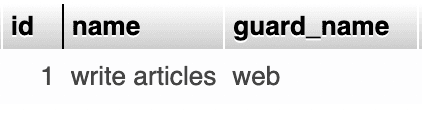
To create permission, we can follow these steps:
Once permission is successfully created, we can see this in the permission table in our DB, which was created in 5th step of our installation process:
Connect Roles and Permissions:
After creating a role and permission, we have to connect them. If we have a role and we want to add permission to it, we can use 1 of the following methods:
Revoke A Permission:
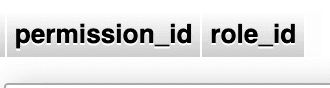
If we want to remove any permission from a role, we can use any one of the methods:
After the successful removal of permission, the row related to it will also be deleted from the role_has_permissions table, and it should look like this (No data):
Manage Roles and Permissions:
Now, let’s see how we can assign the role (writer) and permission(write articles), which we have just created, to our models. To do this.
1. Add HasRoles traits:
First, we have to add HasRoles traits to the particular model(which also should extend the Authenticatable model):
If there is any model which is not extending the Authenticatable model, then along with HasRoles traits, we have to add web as protect guard_name:
2. Assign role:
Then, we have to get the instance of the model (here, get a particular user) with whom we want to associate the role, so create one user(let’s call this user A) and:
After executing this code, we can see a new entry in the model_has_roles table in our DB, where role_id is pointing to a specific row of the roles table:
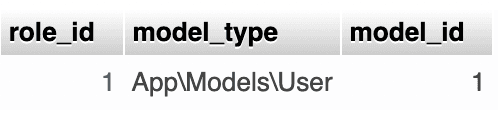
This is the new entry of the model_has_roles table. Now, if we click on role_id 1, it will lead us to the specific row, where the role id is 1, in the roles table:
3. Assign permission:
Direct Permission:
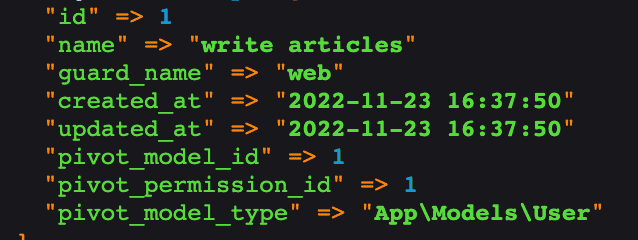
Like role, you can get the instance of the model (here, get a particular user) with whom you want to associate the permission and do the:
After executing this code, you can see a new entry in the model_has_permissions table in the DB, where permission_id is pointing to a specific row of the permissions table:
This assigning permission is direct permission. You can check what direct permission this user has:

This assigning permission is direct permission. We can check what direct permission this user has with:
For this case, this will give:
Add permission via role:
To understand this approach, let’s create one more permission and assign it to our role.
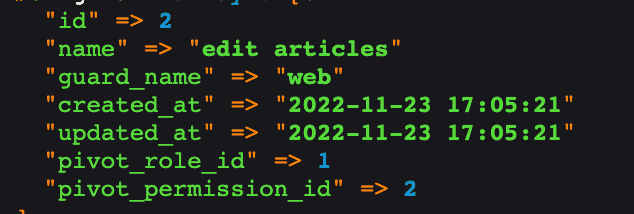
After this, a new entry for edit articles should be created in the permissions table.
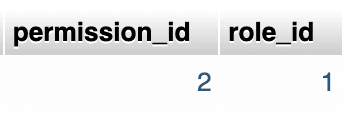
Then, let’s add this permission to our one and only role - writer.
Now, we should see this new entry in the role_has_permissions table, where 2 is the id of the new permission entry of edit articles, and role_id 1 is indicating the role writer.
In Laravel permission (Spatie), permissions are inherited from roles automatically. In our case, the logged-in user is already assigned with the role of writer and has direct permission to write articles. So, even if we don’t explicitly give the user permission to edit articles, he/she still will be able to edit them, as the writer role has permission to edit articles. This type of assigning role is known as add permission via role.
We can check what permission via role permissions this user has with:
This will give us:
Now, let's also add the permission to “write articles” to the role “writer”, just like the way we have added the permission to “edit articles”.
4. Check for Role and Permission:
Role:
We can check if a model instance(here user), has certain roles or not -
As in Laravel permission (Spatie), any permission is registered with the Illuminate\Auth\Access\Gate class(for the default guard), we can check if a user has specific permission with Laravel's default can function:
5. Check for Role and Permission In Blade Directives:
Let’s see how we can check roles and permission in blade files and render elements accordingly. For now, we have the role of “writer”, which has the permission to “write articles” and “edit articles”. We have assigned “write articles” direct permission to the logged-in user(user A), and also have assigned this writer role to the logged-in user. So, eventually, this user is able to write and edit articles.
Now, let’s create one new role of “viewer” and a new user(let’s call this user B), and assign this role to the newly created user.
After this, let’s create one more user(let’s call this user C), and assign him/her permission to “write articles”.
After this, if we want to show a list of articles with create(will connect with create article route) and edit(will connect with edit article route) buttons as per the role, that the logged-in user has, we can -
But, as per Laravel permission(Spatie) documentation, we should always use permission directives, instead of role directives. So, let’s see how we can use permission directives in the blade file.
Laravel permission (Spatie) doesn't add any permission-specific blade directives. So, we will use Laravel's native @candirective to check if a user has certain permission -
6. RBAC (Role-based Access Control):
Let’s see why we need RBAC in Laravel and how we can achieve that with laravel permission(Spatie) middleware feature in our project. We have created 3 users, they have different roles, and permission assigned to them. Let’s take the example of user C(who has only permission to “write articles”). He/she can’t see the edit button as we have applied permission directive to filter the logic. But, if he manually type the edit URL out in the browser, then he/she can access the edit page of an article - which should not be the case. To cover this corner case and to have RBAC, middleware in laravel permission(Spatie) comes into the picture.
Default Middleware:
According to Laravel permission(Spatie) documentation, to check against single permission using can is the best option, and we can use the built-in Laravel middleware provided by \\Illuminate\\Auth\\Middleware\\Authorize::classlike this -
Package Middleware:
If we want to add a role or permission inside the middleware check-in route, then firstly we have to add the middleware(RoleMiddleware, PermissionMiddlewareand RoleOrPermissionMiddleware) inside our project’s app/Http/Kernel.php file -
After this, we can protect our routes using middleware rules like -
If we add a route like this, then user A (who has a “writer” role) will only be able to access the create article route. But, if we see, we also have a user (user C), who has permission to “write article”. So, user C also should be able to access the create article route. But as we have added the middleware of role: writer - this will not be possible, and it will give unauthorized access(403) to user C. So, rather than using role in the middleware, we should use permission there to check in the middleware.
We also can do it this way:
7. Revoke a Permission:
To revoke a permission, from a model instance(here user), we will do -
This, will remove the relation between the model, and permission from the model_has_permissions table.
8. Remove a role:
To remove a role, from a model instance (here user), we will do -
This will remove the relation of model and role from the model_has_roles table.
Why use Laravel Permission (Spatie)?
As we have seen:
- We can easily install Laravel permission (Spatie) in our existing Laravel project.
- It has different predefined functions to create and use roles and permissions.
- It provides defined tables in our DB, where we can visualize all the roles and permissions better and clearly.
- It provides us with blade directives, which check all required conditions under the hood and render desired content. We don’t have to think much about these things.
- It can use multiple guards.
- We can also protect our routes using its middleware rules.
This article will be your perfect guide while working with Laravel Third Party Package.
Dive deep into our research and insights. In our articles and blogs, we explore topics on design, how it relates to development, and impact of various trends to businesses.


