Jun 21, 2023
Keeping Your Users Safe: A Comprehensive Guide to Next-Auth with Customized Token
Learn how to configure Next-Auth with a customized token for secure authentication in Next.js apps. This guide covers token management, NextAuth.js, and the useSession hook.
Author

Book a call
Table of Contents
In the digital realm, where security is paramount, and user experience is king, authentication reigns supreme. Authentication is an essential feature for any application that requires users to provide their details, such as email and password, to access the app. Additionally, users can log in using social apps like Google, LinkedIn, and others to enhance their experience.
But whatever your preference — the traditional route of email and password or the convenience of social app integration — Next-Auth has got you covered.
This article covers configuring Next-Auth for authentication using credentials and a Google provider with a customized login page. Let’s dive in!
Understanding the Technology
NextAuth.js — Secure Authentication with Minimum Hassle
NextAuth.js is a secure authentication solution for implementing authentication in Next.js applications. It is an open-source solution with OAuth services, email, and credentials-based login providers.
What is Token Management?
Token management refers to the process of generating, validating, and revoking access tokens for authentication and authorization. These tokens grant permission to access protected resources and must be kept secure. Two ways to manage tokens are JSON Web Tokens (JWTs) and OAuth 2.0.
Does NextAuth Manage Tokens Internally? Is It a Secure Method?
Next-auth is a popular authentication module for Next.js that internally manages tokens. It supports various authentication methods, including OAuth, JWT, and email or password authentication. Next-auth is considered safe because it follows industry-standard security practices, such as using secure cookies and implementing CSRF protection.
How Does NextAuth.js and the useSession Hook Work Together?
Now, let's take a closer look at the flow of Next.js authentication.
NextAuth.js Flowchart
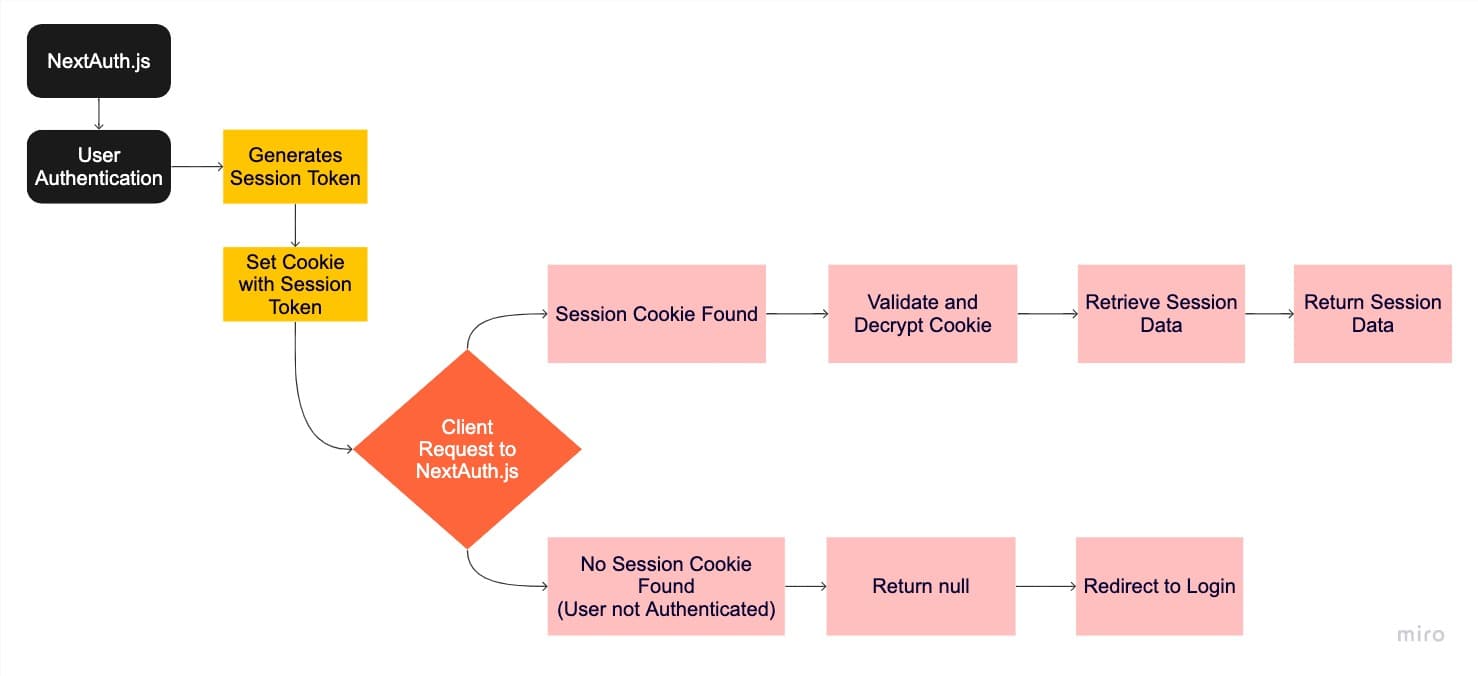
User authentication involves providing login credentials or using a third-party authentication source. Once authorized, NextAuth.js creates a session token saved in a cookie on the user's browser via the server response.
Subsequently, requests are sent from the client to the NextAuth.js server. The NextAuth.js middleware detects the session cookie in the incoming request and retrieves the session token once it has been verified and decrypted (if found).
NextAuth.js then retrieves the relevant user session data using the associated session token. The server sends the session data to the client after obtaining it from the server or locating it in the cookie.
If the user is not authorized, an empty object, null or undefined, is returned instead of session data.
useSession() Hook Flowchart

- To access the session data and authentication status, a component calls the useSession hook.
- The component tree is wrapped by the session provider, which provides the context for accessing session data.
- The
getSessionfunction offered by NextAuth.js is often called internally by the session provider to determine whether a session is present. - If a session is present, the session information is returned so that the component can render the content.
- If there is no session, the user has not been authenticated, and null is returned in place of session information.
Step by Step Guide to Next-Auth with Customized Token
Now that we know the flowcharts, we can get started on the steps.
1) Project Setup:
2) Create a Google OAuth app:
- Click here to create a Google client ID and client secret.
- Click on Credentials, then Create Credentials, and afterwards create an OAuth client ID.
- Application type: This is going to be a web application.
- Name: Enter your application name.
- Authorized Javascript origins: This is the URL where our app runs, in this case, http://localhost:3000.
- Authorized redirect URIs: After authenticating with Google, users will be redirected to this path. http://localhost:3000/api/auth/callback/google
3) Create a .env file in the root directory of your project:
Next.js has built-in support for environment variables, and .env loads those variables to process.env.
4) In src/pages/api/auth/[...nextauth].ts, add the following code:
- This code sets up two authentication providers for a web application.
- The first provider is Google authentication, which allows users to log in to the application using their Google account.
- The second provider is a custom provider that the application has defined, which allows users to log in using their credentials. The
authorizeproperty is a function that the application will use to authorize the user based on their credentials. - The function sends a POST request to the backend server with the email and password provided in the
credentialsobject. The request header specifies that the data being sent is in JSON format. - If the server returns a response with the
successproperty set totrue, the function returns an object containing the user's name, email id, token, and token expiration time. If thesuccessproperty is nottrue, the function returnsnull.
- This code is a simple configuration that sets the signIn page for authentication. By specifying the signIn page, next-auth can handle the authentication flow and redirect the user to the appropriate page for authentication.
- This code defines a series of callbacks that are used by next-auth to handle different aspects of the authentication flow. Let's discuss the flow of execution:
- The first callback is the
signIn()callback, which takes inuserandaccountparameters. This callback is executed when the user signs in or logs in to the application. The callback first checks if the user is logging in using credentials (i.e., a username and password). If so, the callback simply retrieves the token and expiration time from theuserobject and sets them on theaccountobject. If the user is logging in using a third-party provider such as Google or LinkedIn, the callback sends a POST request to a backend API to customize the user's token. The customized token and expiration time are then set on theaccountobject. Finally, the callback returnstrueif the token and expiry time were successfully set on theaccountobject, andfalseotherwise. - The second callback is
jwt(), when the user signs in for the first time, NextAuth.js will receive theaccountanduserobjects as parameters in thejwtcallback function. In this case, we extract the necessary information from theaccountanduserobjects and return a new token with theaccessToken,expiresIn, anduserproperties. - For subsequent requests, NextAuth.js will receive the
tokenobjects as parameters in thejwt. In this case, we check if thetokenis valid by comparing its expiration time with the current time using theexpiresInproperty. If the token is still valid, we return thetoken. Otherwise, we return the original token and an additionalerrorproperty. - The third callback is
session(), which takes in three parameters:session,token, anduser. This callback is executed when the user's session is created or updated. In this case, the callback sets the user and access token on thesessionobject and returns the updatedsession.
5) In src/pages/_app.tsx, add the following code:
- This code sets up the necessary components to handle user sessions in an application using the
next-auth/reactlibrary. - The
SessionProvidercomponent manages the user's session data and provides it to all child components.
6) In src/pages/login.tsx, add the following code:
- The session data returned by the providers include the user payload, which we can inspect with the useSession() hook.
- Using the
useSession()hook from thenext-auth/reactlibrary to check if the user is already logged in. If the user is logged in, it redirects them to the home page. - In this case, the signIn() method is used to perform user sign-in by passing the first argument as the id (which can be "credentials", "google", or others) through which the user will sign-in.
- When the user tries to sign-in with the "Google" account, it calls the
signIn()function with thegoogleprovider and thecallbackUrlparameter set to"/". This will redirect the user to the Google login page, and after successful authentication, the user will be redirected back to the home page.
- When a user tries to sign-in with an email and password, it calls the signIn() function from the next-auth/client library to send a request to the backend to authenticate the user. If the authentication is successful, the user is redirected to the home page. Otherwise, an alert is displayed with the message "Invalid Credentials".
- We verify this in the authorize() method of the credentials provider in [...nextauth].ts.
- If we set the redirect parameter to false, the response will be as follows:
- We can then customize the user's redirection to a specific path.
7) In src/pages/index.tsx, add the following code:
- Here, the
useSessionhook is used to get the current user's session data, including whether they are authenticated or not. - If the user is authenticated, their name is displayed, along with a logout button that calls the
signOutfunction from thenext-auth/reactlibrary. - If the user is not authenticated, a login prompt is displayed with a login button that routes to the login page.
To check the complete code: click here
Curious to know how to keep user data safe or whether Next-Auth is the best for your business? Our experts can share a personalized plan according to your use case.
Schedule a call today.
Subscribe to Our Newsletter
Subscribe to RSS
Press & Media Hub RSS FeedRelated Articles.
More from the engineering frontline.
Dive deep into our research and insights on design, development, and the impact of various trends to businesses.

Jul 20, 2026
AI Operators in Insurance: Improving Customer Experience Through Intelligent Automation

Jul 17, 2026
From Compliance to Predictive Resilience: Building AI-Powered Supply Chain Risk Management Systems

Jul 10, 2026