Table of Contents
Isolates in Dart and Flutter
Author

Subject Matter Expert

Date

Book a call
Introduction
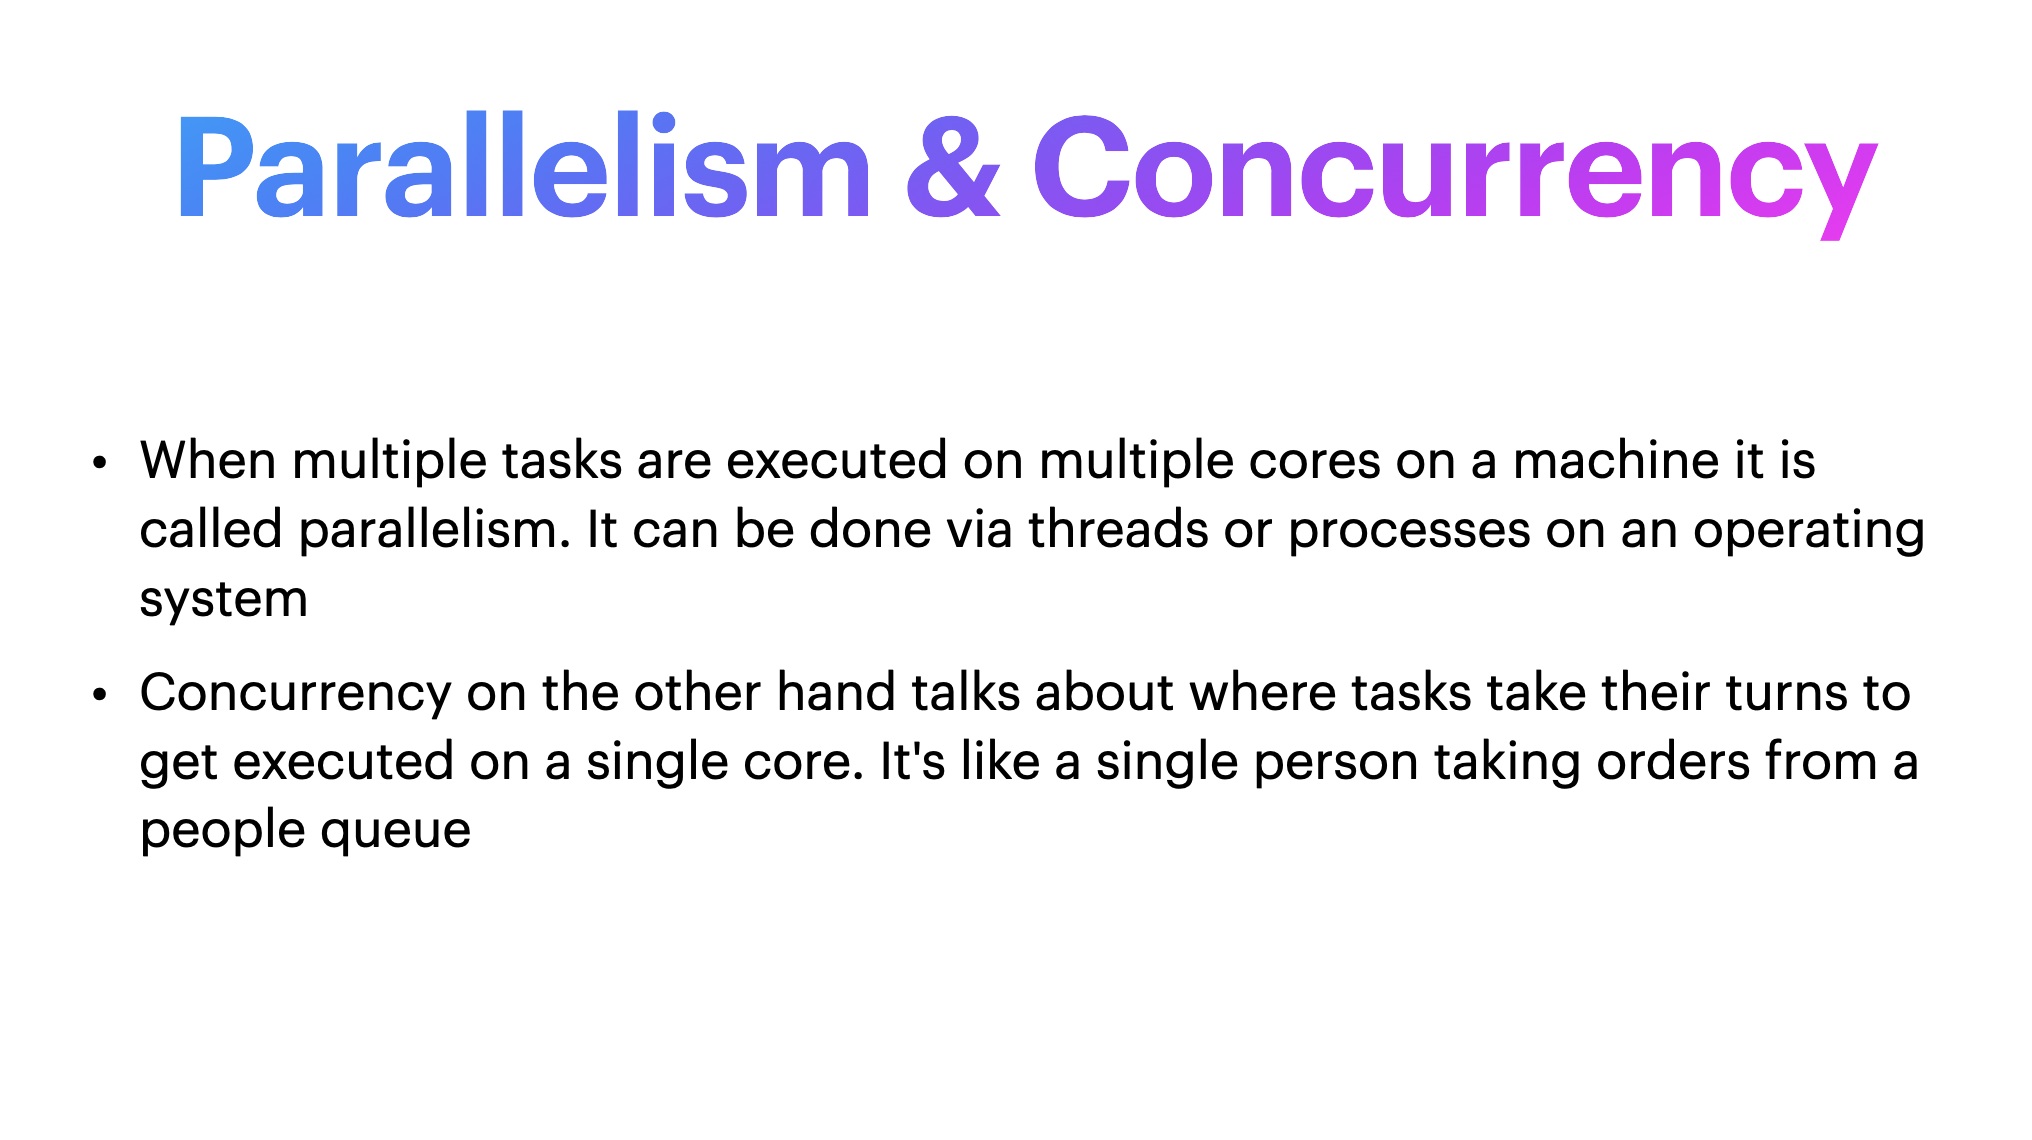
In this article, we will learn how to implement the multi-threading concept in Dart and Flutter. Multi-threading concept generally refers to handling more than one task, more than one type of code running simultaneously. Before starting, there are two terms that we should understand: parallelism and concurrency.
Parallelism refers to the concept wherein more than one task runs simultaneously. It can be run on different codes in the system, or the operating system may handle this differently. On the other hand, in concurrency, more than one task takes turns to execute. There is some approach or system implemented in different languages in which there is a queue and all tasks are present in the queue. There are certain rules for the prioritization of these tasks, which depend on the language and environment.
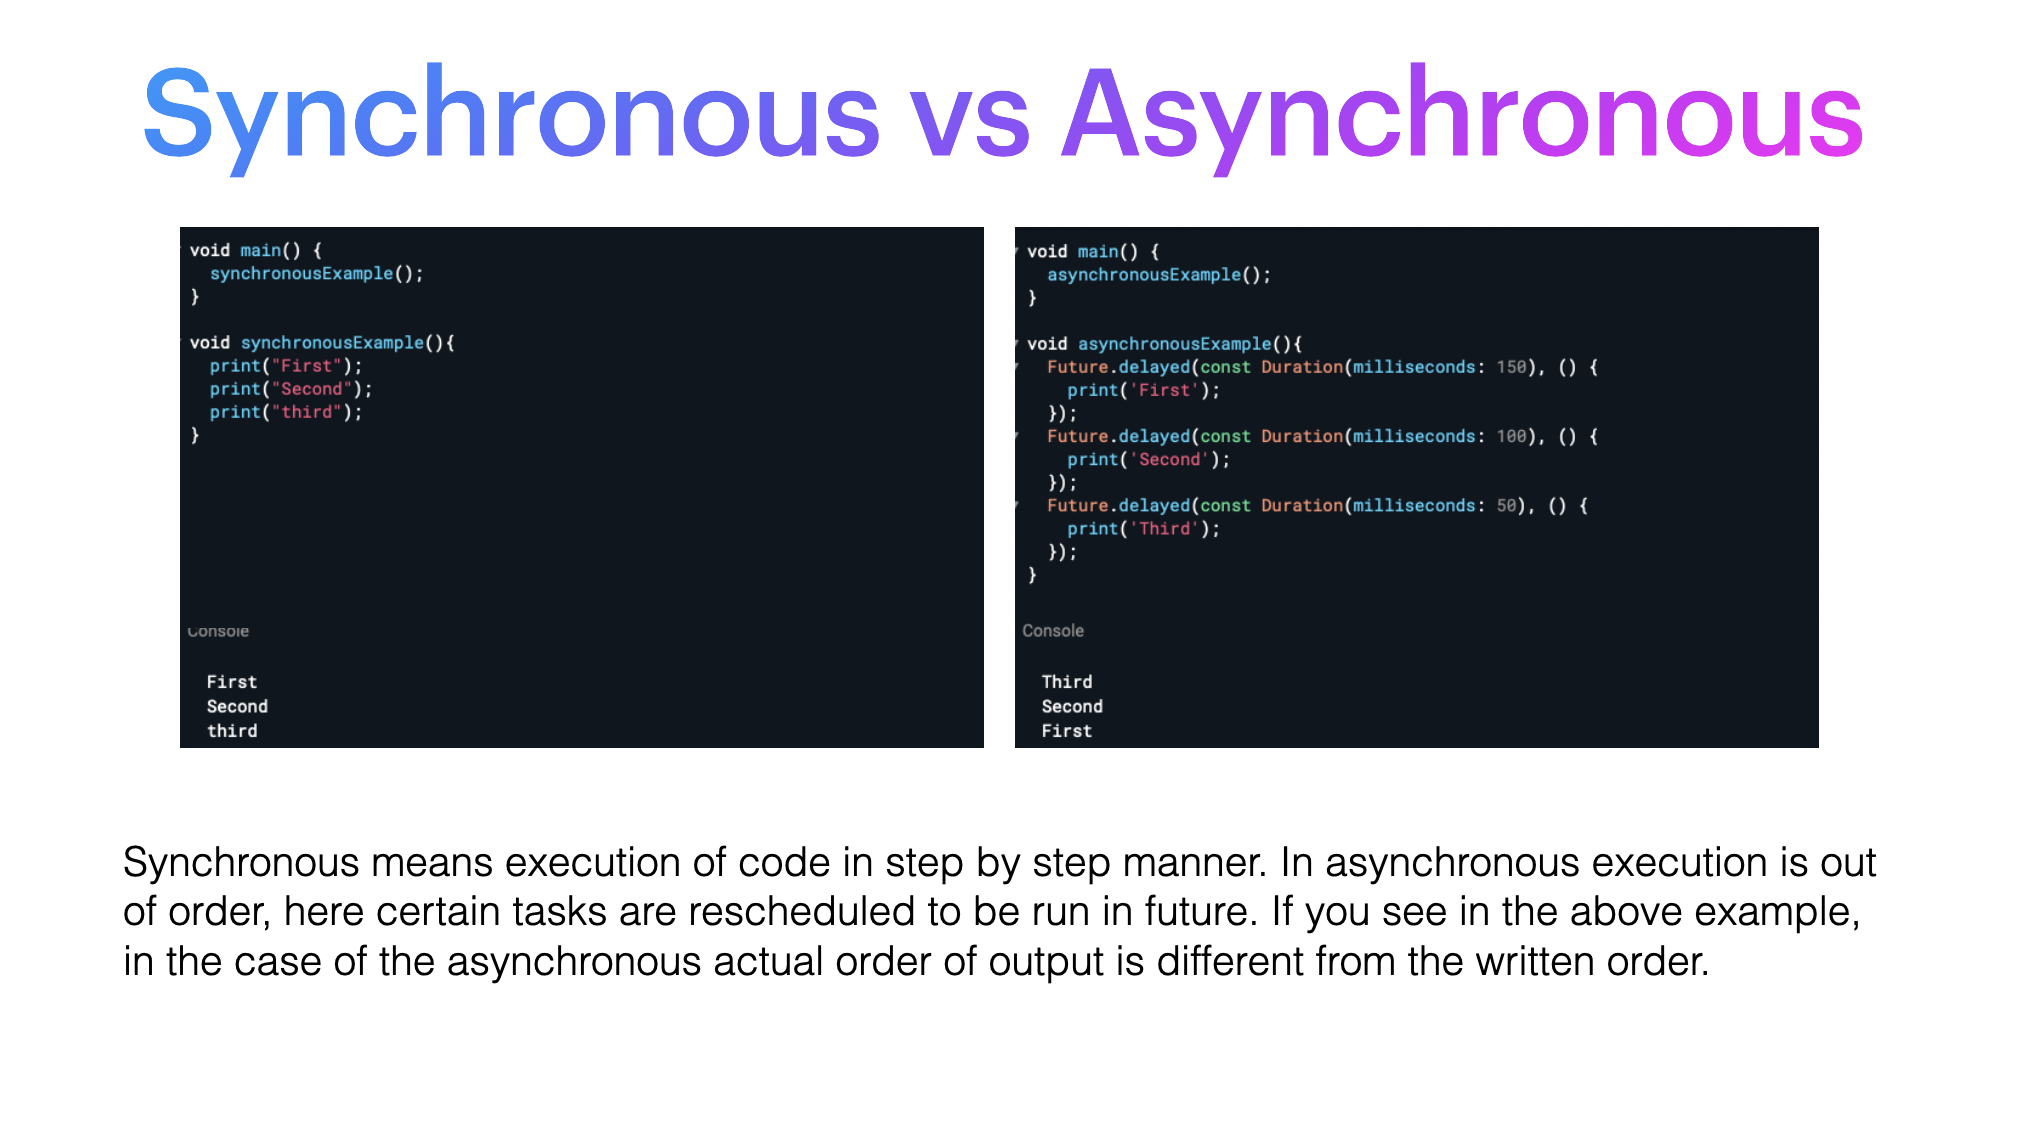
We have often heard the terms synchronous and asynchronous used in Flutter. In synchronous, the statement or code runs synchronously. The execution of code is in a step-by-step manner, as we can see in the examples shown in the image (left- synchronous, right- asynchronous). Each command is running in a sequential manner. On the left side, everything is printed sequentially in the output, but on the right side, some delays have been given, which is why they are not running sequentially (asynchronous).
Some Important Terms to Remember
As this article primarily focuses on isolates, now would be a good time to familiarize ourselves with a few related terms.
Isolate — An isolate is a thread in the Dart environment. Dart is a single isolate environment. Each isolate has its own allocated memory. We are going to look into how we can implement multiple isolates later in this article. For now, we need to remember that each isolate has its own event loop, its own micro-task queue, and event queue.
Let us discuss these in detail.
Event loop — Each isolate has its event loop, as seen in the image. Event loop is running all the time, like an endless loop which is running and executing the task.
Event queue — The queue which has events that are internally triggered. All the input coming from the user, such as gesture, drawing, timer, streams, all these statements are present in the event queue.
Micro-task queue — All the processes which are generated by the internal actions are handled by the micro-task queue. Anything that is system generated is handled by the micro-task queue because they have higher priority than the tasks initiated by the user.
So, in an isolate, the event loop first finishes the micro-task queue tasks. After finishing these tasks, the event loop starts taking tasks from the event queue. We can understand this with the help of a flow diagram.

Here, we can see that in the main thread’s representation, the event loop is running (in the beginning), and it is checking whether the micro-task queue is empty. If it is not empty, it will take out the first micro-task in the queue and execute it and if all the tasks of micro-task queue are finished, then it will go to the event queue and execute all the tasks event queue.
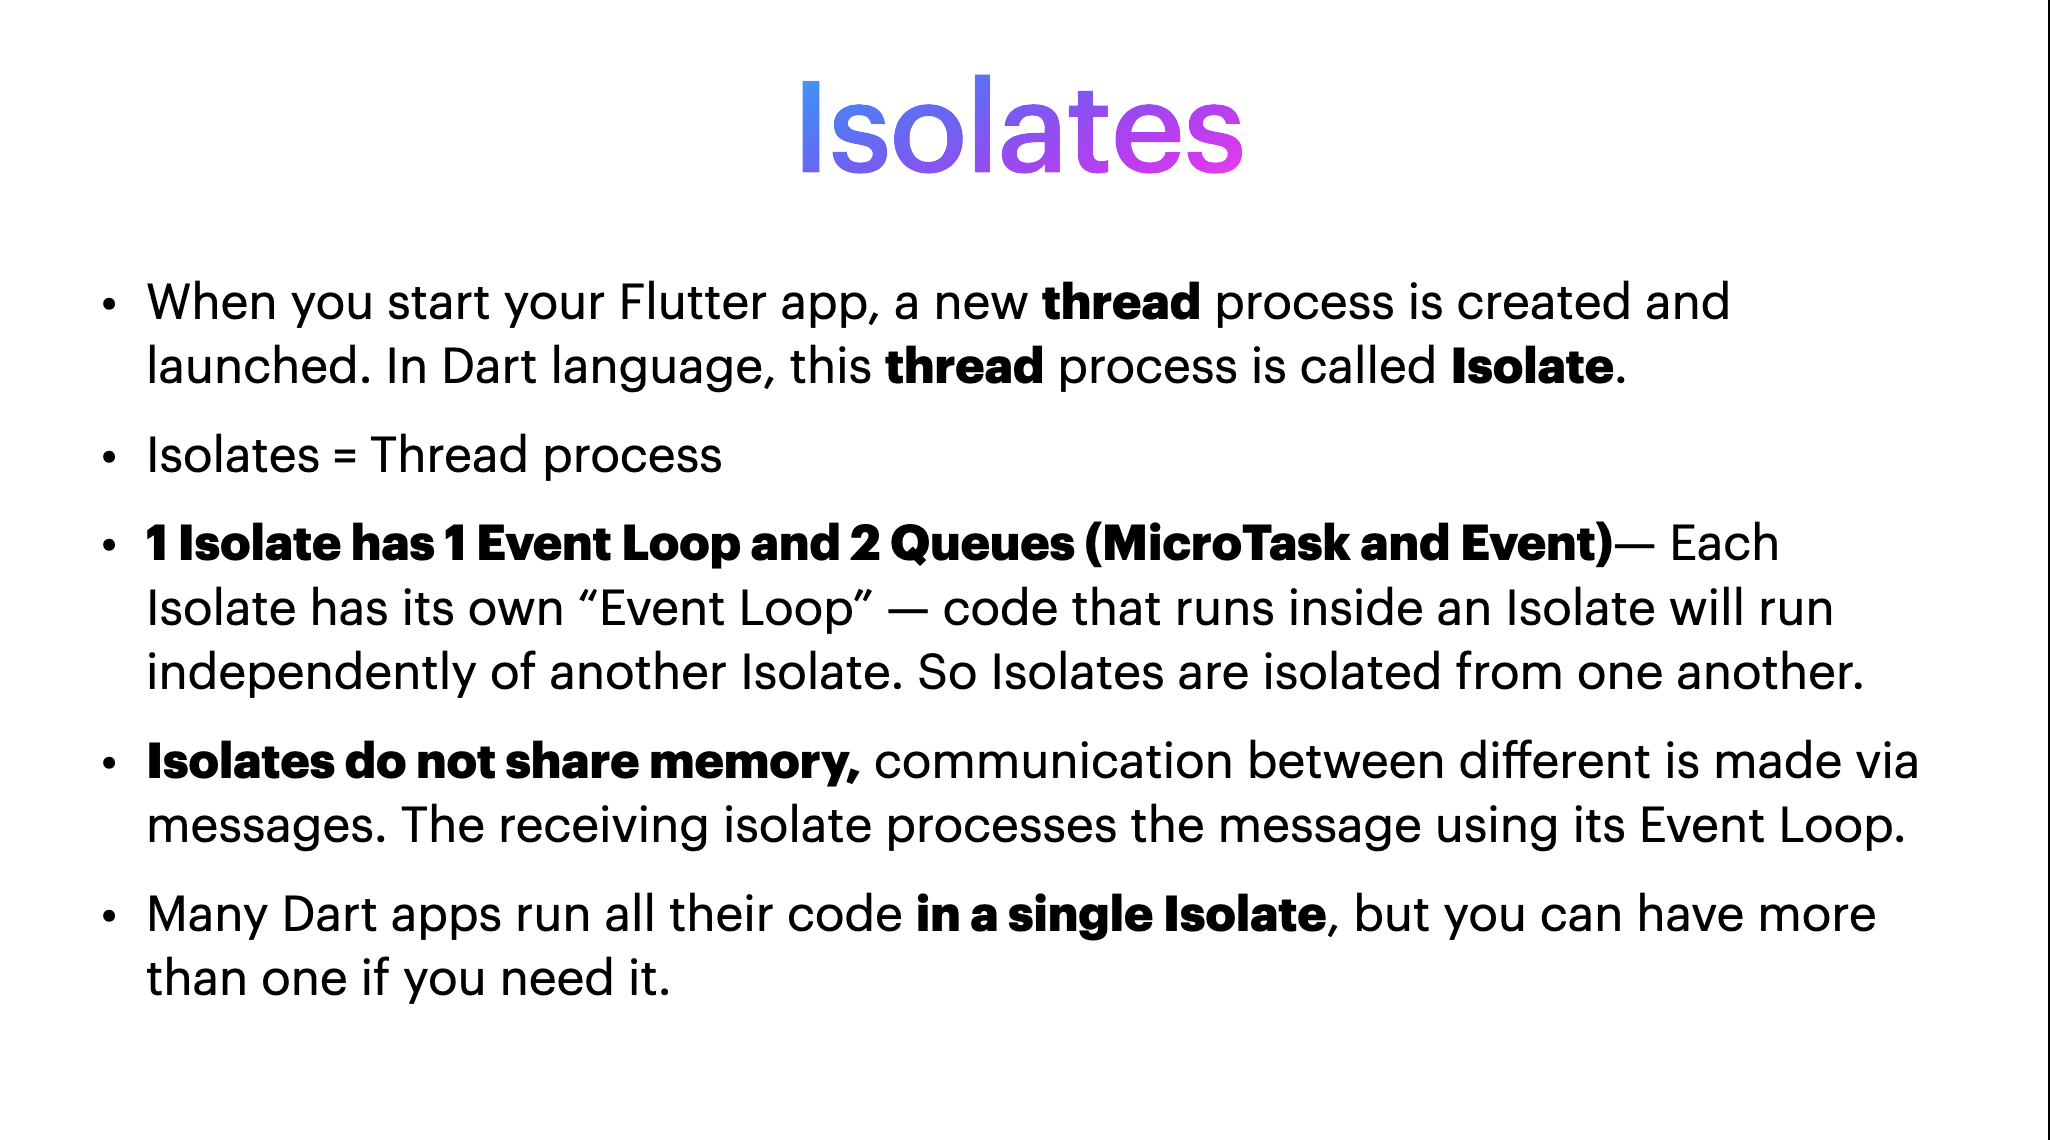
We understand from this discussion is isolates are nothing but threads. In the Dart environment, each thread has its own allocated memory, which is not shared with any other thread. That is why we call it as an isolate. An isolate has isolated memory space which is not shared with any other thread. One isolate has one event loop and two queues, which are micro-task and the event queues. Dart is a single-threaded environment. If we do not create it explicitly, all the operations and tasks are going to be run on a single main isolate.

Suppose there is a situation where we want to perform some big computational task. For example, we want to run a background API call, which is very heavy and takes a lot of time. Or, we want to download a large file. But at the same time, we do not want to disturb the flow of UI in the app.
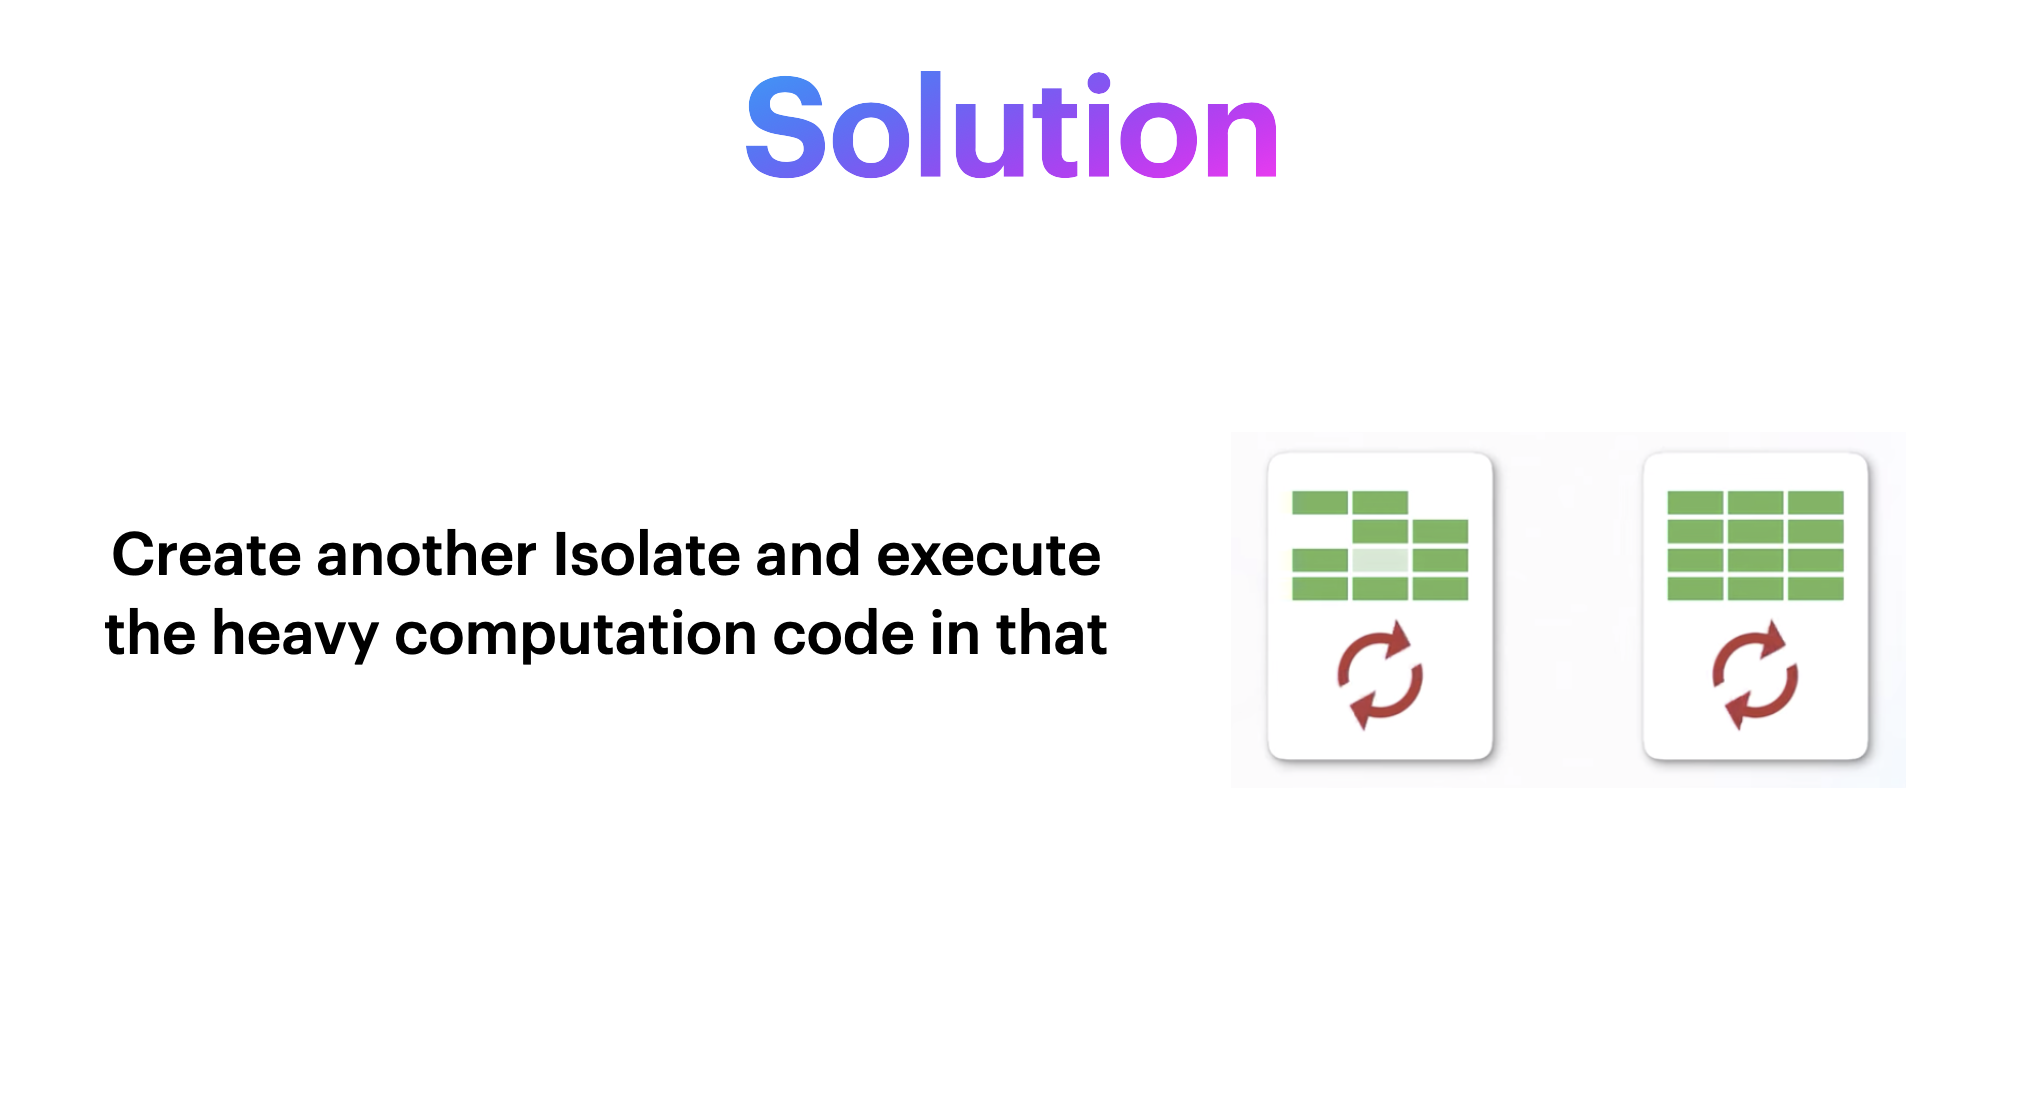
In order to handle these situation, a solution would be to create another isolate and then perform that high computational task in the newly created isolate in the background. The main isolate will be running parallelly, and everything will run smoothly.
There are two ways to create isolates in Dart. There is also an external package for this but here we discuss the two ways we just talked about:
- Isolate.spawn() function
- Compute() function
Though isolate.spawn() function and compute() function are mostly similar, but Isoate.spawn() function gives us more flexibility. In this article, we are going to discuss the Isolate.spawn() function in detail.
Creating New Isolate Using Isolate.spawn()
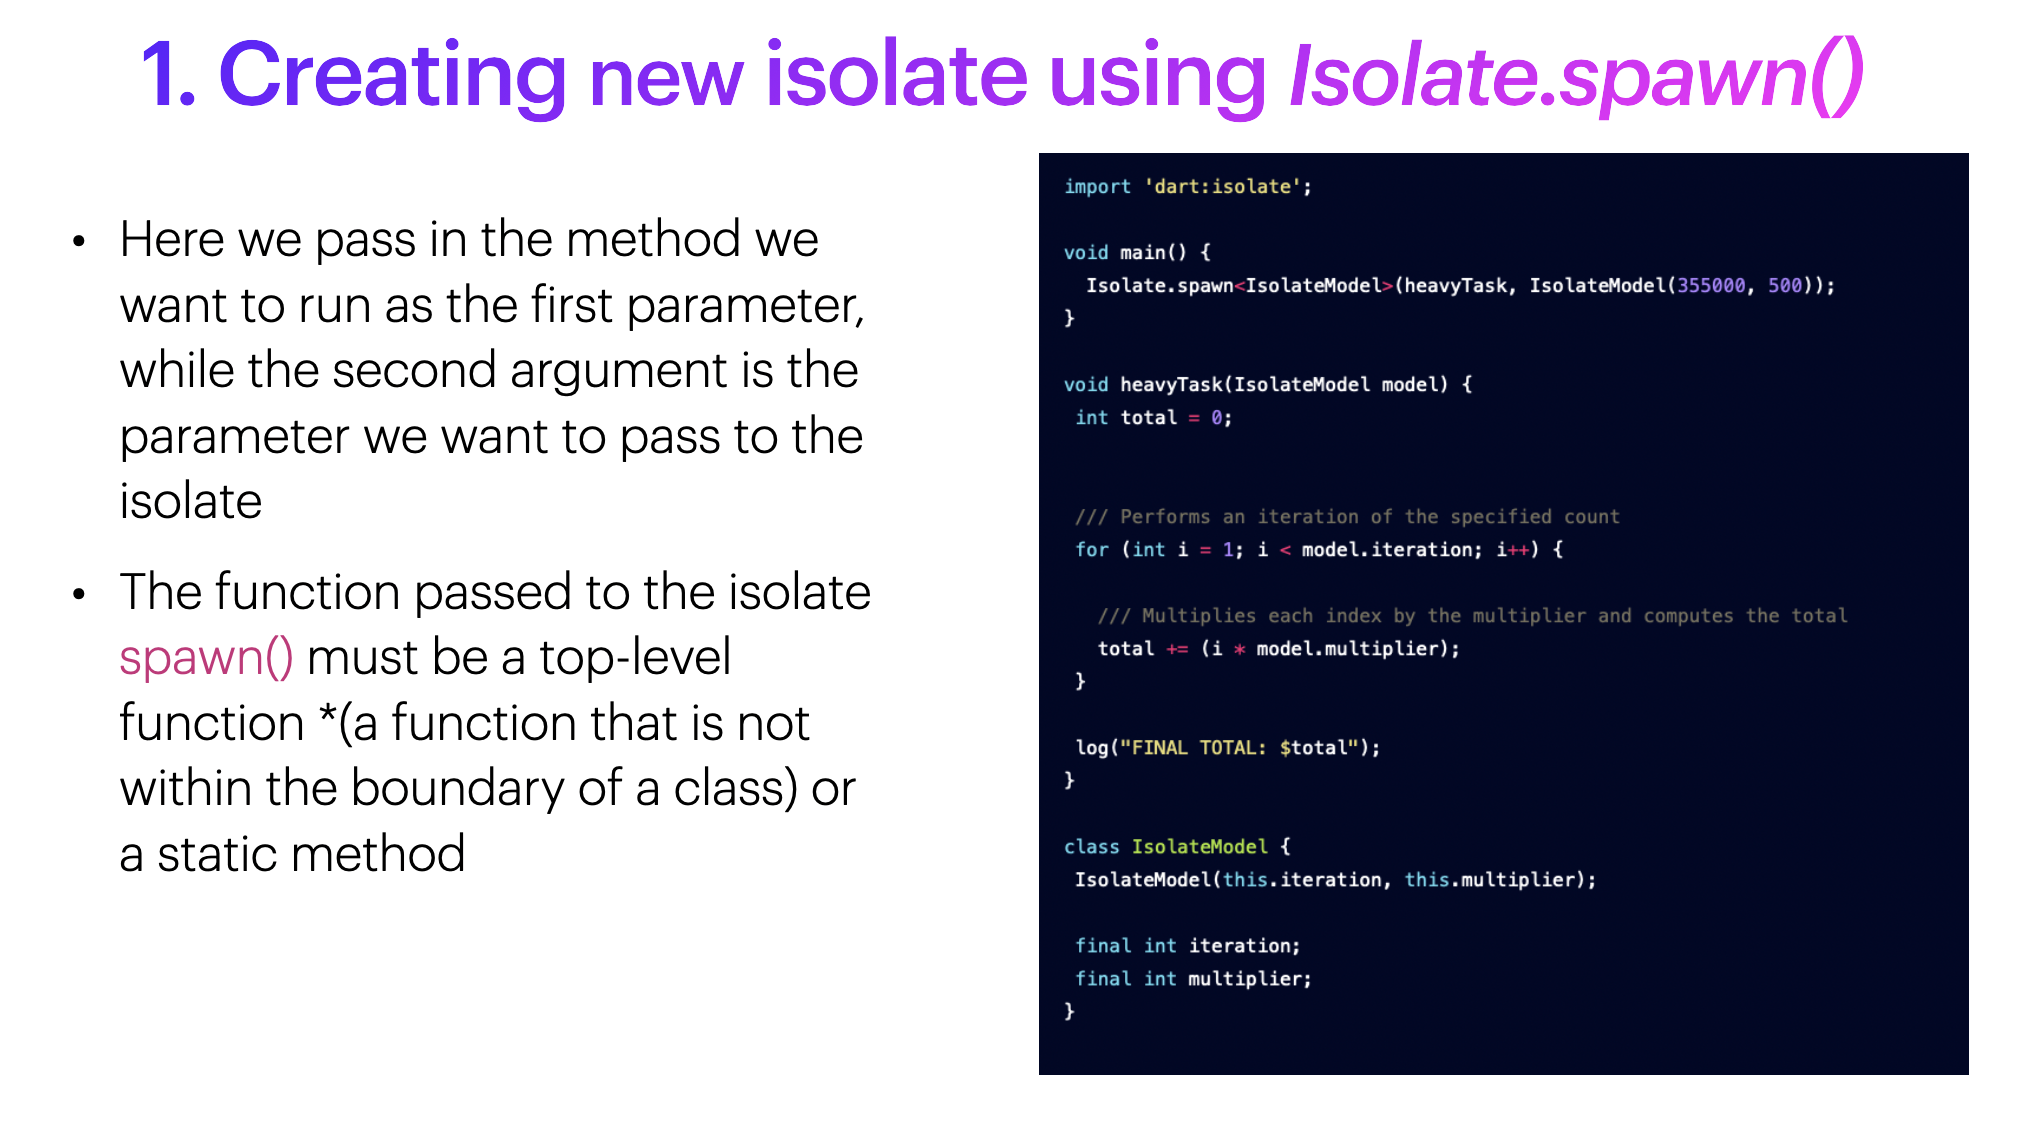
We can see a piece of code where we are creating a new isolate. In the main function, we have called the method Isolate.spawn. As we can see, there is a function named heavyTask, which is doing some high calculations, and there is an IsolateModel class, which is a model. In Isolate.spawn() function, we have to pass two parameters. The first parameter is the function which we want to run after creating the new isolate, and the second is the parameter required by that function. In this case, the isolate model is required by heavyTask. When we call the Isolate.spawn() function, immediately a new isolate is created and the heavyTask function which we have passed in it starts running using the parameters we have passed in the second argument. Here, we need to notice that each isolate has its own memory space, and isolates do not share this memory space with each other. So, suppose we have created a new isolate, but it is not able to share the memory with the main (parent) isolate. For example, we are downloading a large file and want to show the percentage of downloading in the UI. In this case, a new, separate isolate is downloading the file but UI is running in the main isolate and we want to pass that information to the main isolate. In order to fix this issue we need to establish the communication between isolates.
Implementing Communication Between Two Isolates
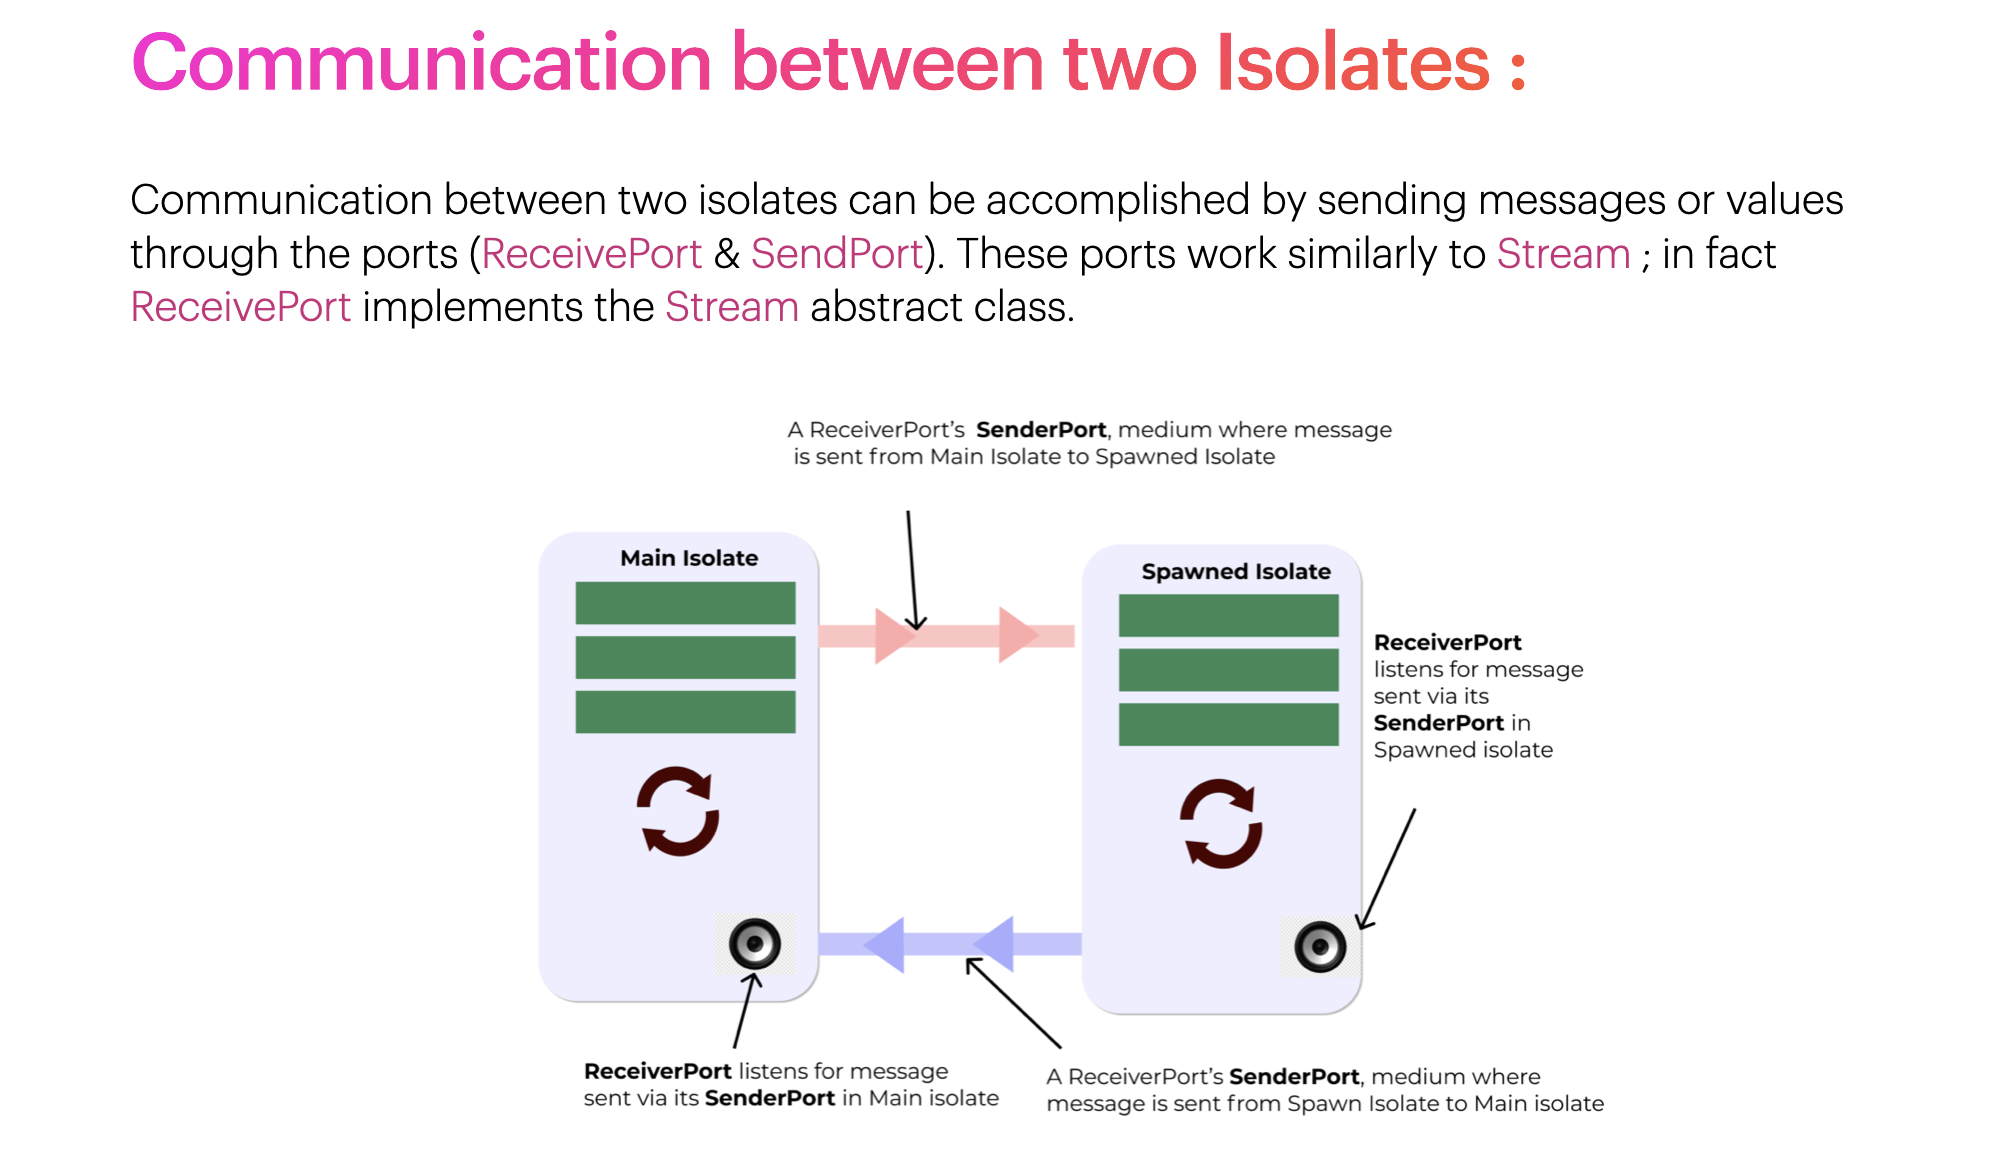
We can implement communication between two isolates using ReceivePort and SendPort. For each isolate, there should be one ReceivePort and one SendPort. We can take a look at the image to understand this better. In the main isolate, there is a ReceivePort; in the Spawned Isolate, there is also a ReceivePort. Through RecievePort, we listen to the data sent by another isolate and through its SendPort, another isolate sends data to the main isolate. We can imagine it like a pipeline between main and other isolate. One end of this pipe is a ReceivePort and the other end is a SendPort. When the main isolate is creating the new isolate, it sends one of the pipe-ends, the SendPort, to the new isolate so that the main isolate can listen through its ReceivePort. Thus, the main isolate ReceivePort remains there but its SendPort is sent to the newly created isolate, and this newly created isolate can send the data using that SendPort while the ReceivePort will listen to that data.
Example of Communication between Two Isolates
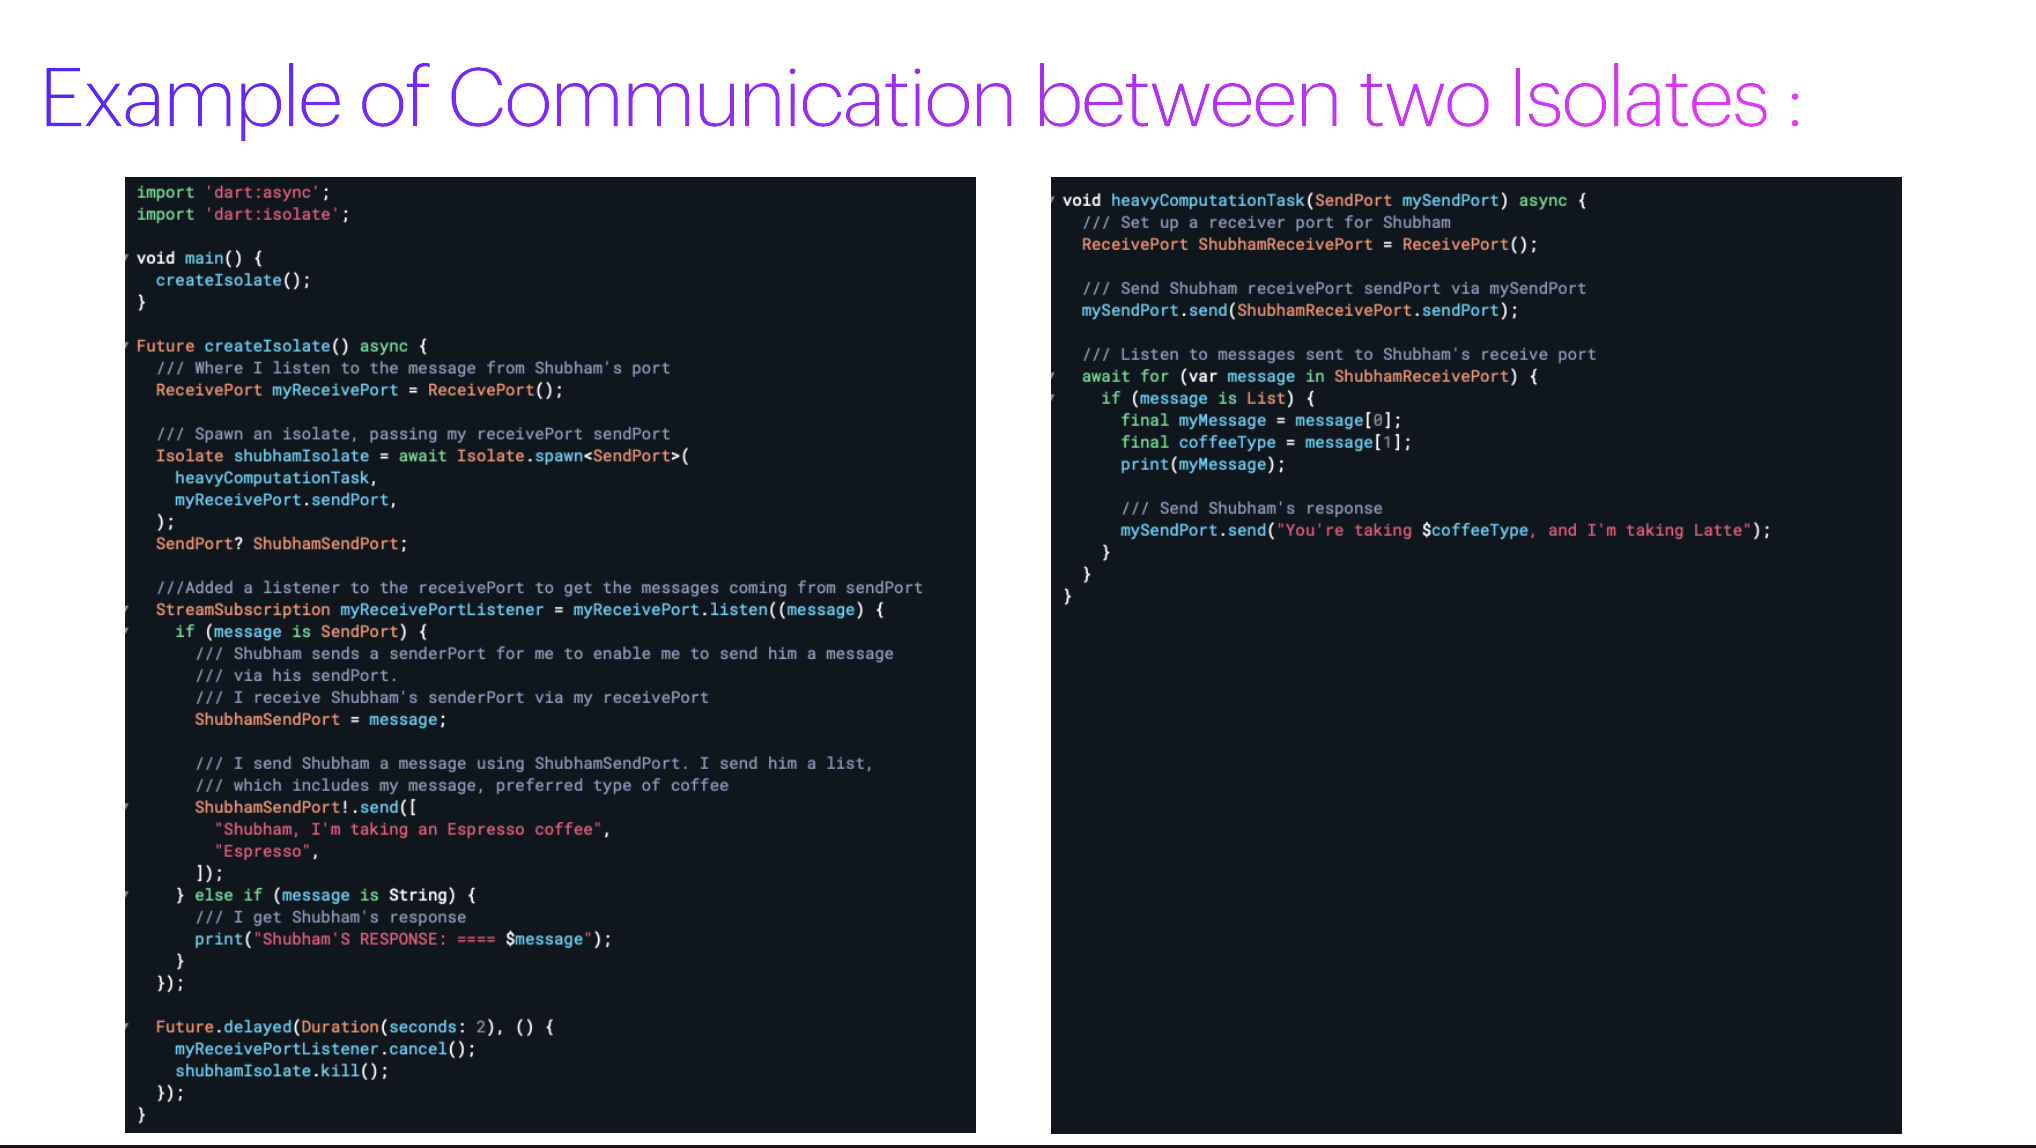
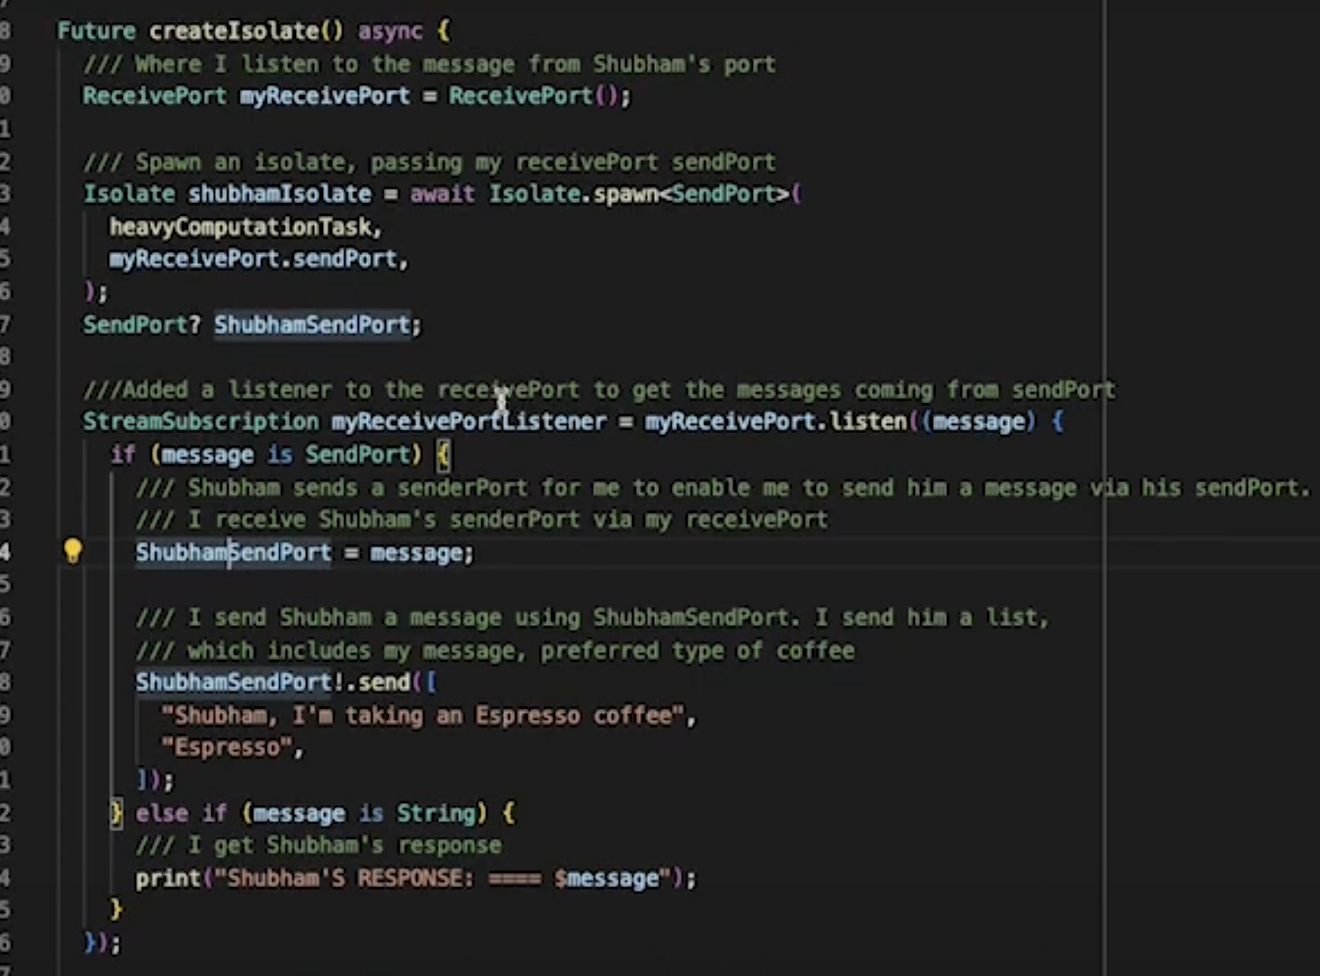
We can understand this with an example. There is a main function in which we are going to run the main isolate. Suppose the createIsolate() function is the main isolate because this is going to run in the main(). In this main isolate, first, we have created a ReceivePort of the main isolate.

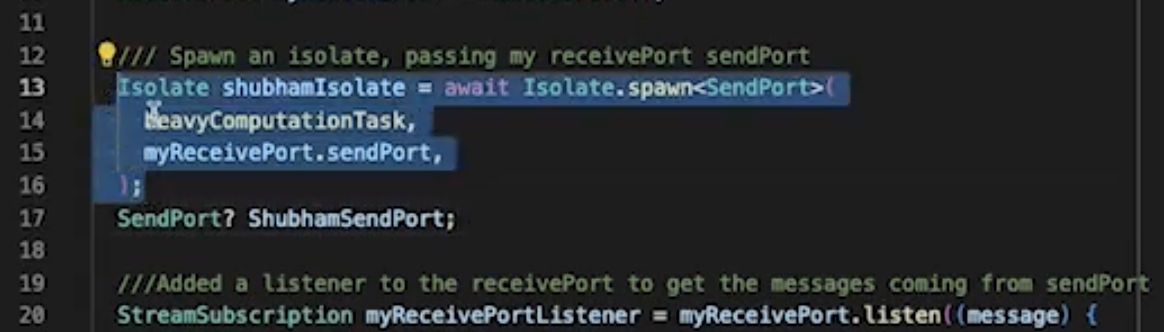
Then, we are creating a new isolate from the main isolate, and the isolate name is shubhamIsolate. Now, we will pass some data from the main isolate to the Shubham isolate, and Shubham isolate will read that data and respond to the main isolate. We are going to print both so that we can see it working and understand how it is working. First, we created the ReceivePort; now, we are creating the isolate. In the isolate, we saw that the first parameter is the function heavyComputationTask that we want to run.
First, we provided the heavyComputationTask function and in the second parameter, we are passing the sendPort which is required by heavyComputationTask function to run.
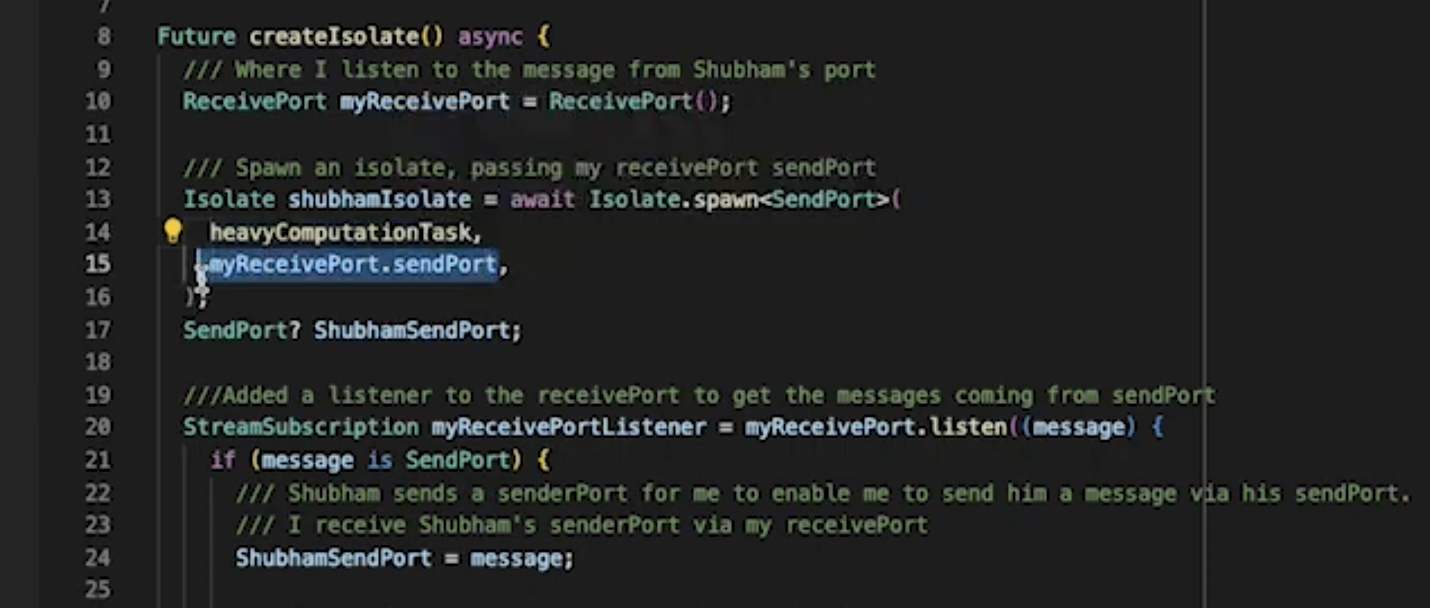
It is like passing one end of a pipe, as discussed previously. We are going to pass one end of the pipe to the newly created isolate so that the newly created isolate can send data using the pipe to the main isolate. The newly created isolate will use the SendPortas seen in the image
and the main ReceivePort is going to listen to the data:
After running this, a new isolate is created and this piece of code will be running.
Now after creating the new isolate, second isolate is able to send data to the main isolate but how can the main isolate send some data again to the second isolate?
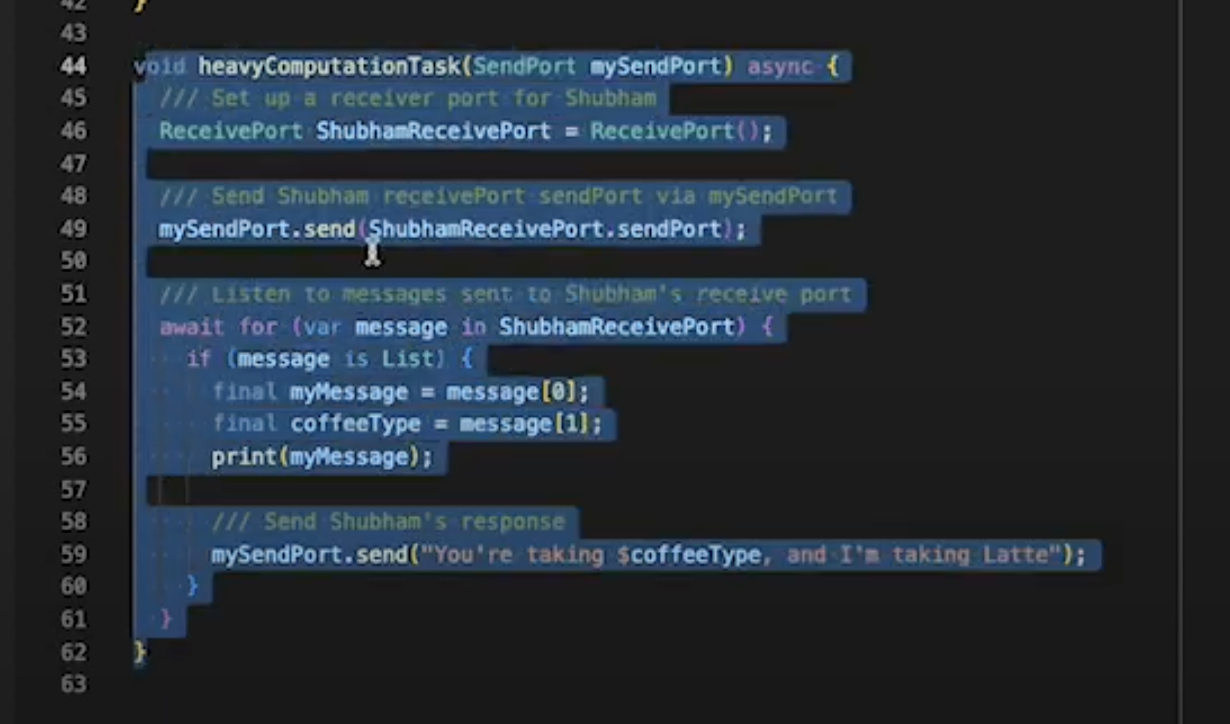
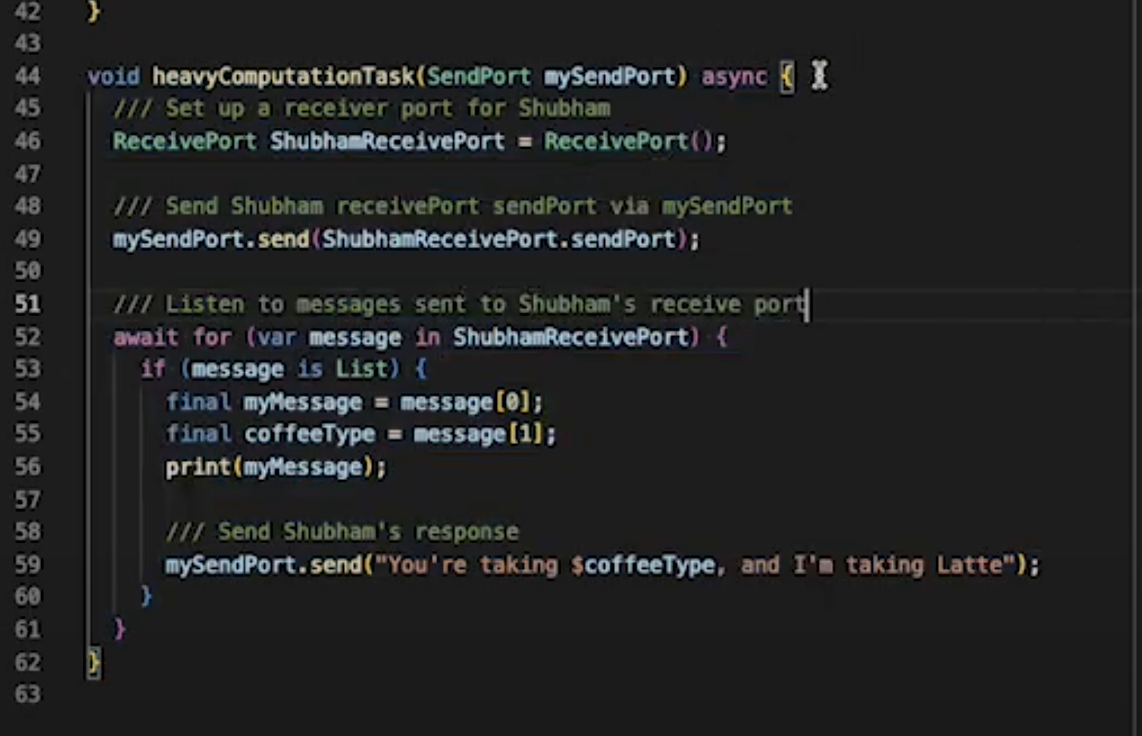
For that, in the second isolate, we are creating a new ReceivePort (shubhamReceivePort), which is the ReceivePort of the second isolate.
So, after creating the second isolate, a ReceivePort is created for it and using the SendPort received by the parameter, and we are sending the SendPort of the newly created isolate to the main isolate. (See line no. 49 in the above image)
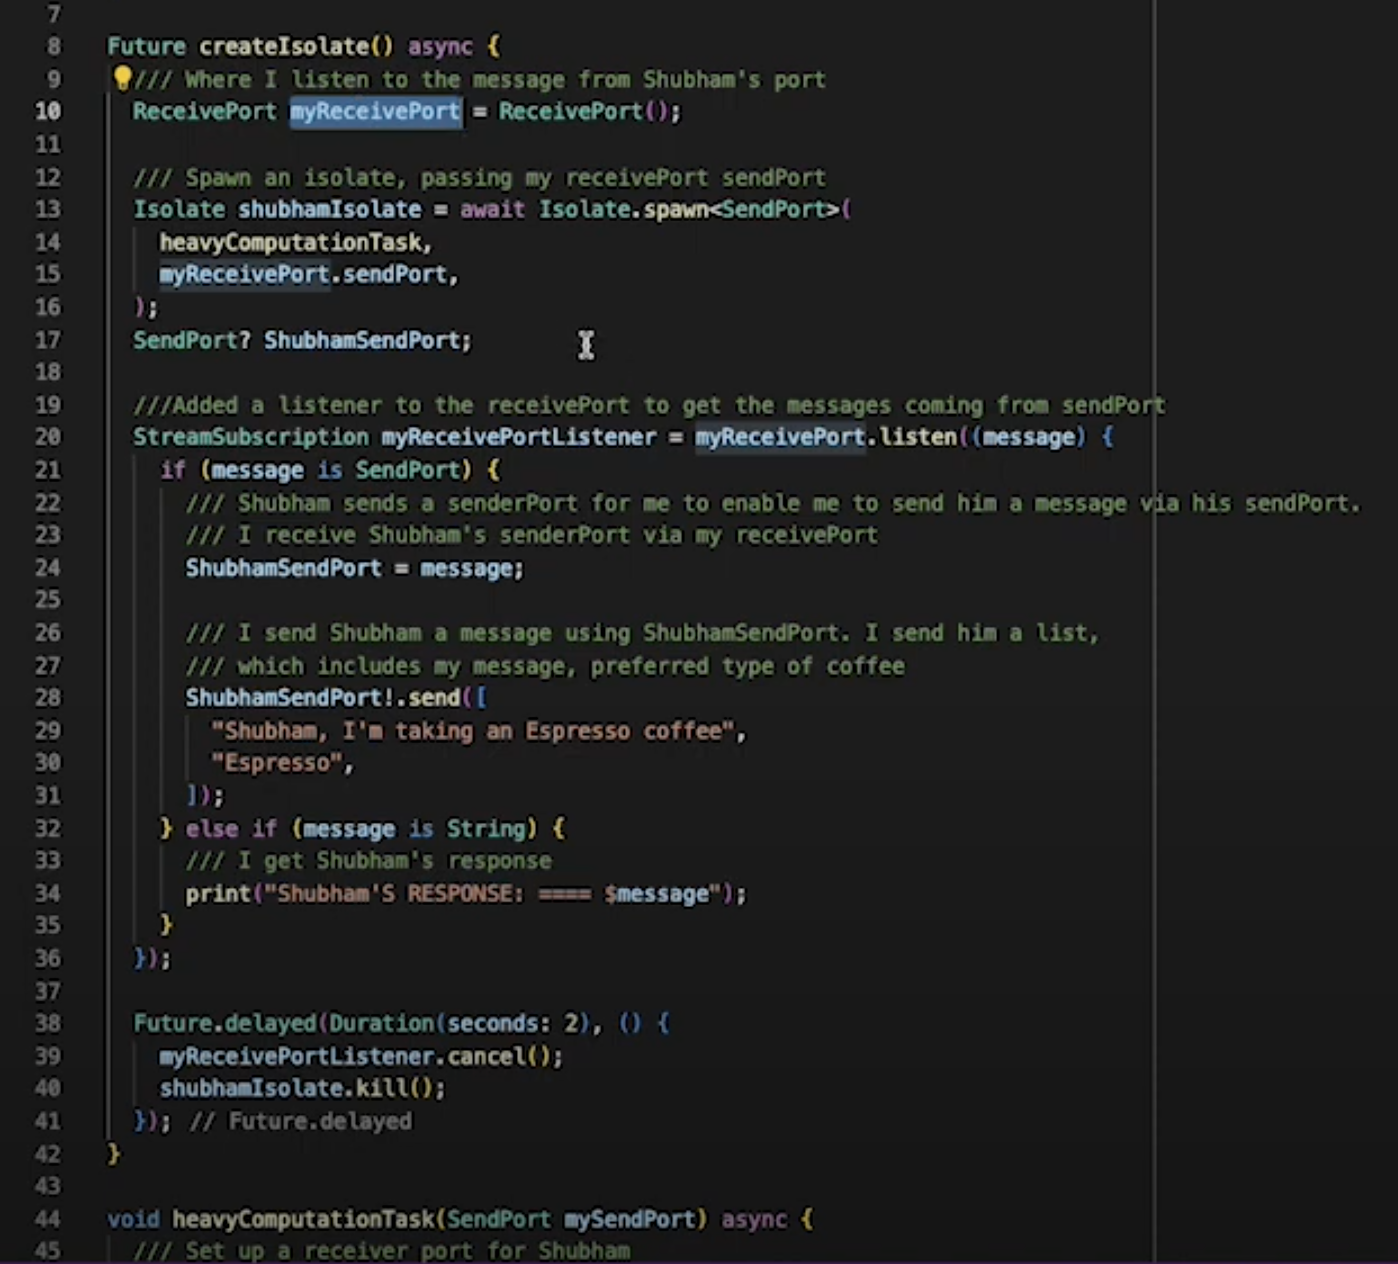
In the main thread, we have created a listener to the myReceivedPort
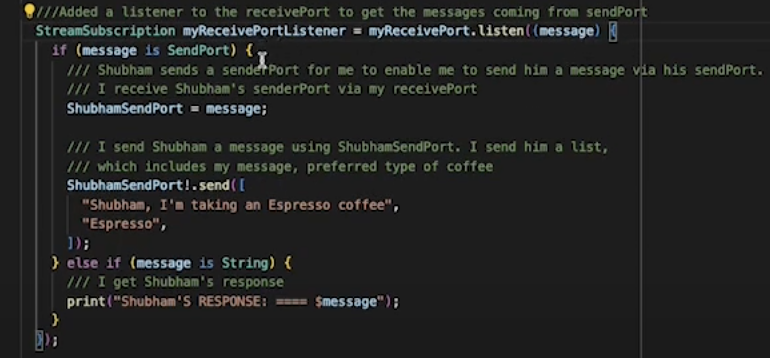
and this listener is listening; whenever there is a message, it will check its type. Here we are first sending the SendPort
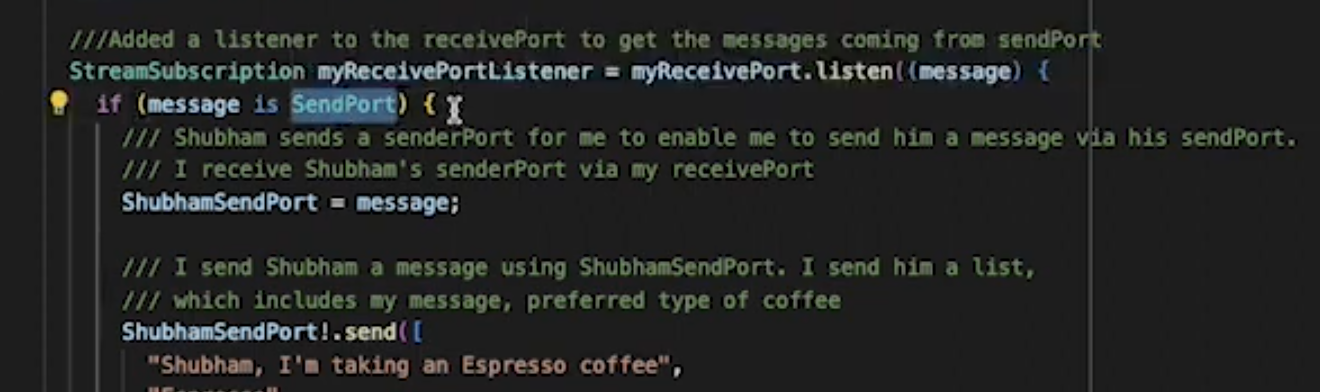
Here it is checking if the message is of SendPort type, and then saving this in Shubham SendPort.
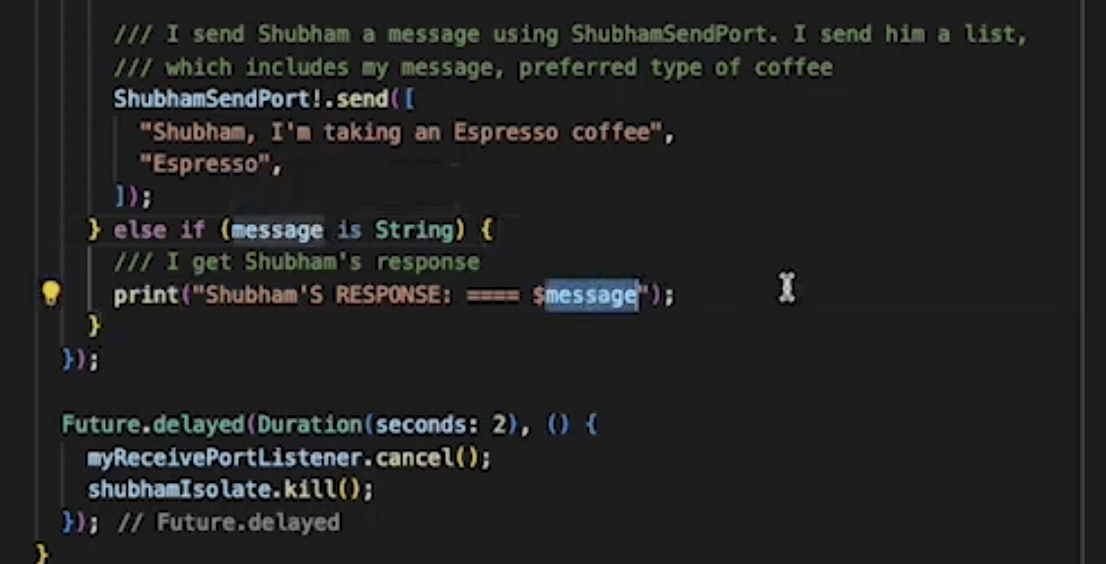
So now the main thread received the SendPort of the newly created isolate (shubhamIsolate). The main isolate can send the data back to the new isolate using the SendPort received just now. The main isolate is sending data to Shubham isolate that “Shubham, I’m taking an Espresso coffee”.
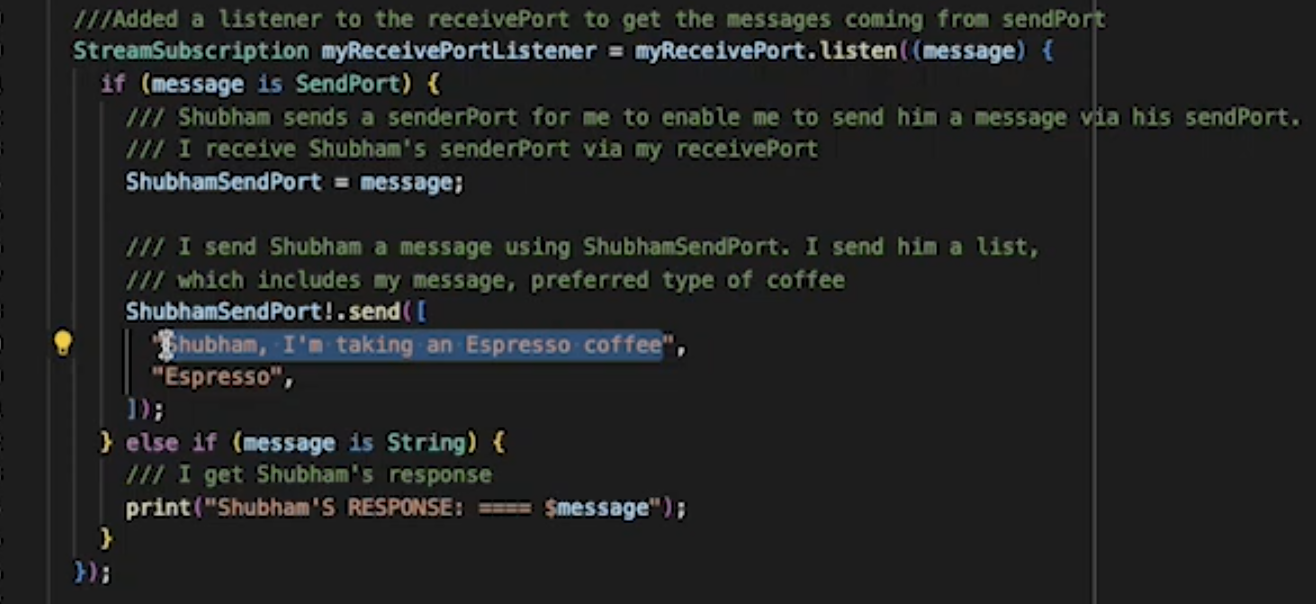
This is sending data in the form of List (of strings). The new isolate (Shubham isolate) is also listening using a different method. The first string message is “Shubham, I’m taking an Espresso coffee” and the second is coffee type “Espresso”.
Now, we are printing the first message received by the second isolate and sending a new message (which contains second message received) back to the main isolate.
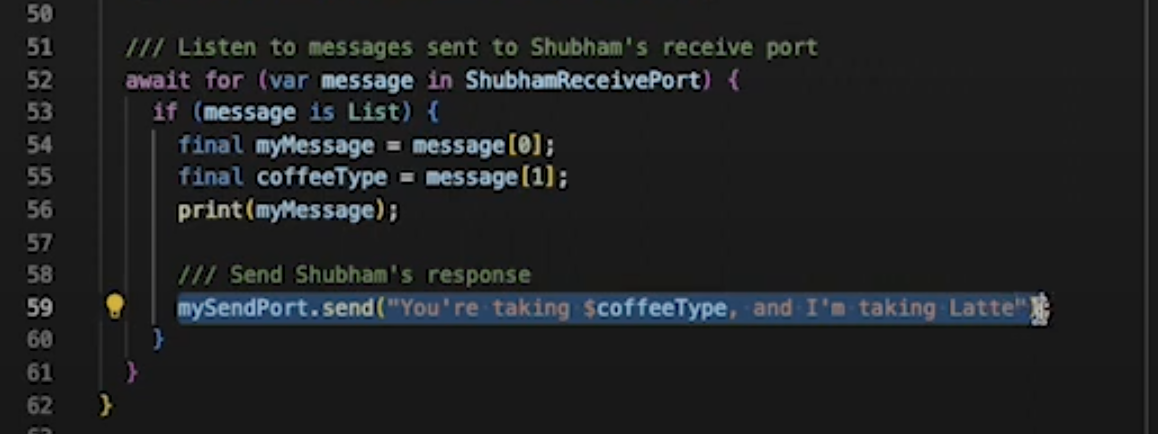
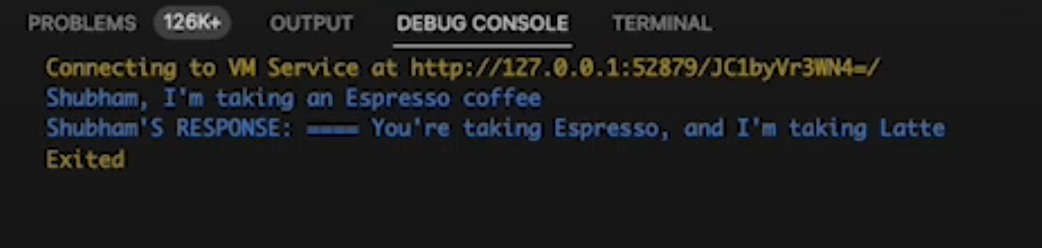
This message is sent to the main thread- “You’re taking Espresso and I’m taking Latte”. When this code is run, the string is passed to the main thread via sendPort and it is received by receivePort’s listener in main isolate.
It will check the type and then print.
This command can then be run to understand it even better.
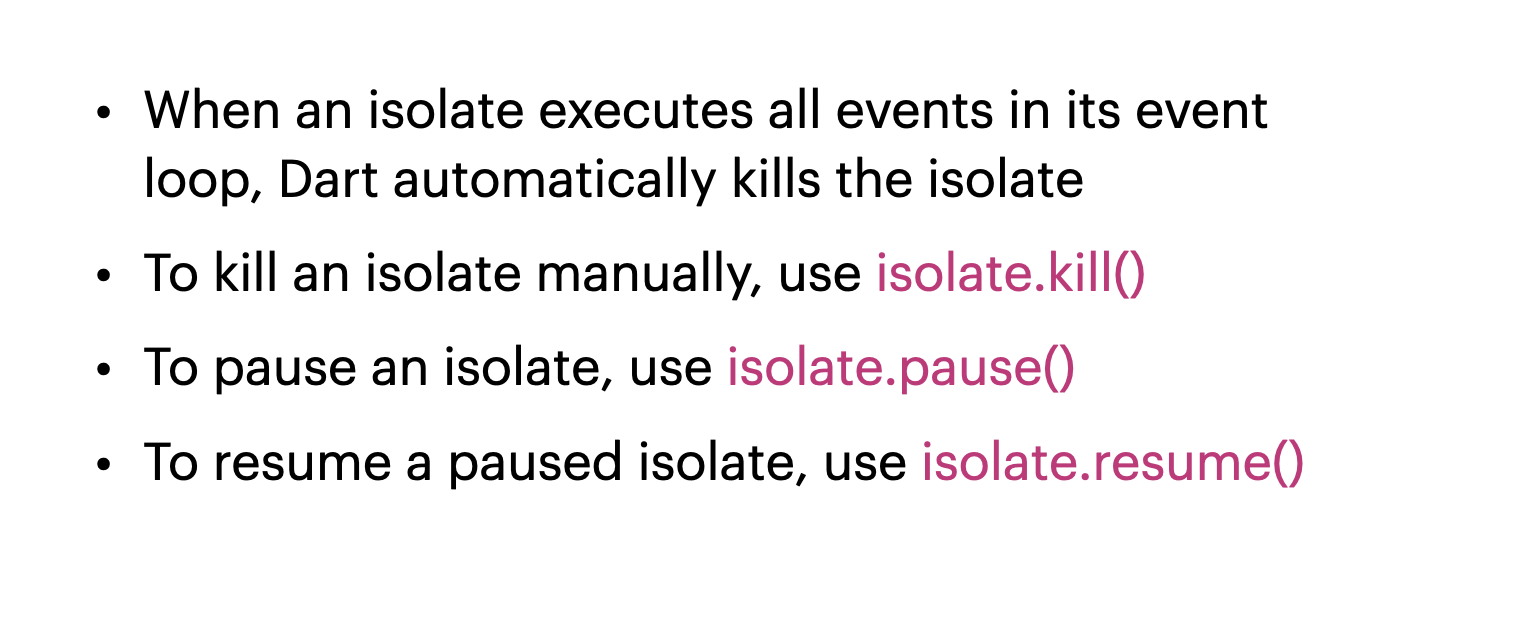
This is a little complex example because here, we are seeing to and fro communication in both the isolates. The main isolate sends the data to the new isolate, and the new isolate sends the data to the main isolate. At the same time, they are listening to each other. Generally, we can just send the SendPort of the main isolate to the new isolate, and the new isolate can directly send the data using that SendPort. After running the code, we cancel the listener and kill the isolate. Even if we do not kill the isolate, the isolate will be killed automatically after running the function we have passed. But there are still functions given by this library explicitly if we want to perform some manual operations. Suppose we are using this in some API and we get some data and in that we do not want to continue that process. In that case, if we want to kill the isolate, we can do that. If we want to pause the isolate for some time and then resume it, we can do it using these functions.
Creating New Isolate Using Compute Function
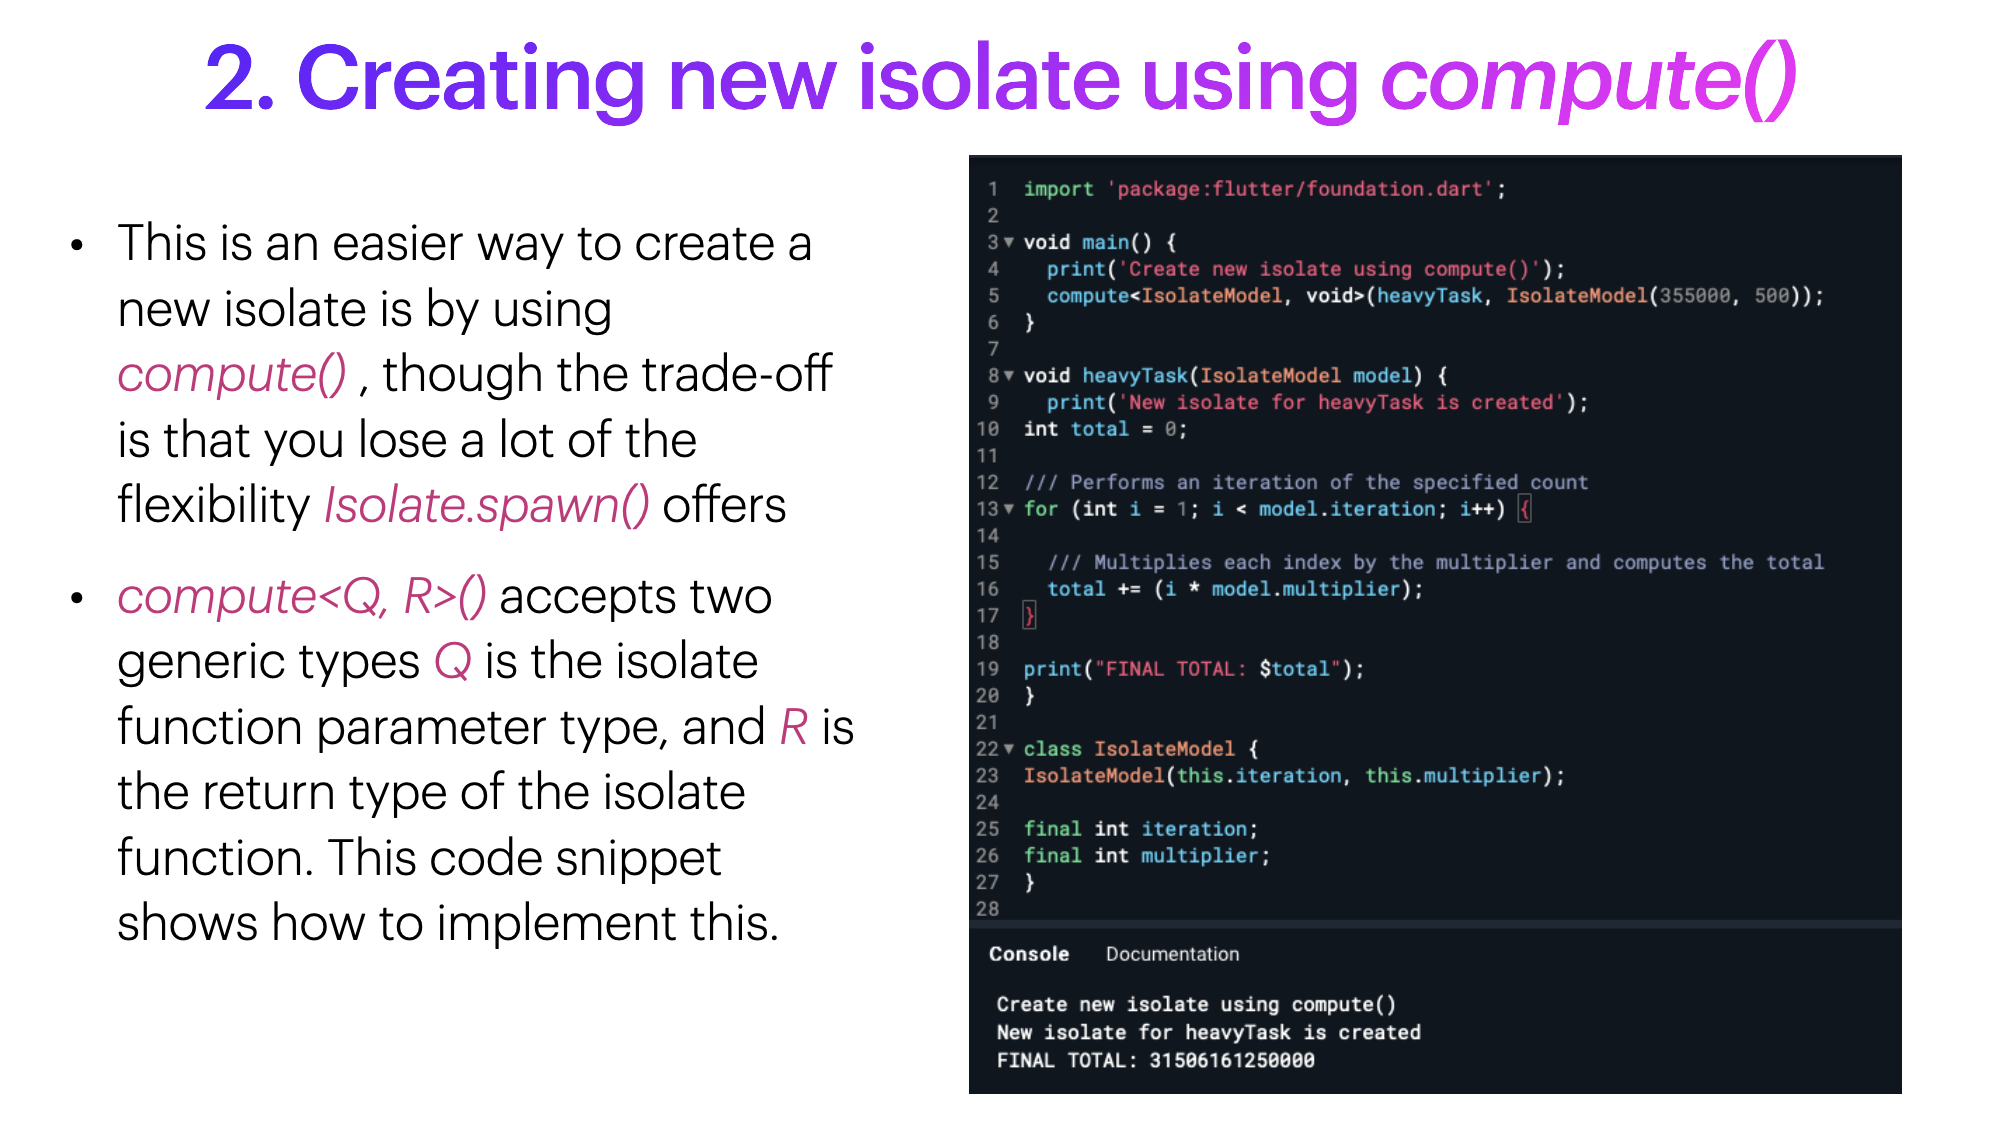
This has a similar use case. Here also, we are creating a new isolate using compute function. We are passing the heavyTask function and the second parameter is the data model for the heavyTask function.
Conclusion
Initially, we discussed the problem that Dart is generally a single-threaded language. But if we have some requirements like downloading heavy files or running some API in the background so that it does not affect the processes running in the UI. It is generally recommended that we perform heavy computational tasks in new isolates because the small tasks can be handled in the main thread by making the functions asynchronous.
Check out the full video on this GeekSpeak talk here.
Dive deep into our research and insights. In our articles and blogs, we explore topics on design, how it relates to development, and impact of various trends to businesses.


