Nov 23, 2022
Introduction to State Machines in React with XState
Insights on state management with XState while developing a React Application
Author


Book a call
Table of Contents
Introduction
One of the biggest struggles with developing a react application is the management of the state, as many issues are caused by getting into unexpected states and their side effects. In many applications where we have a lot of asynchronous logic and conditional rendering happening, we often end up adding more and more states to manage them, which in turn results in bugs and unwanted side effects. If you use too many booleans like isLoading, isError, etc, everywhere, finite state machines might be the right choice for your application.
What is a Finite State Machine?
Finite-state machines are a fairly common concept used in programming and in general. We are surrounded by state machines- a traffic light, a vending machine, an elevator- all are based on the concept of FSM. The textbook definition of a finite state machine goes something like this -
“A finite state machine can be defined as any abstract machine that exists in exactly one of a finite number of states at a given time.”
What this means in a javascript context is that with a finite machine, we can clearly define all the possible state and state transitions beforehand. You can also define the side effects for each of the transitions.
Advantages of Using a State Machine
You must be wondering why you go through the trouble of thinking about every state and state change before writing the component. Won’t it slow down the development process? The answer is yes, it will slow down the development a little, but making this small extra effort might save you a lot of hours spent on refactoring and debugging your code due to recurring state-related issues. Here are a few more benefits -
- State machines make impossible states impossible - By defining every possible state and transition for a component, you can eliminate the possibility of ever getting into a state which is unintended and hence no undesired side effects due to the same.
- Better visualization - With every state named and every state change modeled as a transition, it can help write efficient state logic and avoid bugs.
- Easier to maintain - It is easier to introduce new states without breaking the existing code.
- Easier to debug - With clear state logic visualization, it is relatively easier to identify errors.
XState
XState is a JavaScript/TypeScript library to create finite state machines and state charts. It's the most widely used library currently to get started with creating state machines in any JS based framework. It provides us with clean and efficient APIs to model states and transitions. XState also has a great state visualizer tool for creating and inspecting statecharts.
Example
In the following example, we have a simple application where we start a countdown timer of 10 and we can pause, resume and cancel the timer. You can already spot a few issues here, we will need to introduce some boolean flags if we want to show and hide buttons conditionally and keep track of which state the app is in. Let’s modify this code to use a state machine and make it more efficient.

Install the Dependencies
To get started with XState, let's install the following dependencies.
Creating the State Machine
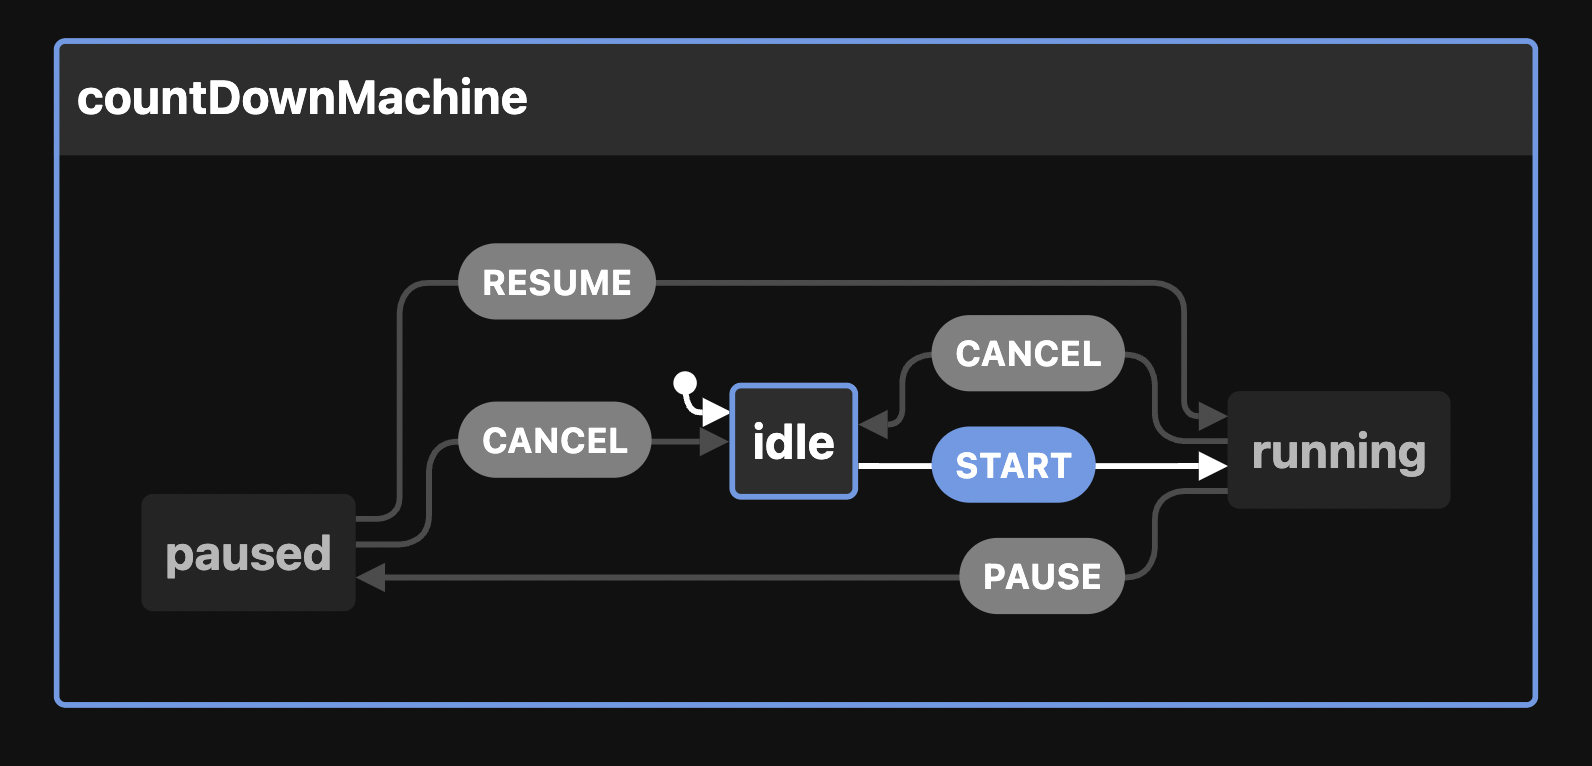
Let's use the XState’s createMachine object to create our countDownMachine. We can begin with defining all the possible states our application can be in and what will be the initial state. For our countdown timer example, our application can be either in an idle, running or paused state so we have defined the same and kept idle as the initial state.
Adding State Transitions
Now, once we have listed down all the possible states, we can start with defining every possible transition from each state. XState provides us with a property called on with the help of which we can define a transition name and provide the target state to which application will go to when the particular transition occurs. So, let's add transitions to the above code.
We can put this code in the XState visualizer to generate a statechart for the above machine. With the statechart you get a clean overview of your application logic which can be shared among teammates. Our above code looks something like this in the visualizer -
Adding Actions
Actions are executed as a reaction to a state transition. Actions are fire-and-forget; that is, they are executed without needing to wait for a response. There are 3 kinds of actions in XState -
- entry - executed upon entering a state
- exit - executed upon exiting a state
- transition actions - executed when a state transition is takes place
Lets use the entry action for our above example.
Using the State Machine
XState provides us with the useMachine hook that interprets the given machine and starts a service that runs for the lifetime of the component. The returned state from the hook is the current state of the machine and a send function to update the state using actions. Let’s use this hook with our countDownMachine.
We can utilize this send method to update the state of our countdown application. For example to start with our countdown we need to update our state from idle to running. We can do the same by sending the START event to the machine.
If we want to conditionally show or hide the buttons based on the current state, we can do so by using the matches property on the current state. We also have a nextEvents property which is useful in determining which next events can be taken, and representing these potential events in the UI such as enabling/disabling certain buttons. Let’s see how we can use the nextEvents property to conditionally render our button.
Now, after adding transitions and actions for every state, finally our countdown app looks something like this -
Conclusion
We can see with a bit of extra work, we were able to make our application much more reliable and efficient. This article covered a fundamental beginner guide to getting started with XState. The library has a lot more to offer, and I would highly recommend you guys check out their docs.
State machines might not answer all your state management-related problems, and it isn’t the perfect solution for every use case. Still, I firmly believe that the concept of the state machine and the perspective it gives you toward state management can be beneficial to visualize states for complex components and help write much more predictable and error-free state logic.
Subscribe to Our Newsletter
Subscribe to RSS
Press & Media Hub RSS FeedRelated Articles.
More from the engineering frontline.
Dive deep into our research and insights on design, development, and the impact of various trends to businesses.

Jul 10, 2026
Self-Healing AI Agents: The Future of Enterprise Automation Needs Governance, Observability, and Product Engineering

Jul 10, 2026
How We Built the Missing Bridge from Code to Figma

Jul 10, 2026