Feb 27, 2023
Introduction To Dapr: Part-3
This blog post is the third in a series on "Introduction to Dapr." It focuses on the concept of PubSub in Dapr and how it can be implemented using Dapr and ExpressJS.
Author


Book a call
Table of Contents
What is PubSub | How To Implement PubSub With Dapr and ExpressJS
Before continuing any further, it is recommended that you read the second part of the series on Introduction to Dapr, which discusses different forms of communication (synchronous and asynchronous) and how micro-services are called.
PubSub is a way to connect with other micro-services in an asynchronous manner. Let's take a look at what other features it offers.
Advantages of Using Pubsub with Dapr
PubSubis an integral component ofDapr, which allows themessage brokerto be interchangeable and set up as aDapr Pubsub component. This eliminates the dependence on a specific service, makingPubSubmore adaptable and portable to changes, even when switching to differentmessage brokers.- With
Dapr, messages can be exchanged using a standard API, regardless of the programming language used. PubSubalso guarantees message delivery at least once and utilizes theCloudEvents 1.0protocol to provide additional context to the event payload.Dapris compatible with all the significant message brokers as aPubSubcomponent.
How Dapr Handles PubSub
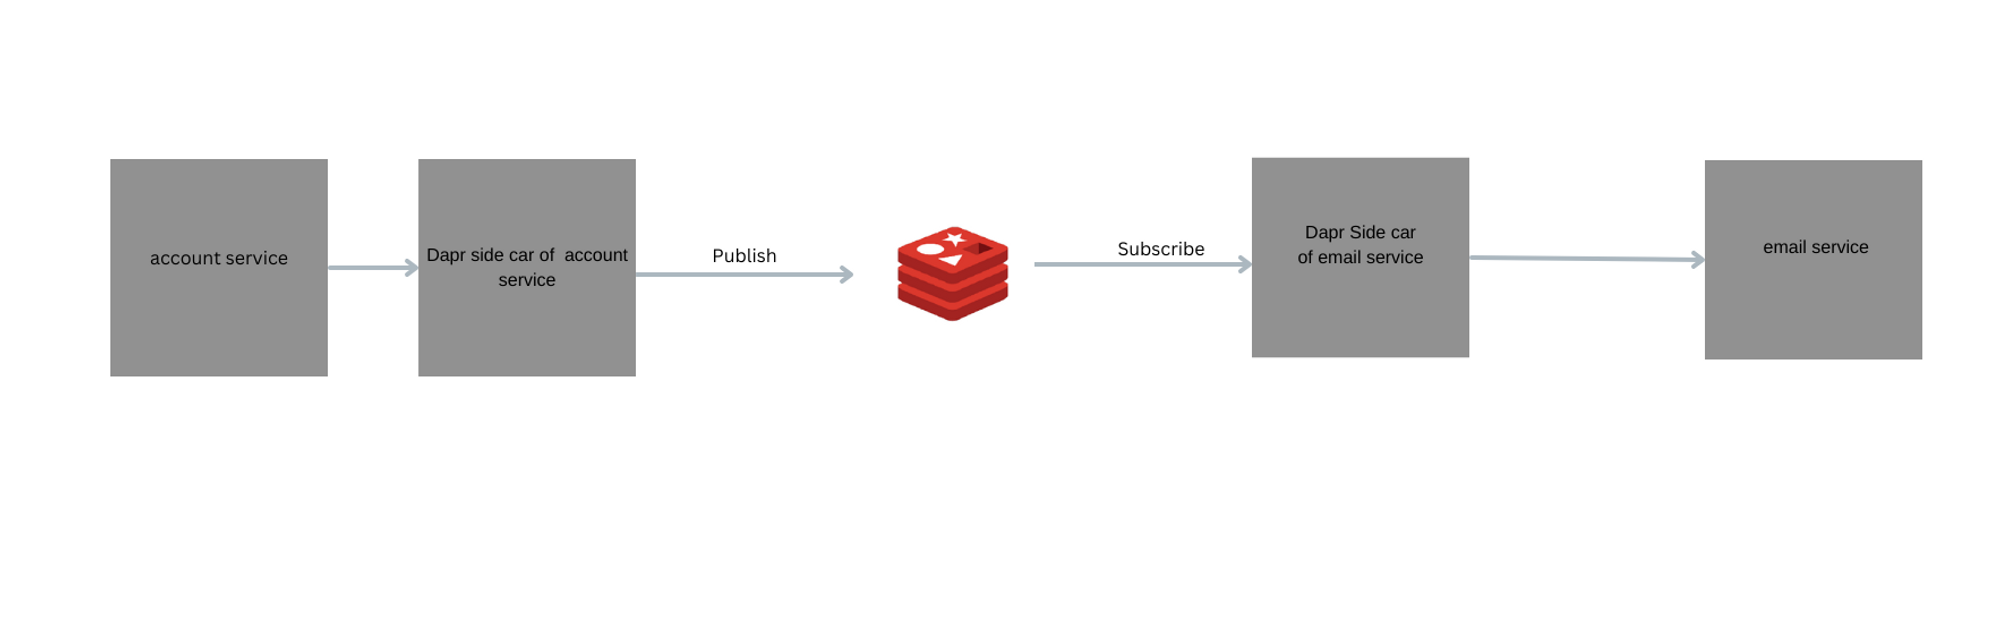
Consider two micro-services: the account service and the user service. When a user is created within the account service, a PubSub message will be sent to the email service, asking it to send a confirmation email, as the email service is responsible for delivering these types of emails. To better understand how this works, the service that wants to publish the message (account-service) sends a network request, or API call, to the Dapr PubSub building block API (account-service Dapr sidecar). This request is wrapped in the specific message broker specified in the configuration and is then sent to the Dapr sidecar (email-service Dapr sidecar) that has subscribed to that specific subject. Once the message is received, the Dapr sidecar will deliver it to the appropriate service (the email service).
To illustrate how to use PubSub with Express.js, we must take into account two important points. One, Dapr uses Redis streams as its default message broker, which will also be utilized in this example. Two, you can subscribe to a topic using either a declarative or programmatic method. In this particular example, we will demonstrate how to subscribe to a topic programmatically.
Create account service with an index.js file and install express and dapr sdk. Then create a route as shown.
Here, we are starting the Dapr client with port 3500 and using the Dapr SDK client to publish the topic called "create-user" so that when the new user is created, this topic is published, and the subscribers receive the message.
As previously discussed, we will use the default message broker, Redis stream, which has the name PubSub. Run the command stated below to start the service.
Similarly, create an email service with index.js file and install express.
As Dapr utilizes cloud event specifications for transmitting PubSub messages, it is necessary to permit the content-type application/cloudevents+json. We have created the route /dapr/subscribe, which will return an array of objects that include the PubSub name, topic, and route. This route will be accessed by Dapr when the server is launched, and Dapr will automatically subscribe to this topic on behalf of the service. Once the publisher posts a message to this topic, Dapr will proceed along the path specified.
To start the server, execute the command below.
When you use postman to create a user from the account service, you will receive a response similar to this.
Also if you check the logs of the email service you would have received EMAIL SERVICE:: SEND WELCOME EMAIL TO: a@b.com. Additionally, a big JSON object (req.body) will also be logged, which will look like this:
By utilizing cloud event specifications, we are able to gather extra information along with the data sent by another micro-service. This includes details such as the topic name, PubSub name, source name, and unique id for each message. The actual data will be stored in an object called data. It's important to note that the route handling a specific topic should return a status code of 200 when it receives data, as Dapr provides a guarantee of at least one message delivery. If Dapr does not receive a status code of 200, it will assume the message was not successfully received and will continue to send the same message.
Final Words
That concludes the introduction to Dapr’s PubSub .To gain a deeper understanding of PubSub, you can refer to the Dapr documentation and access the code on Github. In the next blog post, we will delve into state management in Dapr.
Subscribe to Our Newsletter
Subscribe to RSS
Press & Media Hub RSS FeedRelated Articles.
More from the engineering frontline.
Dive deep into our research and insights on design, development, and the impact of various trends to businesses.

Jul 20, 2026
AI Operators in Insurance: Improving Customer Experience Through Intelligent Automation

Jul 17, 2026
From Compliance to Predictive Resilience: Building AI-Powered Supply Chain Risk Management Systems

Jul 10, 2026