Jun 21, 2023
Building Data-intensive Supply Chain Dashboards Incrementally, With Micro Frontends
Discover how micro frontends overcome challenges in monolithic React apps. Explore data-intensive supply chain dashboards in this insightful talk summary.
Author


Book a call
Table of Contents
Introduction
Over the past three years, we developed a fairly large and performant application with a supply chain dashboard for a client. The process was a treasure trove of insights into how the industry should be approached from a technical perspective. We also discovered an iceberg of issues that were resolved successfully.
In this article, we will share the lessons we learned, including what we should and should not have done during development.
The Basics of a Supply Chain Dashboard
Let us delve into the basics of a supply chain dashboard.
Handling Large Datasets: When you hear "supply chain dashboards," do you picture a simple dashboard with maybe a hundred items displayed, tables, and some data visualization?
That's not the case for large-scale supply chain applications. Each page and grid, of which there are multiple, will hold records that exceed 5,000 at any given point in time. You can start building this application in any manner, such as with a CRA or an ejected app, or a Next app.
However, issues arise when you start building and run into problems later, generally when your team decides to scale and add more features. The end users may have additional requirements and ask for more features. If you started with one code base, it becomes difficult to know if your architecture will support these new requirements without affecting many components. It becomes a slippery slope.
User Management and Modular Access Control: A supply chain dashboard typically has fewer users than, say, a social media site. However, each user on a supply chain dashboard will have a different role, and not all users are the same. Permissions are configured on a per-user basis, so each person who logs in gets modular access to the application and can only access certain parts of it.
For example, only admins or super admins can access all parts of the application. However, the application is very modular, which can be problematic if permissions are incorrectly handled in the codebase.
Effective Data Visualization: When dealing with records exceeding 5000, scrolling through everything is not practical. A good visual representation is necessary so that whoever logs in, or looks at the dashboard, can quickly understand what is happening. They can easily see what has been completed, what is still pending, and who it is pending from. This provides a clear picture of the application's state, which is essential for a supply chain dashboard.
Order Fulfillment and Shipment Tracking: When multiple entities are logged in, it's important to be able to track orders. You should be able to see whether orders have been fulfilled, returned, or are defective. This is especially important for supply chain management dashboards between manufacturers and suppliers sending and receiving goods. There will likely be cases of dissatisfaction with items, pricing, or materials, so an effective tracking system is necessary to request changes.
Communication Channel: While this is not essential, it is very important. Consider this scenario: a manufacturer and a supplier are working together. If they do not have a dedicated communication channel, they will likely default to using their usual methods, such as email or a platform like Slack. Building an inbuilt communication channel into your dashboard becomes a one-stop solution for everything, and users do not have to leave your application.
These are the kinds of things that we are looking at when you are building a supply chain dashboard.
Complexities with a Single Monolith React Application
We began by building a supply chain dashboard without fully realizing the project's scope. We started with a CRA app, thinking it would be straightforward. At first, we built a table with about 2000 records. While we encountered some performance-related issues, overall, things were going well. However, when we added another screen linked to five others, our codebase became much heavier, and each deployment took 20 minutes.
We quickly realized that any change request would require us to ensure that the 50 components using that code were unaffected. So one of our top priorities was achieving extensive test coverage, which we lacked initially. Unfortunately, we could see that this situation was unlikely to improve anytime soon. These complexities were what we began to face with that application.
- No Separation of Concerns: When a component we have built serves multiple applications in different ways, it can become problematic. If it is a shared component, such as a searchable dropdown, it makes sense for every part of your application to utilize it. However, if it is specific to a particular function, it should remain that way and not be configured with additional props for a different use case.
- Overwriting of Existing Changes: This was another big issue. Suppose I finish a ticket, and the task is marked as done. Two months later, some other developer onboards onto the project. They get a task to change it. We both use the same component and make some changes. As a result, my code, which is in production and I did not touch, suddenly breaks. This was one of the big practical problems that we faced.
- No Independent Deployments: You are always dependent on the rest of the application. For instance, you may encounter issues if all of your code is on one branch, such as QA, and you need to move it to the staging. You may need to be certain if all of your code in QA is ready to be deployed to staging and then to release. The entire deployment is controlled at a single point, so the complete application is deployed whether you want it or not.
- Release Plans are A Nightmare: The problem with release plans is the same as previously discussed. The team of around 25 developers for each release had 20 or 50 commits. Each release had more than two hundred commits that needed to be cherry-picked. If there were conflicts, they needed to be resolved. The DevOps engineer is responsible for all of this and is overwhelmed. They can only handle it with a lot of input from each developer. Therefore, each developer must sit with him for about 20 minutes and help him pick codes. We developed it for one week and released it for the other week, resulting in a two-week sprint. This was not ideal.
How do we solve these problems? Micro Frontends is a good solution.
Micro Frontends (MFEs)
We explored a couple of options, but this was the most straightforward. It made sense, especially because supply chain dashboards are ideally suited to modular access without many connections between different parts. For example, a supplier logs in to access their admin screens to update their address. If you want to pick stuff up from this supplier, go to this address. They have their admin portal. That admin portal is unrelated to an admin or someone associated with purchasing. They can log in and see the list of orders but cannot change those values because it is the supplier's address. They can view that portal, but they will view it only when they order some parts. This was an exact use case for us.
Micro frontends decompose a monolithic frontend app into smaller units. By monolithic app, we mean, for example, a CRA app, a Next app, or an ejected app. The point is that the code base is singular, there is a single entry point, and all of your modules are hosted inside the same space.
- Enables multiple engineering teams to control individual deployments and workflows: With micro frontends, we break down our application into modules. Each module with limited interaction with your dashboard's existing part is separated. As a developer, you must decide where to draw the line on how much interaction is needed between the modules and the existing dashboard. Once you decide to break down your application into multiple parts, you can assign the functionality to the modules. This allows engineering teams to have control over their deployments. If you want to deploy your module, you do not have to wait for other teams. You can deploy at your own pace.
- Avoids technology lock-in for teams: The team is at an impasse: I want to use Material UI, while others want to use Vanilla Extract. We are debating the pros and cons of both. However, with micro frontends, there is no lock-in. You can use any state management tool you prefer, whether Redux or Context. This flexibility is especially useful as the team grows.
- Client-side composition: We implemented micro frontends using client-side composition, meaning everything occurs within the browser. The main shell apps and micro frontends coexist within the browser and are compiled there.
- Enhances scalability: This again goes back to the first point: multiple engineering teams controlling their deployments. You can easily scale and expand on a feature without affecting anything else.
There are a lot of benefits, but how do you implement this?
Implementation
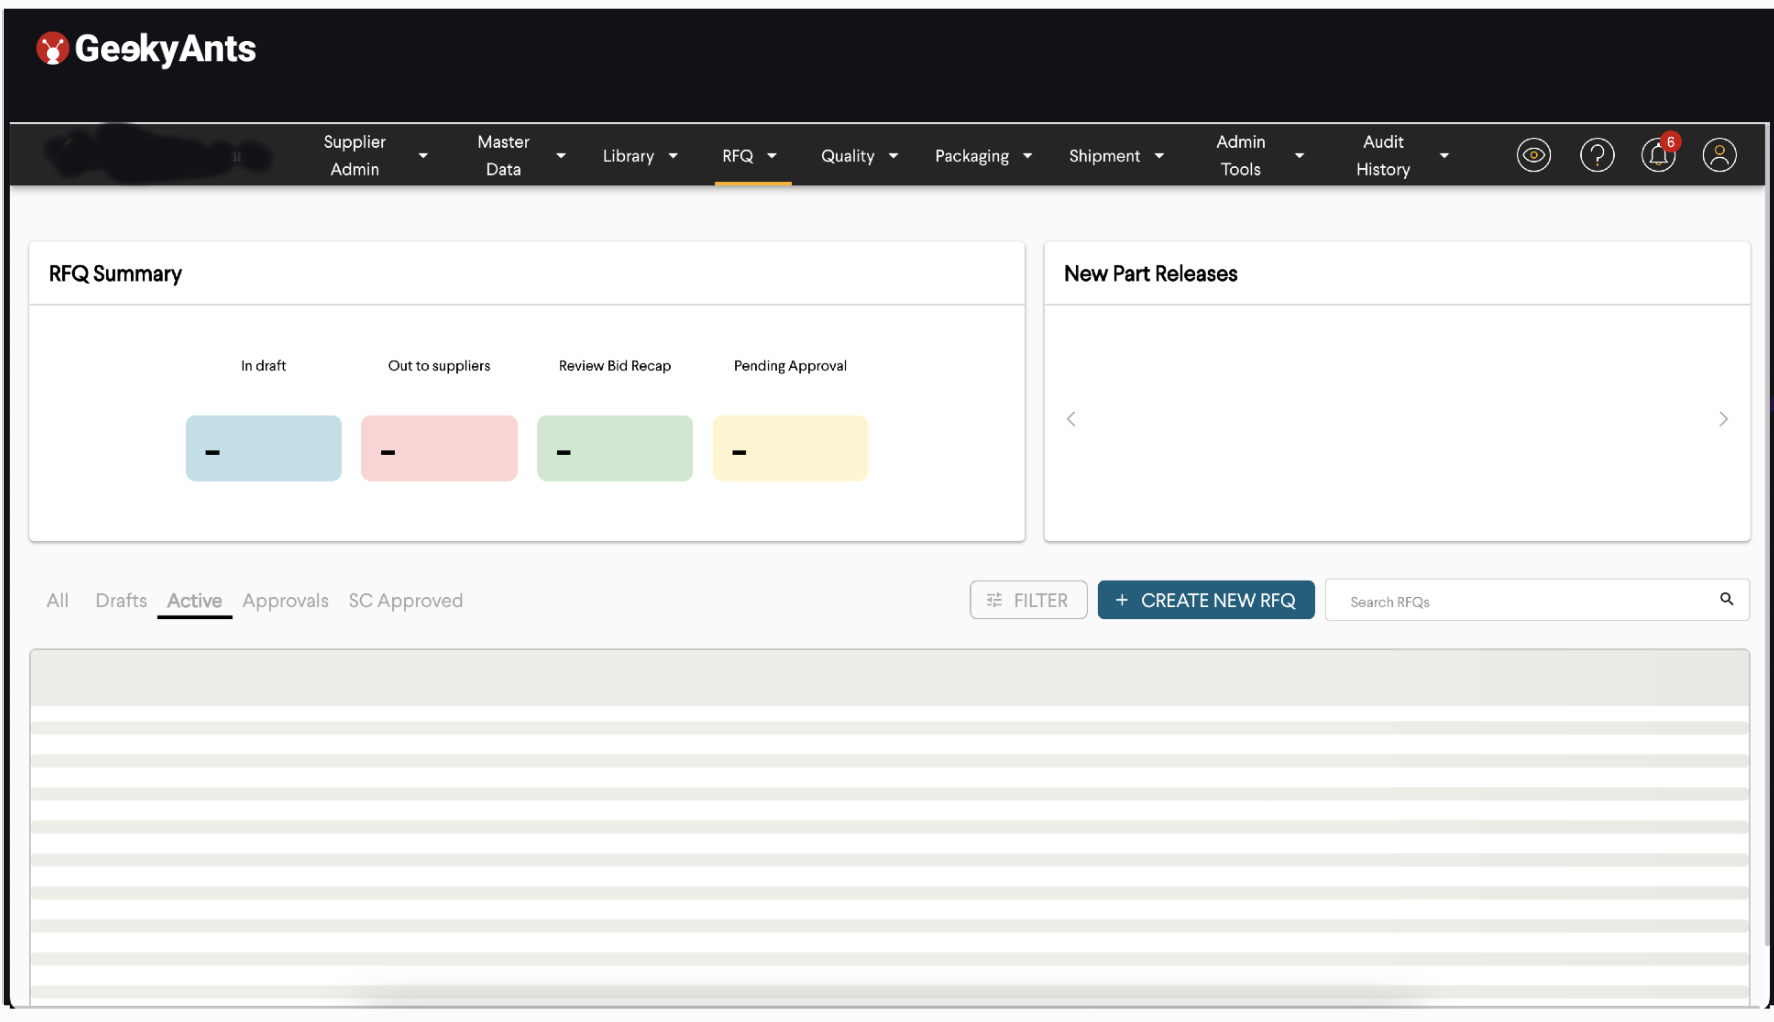
The image above is an example of a supply chain dashboard. You can see that the nav bar is pretty overcrowded. You see a bunch of dropdown selections, each about a specific use case and to a set of approximately 50 screens each. When we started, all of this survived in one application for us. Our task was to divide this dashboard into smaller chunks and assign teams to work on them. We broke down each dropdown into an individual micro frontend. And we could not stop at that.
For example, if you look at the image above, there is a column that says RFQ summary. There is another column that says New Part Releases. New Part Releases is a graph display, while RFQ summary is a metrics display. You can host both of them on separate micro frontends. Or you can put the dashboard below in the loading state into a separate micro frontend. All of your three big contents on this page can survive independently, without dependency.
You can use your styling. If your dashboard needs external libraries, which the other libraries do not want, you can use them. What you want to break and at what point depends on you. We did not break this because the APIs were similar. These actions were not taking a lot of time, and there needed to be more visual dependencies or graphs that were taking time to render. So we decided to break each of these dropdowns into separate micro frontends.
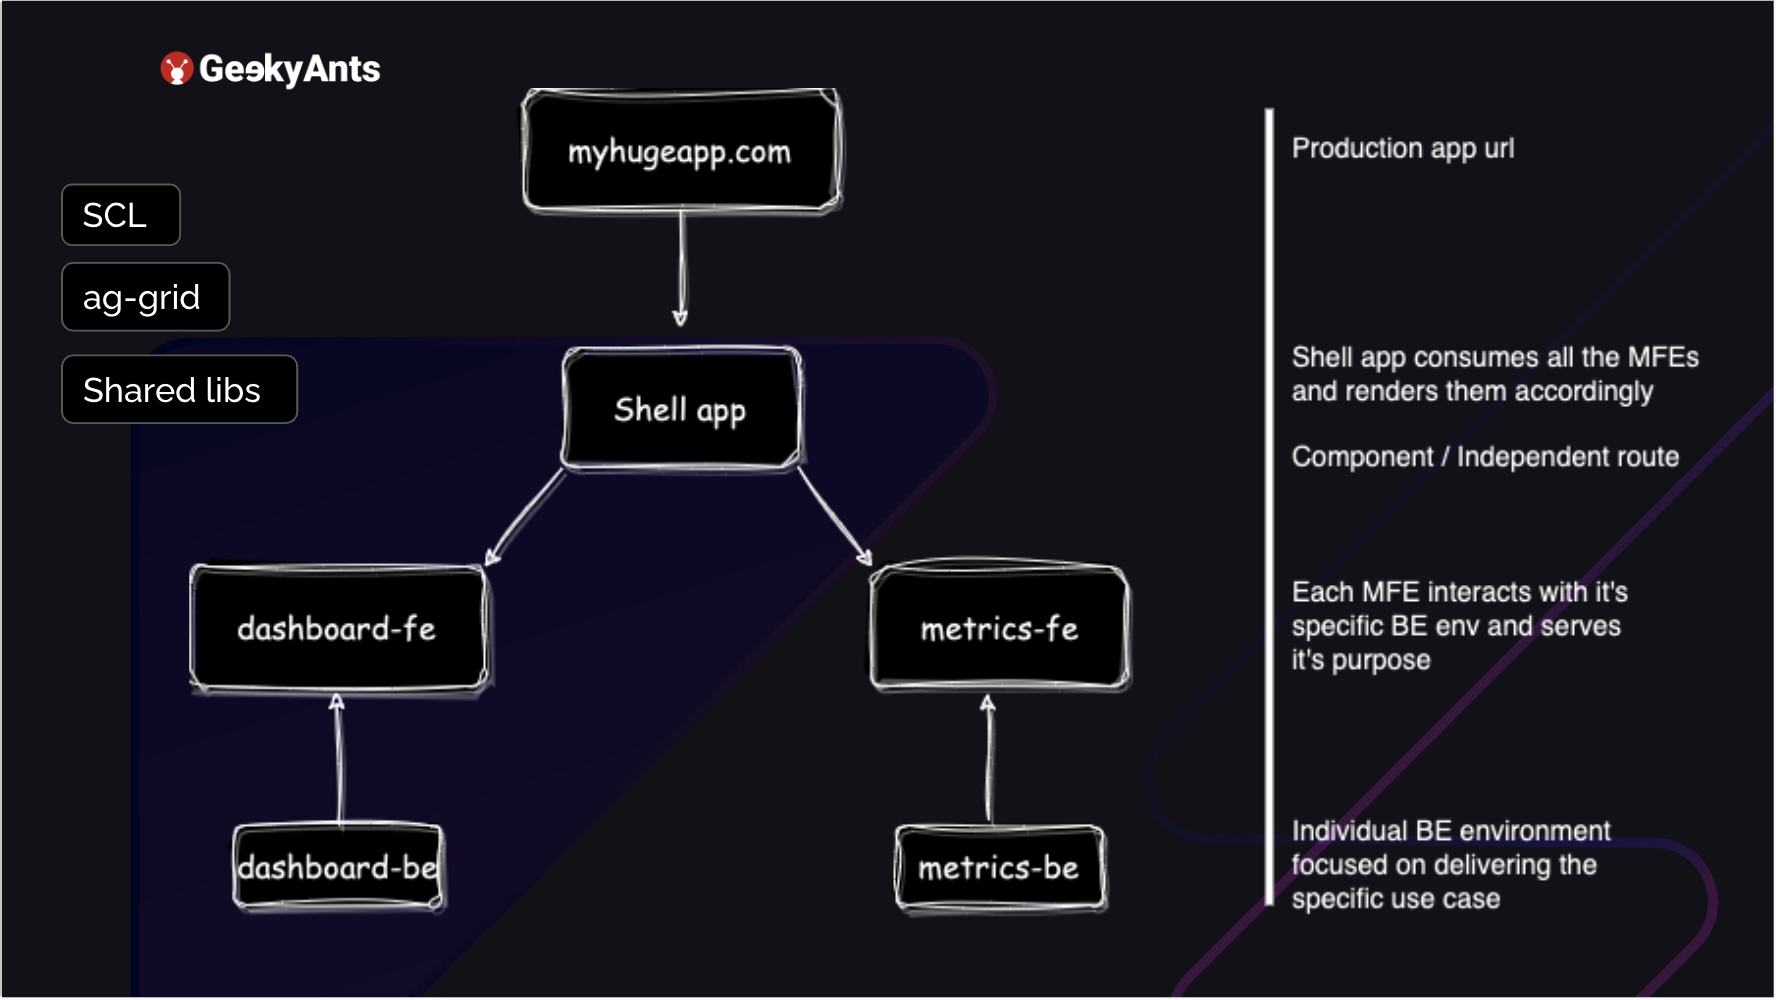
Suppose you have your application. It is hosted, and you have a URL that you access. How do you break it down into a micro frontend? First, you create a shell app. It is best to not create a CRA app when you start to do this. You can, but you will need your webpack config file. Eventually, you will have to export it. You have to eject your app. So, try to start with a plain NPA minute JavaScript application, add a webpack config, add a package .JSON, and just get started. The shell app consumes all your micro frontends.
Right now, the shell app's task is to take in all the micro frontends and display them wherever they are supposed to be said. For example, in the previous image, the navbar can ideally survive and is not dependent on each micro front end. But, as soon as you click on the dropdown and link that route, the component you return can be a micro frontend, whether you want to return your dashboard or your metrics. These are each MFE that you have, metrics, and dashboard.
Each MFE has its backend environment. You can host it separately. It is serving your front end rather than dealing with anything else. If there are common functions, you can export them. If you are, for example, using an AWS environment, you can export them into a LAMBDA. But the backend itself, the schema of it, is hosted separately. No connection to the other MFE. Along with this, you can also use your shared component libraries on the side.
Or you can use some grid libraries, for example, ag-grid, or you can have some other shared libraries. So your shared component library is the one that follows your organization's design system and builds components up. That can be a common library that all of your applications use. Your shell app, your dashboard-fe, and your metrics-fe. It just has to be installed in each of them directly for direct use, without changes.
A Look at Some Codes
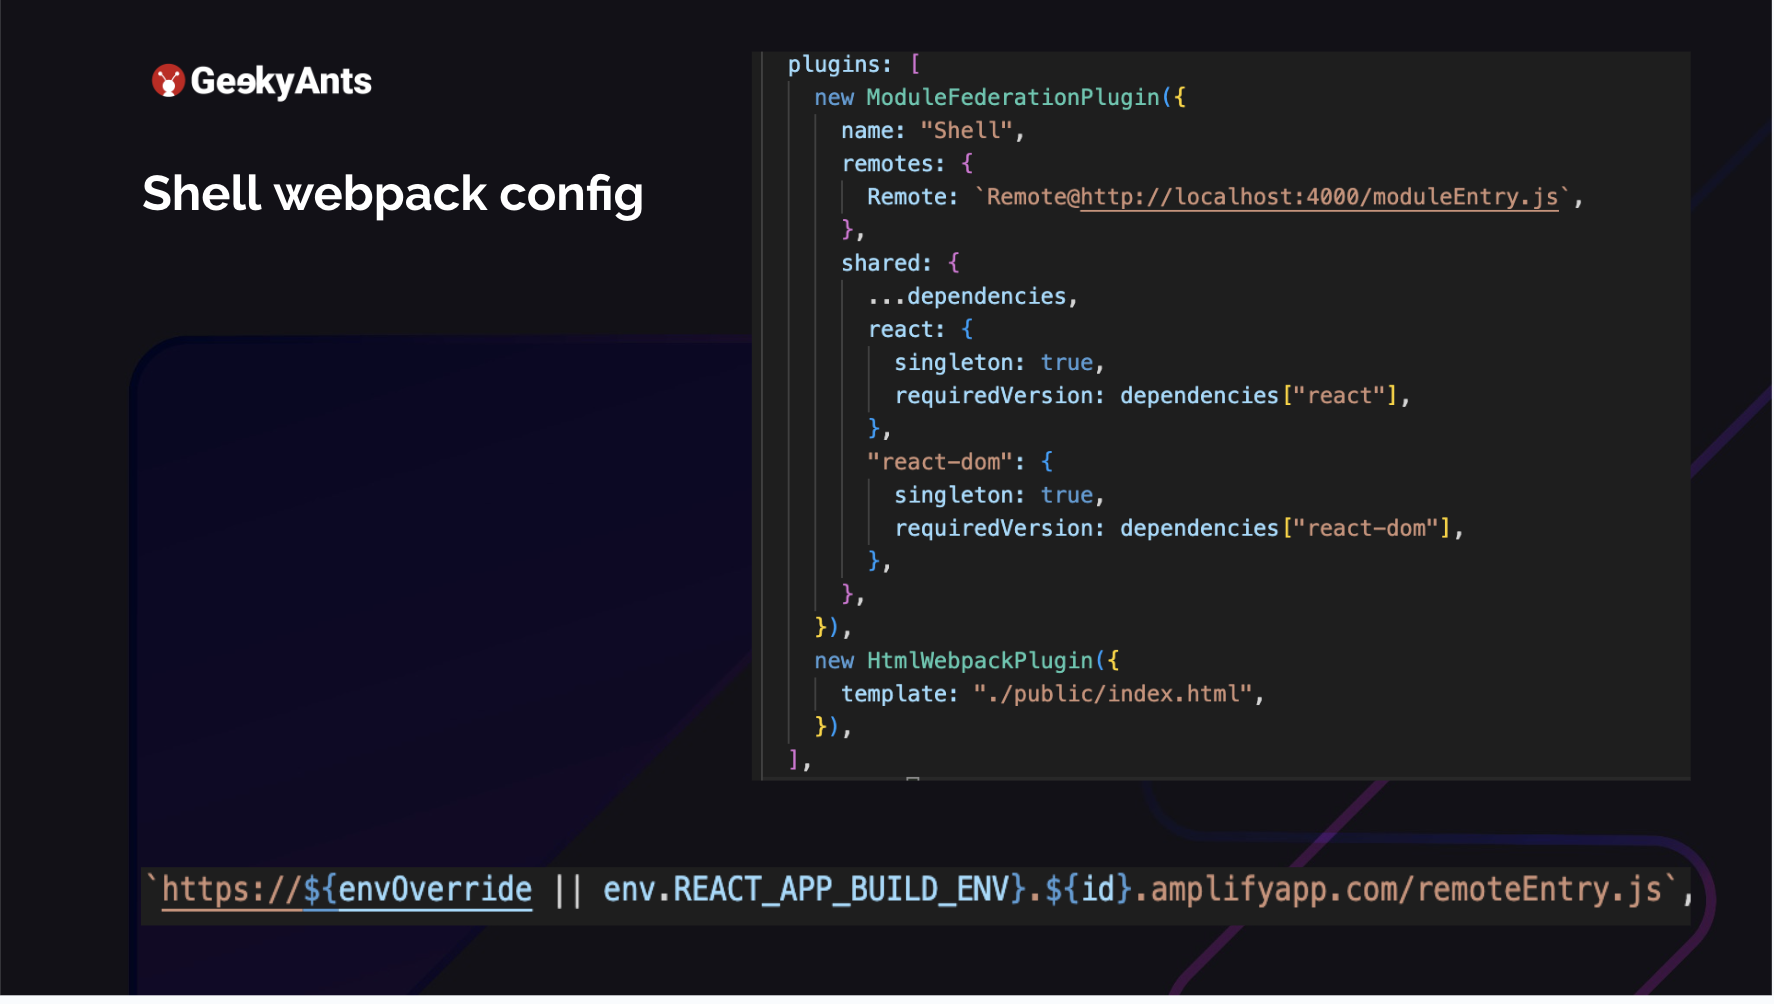
Let us take a look at the webpack config. This is the Shell app, which is the parent app, which combines all the individual applications. Here, I am adding a new ModuleFederationPlugin. So I am using webpack with Module Federation. Webpack 5 has some great improvements to use Module Federation. I named this as my Shell, and I have added a Remote to it. My remote is running on my localhost:4000 at moduleEntry.js. It is a simple app, like when you do a yarn start for a CRA or if you are doing a yarn start for a web pack ejected build. This is where my app is running. So what is happening here is that the Shell app is running on 3000, but the 4000 is for my micro frontend. I will be returning to the line at the bottom later.
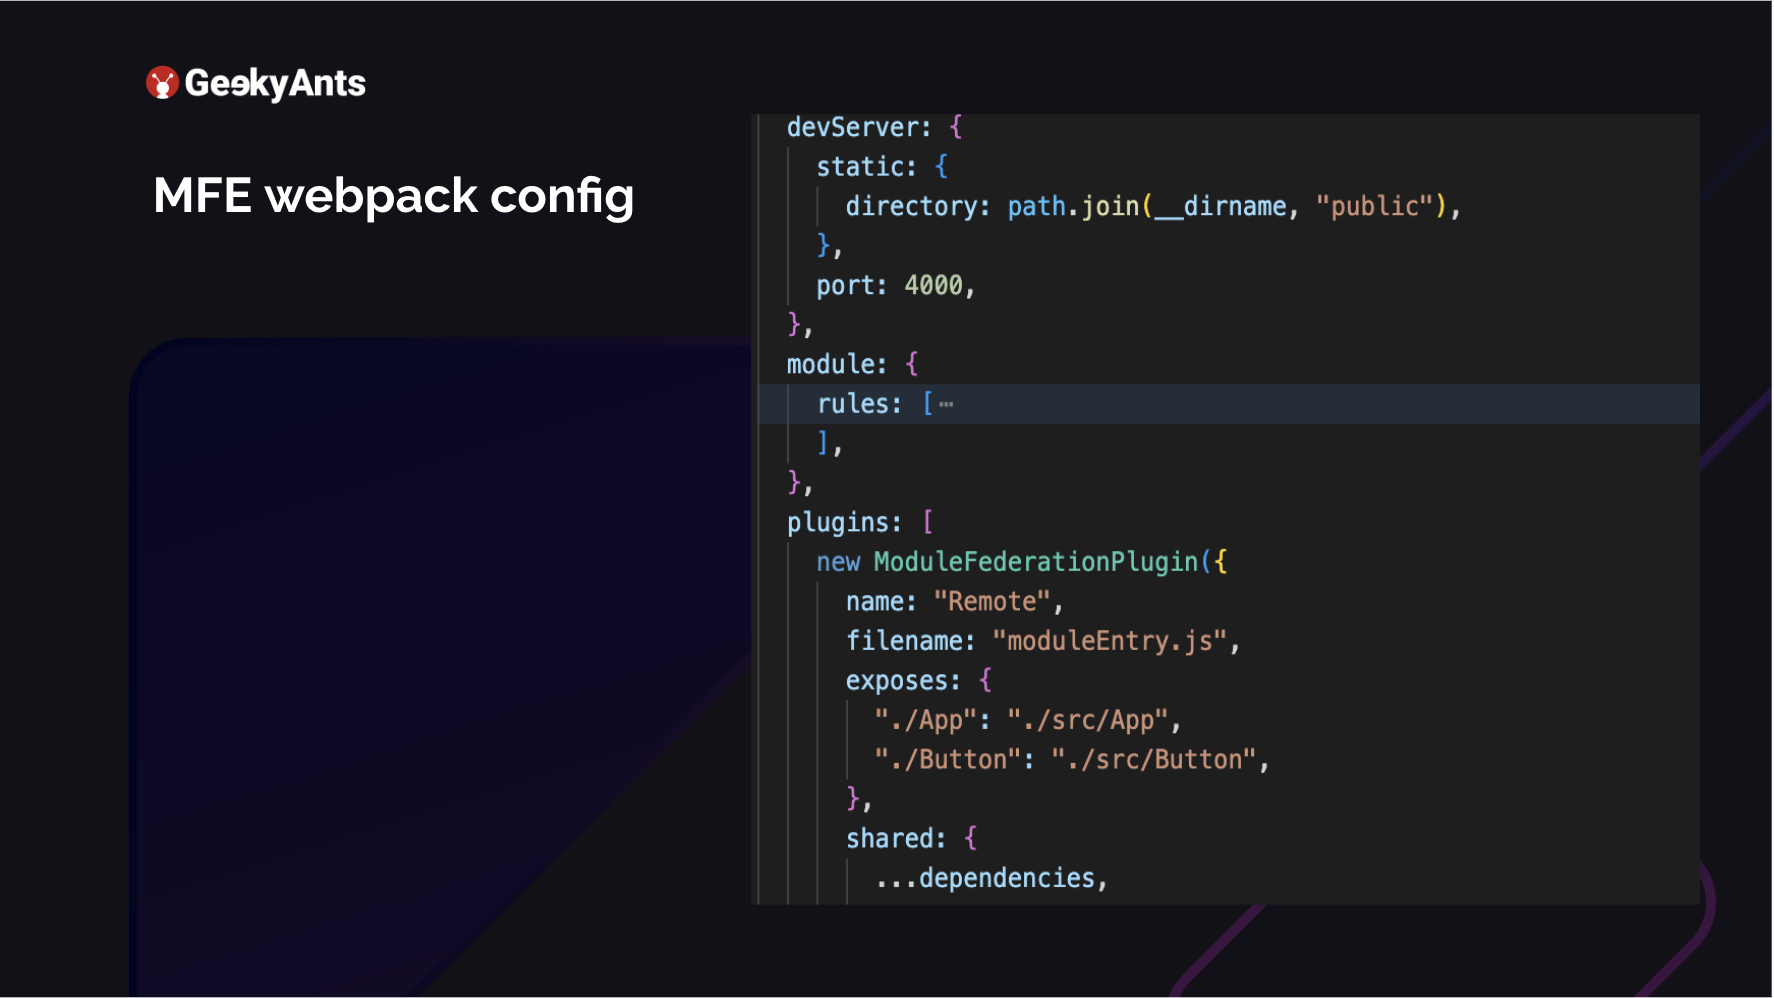
The above is my MFE. This is my micro frontend, like dashboards-fe metrics-fe. It exposes the entry name of the file and the name of the plugin that I am adding. What does this module actually expose? I have exposed the app, which is src/App, and I created a small button component. I am trying to export that also from the same micro frontend. I could go ahead and host this button in another micro frontend. And all I need to do is change the remote access of this application. Currently, this one exposes App and Button. How would you go ahead and use this?
Usage
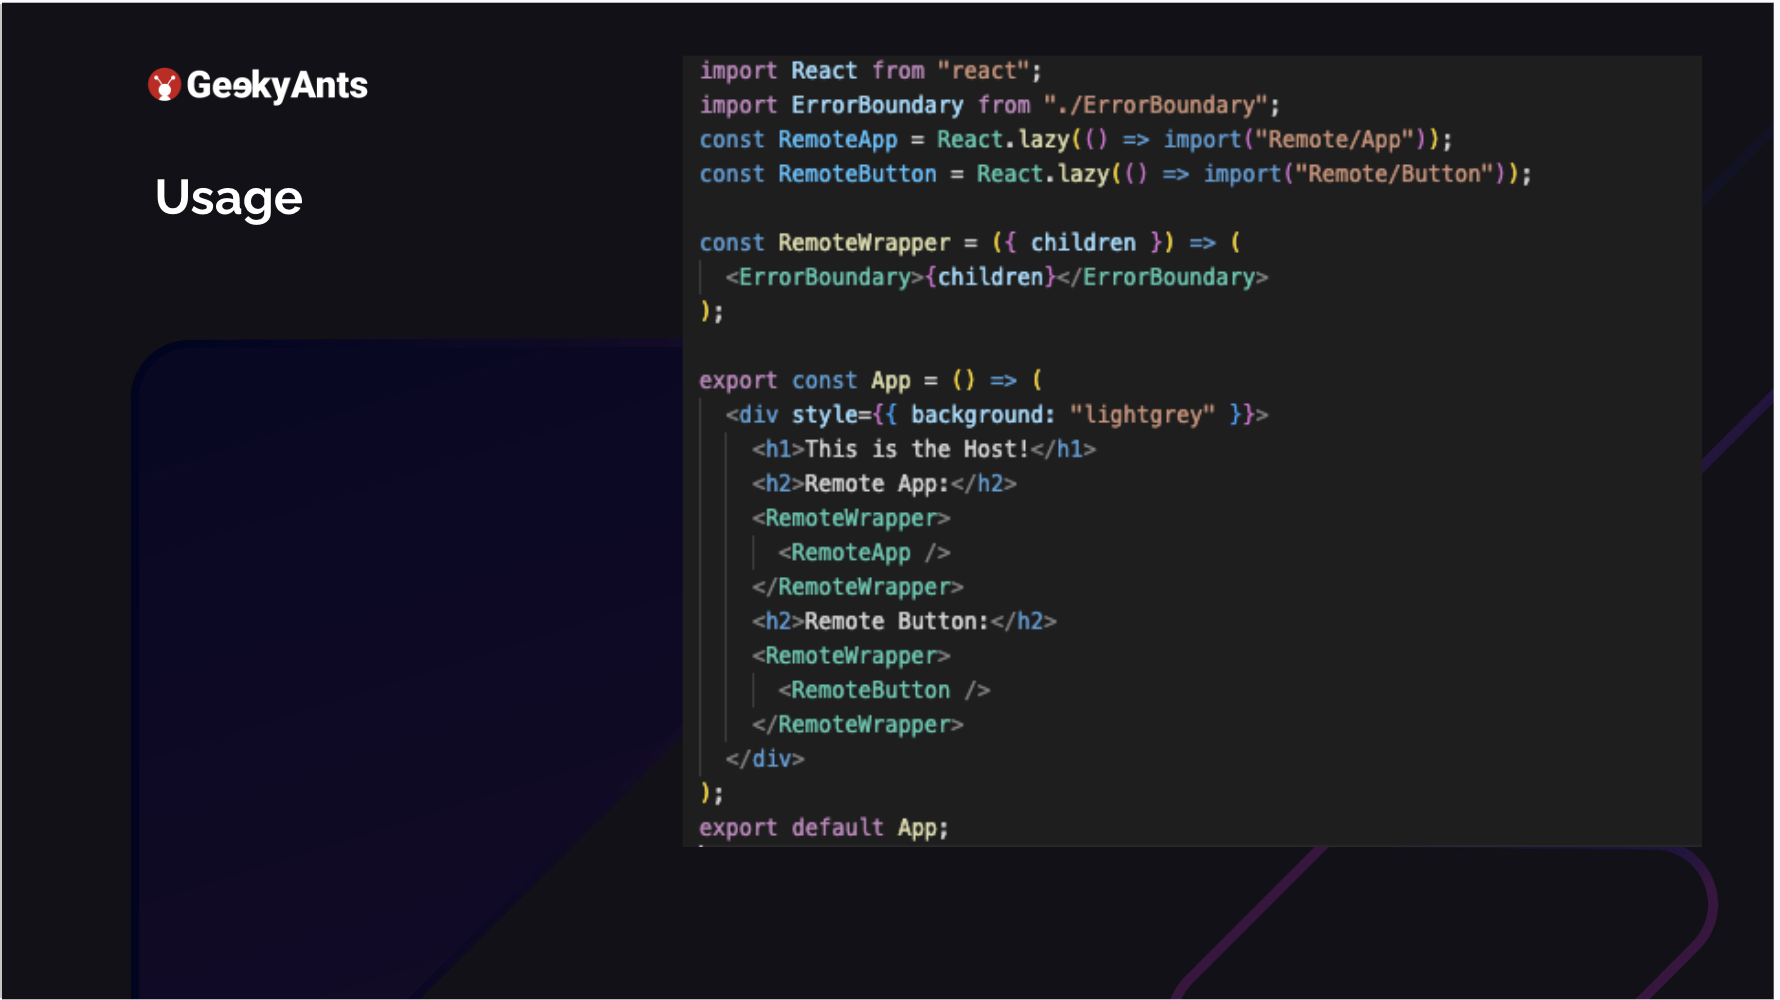
You run this application on 4000. Your shell is running at 3000. Now how do you use it as a lazy input on your remote? So we defined that as remote, where our MFEs were hosted. And what we are doing is we are just importing what we exposed. We exposed App, and we exposed Button. We are importing both of those. We go ahead and render them. We are in the host, which means we are in the shell. We have just rendered an application. The RemoteApp key in the image above is neither a part of this application nor the RemoteButton. Both of these come from their micro frontends, but we can quickly render them there. This is how it shows up.
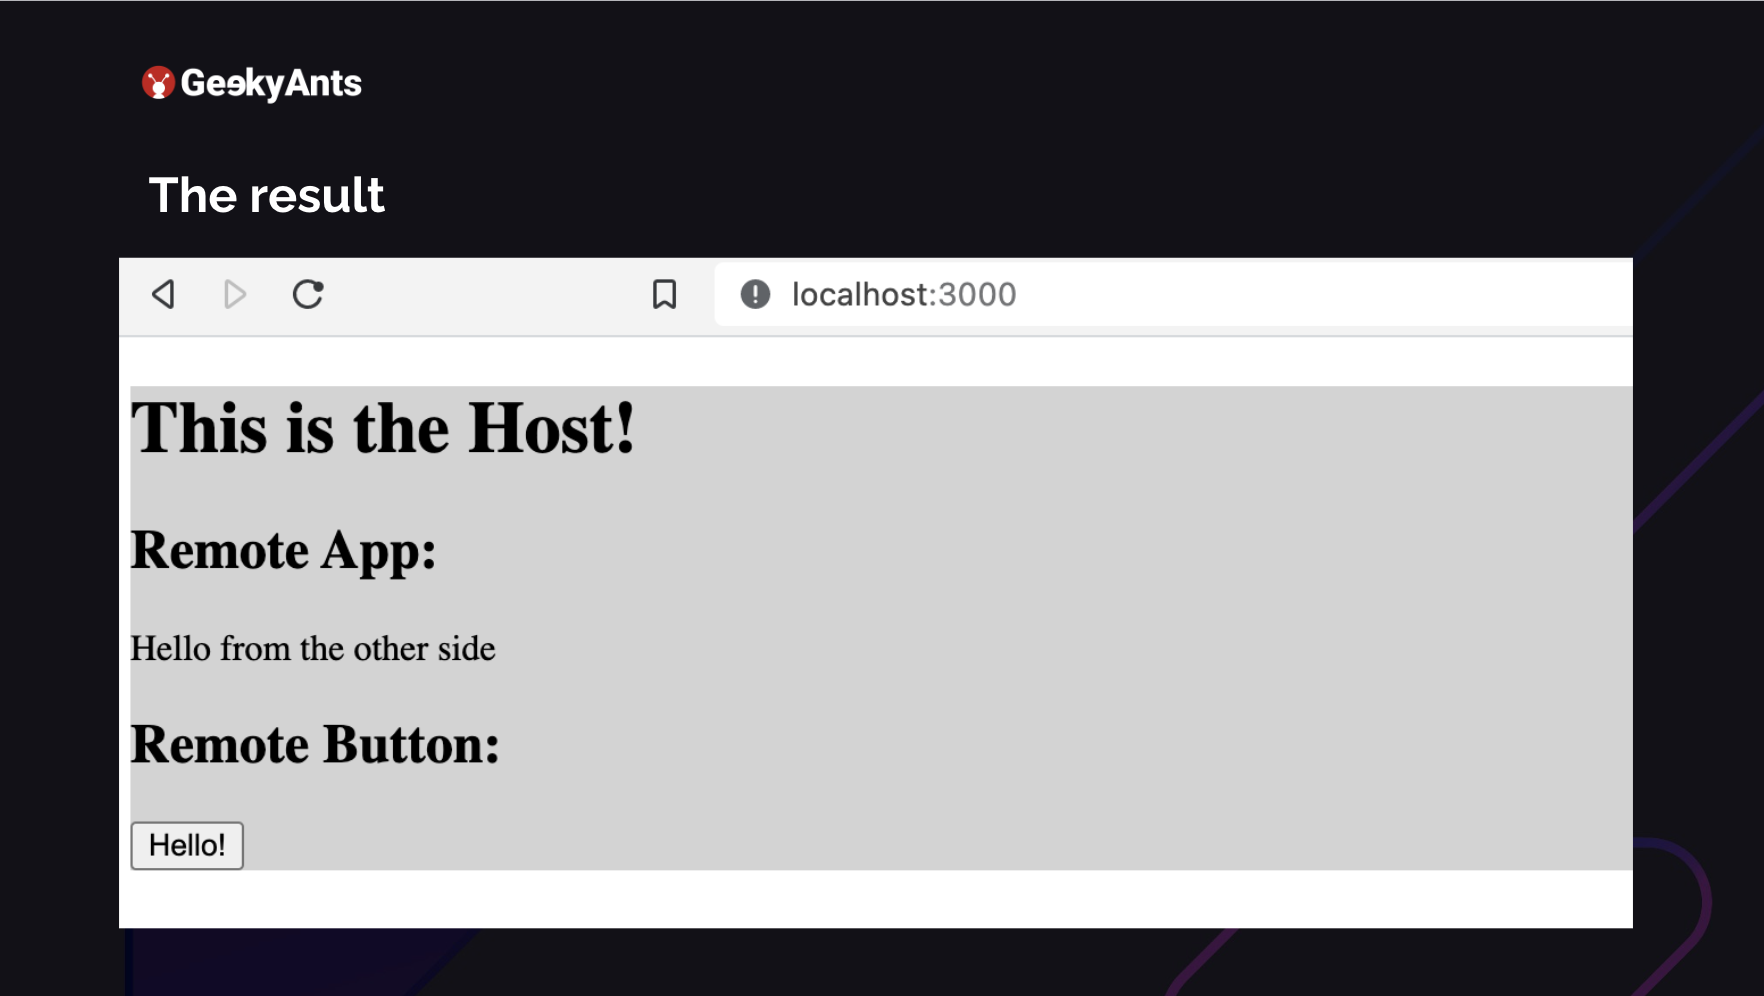
The button that you see and the Hello from the other side in the image above are coming from another application. You can run all of this together in your shell. This is a very basic example of how you run these micro frontends. So we can understand that webpack config is not very complicated and straightforward.
Conflicting Build Time Classnames
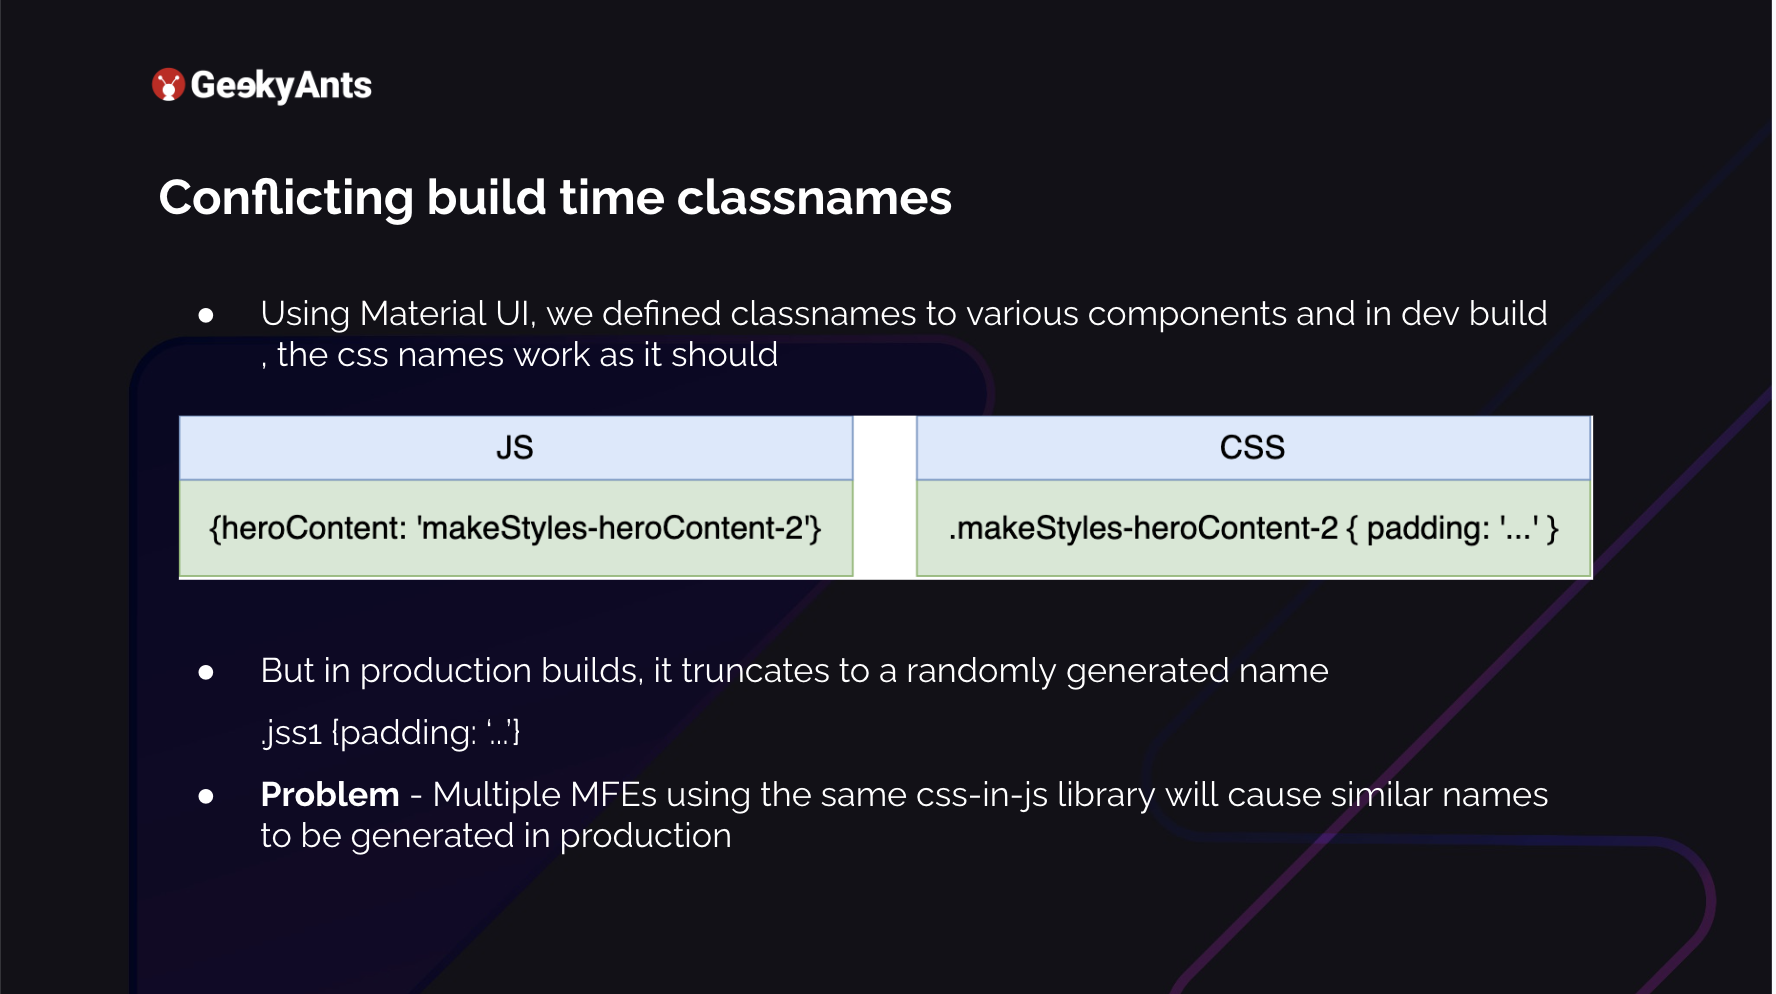
One of the main things that we found after we did this was that we could not identify which element was where. Instead of the dashboard, the screen was covered with a red background. Instead of metrics, we were seeing the component elongated and even bigger than the whole screen. You could not see anything on the whole application. What was actually happening was that each MFE was using Material UI and in development, what happens is that you assign a class name to your div. You say it is heroContent and you make many changes to it. You want to give it a padding. So what it is going to do in your dev environment is append it with your make styles, which Material UI exposes, and then it will assign whatever padding there was. And this is fine; we have no issues with this. But in production, what happens is that it tries to save a lot of space.
When it wants to save space, this long name .makeStyles-heroC-2 is too long. So it randomly generates strings, which it assigns to those specific styles you defined there, like, for example, whatever your padding is. For example, it defines .jss1. Now the problem is multiple MFEs are using the same library, and in the production build, all of them are creating multiple .jss1. This will never happen in a monolith architecture because they know this is common but already created. So in one micro frontend, these .jss1s will always be unique, just as .jss1, .jss2, etc. But multiple micro frontends need to learn about this. We started looking into this.
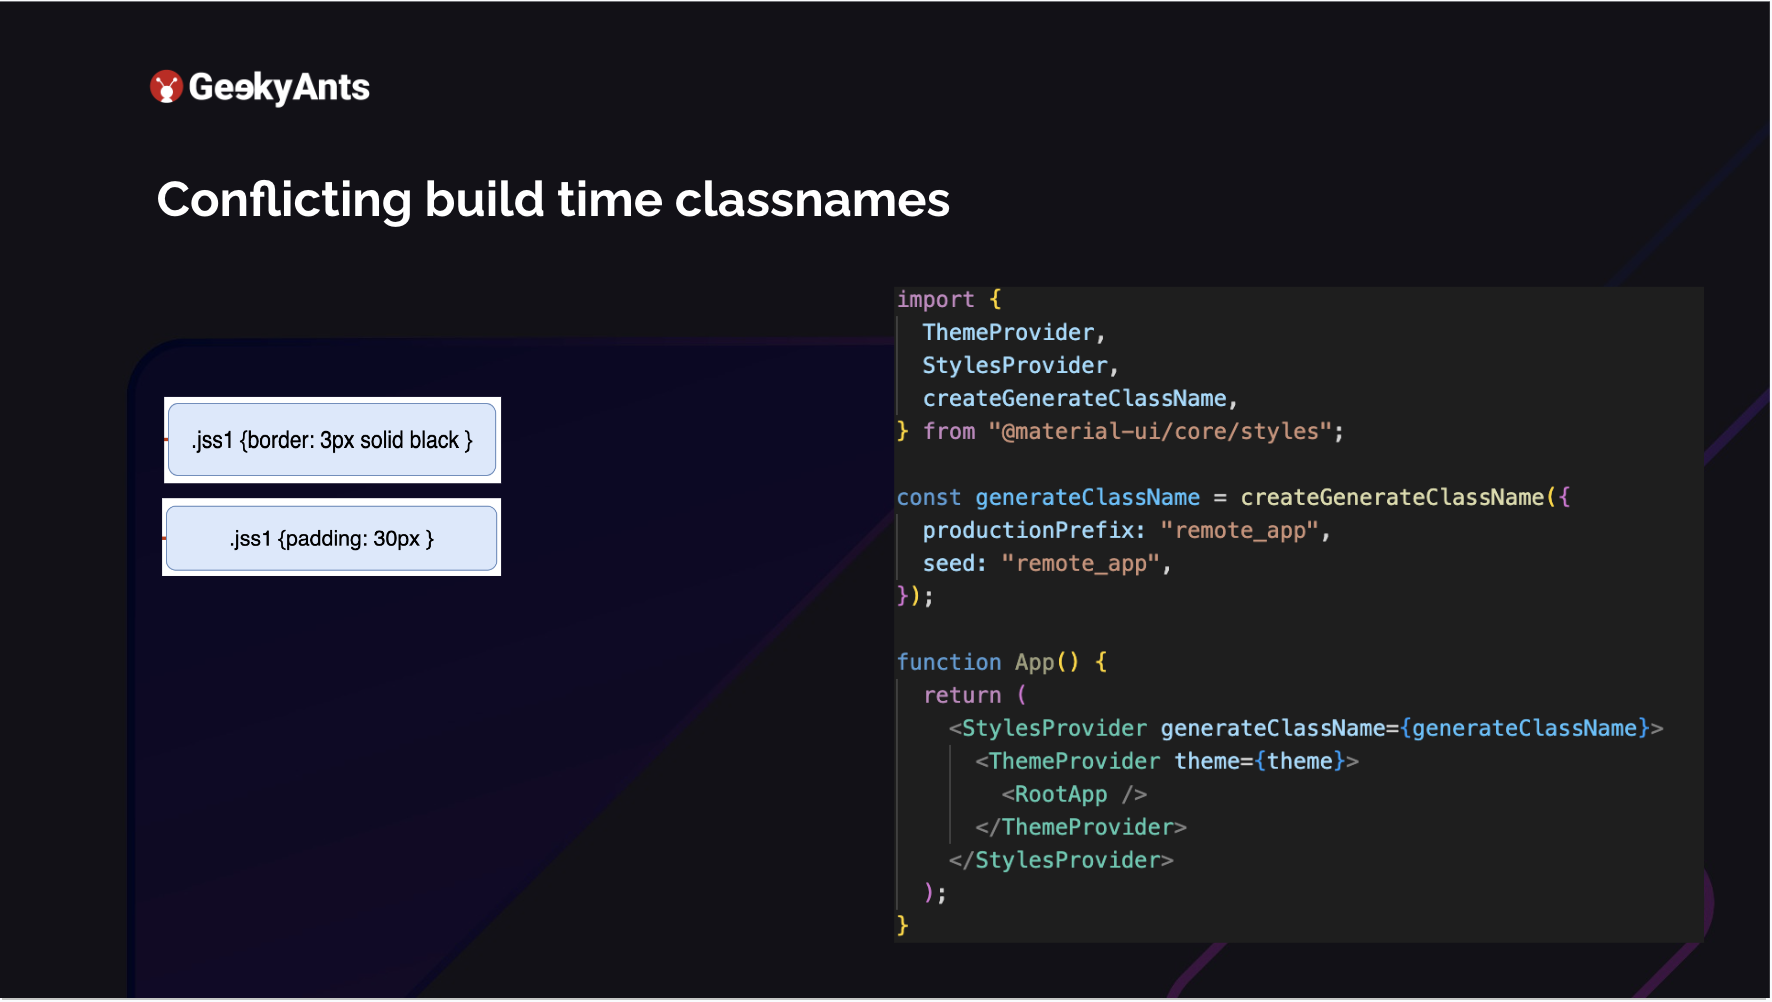
Material UI, on its behalf, knew about this. It provides us with a createGenerateClassName, which provides you access to enhance it and make your classnames. You add a prefix to it, each for a specific micro frontend, which is a unique name. Add that prefix to your generated classname, like .jss1 .jss2. This becomes unique, so you never encounter any style issues. You pass this to the StylesProvider, which is, again, exported from the material-ui/core. This was one of the big problems we faced and solved quickly.
MFE Considerations
Keep in mind some considerations before you jump to make an application into a micro frontend.
Migration From an Existing Architecture is A Big Task: Before you start, ensure that your entire team is on board. For the application we worked on, we had to extract approximately 120 screens from an existing production application and move them to a separate MFE. We expected this to work seamlessly, but it did not. It took us three months to complete the task after two years of development, with 15 developers working on the app. This gives an idea about the size of the application. Therefore, ensuring everyone is on the same page before starting is crucial.
Complexities in Maintaining State and Sharing Information. When working with MFEs, you have the option to use Redux, Context, or even MobX. However, you must pass down the state from your shell, which inherently has some state, even if it is minimal. For example, you may have global feature flags or user objects to share with your MFEs to indicate whether a user is logged in or out. To achieve this, you must pass these variables down, but since you are not using a state management library on the shell itself, each MFE cannot control it. Thus, when passing data from the shell, you must ensure that you pass a callback to tweak the data, among other things. This leads us to the next point.
Challenges in Auth Information Sharing: This authorizes if the user is logged in or logged out and how to inform the MFE that a particular user logged out from the shell. Because the logout feature is not on the MFE, it does not control whether the user is logged in.
Increased Testing Coverage: End-to-end tests become difficult. Each micro frontend is hosted in its entity, and now end-to-end test cases run from the user logging in, interacting with five different modules, and logging out becomes an issue. This is because you have to go into each micro front end and take care of what they are trying to do in that micro front end.
Maybe the setup is completely different, and then your test cases need to be tweaked. The best way is to have a very good amount of coverage on each micro frontend, which helps you down the line. Then even if end-to-end coverage is not possible, you will still be good after completion. So it is necessary to make sure to allocate time for that.
Summing Up
This is a summary of the learnings we gained from the project. Currently, we have eight micro frontends, each of which can be deployed at its own pace. We no longer need to wait for anyone, and we have resolved the problems we had a few years ago ultimately.
For a better and more detailed breakdown of this article, take a look at the full video below ⬇️
Subscribe to Our Newsletter
Subscribe to RSS
Press & Media Hub RSS FeedRelated Articles.
More from the engineering frontline.
Dive deep into our research and insights on design, development, and the impact of various trends to businesses.

Jul 22, 2026
Why Healthcare Organizations Are Moving Beyond Telehealth Toward AI-Driven Care Systems
Jul 20, 2026
AI Operators in Insurance: Improving Customer Experience Through Intelligent Automation

Jul 17, 2026