
From Setup to Your First Test on Emulator and Real Device
Mobile apps dominate the digital experience; delivering bug-free applications quickly is non-negotiable. Whether it’s a shopping app or a fintech solution, quality assurance must scale with development.
This is where Appium shines — enabling robust, cross-platform mobile automation.
In this blog, you will walk through:
- What Appium is and how it works
- Setting up your automation environment
- Running your first test on the emulator and real devices
- Common issues and how to fix them
Let’s begin your mobile automation journey!
What is Appium?
Appium is an open-source automation tool that allows you to test native, hybrid, and mobile web apps on both Android and iOS platforms — using the same API. Built on the WebDriver protocol (just like Selenium), Appium provides the flexibility to write tests in your favorite programming language.
Why Appium?
- No need to recompile or modify the app under test
- Supports Java, Python, JavaScript, Ruby, and more
- Works across Android and iOS platforms
- Completely free and actively maintained
Appium saves time and effort by making your mobile test code portable and scalable across platforms and devices.
Understanding Appium Architecture
Appium operates on a client-server model built over the WebDriver protocol. It acts as a bridge between your automation scripts and the mobile device — whether it’s an emulator, simulator, or a real phone. This architecture allows platform-independent test execution using a single API.
Here’s a simplified view of its core components and how they interact:
1. Appium Client
This is your test script, written in languages like Java, Python, JavaScript, etc., using WebDriver-compatible libraries. It sends automation commands (like click, type, scroll) to the Appium Server via HTTP.
2. Appium Server
A lightweight Node. JS-based server that listens for incoming requests from the client. It interprets those commands and routes them to the appropriate mobile automation engine based on the platform (Android/iOS).
3. Automation Engines
These engines handle the actual interaction with the device’s UI:
- UIAutomator2 / Espresso (Android) – Executes commands on Android devices
- XCUITest (iOS) – Executes commands on an iOS device
4. Mobile Device (Emulator, Simulator, or Real Device)
The target device where your app is installed and tested. This is where the actual interactions (clicks, swipes, input, etc.) happen, driven by the automation engine.
5. Platform-Specific Bootstrap Components
Appium deploys helper apps (like uiautomator2-server.apk and Appium Settings for Android) to facilitate communication between the Appium Server and the OS. These components ensure commands are reliably executed on the device.
How Appium Executes a Test Command
Here’s the complete flow of a single test command inside Appium’s architecture:
- Command Sent: Your test script (client) sends a command using WebDriver over HTTP (e.g., “Tap the Login button”).
- Server Processes: The Appium Server receives and parses the command, checks the desired capabilities to identify the platform.
- Routing to Engine: Based on the platform (Android/iOS), the server forwards the command to the correct automation engine.
- Interaction with Device: The engine acts as the app via the connected device or emulator.
- Response Returned: The result (success/failure) travels back through the engine and server to the test script.
This separation ensures flexibility and supports a wide range of platforms and use cases.
Prerequisites Before You Begin
To get started with Appium, ensure the following software and tools are ready:
Required Tools:
- Java JDK (11 or higher)
- Node.js & npm
- Android Studio (for SDKs, emulator, platform tools)
- Appium CLI
- Appium Inspector
- Code Editor or IDE (e.g., IntelliJ, VS Code)
Programming Language Setup
Depending on your choice (Java, Python, Node.js), install the respective language and dependencies. For this blog, we’ll use Java for examples.
Setting Up Your Automation Environment
Here’s a step-by-step installation guide:
1. Install Node.js & NPM
Download from https://nodejs.org or use Homebrew on macOS:
Bash:
Brew install node2. Install Appium CLI Globally
bash:
npm install -g appiumTo start the server:
Bash:
Appium3. Verify Setup with Appium Doctor
bash:
npm install -g appium-doctor
appium-doctor
It will check for missing dependencies, such as Java and Android tools.
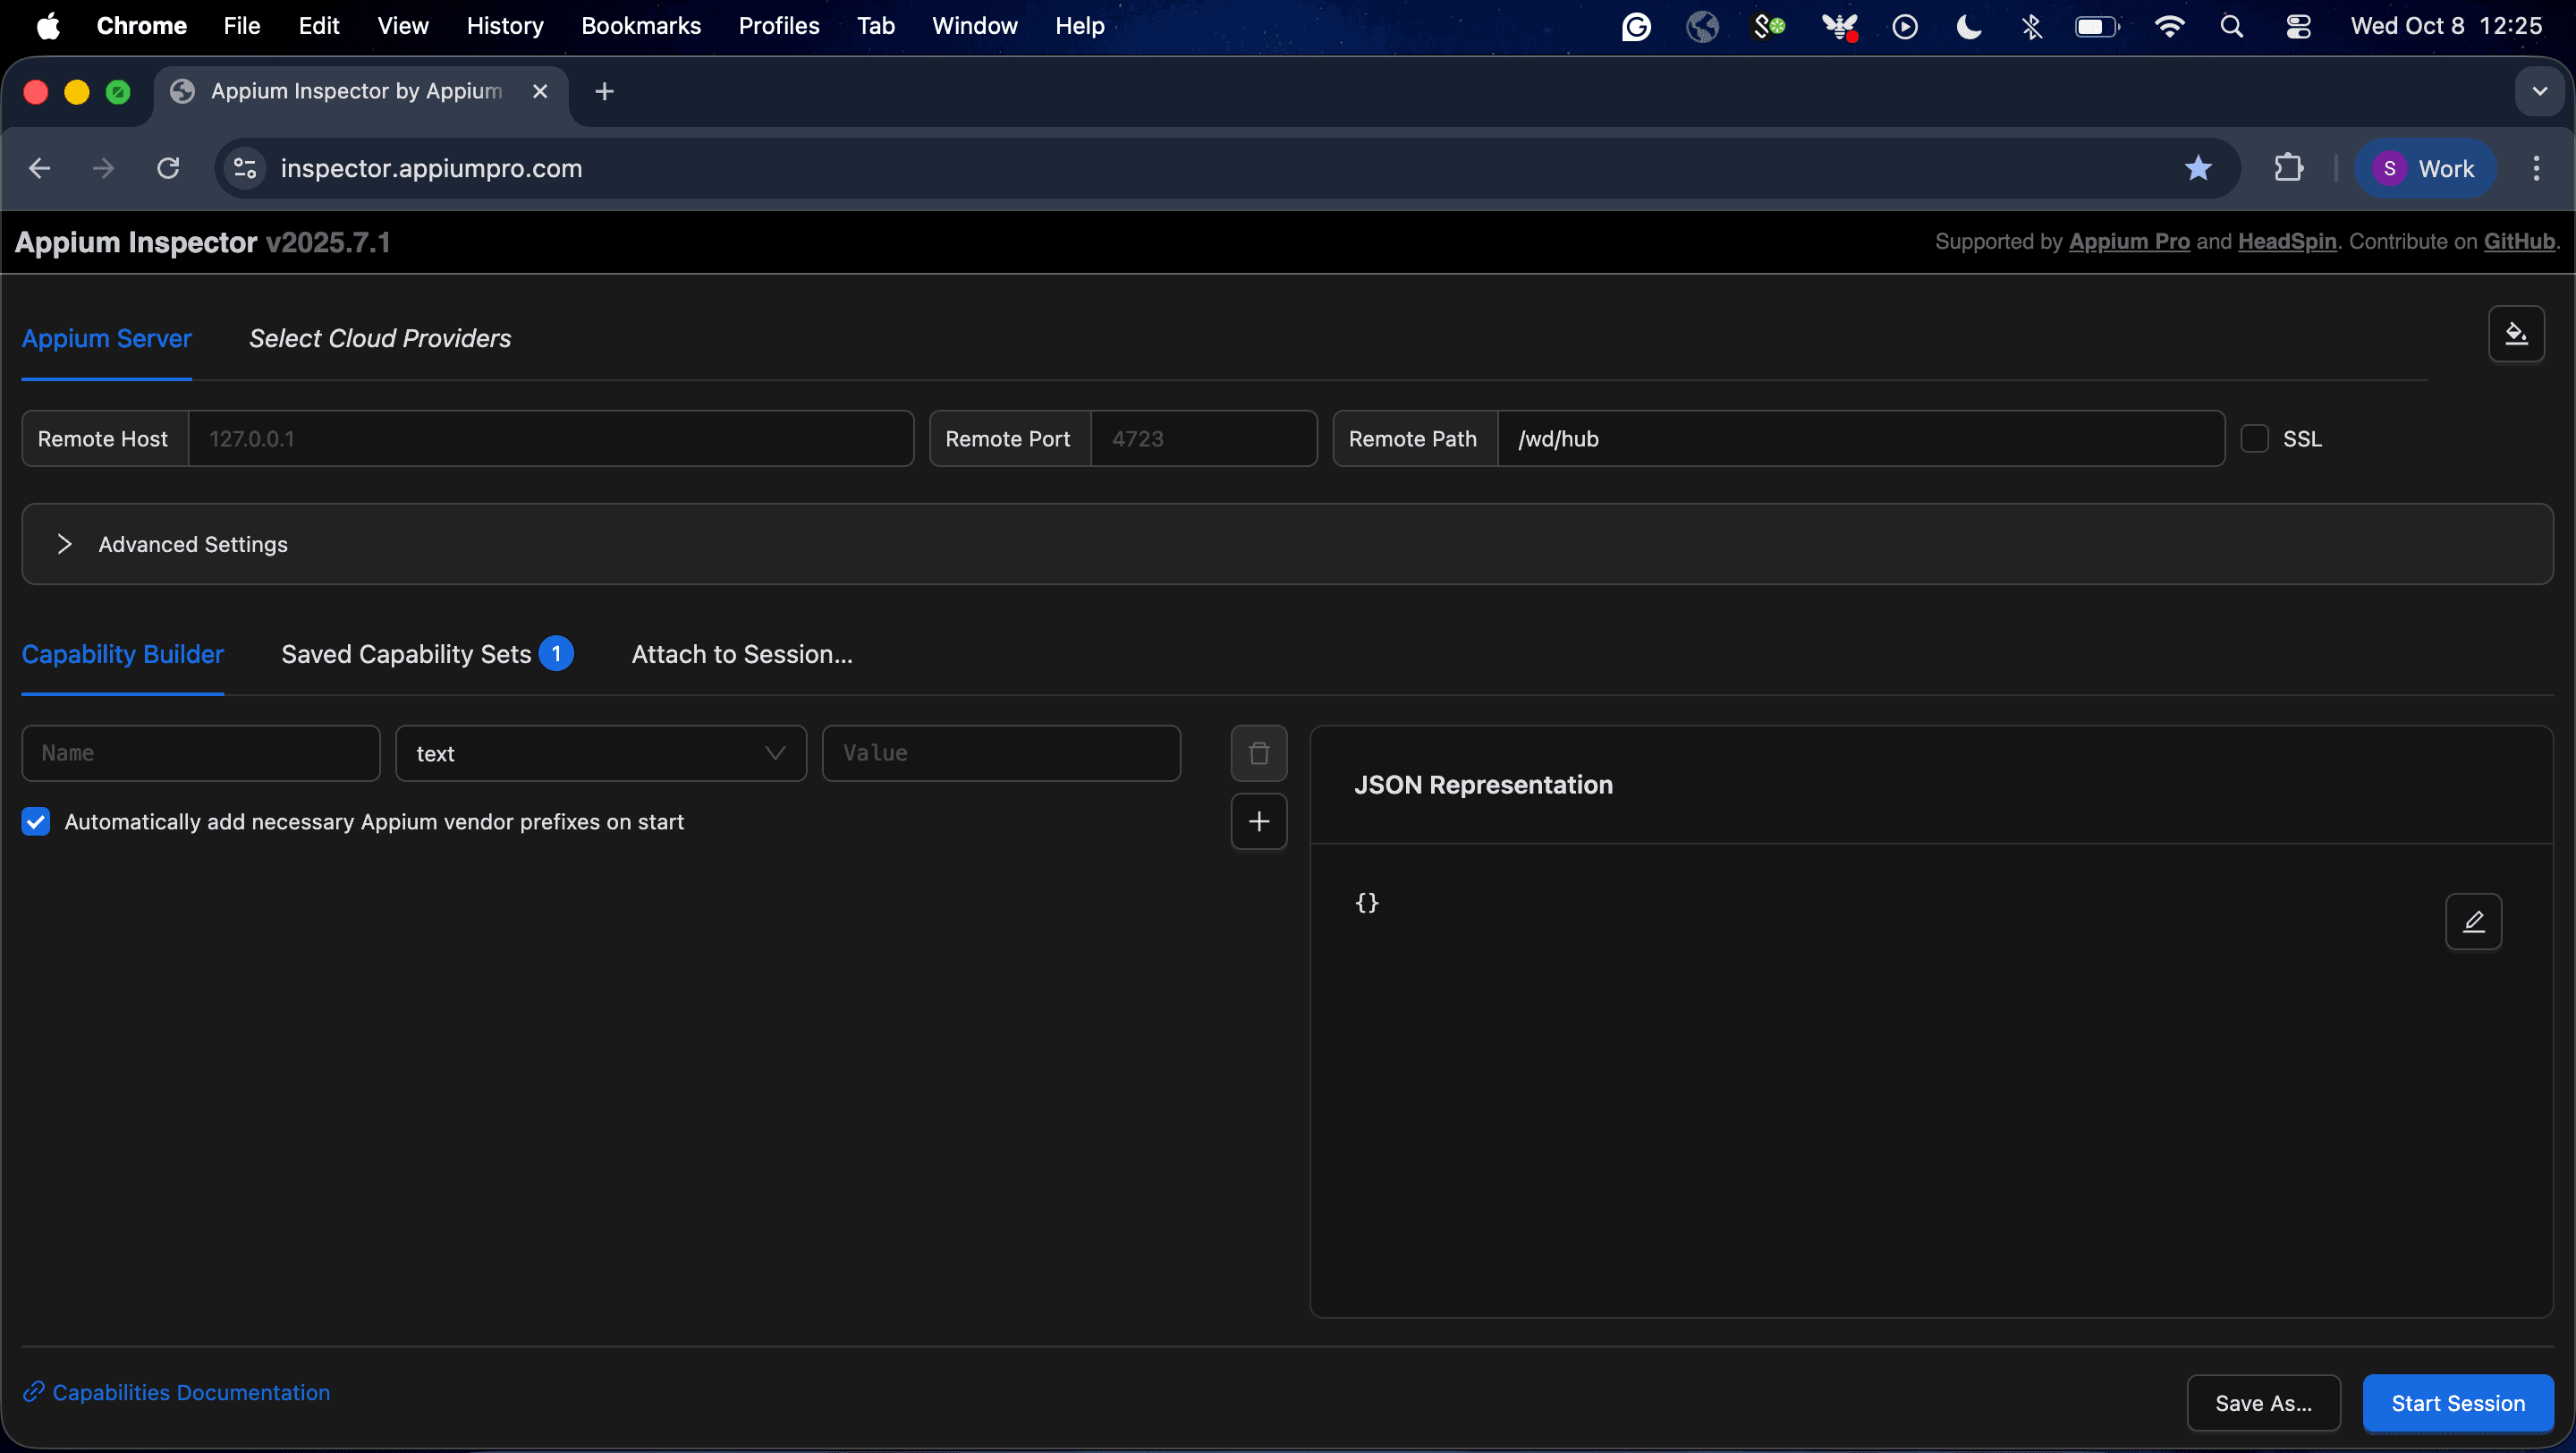
4. Install Appium Inspector
Download from GitHub Releases. This tool allows you to inspect UI elements on your app and generate locator strategies. Ensure you download the corresponding file for your operating system.
Otherwise, you can use a web version of Appium Inspector, which will work similarly.
5. Set Environment Variables
Ensure you add these to your .zshrc or .bash_profile:
Bash:
export JAVA_HOME=$(/usr/libexec/java_home)
export ANDROID_HOME=$HOME/Library/Android/sdk
export PATH=$ANDROID_HOME/emulator:$ANDROID_HOME/tools:$ANDROID_HOME/platform-tools:$PATH
Then:
Bash:
source ~/.zshrc # or source ~/.bash_profileAndroid Studio & Emulator Setup
1. Install Android Studio
- Download from: https://developer.android.com/studio
2. Set Up SDK Tools
- Open Android Studio → SDK Manager
- Install: SDK Tools, Platform Tools, and Build Tools
3. Create and Launch an Emulator
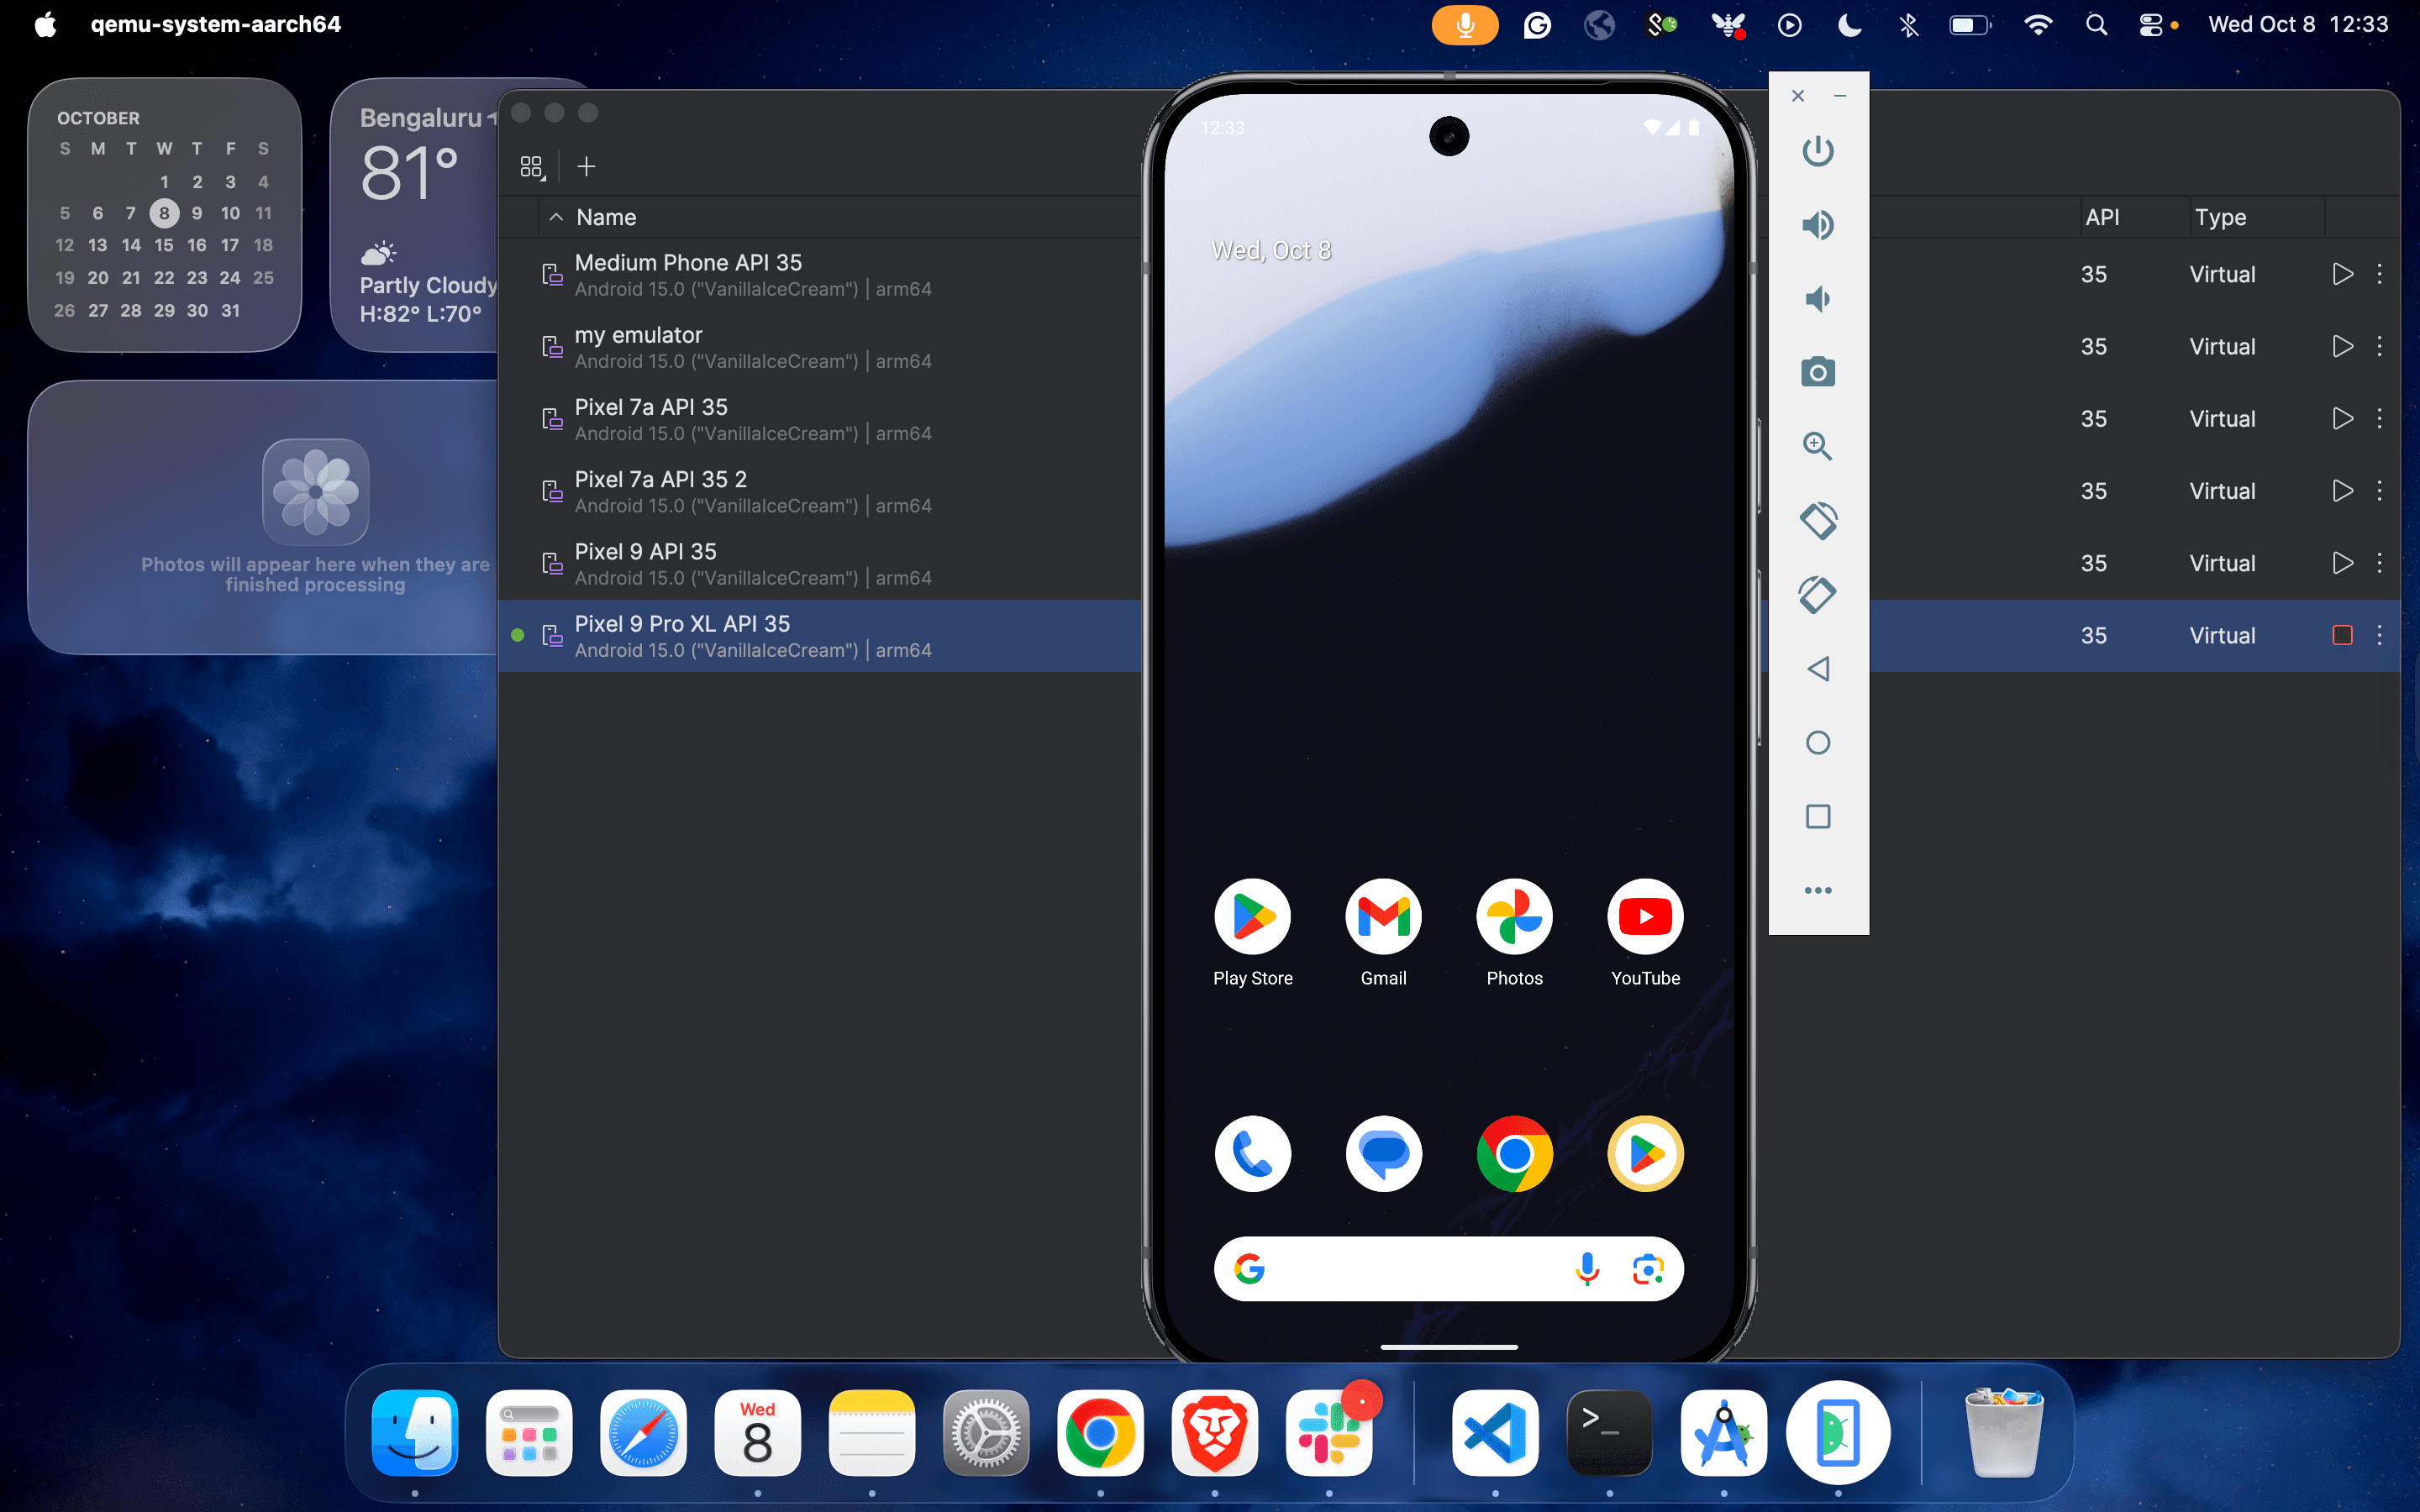
Use AVD Manager inside Android Studio to create a virtual device. Ensure it's a recent Android version (e.g., API 30+).
Follow the process to launch an emulator:
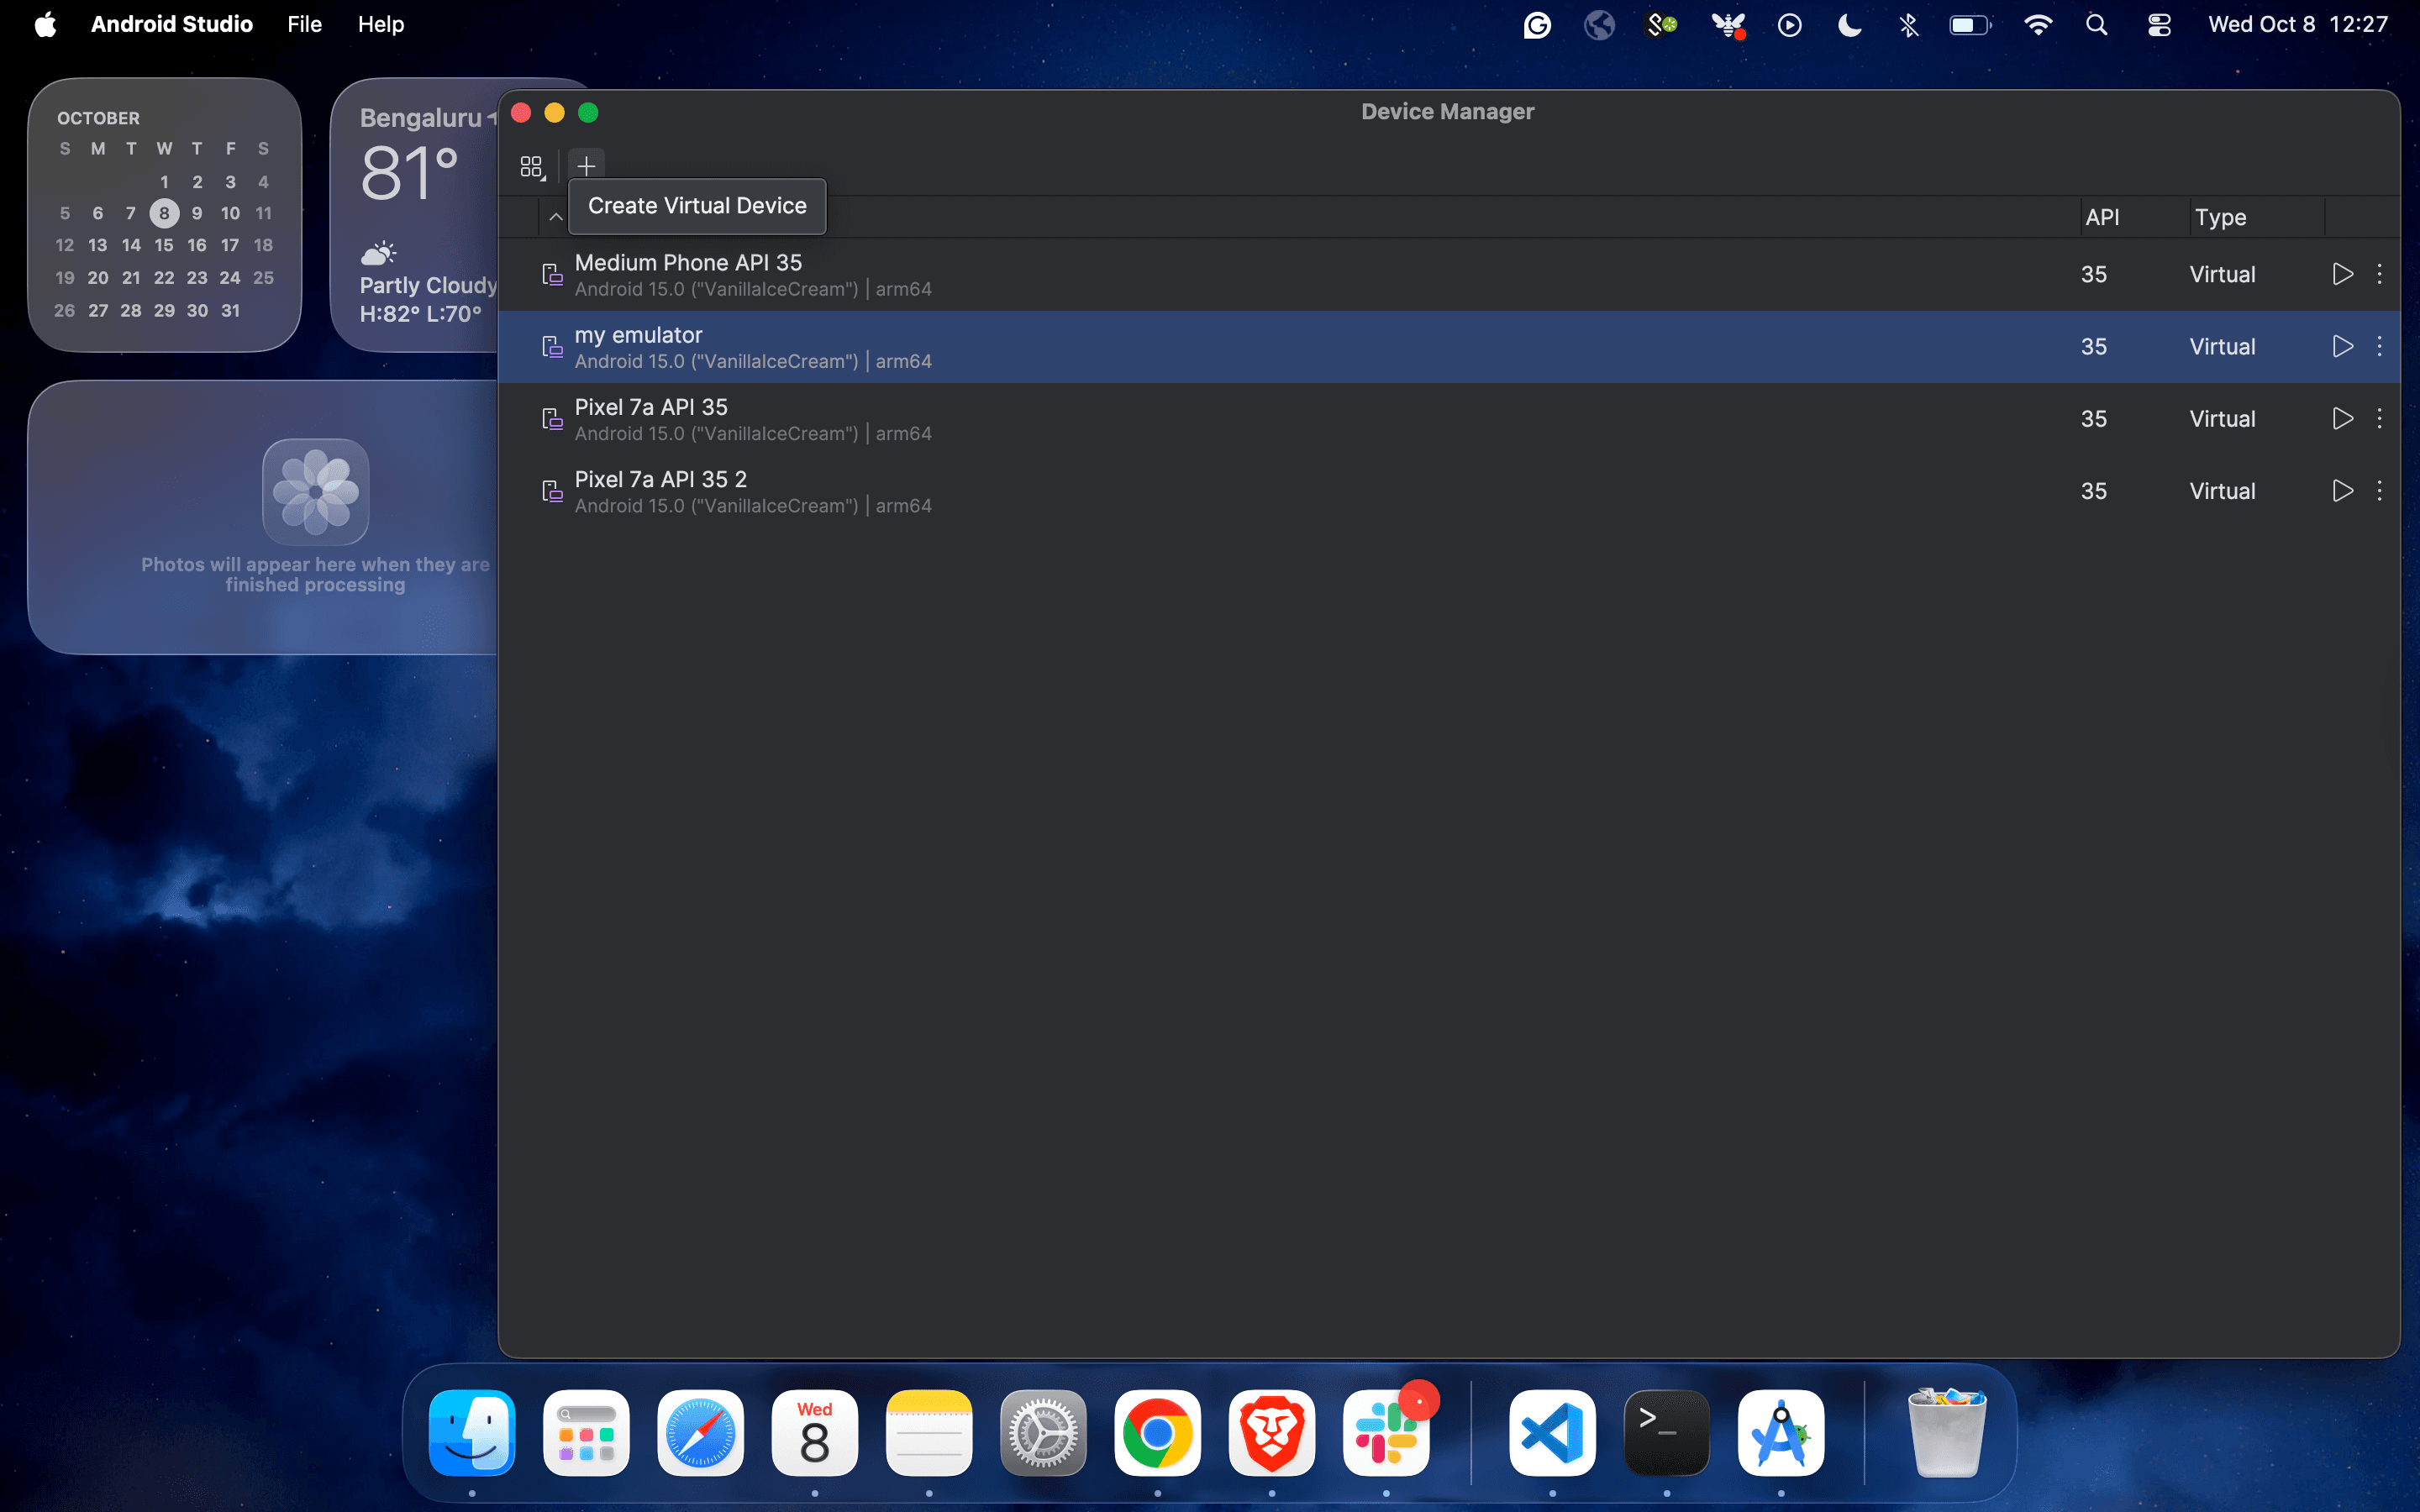
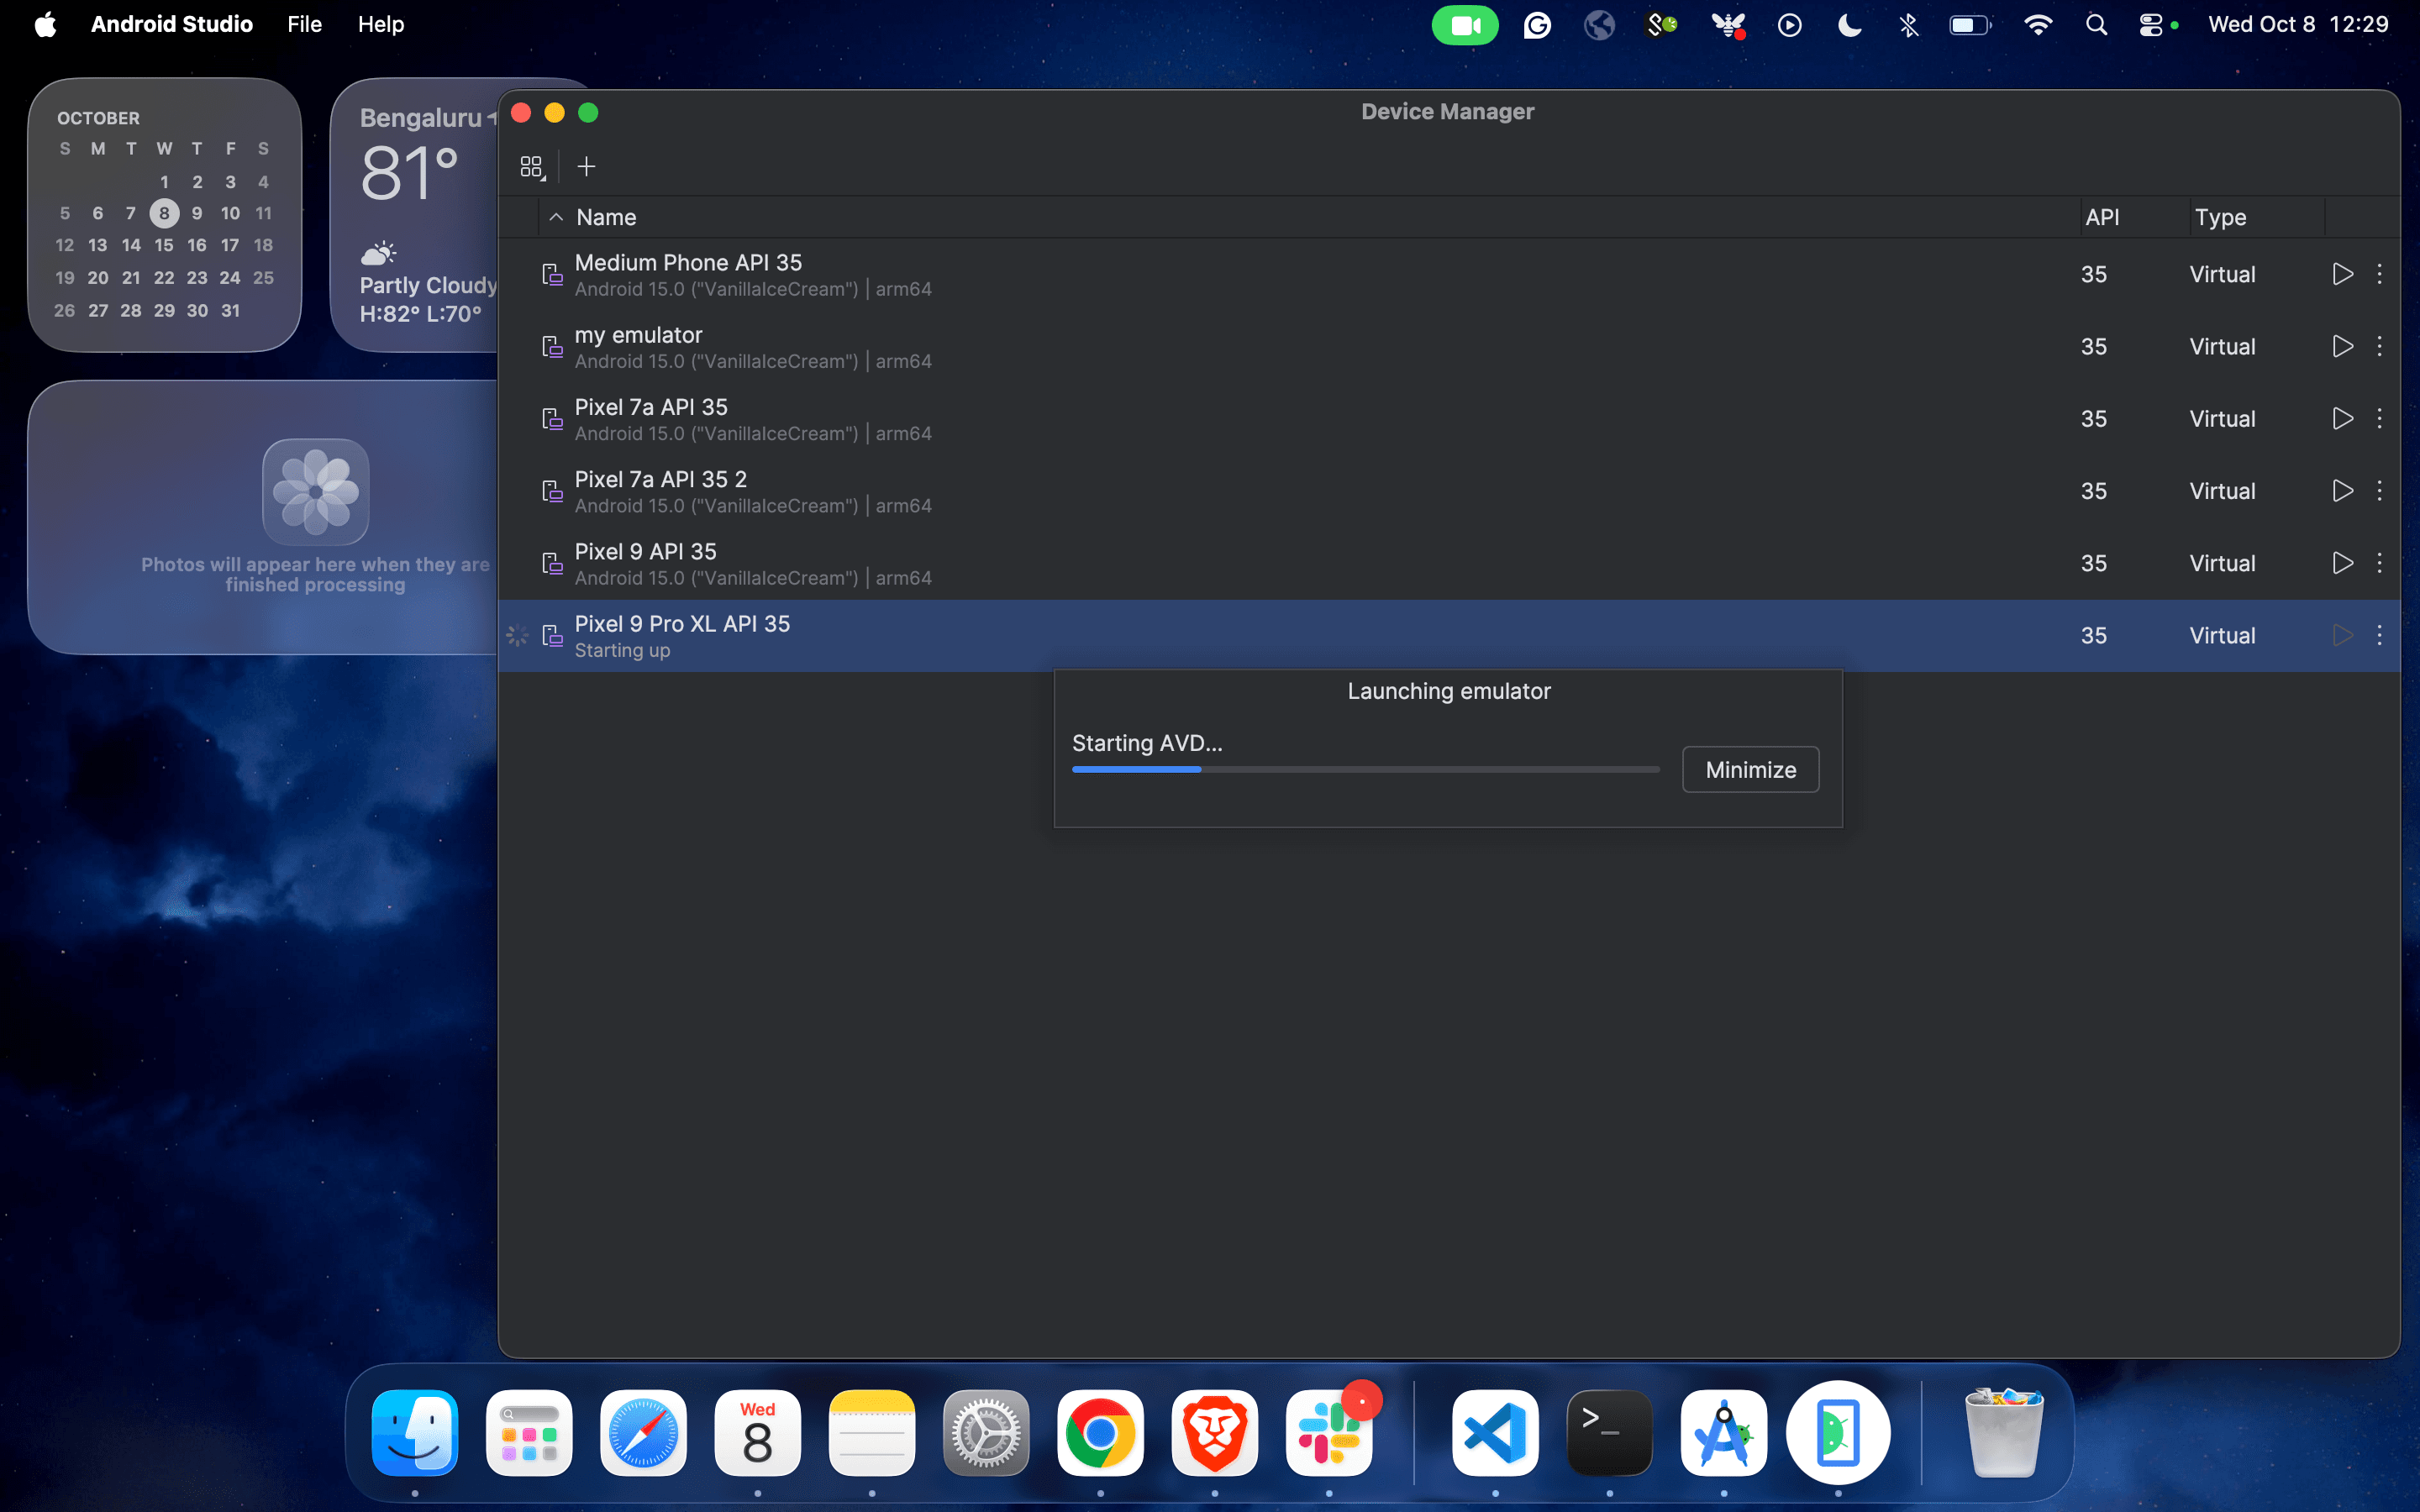
1. Launch the application and click on Virtual Device Manager.
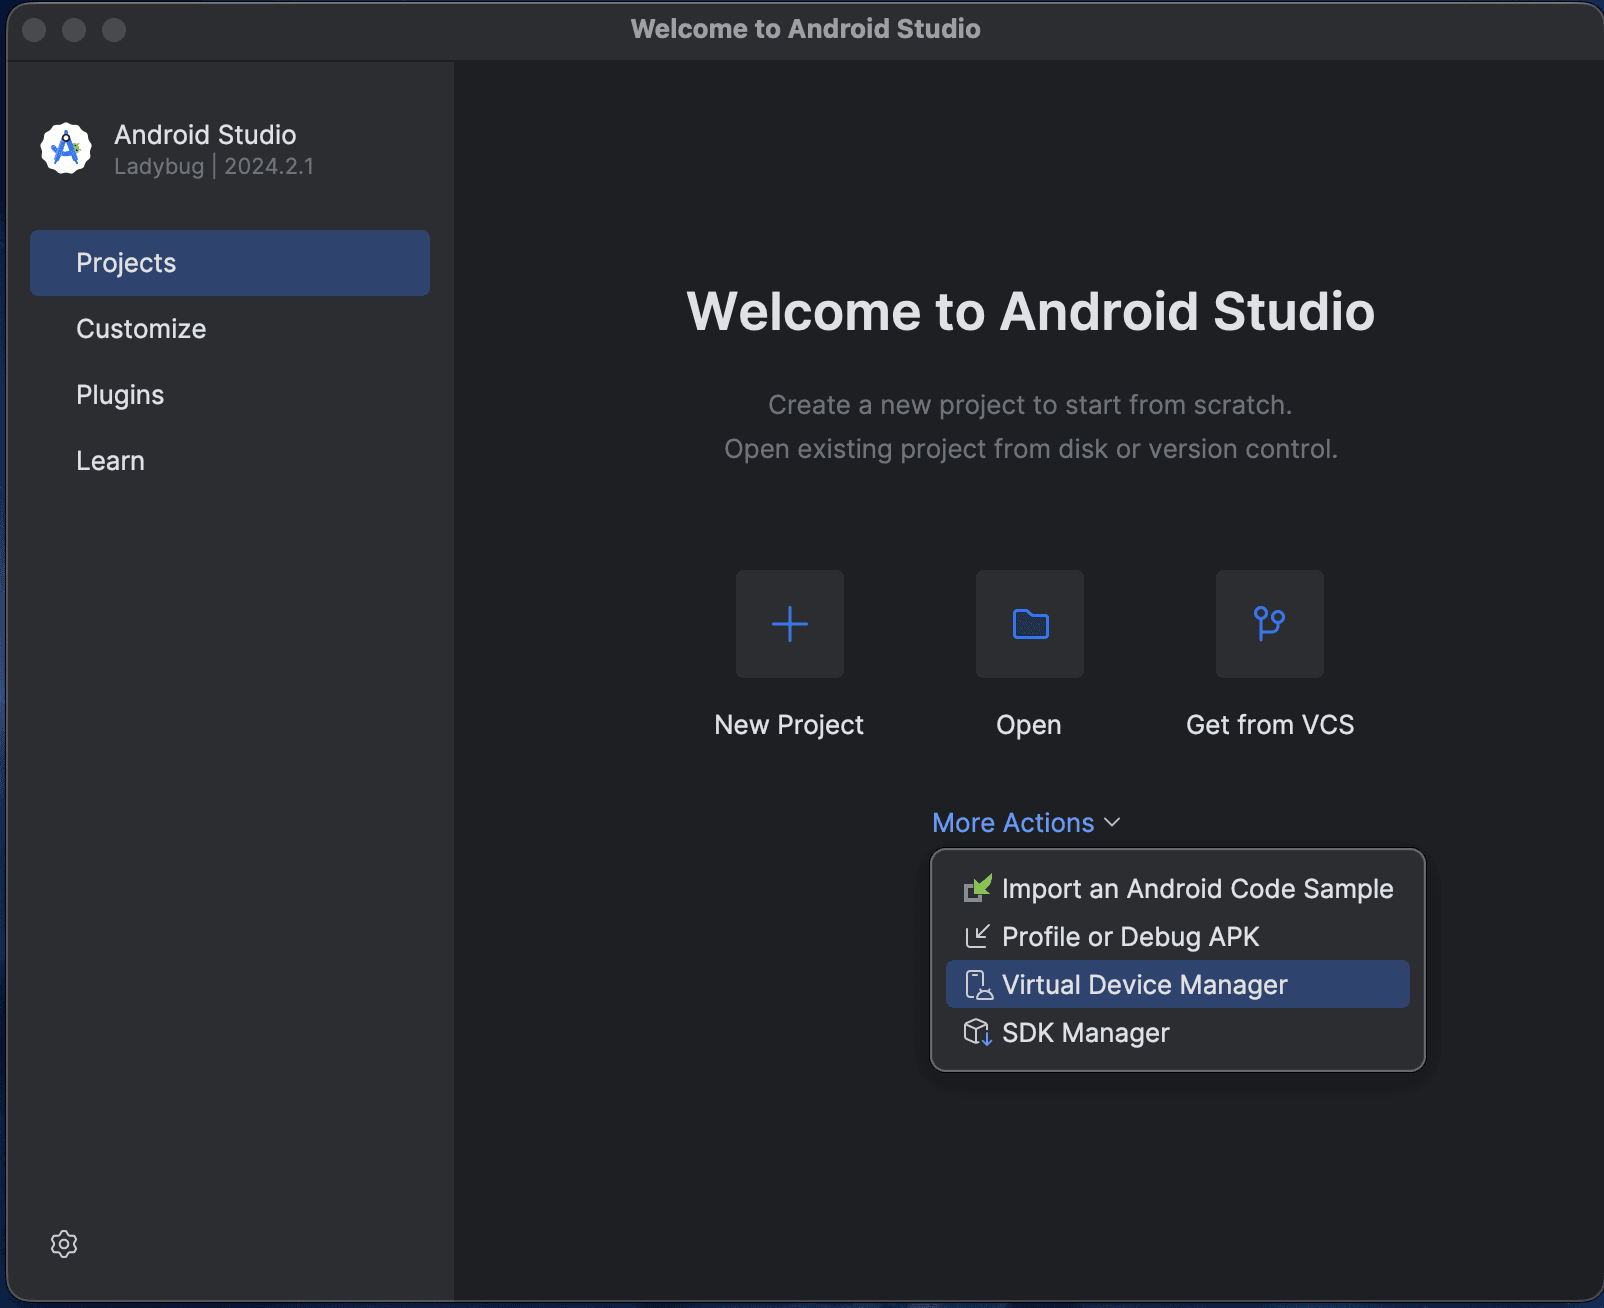
2. Under Device Manager, click on the plus icon to create a new virtual machine.
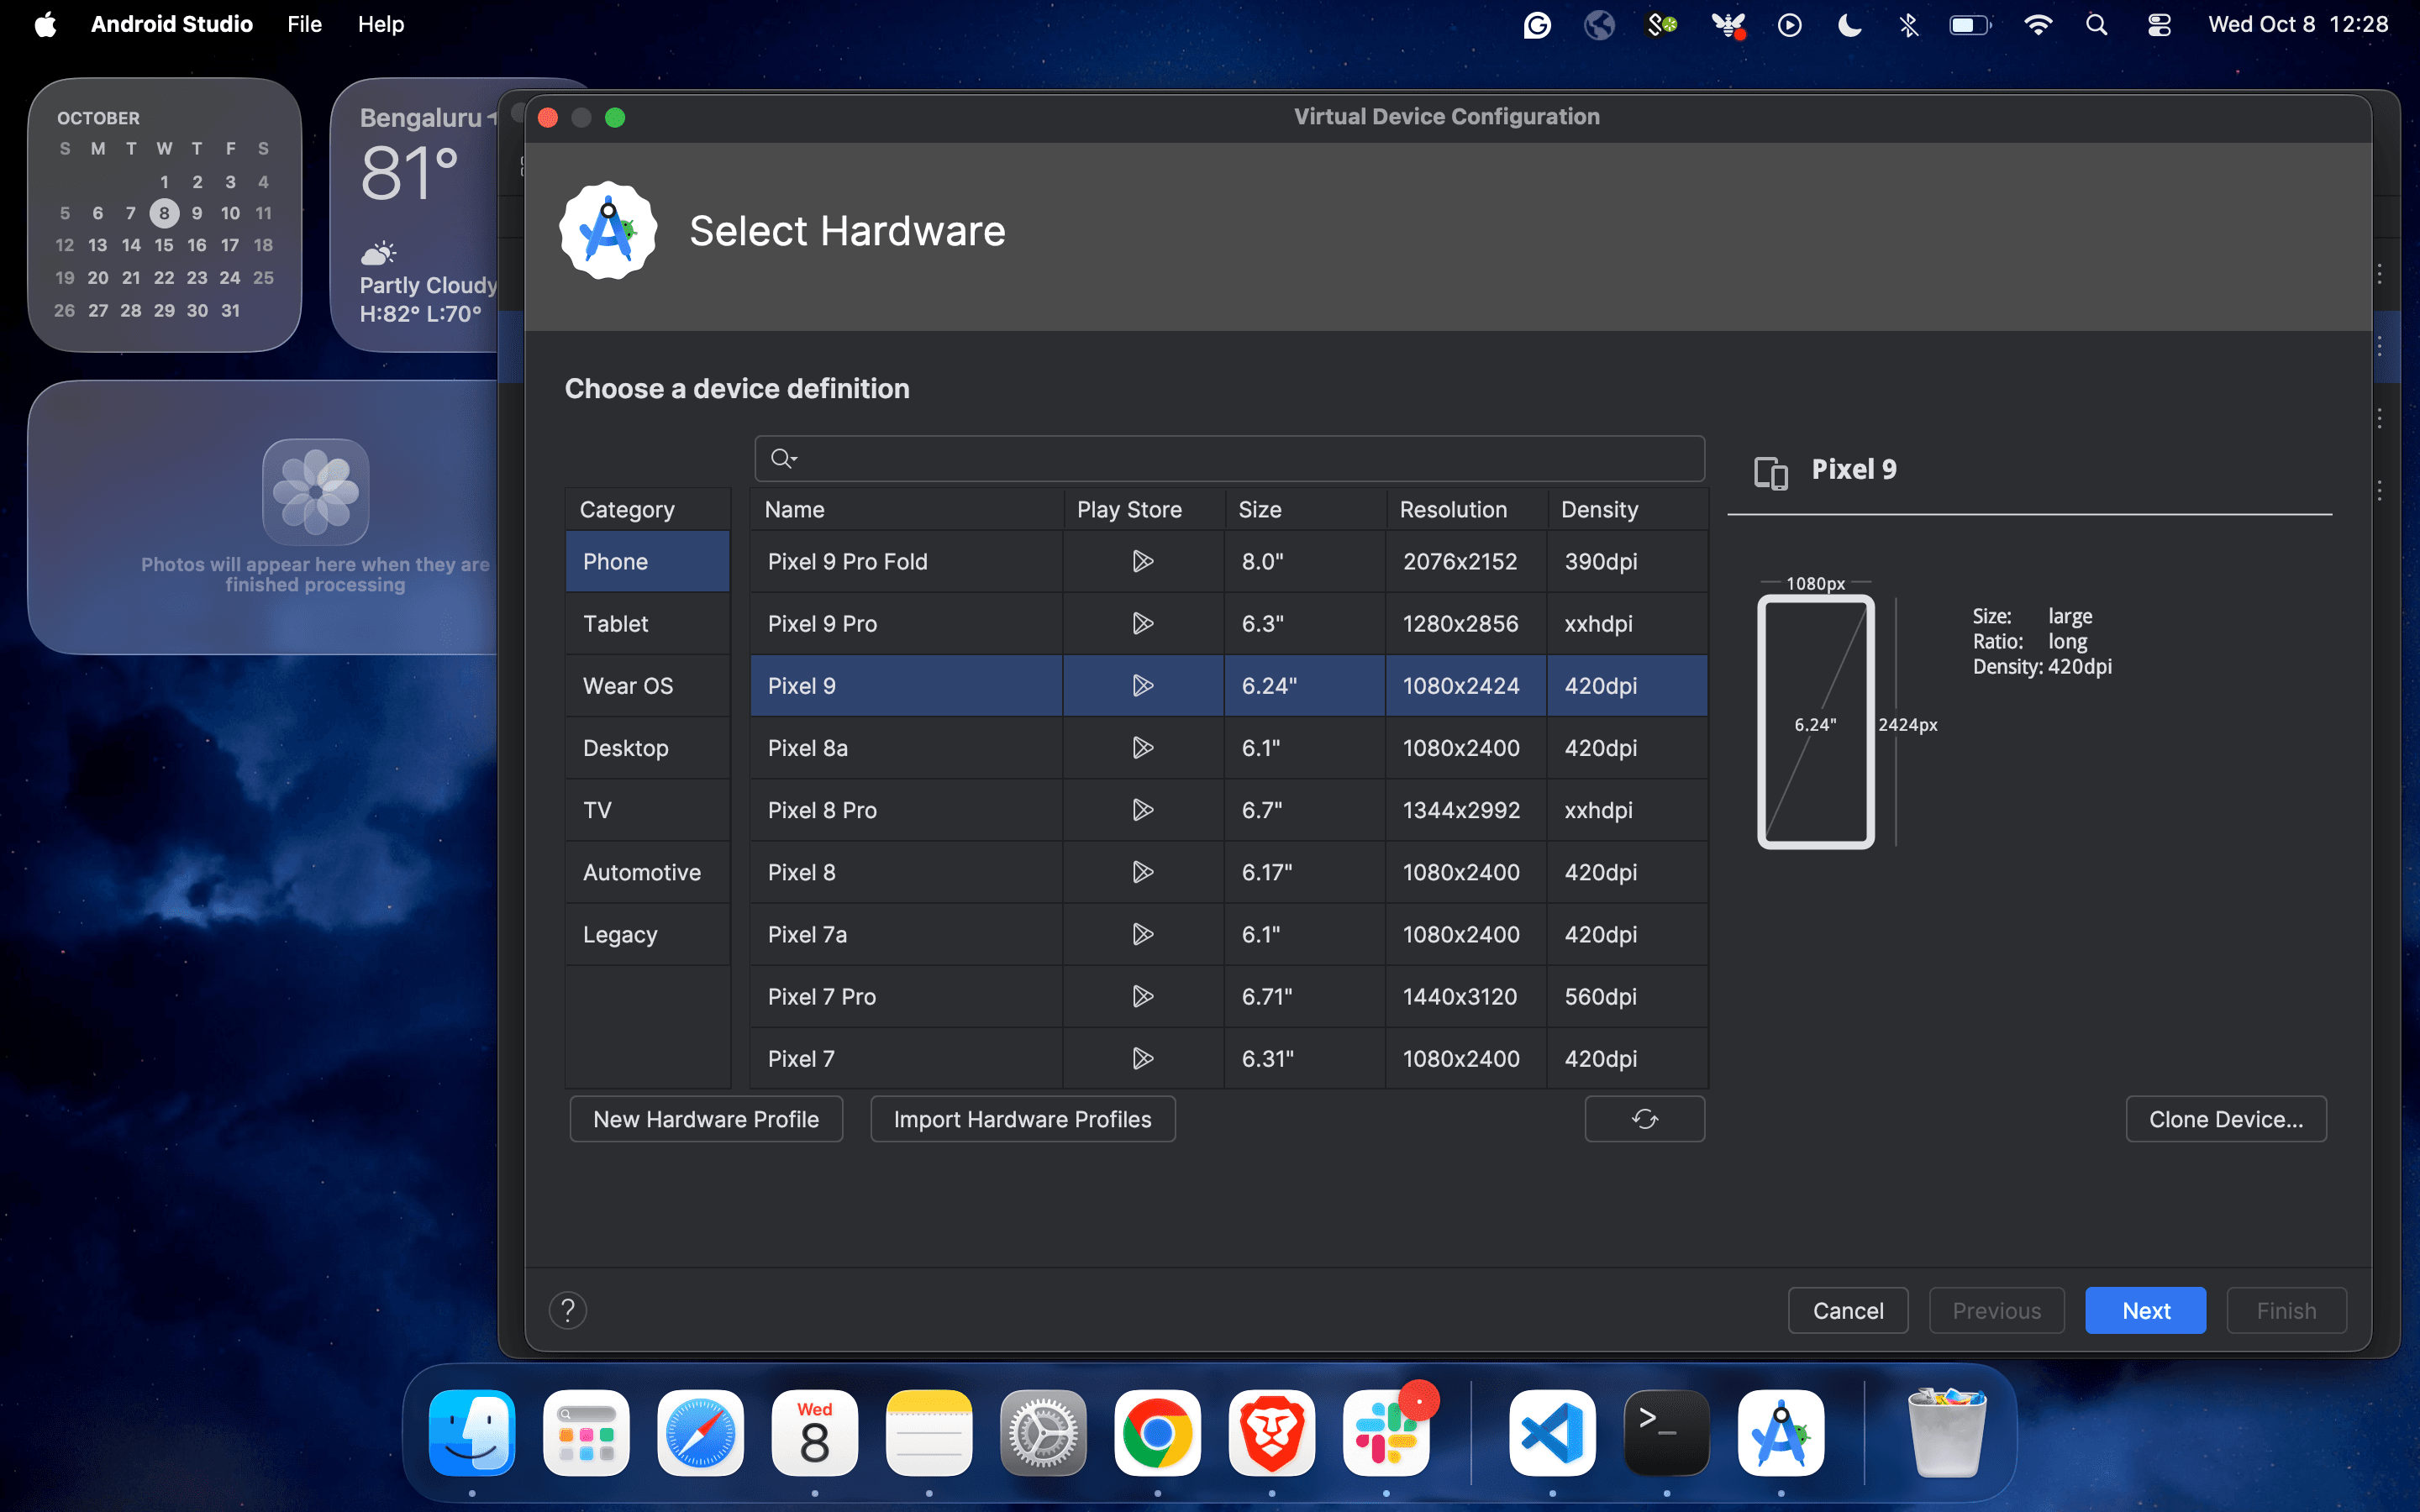
3. Select the device configuration from the list of virtual devices and click on “Next”.
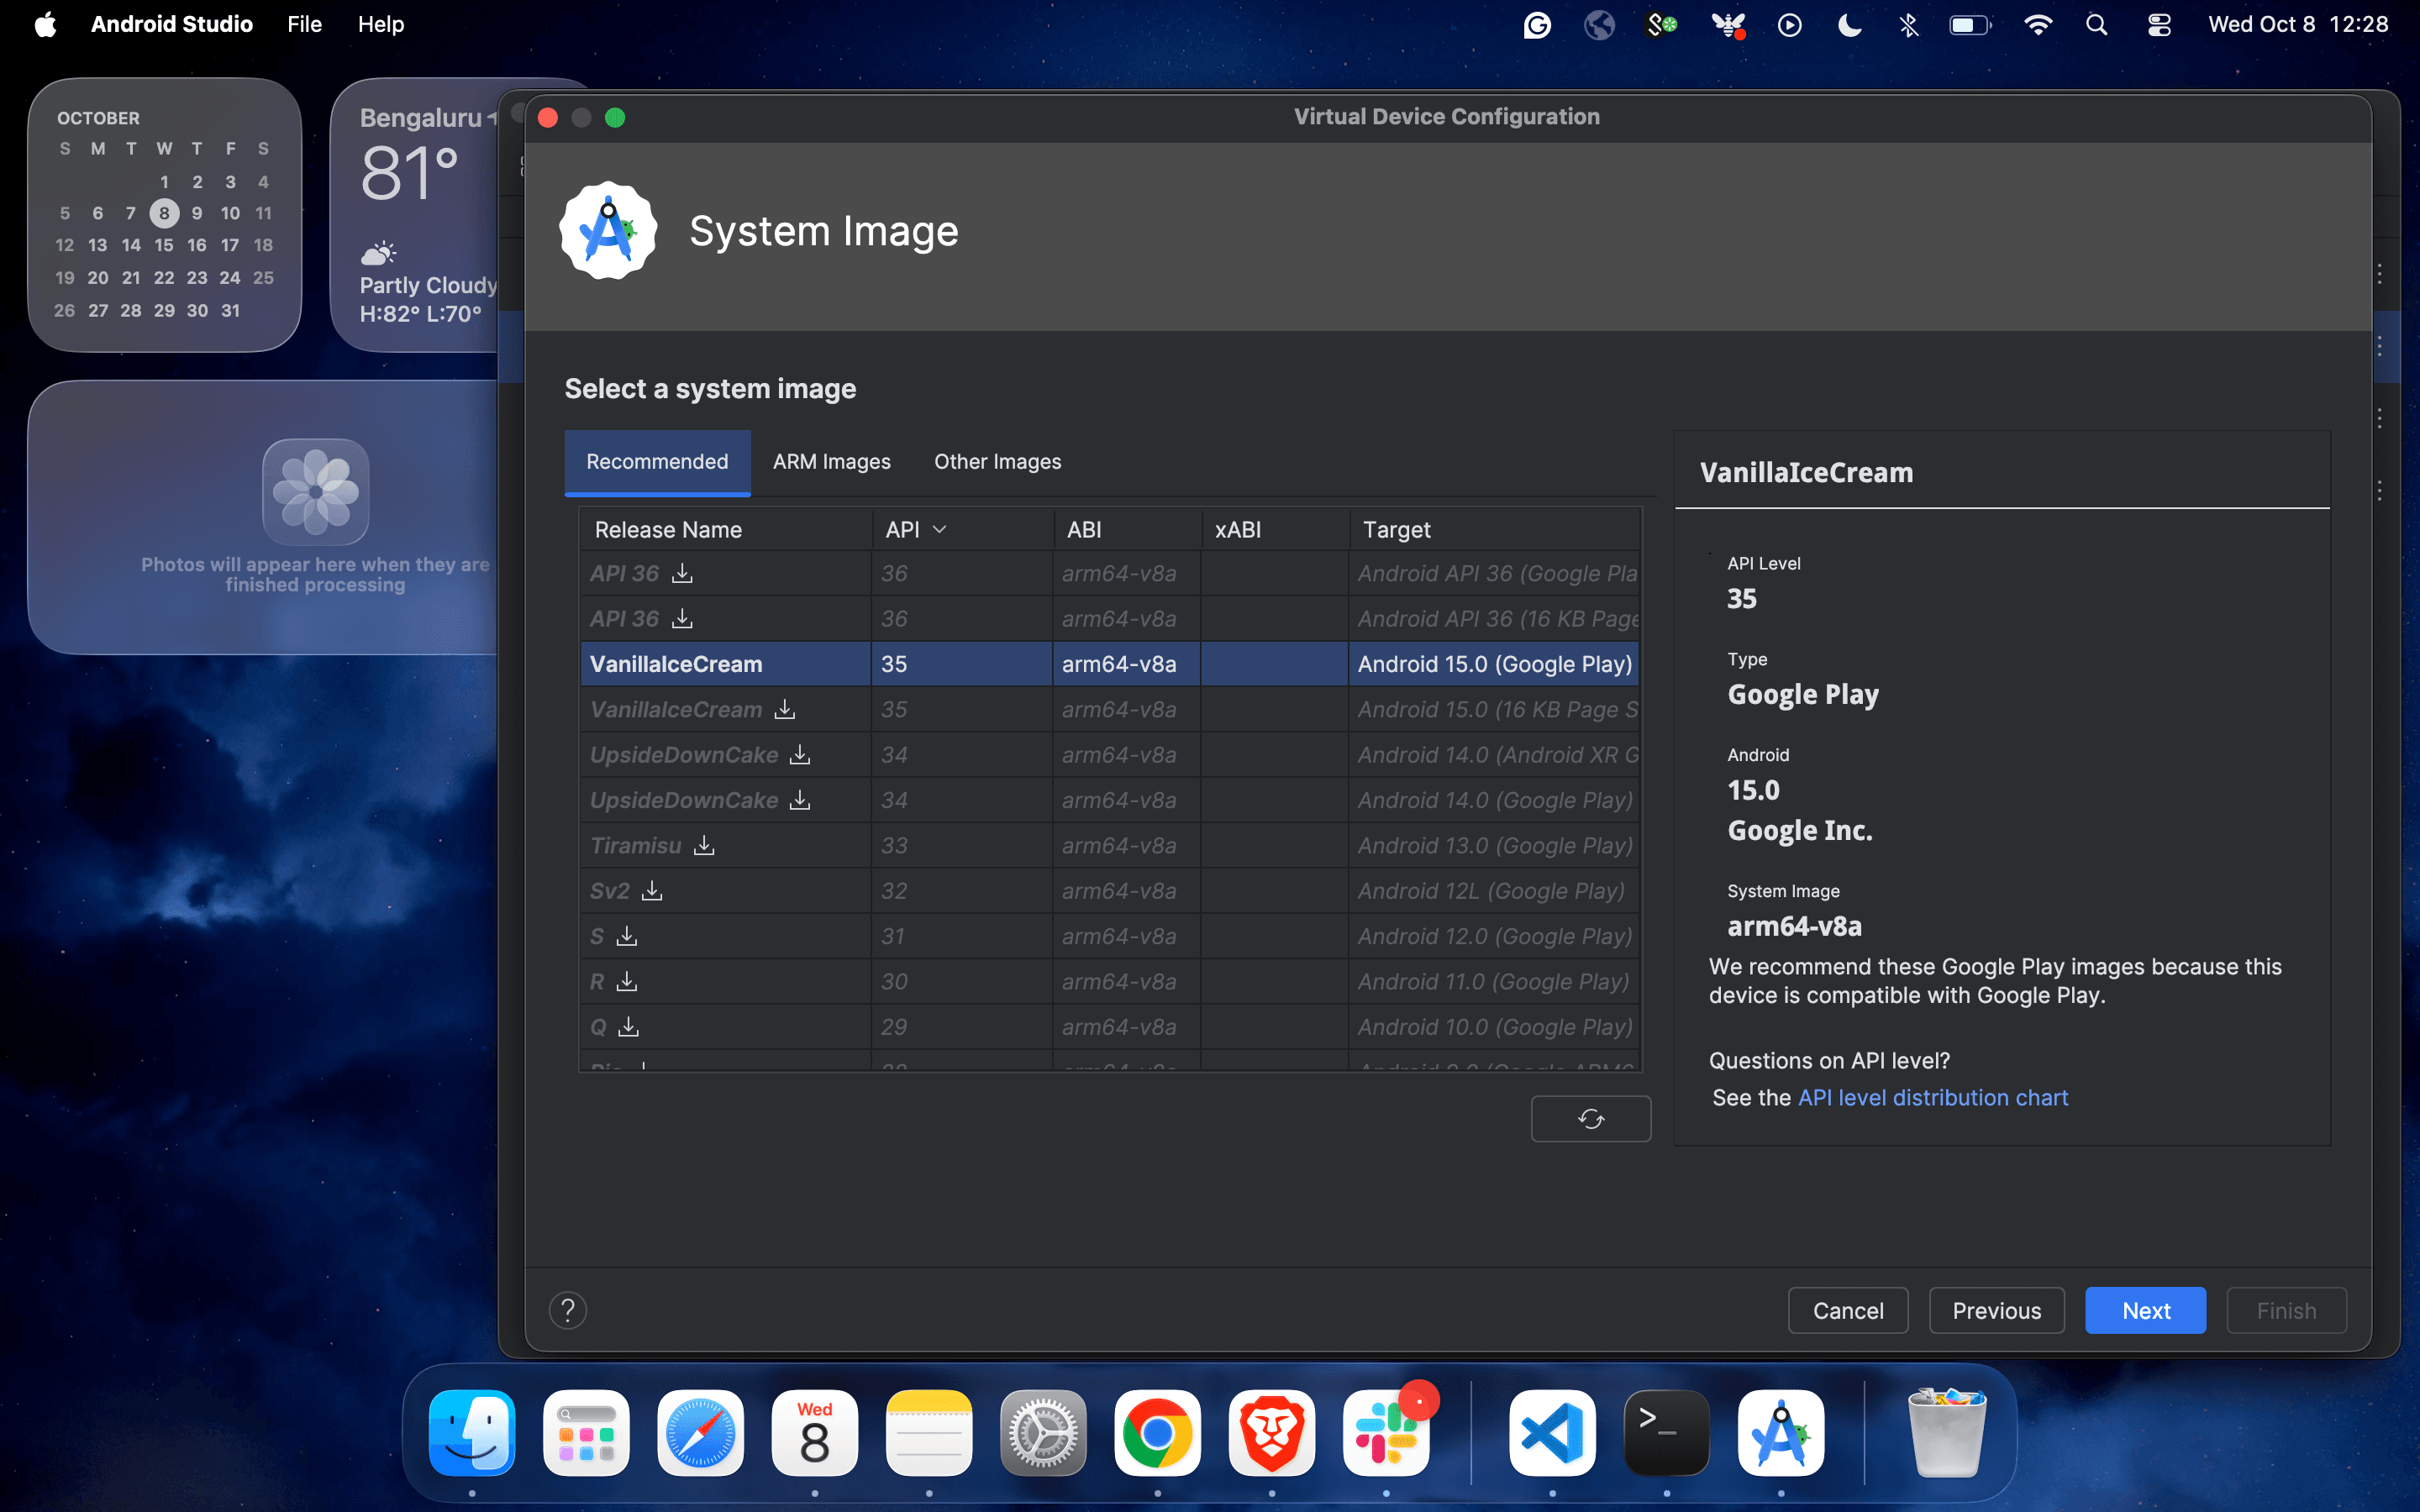
4. Complete the configuration process by selecting the operating Android version.
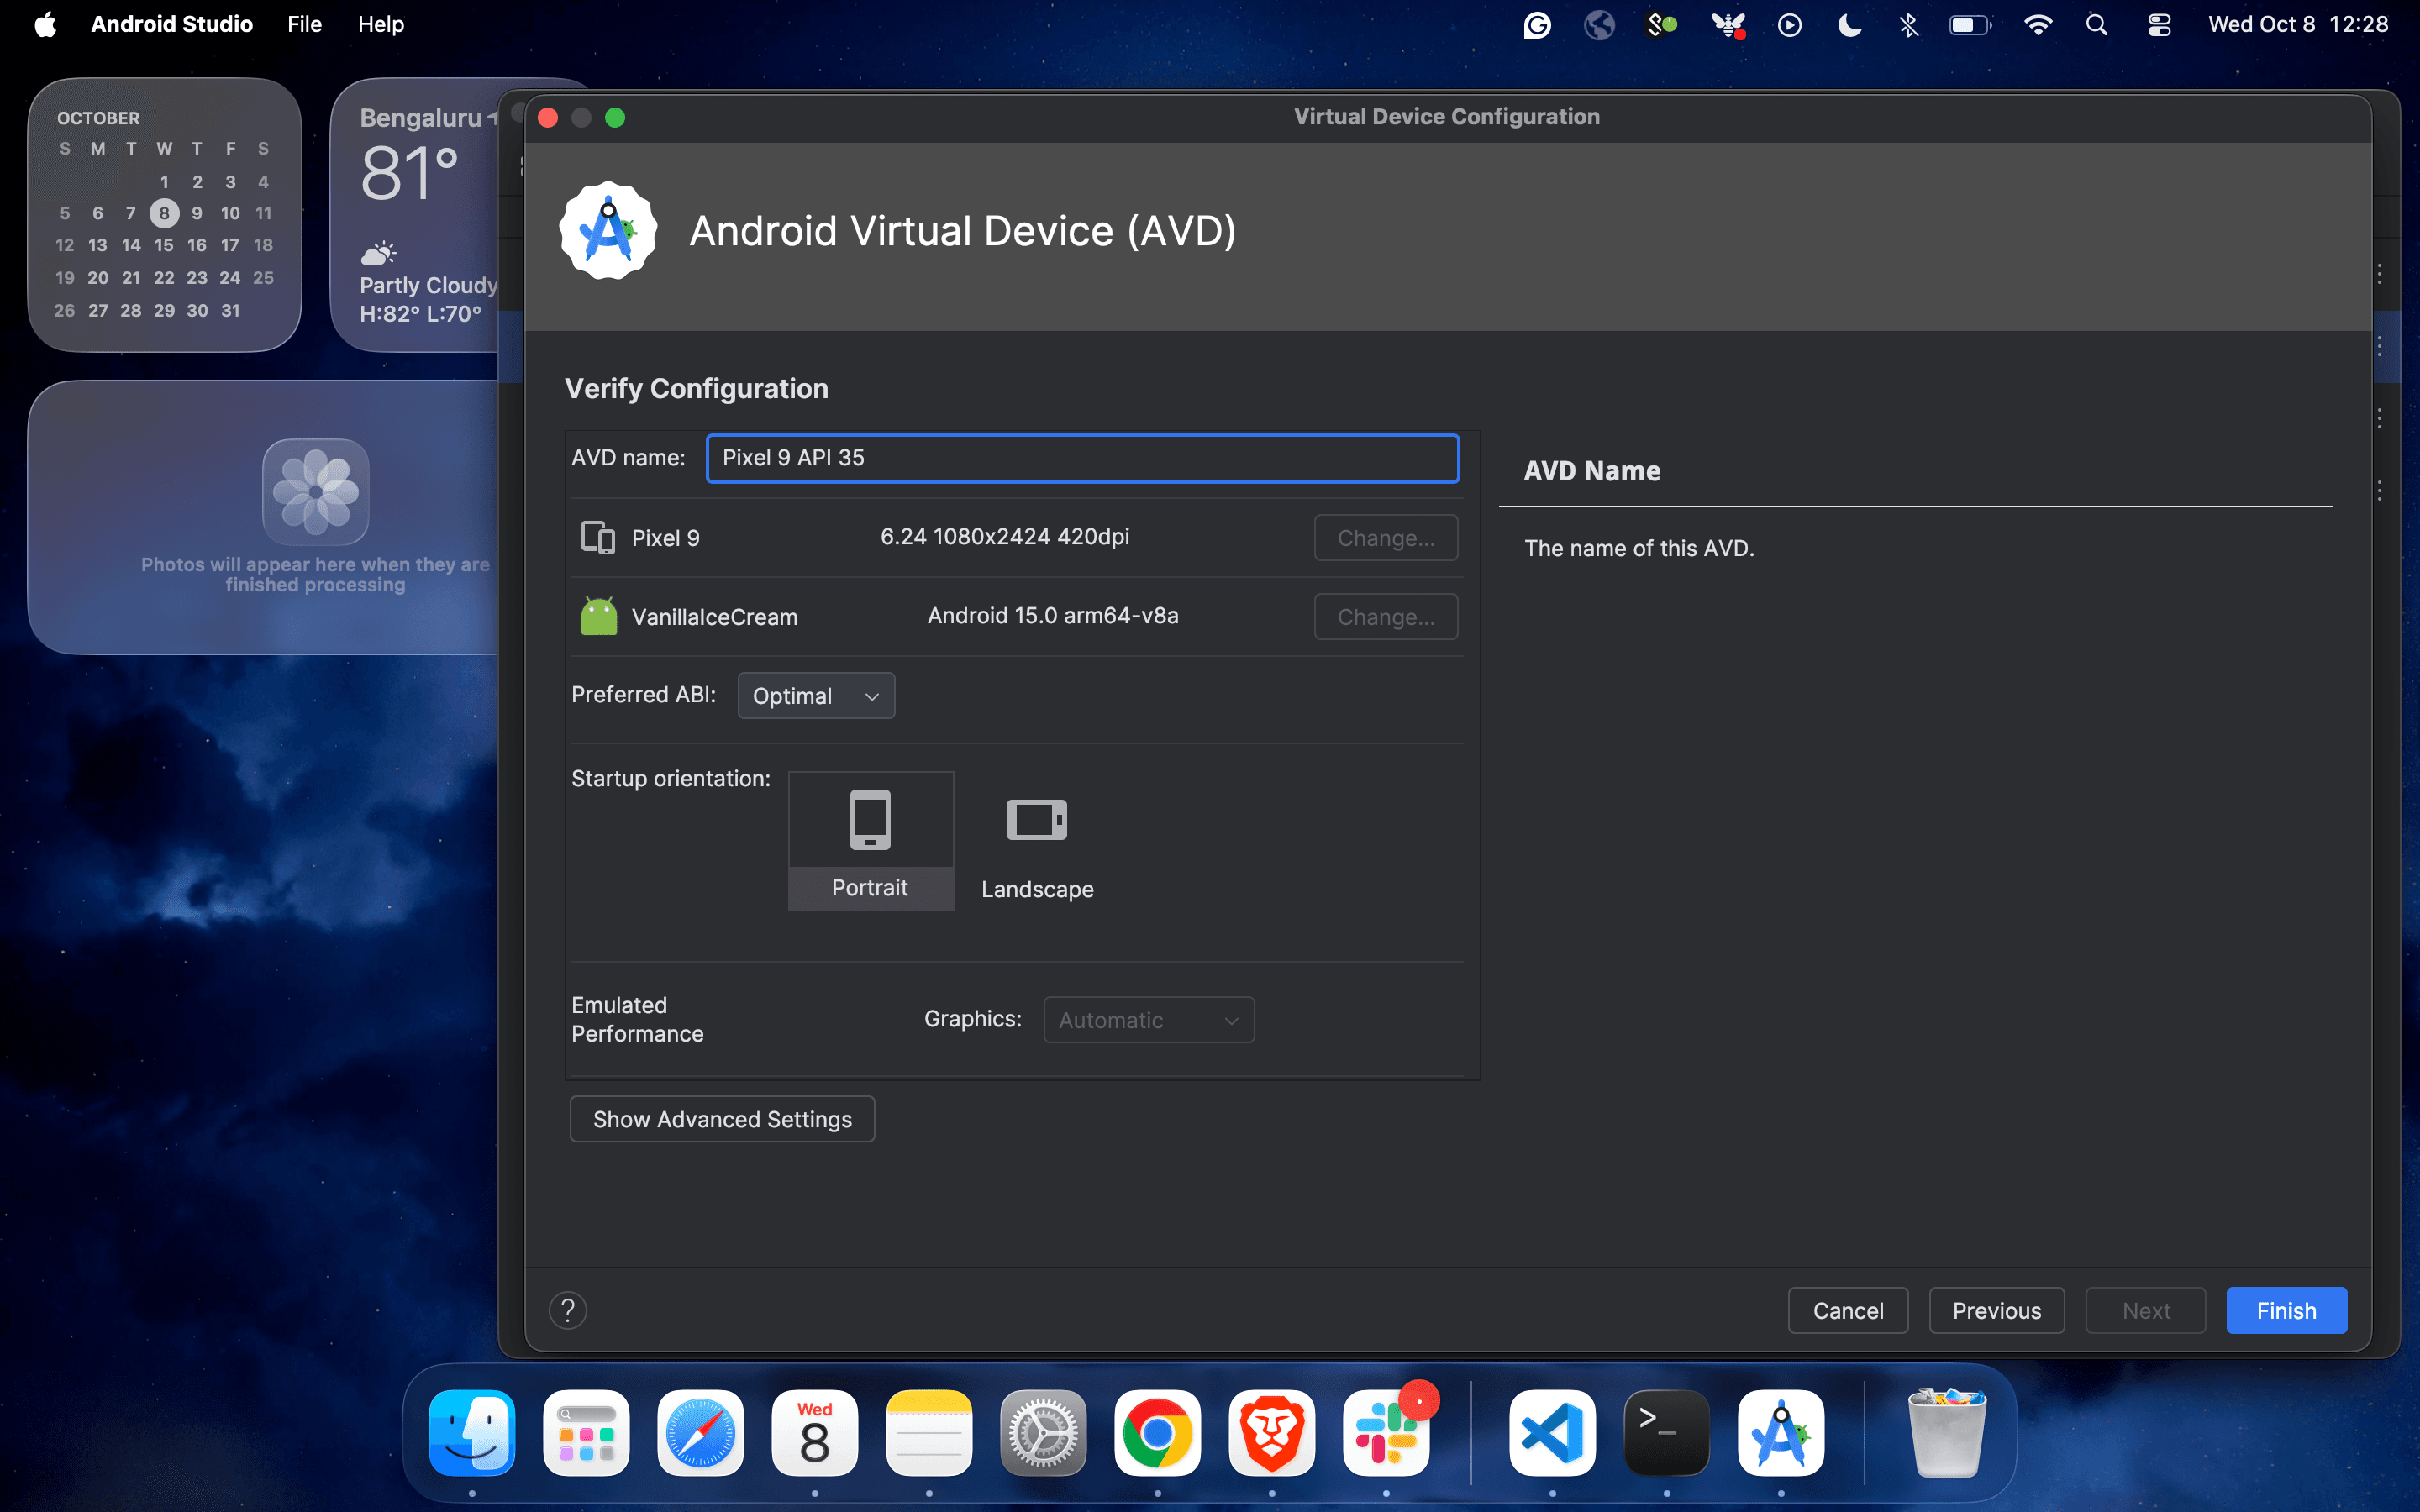
5. Update the name of the virtual device and click on “Finish”.
6. And you are almost done:
Getting Started with ADB (Android Debug Bridge)
ADB is a powerful command-line tool that lets you communicate with Android devices.
Common ADB Commands:
Bash:
adb devices                # List connected devices
adb install app.apk        # Install an app
adb uninstall <package>    # Uninstall an app
adb logcat                 # View device logs
Make sure your device or emulator is listed:
Bash:
adb devicesNOTE: If you're using a virtual device (emulator), ensure it is in a running state.
If you're using a real Android device, make sure it is properly connected to your system via USB and that Developer Options with USB Debugging are enabled.
Command to find App Package and App Activity:
adb shell dumpsys window | grep -E 'mCurrentFocus|mFocusedApp'Make sure the app is in a running state in the emulator/physical device.
Writing Your First Appium Test on Emulator
1. Define Desired Capabilities (JAVA):
JAVA:
caps.setCapability("deviceName", "My Phone");
caps.setCapability("udid", "your_device_udid"); // Replace with your actual device ID
caps.setCapability("platformName", "Android");
caps.setCapability("platformVersion", "15.0"); // Adjust as per your device
caps.setCapability("appPackage", "com.android.vending");
caps.setCapability("appActivity"," com.google.android.finsky.activities.MainActivity");
caps.setCapability("noReset", true); // Use boolean instead of string
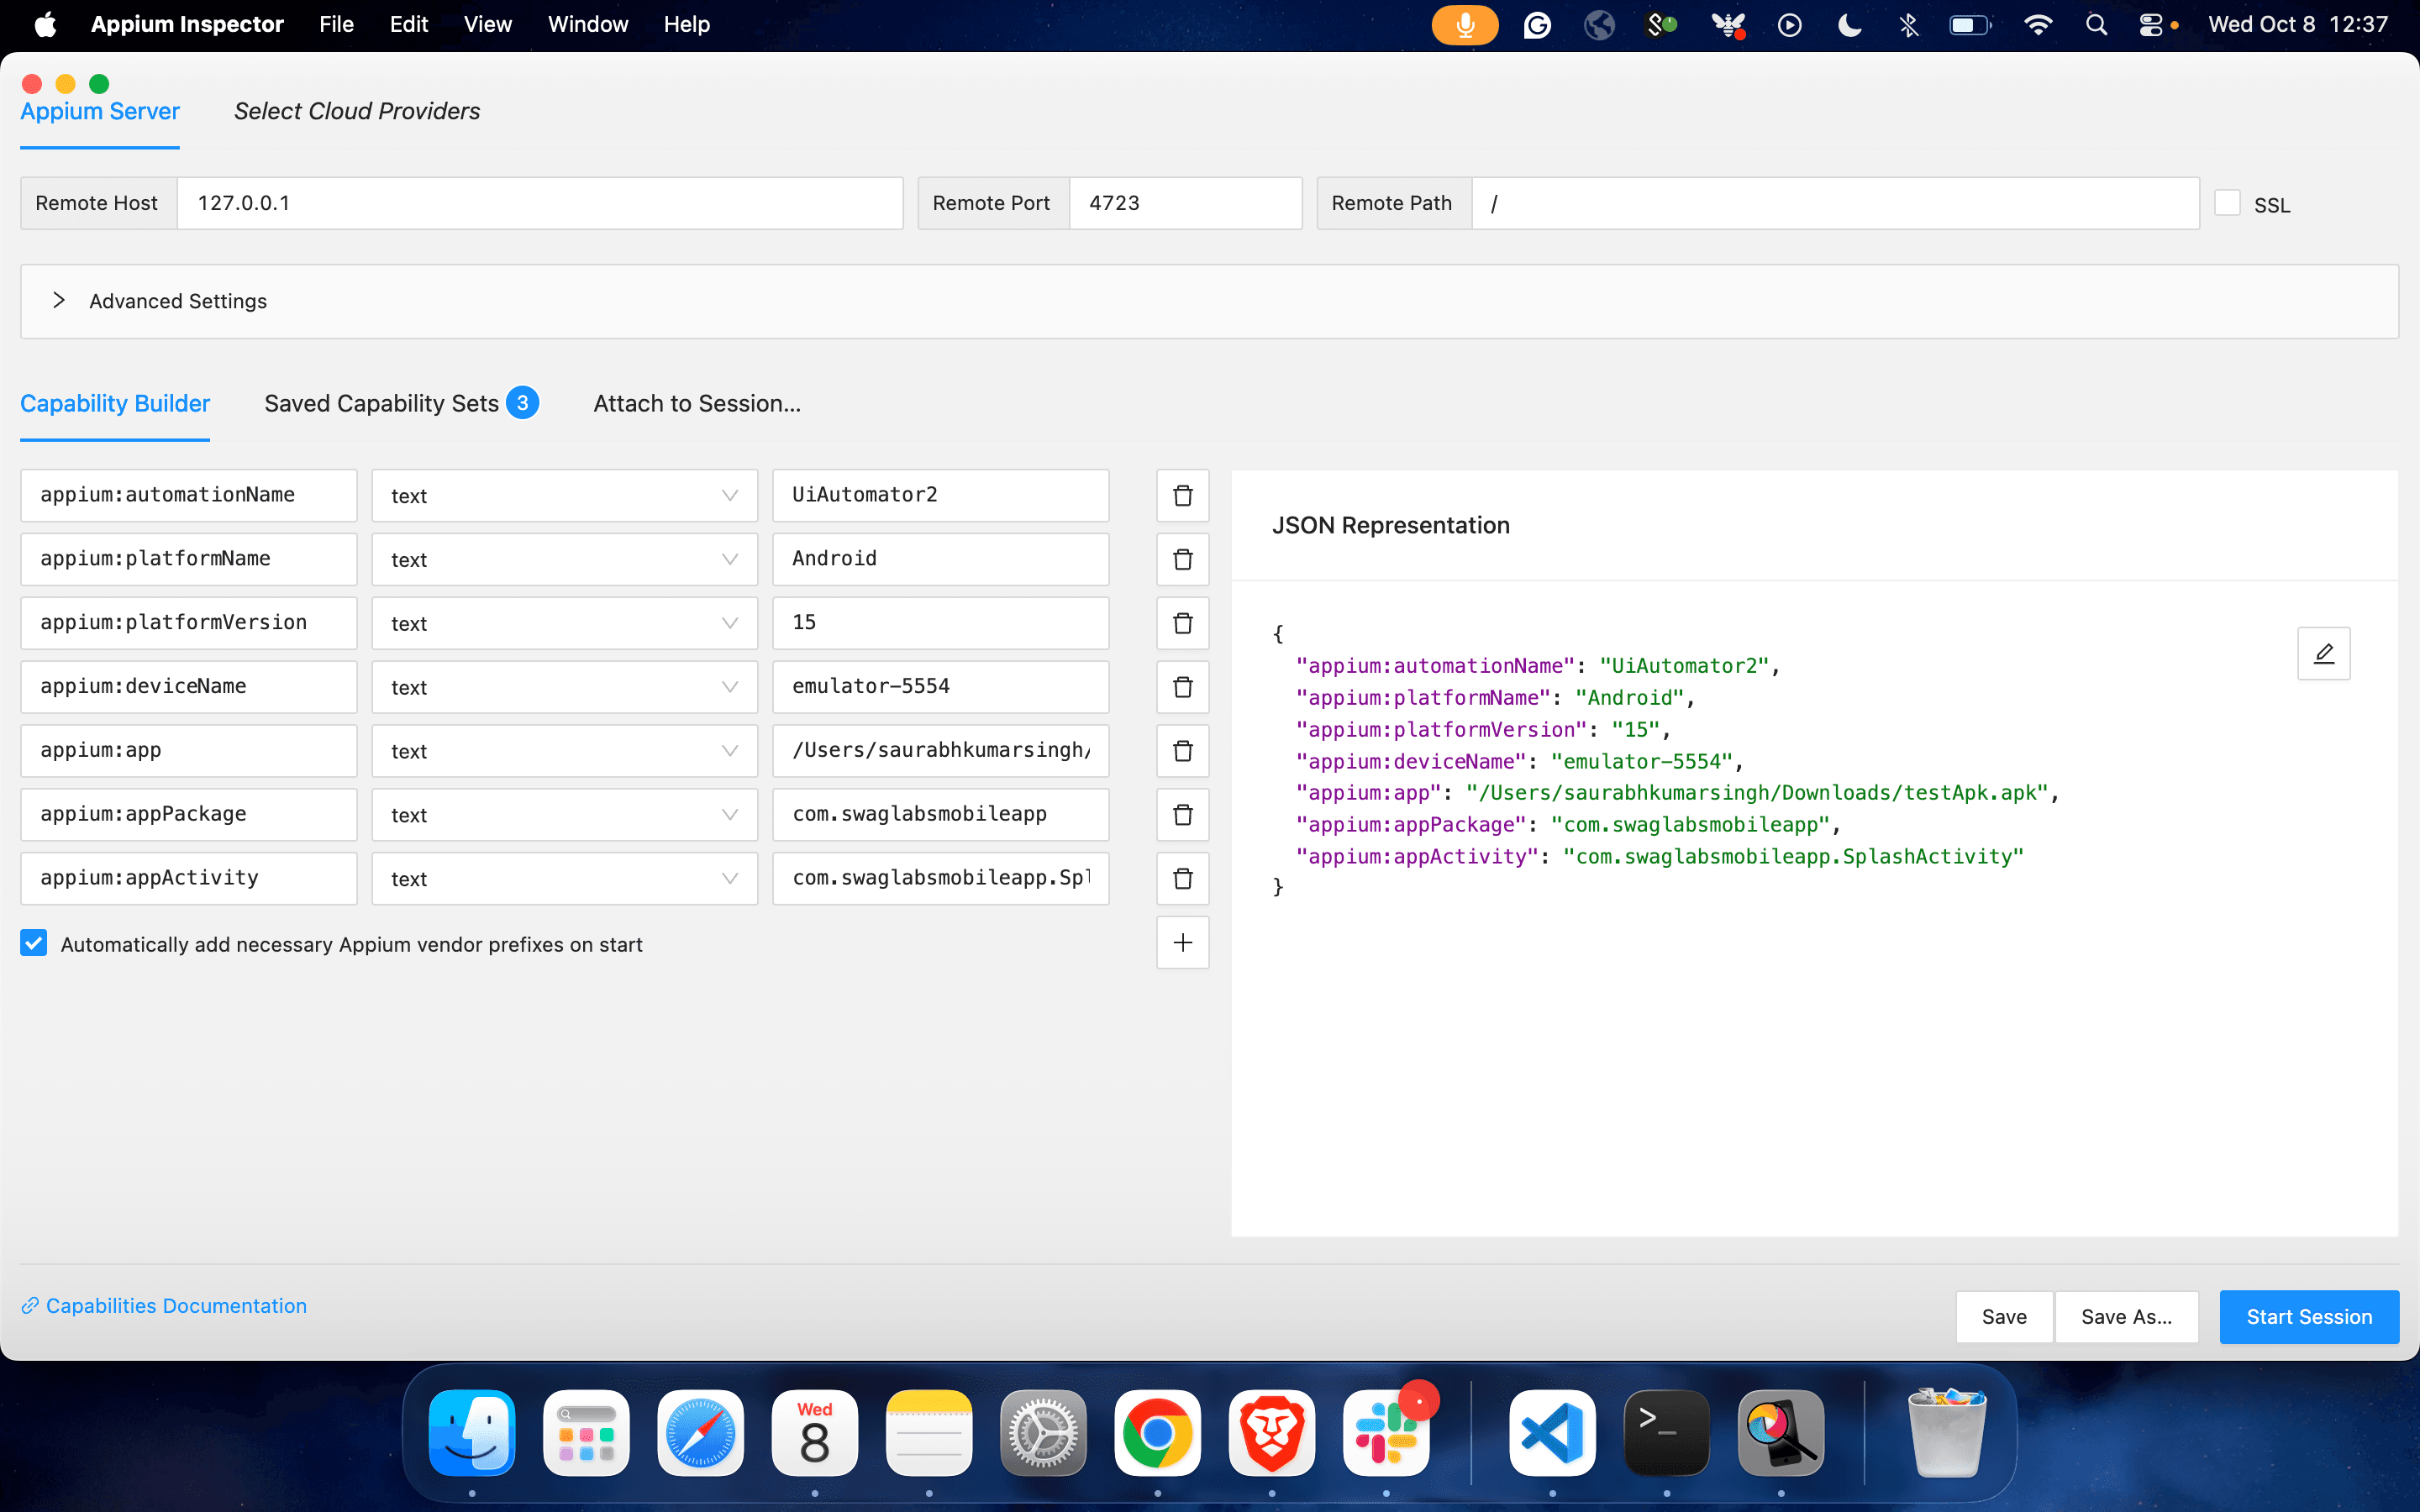
Desired Capabilities for Appium Inspector to Inspect Mobile Elements:
{
  "appium:automationName": "UiAutomator2",
  "appium:platformName": "Android",
  "appium:platformVersion": "15",
  "appium:deviceName": "emulator-5554",
  "appium: app": "/Users/saurabhkumarsingh/Downloads/Android.SauceLabs.Mobile.Sample.app.2.7.1.apk",
  "appium:appPackage": "com.swaglabsmobileapp",
  "appium:appActivity": "com.. swaglabsmobileapp.SplashActivity"
}
2. Sample Test Code: Launching Emulator Chrome Browser
JAVA CODE:
import java.net.MalformedURLException;
import java.net.URL;

import io.appium.java_client.MobileElement;
import io.appium.java_client.android.AndroidDriver;
import io.appium.java_client.remote.MobileCapabilityType;
import org.openqa.selenium.remote.DesiredCapabilities;

public class App {

    public static void main(String[] args) throws MalformedURLException, InterruptedException {

        // Step 1: Set Desired Capabilities
        DesiredCapabilities dc = new DesiredCapabilities();
        dc.setCapability(MobileCapabilityType.AUTOMATION_NAME, "Appium");   // Automation engine
        dc.setCapability(MobileCapabilityType.DEVICE_NAME, "Android");     // Device name (any string if using emulator)
        dc.setCapability(MobileCapabilityType.PLATFORM_NAME, "Android");   // Platform name

        // Step 2: Provide App Details (App Package & App Activity)

        // Example: Launching Chrome Browser
        dc.setCapability("appPackage", "com.android.chrome");
        dc.setCapability("appActivity", "com.google.android.apps.chrome.Main");

        // Step 3: Define Appium Server URL
        URL url = new URL("http://127.0.0.1:4723/wd/hub");

        // Step 4: Initialize the Android Driver
        AndroidDriver<MobileElement> driver = new AndroidDriver<>(url, dc);

        // Step 5: Keep the app open for a few seconds
        Thread.sleep(5000);

        // Step 6: Quit the driver.
        driver.quit();
    }
}
Run the script using Maven(Archetype - Quickstart) or your IDE(IntelliJ IDEA).
3. POM.XML File
<project xmlns="http://maven.apache.org/POM/4.0.0"
         xmlns:xsi="http://www.w3.org/2001/XMLSchema-instance"
         xsi:schemaLocation="http://maven.apache.org/POM/4.0.0
                             http://maven.apache.org/xsd/maven-4.0.0.xsd">

    <modelVersion>4.0.0</modelVersion>

    <groupId>com.example</groupId>
    <artifactId>appium-project</artifactId>
    <version>1.0-SNAPSHOT</version>

    <dependencies>
        <!-- ✅ Appium Java Client -->
        <dependency>
            <groupId>io.appium</groupId>
            <artifactId>java-client</artifactId>
            <version>7.6.0</version>
        </dependency>

        <!-- ✅ Selenium (WebDriver support) -->
        <dependency>
            <groupId>org.seleniumhq.selenium</groupId>
            <artifactId>selenium-server</artifactId>
            <version>3.141.59</version>
        </dependency>

        <!-- ✅ Apache Commons Lang (extra utilities for strings, objects, etc.) -->
        <dependency>
            <groupId>org.apache.commons</groupId>
            <artifactId>commons-lang3</artifactId>
            <version>3.8.1</version>
        </dependency>
    </dependencies>

    <build>
        <plugins>
            <!-- ✅ Maven Compiler Plugin (ensures Java 8 compatibility) -->
            <plugin>
                <groupId>org.apache.maven.plugins</groupId>
                <artifactId>maven-compiler-plugin</artifactId>
                <version>3.8.1</version>
                <configuration>
                    <source>1.8</source>
                    <target>1.8</target>
                </configuration>
            </plugin>
        </plugins>
    </build>

</project>
Running the Same Test on a Real Device
1. Prepare Your Device:
- Enable Developer Options and USB Debugging
- Connect via USB and authorize debugging.
- The above code needs Appium version 2.19.0
2. Update Desired Capabilities:
JAVA:
caps.setCapability("deviceName", "MyDevice");
caps.setCapability("udid", "your_device_udid"); // Optional but useful
Your test should now run on the physical device.
Troubleshooting Common Issues
Issue | Fix |
|---|---|
Emulator not detected | Restart the emulator, check the adb devices |
Appium server error | Restart the server, validate capabilities, and check the Java Client compatibility. |
APK not installing | Check the path, permissions, or compatibility |
Environment variable errors | Verify ANDROID_HOME, JAVA_HOME, and add to PATH |
Conclusion & What’s Next
Congratulations! You have just automated your first mobile test with Appium on both an emulator and a real device. In this journey, you’ve set up the environment, learned about ADB, and interacted with elements programmatically.