
Deep linking is a powerful technique that takes users exactly where they need to go within an app, skipping the generic home screen and landing on the desired content or specific section. By enabling direct navigation, deep linking streamlines the user journey, enhances engagement and delivers a smoother, faster app experience.
Everyday Deep Linking in Action
Imagine these scenarios:
- You receive an Instagram reel shared via WhatsApp. A simple tap doesn’t just open Instagram – it takes you straight to the reel, making the whole process seamless.
- A friend invites you to a fitness app using a referral link. Click the link, and you're not only directed to the app’s sign-up form but the referral code is automatically passed along, ensuring you never miss out on the benefits.
- Someone sends you a song via YouTube. When you tap the link, the YouTube app launches and the song starts playing instantly
- New users clicking on onboarding emails can be directed to specific parts of the app, such as tutorials or account setup screens.
- Event Invitations, Marketing Campaigns, Customer Support, etc.
Deep linking plays a crucial role in driving user retention, improving user experience, and enhancing app marketing strategies.
How Deep Linking Works: A Behind-the-Scenes Look
Here’s the magic behind the curtain:
- App Detection: The system uses a domain URL to check if the app is installed on the device (iOS/Android).
- Link Handling: Once the app is found, a listener function kicks in, waiting for incoming links.
- Navigation: The app handles the link, determining where the user should land, based on the data or route embedded in the link.
Now, what if the user does not have the application installed?
Introducing Deferred Links: The Supercharged Deep Link
That’s where Deferred Links come into play. Think of them as deep links with a twist – they don’t just stop when the app is not installed; they keep the journey going!
Deferred Links have the unique ability to seamlessly navigate users to the appropriate app store (whether it’s the App Store or Play Store), or to a fallback URL if configured. When a user clicks a deep link without having the app installed, instead of getting lost, the deferred link takes charge. It redirects the user to the correct destination first, ensuring they install the app, and then, post-install, it automatically navigates them to the content embedded in the link.
Branch.io offers the best of both worlds: not only deep links but also the magic of deferred links, making sure your users never miss a beat, even if they’re new to your app.
Setup Branch Account
You can create an account by signing up at Branch.io. After creating an account, your dashboard will look like the one below.
While Branch offers free mobile deep linking for your first 10k conversions/links, you'll still need to enter your credit card details to access the feature. Once your billing is set up, you're ready to go!
Next, head over to the Configuration tab in the dashboard’s menu to start setting up your Android and iOS platforms.
Branch Android Configuration
- Android URI scheme: It has to be in this format “<Your App Name>://”. Anyway, the field in the dashboard guides you with the format.
- Check on the “I have an Android app” option. If you are already live then search your app on PlayStore or select Custom URL - your app’s Play Store listing (e.g., https://play.google.com/store/apps/details?id=com.example.yourapp). This is to make sure that if the app is not installed then the fallback re-direction is set.
- Check on the “Enable app links” option. You are supposed to provide SHA-256. Input the SHA-256 fingerprint of your app's certificate (used to sign your APK). This ensures Branch can verify your app’s authenticity.
To get this fingerprint, run the following command in your terminal:
keytool -list -v -keystore [your_keystore_path] -alias [your_key_alias] -storepass [your_keystore_password] -keypass [your_key_password]
Branch iOS Configuration
- iOS URI scheme: Same as Android configuration. “<Your App Name>://” .
- Check on the “I have an iOS app” option. If you are already live then search your app on the AppStore or select Custom URL. Input your app’s Apple App Store ID. You can find this in your app’s App Store listing URL. - e.g. https://apps.apple.com/app/id123456789, then 123456789 is your App Store ID.
- Enable Universal Links. Enter your app’s bundle identifier (e.g., com.example.yourapp). This must exactly match the bundle ID specified in your Xcode project under General > Identity. Enter your Apple Developer Team ID in place of the Apple App prefix.
You can take it a step further by configuring how your link looks when shared on social media.
Add a personal touch with a custom image, title, and description to create eye-catching previews.
How cool is that? Your shared links won’t just function well—they’ll look lively and engaging too!
Branch.io provides a default domain URL (something like c8prt.app.link), but why stop there?
You can easily create your own custom domain to make your links more personalized and on-brand.
Already have a domain? Even better—you can use it seamlessly with Branch!
Be sure to take note of your Branch Key, Branch Secret Key, App Name, and App ID in the Account Settings.
Integrating Branch into Flutter: The Flutter Branch SDK
Start by integrating the Flutter Branch SDK.
You can easily find the plugin here flutter_branch_sdk
$ flutter pub add flutter_branch_sdk
Android Integration
In your main AndroidManifest.xml file, make the launchMode to SingleTask to ensure only one instance of the activity exists at a time. If an instance already exists, it will bring it to the foreground instead of creating a new instance.
<activity
            android:name=".MainActivity"
            android:exported="true"
            android:launchMode="singleTask"
            android:theme="@style/LaunchTheme"
            android:configChanges="orientation|keyboardHidden|keyboard|screenSize|smallestScreenSize|locale|layoutDirection|fontScale|screenLayout|density|uiMode"
            android:hardwareAccelerated="true"
            android:windowSoftInputMode="adjustResize">
 ...
</activity>
Inside the activity tag, add the following intents:
<activity
...
	 	 		   <intent-filter>
                <data android:scheme="branch" android:host="open" />
                <action android:name="android.intent.action.VIEW" />
                <category android:name="android.intent.category.DEFAULT" />
                <category android:name="android.intent.category.BROWSABLE" />
            </intent-filter>

             <intent-filter android:autoVerify="true">
                <action android:name="android.intent.action.VIEW" />
                <category android:name="android.intent.category.DEFAULT" />
                <category android:name="android.intent.category.BROWSABLE" />
                <data android:scheme="https" android:host="branchiolink.app.link" />
                <data android:scheme="https" android:host="branchiolink-alternate.app.link" />
            </intent-filter>
...
</activity>

Add the following in the application tag
	<application
	...
	<meta-data android:name="io.branch.sdk.BranchKey" android:value="key_live_nBbMPdDcPTarHHbVnHZ50ddiDwoL6YJq" />
	<meta-data android:name="io.branch.sdk.BranchKey.test" android:value="key_test_krmULdukNJcsRJkVdU7Z1okjDrlQ2ZNI" />
	<meta-data android:name="io.branch.sdk.TestMode" android:value="fasle" />
	...
	</application>
Note: If you are developing in Test mode then io.branch.sdk.TestMode should be set to true.
iOS Integration
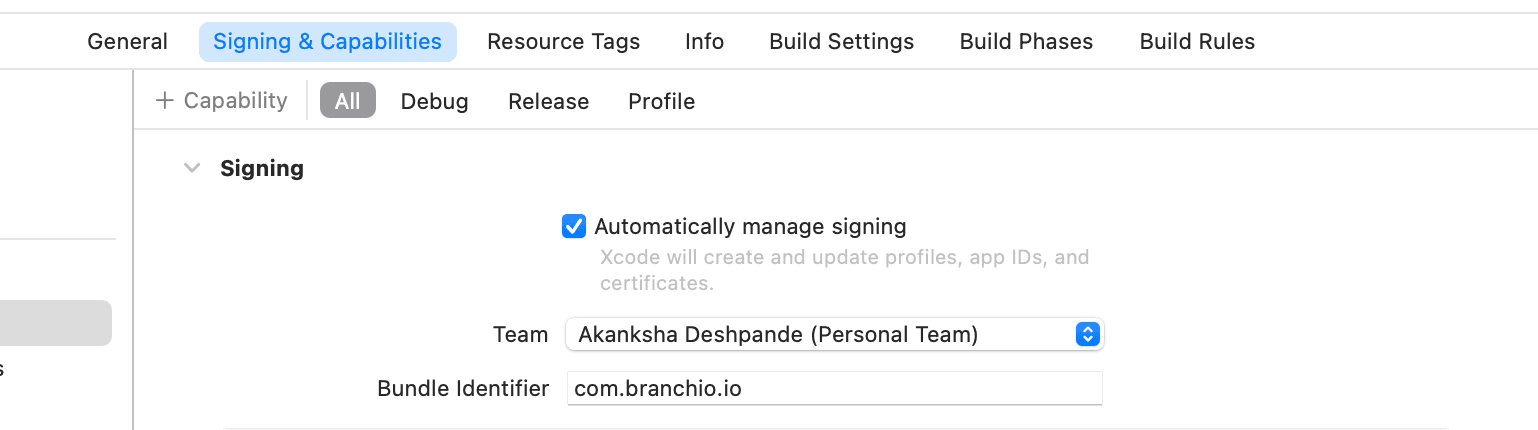
The first step is to ensure that your Bundle Identifier in Xcode matches the Bundle ID you set during the Branch configuration.
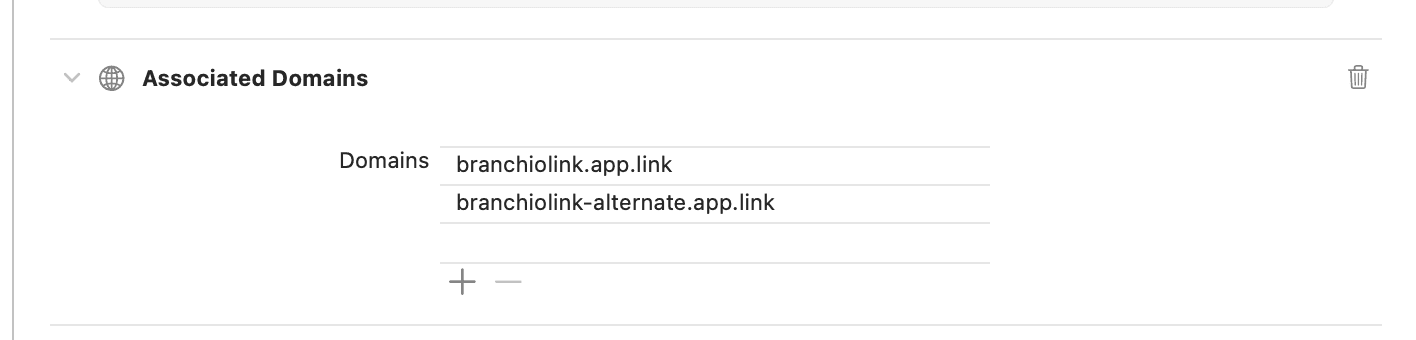
In Xcode, navigate to the Capabilities section and enable Associated Domains. Simply click the "+" button to add the domain links generated by Branch.
Coming to Info.plist to add Branch key, domain links and URI scheme.
For domain link :
	<key>branch_universal_link_domains</key>
 	<array>
 		<string>branchiolink.app.link</string>
		<string>branchiolink-alternate.app.link</string>
 	</array>
For URL scheme :
	 <key>CFBundleURLSchemes</key>
	 <array>
	 		<string>branch</string>
 	 </array>
For Branch Key:
 <key>branch_key </key>
 <string>key_live_izaO2UairIhXj0ZrTZTJmmmguwp7XD5d</string>
Time to Dive In: Implementing Branch Link Logic in Flutter
Now comes the exciting part—bringing your Branch links to life! Let’s walk through how to seamlessly generate and handle Branch links within your Flutter app.
Start by importing the Flutter Branch SDK into your main.dart file, then initialize it to get everything up and running.
import 'package:flutter/material.dart';
import 'package:flutter_branch_sdk/flutter_branch_sdk.dart';

void main() async {
  WidgetsFlutterBinding.ensureInitialized();
  await FlutterBranchSdk.init(enableLogging: true, disableTracking: false);
  runApp(const MyApp());
}
To ensure everything is set up correctly, you can verify the SDK integration by running the following command:
FlutterBranchSdk.validateSDKIntegration();After validating, you can comment this line.
Now, let’s set up listener to capture deep link clicks and retrieve the embedded data that comes along with them:
 void branchLinkListener(Map<String, dynamic> data) {
    streamSubscription = FlutterBranchSdk.listSession().listen((data) {
      if (data.containsKey("+clicked_branch_link") && data["+clicked_branch_link"] == true) {
        print('$data');
        //route to respective screen by reading data
      }
    }, onError: (error) {
      print('listSession error: ${error.toString()}');
    });
  }
The process of generating a link follows a straightforward formula!
To make things clearer, let’s dive into a practical example and walk through the integration step by step. It’s always easier to grasp when you see it in action!
To Generate a Branch Link for Sharing a Post / Reel / Blog
First, we encapsulate the content and metadata of what we want to share using BranchUniversalObject. This object acts as the core of your content, carrying details like the title, description, and other relevant information.
To define how the link behaves and If you are keen on tracking the performance of your links—be it through analytics or specific campaigns—fine-tune the link’s behaviour using BranchLinkProperties - Here, you can specify important elements like tags, channels, campaigns, and other tracking parameters.
void generateBranchLinkForPost(String postId, String postTitle, String postDescription) async {
  // Step 1: Create BranchUniversalObject with the post details
  BranchUniversalObject branchLinkData = BranchUniversalObject(
    canonicalIdentifier: 'post/$postId',
    title: postTitle,
    contentDescription: postDescription,
    imageUrl:'post_image_url',
    keywords: ['Post', 'SEO', 'Flutter'],
    contentMetadata: BranchContentMetaData()
          ..addCustomMetadata('post_owner_name', 'akanksha')
          ..addCustomMetadata('post_likes', 10)
  );
}
It is required to provide Link properties before we can generate the branch link.
In our use case, for sharing of post:
  BranchLinkProperties branchLinkProperties = BranchLinkProperties(
    channel: 'app',        // The channel where the link will be shared, e.g., app, email, social media
    feature: 'share',      // The feature of the app (e.g., sharing) where the link is created
    campaign: 'post_share',// Campaign for tracking purposes
    stage: 'new_user',     // You can use this to track the lifecycle stage of the user (optional)
    tags: ['post', 'share'] // Tags for analytics
  );
Finally, generate the link
BranchResponse response = await FlutterBranchSdk.getShortUrl(buo: branchLinkData, linkProperties: branchLinkProperties);
if (response.success) {
    String branchLink = response.result;
    print('Branch link generated: $branchLink');
    // You can now share this link (e.g., via social media, SMS, etc.)
  } else {
    print('Error generating Branch link: ${response.errorMessage}');
  }
In the use case above, handling routing within the listener is essential. Since the postId value is extracted from the deep link, you can use it to fetch the full post details from your backend. To navigate to the correct screen, simply adjust your navigation logic.
It will look something like this:
 void branchLinkListener(Map<String, dynamic> data) {
    streamSubscription = FlutterBranchSdk.listSession().listen((data) {
      if (data.containsKey("+clicked_branch_link") && data["+clicked_branch_link"] == true) {
        print('$data');
        if (data.containsKey("post_id")) {
             String postId = data["post_id"];
		         // Navigate to the post screen
		         navigateToPostScreen(postId);
      }
    }, onError: (error) {
      print('listSession error: ${error.toString()}');
    });
  }

 void navigateToPostScreen(String postId) {
		 Navigator.of(context).push(
      MaterialPageRoute(
        builder: (context) => PostScreen(postId: postId),
      ),
    );
 }
The code above seamlessly manages deep links whether the app is running, in the background, or opened from a cold start (completely closed). When the app launches via a Branch link, even from a cold start, the deep link data is passed through the initSession() method, ensuring smooth navigation.
Branch links are more than just links—they’re intelligent!
Branch’s smart links work effortlessly across platforms. If the app is not installed, these links automatically detect the user’s platform and redirect them to the appropriate destination—whether it's Google Play or the App Store. For apps not yet live, you can easily set up a fallback URL to guide users. If your app is live, just configure the Branch dashboard to point directly to your app’s store listing. It’s that simple—whether for deep linking or deferred linking, Branch handles it all with ease!
Voilà! We’ve Reached the Finish Line
As I wrapped up my dive into deep and deferred linking with Branch, I discovered that Branch offers so much more than just linking. The Flutter SDK opens the door to a wealth of features—tracking user actions and events, working with first and last parameters, managing views, using share sheets, and beyond.
Excited to explore these possibilities even further—stay tuned!